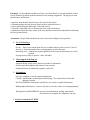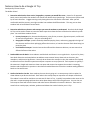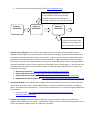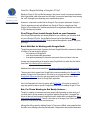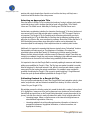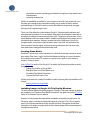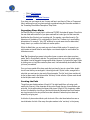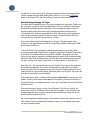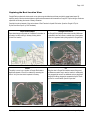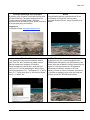
1
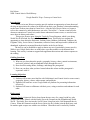
Kai Nelson
NEH: Central Asia in World History
Google Earth Lit Trips: Gateway to Central Asia
Introduction:
Novels set in non-Western countries provide students an opportunity to learn about and
develop an appreciation for cultures far different from their own. Nowhere is that understanding
needed more in these times than in Central Asia. After the fall of Soviet Union, we began to
refer to the countries by individual names, not as the "Soviet bloc". Current events have also
drawn our attention to Central Asia, and to better understand current events, we need to know
more about its history and culture.
This project focuses upon Along the Tracks by Tamar Bergman, which is set during
World War II in Poland, the Soviet Union, and Uzbekistan. This book gives students the
opportunity to learn about the Holocaust, Judaism, Islam, Bukhara, Samarkand, Tashkent, the
Ferghana Valley, Soviet Union, Communism, collective farms, and besprizoniki (children left
abandoned, orphaned or separated from their families in the Soviet Union).
The activity can be modified to apply to almost any novel (particularly journey novels).
While it uses Google Earth, there are many other ways that students can demonstrate their
learning. This activity is meant to support and supplement discussions and written responses to
the reading.
Guiding Questions
1) What can you learn about the people, geography, history, culture, natural environment,
and social, political, and environmental issues through this novel?
2) How does this setting define, challenge, and change the protagonist?
3) How can you share what you have learned about this culture and the protagonist's
experience with it?
Learning Objectives
1) Students will become more familiar with Uzbekistan's (and Central Asia's to some extent)
geography, history, culture, achievements, and problems.
2) Students will learn how to use Google Earth as a platform for presenting information
effectively.
3) Students will learn to collaborate with their peers, acting as teachers and students for each
other.
Background
Along the Tracks is historical fiction, based upon the true story of a young Jewish boy who
escapes from Lodz, Poland, with his family just as the Germans invade Poland during World
War II. The family flees east into the Soviet Union, living first in the Ural Mountains then in
Crimea. When the German invade the Soviet Union, the boy's father joins the Red Army, and
his mother again escapes east with her two children. When their train is strafed by German
Stukas, passengers take refuge in the forest. Separated from his mother, Yankele is too slow
returning to the train, and he is left behind.
Yankele spends the duration of the war traveling through Kazakhstan and Uzbekistan searching
for his mother and learning to survive on his own. The story is full of references to life in the
Soviet Union and Uzbekistan. Students can research these references to the geography, history,
culture and way of life in this part of the world.
Project: To learn about Uzbekistan, students will be using Google Earth lit trips (see Jerome
Berg's website http://www.googlelittrips.org/ for description and examples of lit trip projects.)
Google Earth lit trips "mark the journeys of characters from famous literature on the surface of
Google Earth. At each location along the journey there are placemarks with pop-up windows
containing a variety of resources including relevant media, thought provoking discussion starters,
and links to supplementary information about 'real world' references made in that particular
portion of the story." [Jerome Berg, Apple Educator]. Students become armchair travelers,
experiencing the culture of the "native land" as the protagonist does.
Activity: Google Earth Introduction to Uzbekistan:
Students can work in groups or as individuals to create Google Earth introductions to the setting.
Students will teach and learn from each other.
Using Google Earth, each group/individual will create
1) FLY-INS to a relevant location in Uzbekistan
2) PLACEMARKERS to mark each site
3) POP-UPS with relevant information from research, graphics, and a video clip when
possible
Attached are PDF files with helpful information about creating Google Lit Trips:
"Building Lit Trips Basics", "How to do a Google Lit Trip", and "Creating the Best View"
Topics for research: Each group/individual will select one.
1) Geography and climate:
Describe each geographic location. How does each geographical feature affect
life/climate in Uzbekistan?
Aral Sea (then and now)
Syr Darya and Amu Darya
Kyzul Kum Desert
Fergana Valley
Tien Shan Mountains
2) Historical Landmarks: many choices
When were these landmarks built? Why? By/For whom? Why are they remarkable?
Ulugbek's observatory – Samarkand
Registan - Samarkand
Gur Emir Mausoleum - Samarkand
Naqshbandi tomb – Bukhara
Samani Mausoleum - Bukhara
Chor-Minor Medressah - Bukhara
Timur's statue – Tashkent
Khazret-Imam Ensemble - Tashkent
3) Notable historical figures – the movers and shakers of the region
Who are these people? Why are they notable? What long lasting effect did they have
upon Central Asia? [Suggestion: create fly in to their country/region of origin]
Alexander the Great
Chinggis Khan
Tamerlane (Timur) Tashkent a fabulous statue of a man on horseback
Khan Uzbek
Babur - ruler of Ferghana,
3) Notable cultural figures:
Who are they? What did they contribute to their society?
How have we benefited from their achievement?
Al Khorezmi- Khwarazm (now Kharazm province in Uzbekistan.)
Ibn Sina - Kharmaithen (near Bukhara),
Al Biruni- Kath, Khwarazm (now Khorezm province, Uzbekistan
Ibn Battuta
Mirzo Ulugbek - observatory in Samarkand
Alisher Navoiy
4) Religion
Islam: 5 Pillars of Islam
mosques (Bibi-Khanym Mosque), minarets, madrassas
Sunni, Shi'a
Sufism: Ismail-Al-Bukhari,
Amir-e-Tarriqat Hadhrat Khawja Bahauddin Naqshband
Zoroastrianism
Other possible topics:
The people of Uzbekistan (ethnicities, languages, vocations, education)
Cultural practices (holidays, dance, art, food)
Extension: As the students read the novel, they can collect details to research and then create a
Google Earth lit trip based upon the location of each reading assignment. The pop-up for each
placemarker could include
• quotation from the book which refers to the topic he/she choose
• information about the topic derived from research (with cited source)
• picture which illustrates their topic (with cited source)
• if possible, embedded video to illustrate the topic (with cited source)
• explanation of how that topic relates to the story and how research has helped them understand
the story/culture/history.
Assessment: Google Earth introductions can be assessed according to these qualities:
1. Use of Technology
Fly-ins - There is movement from one site to another which creates a sense of "travel."
Accuracy –Each placemarker flies to an appropriate spot for that topic.
Interesting view – Student has used navigation tools to create an interesting view of the
location
Pop-ups open up fully to pictures, video, and links
2. Visual appeal of the Pop-up
Adequate breaks (white space) between sections of information
Pictures and video enhance and connect to the research.
Organized layout of information, graphics, and video
3. Information:
Pop-up is complete; it has all required information.
Content: Explanations are thorough and interesting. The content shows effort and
adequate research.
NO PLAGIARISM –Student has used his/her own words to explain information.
Bibliographical References: Sources of pictures, research, videos are cited appropriately.
Writing has been PROOFREAD: no errors in capitalization, spelling, punctuation.
All sentences are complete (no fragments, run-ons)
4. Project is turned in ON TIME
Models: Attached to this plan is
a. a model of Google Earth Introduction for Historical Settings.
b. a model of a Google Earth placemarker for Along the Tracks
You will need to download Google Earth to view both models
Resources:
These sources would be helpful to and manageable for middle school and high school students.
Students will also need to do Internet research.
Abazov , Rafis, The Palgrave concise historical Atlas of Central Asia, Palgrave Macmillan 2008
Golden, Peter B. Central Asia in World History; Oxford University Press, 2011
Foltz, Richard, Religions of the Silk Road: Overland Trade and Cultural Exchange from
Antiquity to the 15th Century, St Martin's Press.
Notes on How to do a Google Lit Trip
Developed by Thomas Cooper
The Walker School
1. Determine what books, short stories, biographies, or poems you would like to use. Have a list of approved
books, stories and poems that students can choose from before the project beings. The best ones involve travel
by the main character. I suggest starting out by having the entire class do the same book. After you feel
comfortable with the process, you might consider have students do different books. This way you can have
students look at broad themes across books.
2. Determine what literary themes and concepts you want the students to understand. On a basic level Google
Lit Trips can be used to create an interactive book report that relates the facts of the book to where they took
place. You could have students discuss:
a. Literary Concepts: plot, character development, point of view, structure, figurative speech, conflict and
of course the big question – “why are we reading this?”
b. Geographic Concepts: spatial relationship between people, places, and events; geographical origins of
the character and how their upbringing affects their actions; or how the character feels about being in a
particular place
c. Social Studies Concepts: historical events that affected the characters decisions; current events that
affected influenced the author
3. Read and Discuss the Book: Have students read the book and discuss it on a regular basis. As part of my class, I
have book discussion each week where we address some common literary ideas such as character, plot,
metaphors, and historical significance. Not only do we discuss the concepts in class, but students are required
to choose one of our discussion questions and post a response to our project wiki. Each response is typically 710 sentences in length and contains at least one quote and citation that supports the student’s reasoning.
Students end the post with a question to stimulate a threaded discussion from other students reading different
books on the same theme.
4. Outline the Book as You Go: Have students plot out what is going on in a concept map, similar to what I’ve
drawn below as you discuss the book. Each node in the concept map can represent one chapter of the book.
The student’s notes will be used later to create text for their Lit Trip. I typically have students take notes on the
plot and in a separate paragraph have them write about themes and historical significance. You can also use
such maps to show how historical events and other factors affected the character’s decisions. These can be
come links to outside paper, websites, podcasts and videos that can be linked to your Lit Trip.
a. A free online tool to concept map with is Gliffy (http://www.gliffy.com ).
Link in Historical Events that affected the
current location of the place where the
character is and how they affected the
character’s decisions or the plot of the book.
Chapter 1
Information
Chapter 2
Information
Chapter 3
Information
Link in Current Events found
in news articles that can add
background information to a
place mentioned in the book.
5. Learn to Use the Software: Plan 3-5 days in the computer lab where you can teach the students how to
navigate around Google Earth, create basic placemarks, add text and images, work with tables to outline their
information, and embed other applications, such as videos. I start this process only after students have read a
good portion of the book and have a number of chapters outlined. I suggest spreading out these technology
lessons over 3-5 weeks so that students have time to practice. Encourage students to start creating placemarks
with the information from their outlines to practice the techniques you are teaching them. I have created some
screencasts that show how to use the software and you can find other videos and documents on how to use
Earth at the links below:
a. My Screencast Tutorials – http://teensandtechnology.wikispaces.com/Tutorials
b. Google Earth Video Tutorials - http://www.youtube.com/GoogleEarthVideoHelp
c. Google Earth Document Tutorials - http://earth.google.com/userguide/v4/tutorials/index.html
d. KML Document Tutorials (advanced) - http://code.google.com/apis/kml/documentation/kml_tut.html
6. Storyboard the Book: Have students collect images, podcasts and videos that they plan to use to make points
about aspects of the book’s plot, character development, or events that affected the character and organize
them in a storyboard (see attached form). You can use the attached form or try the free storyboard software at
the link below:
a. Story Board Tools - http://www.newfreedownloads.com/Multimedia-Graphics/ImageEditors/Storyboard-Tools.html
7. Conduct a Peer Review: After the storyboard had been created and before students put the final layer
together, have students to a peer review. I typically have students create the storyboard and then pass it on to
at least two different students so they can make their comments.
8. Leave Sufficient Time for Construction of the Layer: Make sure to leave at least 3-4 weeks at the end of the
project so that students can construct their final layer, do a final peer review, and have time to make changes to
their layers. I typically assign all of this as homework. Google Earth is free and can be downloaded at home by
students so there is no need to use class time for the construction of final layer.
How Do I Begin Building a Google Lit Trip?
Google Lit Trips
GoogleLitTrips.org
Jerome Burg, founder
[email protected]
Building a Google Lit Trip is a little like learning to play chess. It really only requires a few basic
skills to get started, while at the same time like chess, one can also spend many hours learning
the “craft” of designing and developing more sophisticated projects.
However, it is important to realize that the Google Lit Trip concept is quite broad. Google Lit
Trips for elementary use are quite different from Google Lit Trips for university use. Also,
Google Lit Trips developed by “professional educators” are significantly different from Google
Lit Trips developed by students.
First Things First: Install Google Earth on your Computer
If the Google Earth application isn’t already installed on your computer, you can neither build
nor view a Google Lit Trip file. Google Earth is free and can be downloaded at: http://
earth.google.com/download-earth.html. Simply download the application, install it, and you’re
good to go.
Basic Skill-Set for Working with Google Earth
Though there are several levels of mastery, the basic Google Earth skills necessary for building
a Google Lit Trip are having the ability to:
• find locations on Google Earth
• mark those locations with place marks
• draw paths representing the characters’ movements from one location to the next.
An easy way to begin getting up to speed on using Google Earth is to watch the short videos
found here: http://www.google.com/earth/learn/.
Additional short videos can be found here: http://www.youtube.com/GoogleEarthVideoHelp.
There are also links to several other Google Earth resources available on the Google Lit Trip
website. Clicking on the Downloads etc. link at the top of any page and then clicking on the
Google Earth Resources link in the sub-menu leads to a list of these resources for those
wishing more information about the Google Earth application.
Also in the Downloads etc. area is a section called Lit Trip Tips. In this area are several 1-2
page step-guides focused on specific Google Earth skills useful for building Google Lit Trips.
But, For Those Wanting to Get Really Serious...
Though it is certainly not necessary and many people pride themselves on never doing so, if
you really want to get the answers to all questions regarding Google Earth, I’d suggest that
sooner or later you read the entire Google Earth user’s manual which is available here: http://
earth.google.com/userguide/v5/. There is a link at the top of the page if you’d like to download
and print it, but be sure you have lots of printer ink!
Although the skills required for building Google Lit Trips are not difficult, most people find their
first effort more challenging than they had expected. I always advise that potential developers
!
GoogleLitTrips.com
practice with a single chapter from a favorite novel or with a short story until they have a
comfort level with the basics of the entire process.
Selecting an Appropriate Title
Since the heart of a Google Lit Trip is marking the locations of a story’s settings, simply make
certain that the story is set in locations that can be found in Google Earth. Thus, Dante’s
Inferno and The Hobbitt are out. Make Way for Ducklings and The Kite Runner are in.
Another basic consideration is whether the characters “travel enough.” If the story line does not
move around a bit, there is little potential value in creating a Lit TRIP. The range of the trip is
not important. The Google Lit Trip for Candide has the characters globe trotting over three
continents while the Lit Trip for Make Way for Ducklings has its characters traveling entirely
within the city of Boston. But, some movement is necessary. Stories like Of Mice and Men or To
Kill A Mockingbird pose problems since although the locations can be determined, the
characters spend the vast majority of their respective stories in a relatively static location.
Additionally, it is important to remember that there are stories that use “fictionalized” locations
that represent real locations such as The Adventures of Huckleberry Finn where the
scholarship informs us that Mark Twain’s St. Petersburg is a fictitious name for Hannibal,
Missouri and that Jackson’s Island is a fictitious name for Glasscock’s Island. These titles can
certainly be considered, though they may be more challenging in that additional research might
need to be done to discover the true locations being masked by fictitious names.
It is important to also note that Google Earth is constantly updating its resources and therefore
adding new possibilities for Google Lit Trips. The Sky layer now makes it possible to consider
titles set “anywhere” in the known universe! And, after all, since there are at least a couple of
resources in Sky that overlay the ancient constellations, it is possible to even consider the
possibility of employing the Google Lit Trip concept to ancient mythology! Google Mars and
Ocean now open up several additional possibilities for Google Lit Trips.
Collecting Content for a Google Lit Trip
Once you have an understanding of how to use Google Earth’s basic navigation controls, place
marks, and path tools, and have selected a suitable title to develop, it’s time to collect the
“content” for your Google Lit Trip.
My particular process for collecting content is to reread the book with a couple of colors of postits or highlighters. I reserve one color just for references to any locations or hints at locations
that will help me pinpoint them on the Google Earth globe where I can set place marks for the
journey. I use the other color(s) to mark any reference for which I think I might be able to find:
• interesting images, videos or other resources on the internet that might enhance or
extend students’ appreciation of the story.
• interesting websites that could provide supplementary information on historical or
geographical references, biographical information, or cultural connections, etc.
appropriate to the story,
!
© GoogleLitTrips.com 2007
!
GoogleLitTrips.com
•
•
spots where the author is providing good material for thought-provoking questions and
class discussion.
interesting vocabulary use
Actually the possibilities are endless for pop-up window content. But, as a general rule I try to
stay away from considering plot summaries as quality pop-up content at least for teachergenerated Google Lit Trips as this tends to remove the students’ first opportunity to engage
their own minds in appreciating the story.
This is one of the distinctions I make between Google Lit Trips developed by educators and
those developed by students. For some students, being able to demonstrate the basic skills of
decoding by including plots summaries might have value. Though even in these cases, I like to
advise teachers to also encourage students to consider including higher level contents such as
speculations about characters’ motives or possible future plot developments. Even for the
youngest readers, having them include information about “new words” and information that
“tells more about” historical events, and locations, and people referenced in the story helps
them develop their reading skills beyond decoding levels.
Creating Place Marks
Sometimes, I collect all the content information for a title before beginning to create the actual
place marks. Other times I “toggle” back and forth between collecting the content information
and creating the place marks. For example, in complex works, I prefer to work chapter by
chapter or “scene by scene.”
In the Lit Trips Tips section of the Google Lit Trip website, the following step-guides are useful
during this phase:
• Finding Hard Location on Google Earth
• Making the Most Out of Place Marker Icons
• Formatting Place Marker Descriptions
• Capturing the Best Location View
Another good resource for creating Place Mark include the following video clips available on the
Internet:
• Marking locations in Google Earth
Including Images in Google Lit Trip Pop-Up Windows
The basic technical aspects of including images in a Google Lit Trip place mark pop-up window
are explained in the “Formatting Place Marker Descriptions” step-guide found in the Lit Trip Tips
section of the GoogleLitTrips.com website.
However, including images also raises ethical considerations regarding copyright issues. For
this reason, when I am looking for appropriate images for a Google Lit Trip, I like to begin my
search in the following websites since they are vast collections of images that provide clear
information on the images copyright status, and they feature images that have some degree of
copyright free permissions.
!
© GoogleLitTrips.com 2007
!
GoogleLitTrips.com
•
•
•
Flickr’s The Commons.
Creative Commons
Wikipedia and Wikipedia Commons
If you have your own images to use, it is easy and free to post them to Flicker or Picassa and
then to reference them in your place mark pop-up windows using the information available in
the “Formatting Place Marker Descriptions” Step Guide.
Organizing Place Marks
Use the ADD menu in Google Earth to add a new FOLDER. A window will appear. Since this is
the main folder within which all of your place marks will be located, give it a brief name that
identifies the title of the book you’re working with. For example, a good brief name for The
Adventures of Huckleberry Finn, might simply be “Huck Finn.” However, try to avoid baffling
abbreviations. For example, ” Adv_oHF” would not be a good name since the abbreviation,
though clear to you, would not be intuitive to another person.
Within the Main folder, you can create any sort of internal folder system. For example, you
might create an internal folder for each chapter or an internal chapter for each location the
characters move to.
Cool Tip: Sometimes there seems to be neither rhyme nor reason as to where new place
marks “land” in Google Earth’s side bar. The good news is that once you find a place mark in
the sidebar it can be dragged to the appropriate folder. However, if you select the “target” folder
by clicking once on it and then create the place mark, it will automatically land inside the folder
you have “pre-selected.”
Once you have created all the place marks that you intend to have in a given folder, double
check to see that they are arranged in “chronological order.” By this I mean, arranged in the
order that you want users to view each of the place marks. The first “stop” place mark should
be the top place mark in the folder and the “final stop” for that collection of place marks should
be the last place mark in that folder.
Creating the Path
Though there are situations where a Google Lit Trip might benefit from not having a path
marking the “itinerary” of the characters as they move through the story, those situations are
quite rare. It is the path marking the itinerary that gives a Google Lit Trip a beginning, middle
and end. It indicates the chronology of the travel and visually indicates where the characters
are at a given point in the story as well as a clear indication of where they have been and
where they are going next.
A collection of place marks without a path looks sort of like a dart board where there are no
visual indicators of which of the many other place markers is the “next stop” on the journey.
!
© GoogleLitTrips.com 2007
!
GoogleLitTrips.com
The path tool is “easy once you get it.” However, it can seem a bit hard to manage until then.
There is a simple step-guide called “Adding Route Paths to a Lit Trip” in the Lit Trips Tips
section of the Google Lit Trip site that can help you wrap your head around this tool.
About Saving Google Lit Trips
It is unlikely that a completed Google Lit Trip can be developed in a single sitting. Whether you
are “in progress” or ready to save a completed Google Lit Trip, it is important to understand
Google Earth’s available options for saving files. I can not emphasize enough the value of
keeping the place marks, paths and any other elements organized in folders and in the
“chronological order” you feel a user should follow. When ready to save, like all applications,
there is a Save command under the FILE menu. However, Google Earth offers four Save
options rather than the typical Save and Save As... options.
Once you have developed all of the elements for a Google Lit Trip (place marks, paths,
overlays etc, and organized them into folders, Google Earth provides the following four SAVE
options under the File menu:
Save to My Places: This is generally not used when developing your own project. When
opening any downloaded Google Earth file, by default it opens in the Temporary Places section
at the bottom of the Places portions of Google Earth’s Side Bar. The purpose of this Save
option is to give users an opportunity to decide whether they want that file to be kept available
within the Google Earth My Places section of the Side Bar or not. Essentially, this gives users
the option of saving a file “inside” Google Earth, or saving it externally on their hard drive.
Save Place As... : This option allows the saving of a Google Lit Trip to any location external to
the Google Earth application. Once a file is saved external to Google Earth it can then be
emailed, burned to CD to be transferred via any of the normal file transfer methods. For those
creating Google Lit Trips with the intention of submitting them to the Google Lit Trip project, this
is the way to create a file that can be emailed.
When choosing this option it is critical to have selected the main folder of the project you have
created. This way you will save the folder and all of its contents. If you have one element of a
project selected such as a single place mark or one of your “sub-folders” then only that selected
item will be saved.
When using this option, there is a choice of two file formats. The first is as a .kmz file. the
second is as a .kml file. The difference is that ,kmz files are “zipped.” In truth, unless you are
including elements that do not exist on the internet such as photos that actually live on your
hard drive, either format will work fine.
But, I again suggest that including images or other elements such as videos that do not live on
the the internet is risky and dramatically increases the size of your file possibly making them
too large to transfer via email.
!
© GoogleLitTrips.com 2007
!
GoogleLitTrips.com
Save My Places: This option simply insures that changes made t anywhere in the My Places
section of the Side Bar will be saved within Google Earth.
Save Image... : This option saves an image of the 3D section of the Google Earth viewer. Since
Google Lit Trips are always viewed on the internet, this function or any simple screen capture
process will save images of sufficient quality.
!
© GoogleLitTrips.com 2007
Page 1 of 3
Capturing the Best Location View
Google Earth provides both obivious and not so obvious opportunities beyond those provided by paper-based maps. By
exploring some of the less obvious features, significant enhancements can be made to a Google LIt Trip that bring a whole new
experience to following the travels of literary characters.
Consider the various impacts of the various views of San Francisco's Aquatic Park below. (from the Google Lit Trip for
By the Great Horn Spoon, by Sid Fleicshman)
Paper-Based Maps
Paper-based maps can provide an "intellectual" orientation to
a location, but offer nothing in the way of being able to
"picture" the location.
Google Earth View
The Google Earth (default) view makes a world of difference
in a student's mind as it shows a realistic view of the location,
at least as it appeared when photographed for Google Earth.
Zoom
The ability to zoom in on a location in Google Earth adds a
significant element of "focus" for students by narrowing the
view to "only" the view that is important in the story.
Tilt
Tilting the view in Google Earth adds a sense of forground
and distance as well a way to see the location in relationship
to its geographical context. An additional and very significant
change is that tilting changes the perspective from a "God'seye view" to a more familiar "person's eye-view."
Capturing the Best Location View
http://www.GoogleLitTrips.com
Page 2 of 3
Consider Including A Pop Up Graphic
By including a Pop Up Graphic of the location from the actual
time frame of the story. The graphic below shows the San
Francisco harbor as it actually looked in 1850 when
characters from By the Great Horn Spoon arrived on their way
to the gold mines during the Gold Rush.
image source:
Le Voyages en Papier: http://www.antique-prints.de/
Rotate
Using the Rotation feature in conjunction with the Tilt and
Zoom features, the Google Earth view can closely
approximate the same view as in the pop up graphic you've
selected.
"Then" and "Now"
Thus, showing and hiding the pop up description allows a
great "Then" and "Now" comparison so students "see" the
historical changes in the geography of the location.
Several examples of this can be seen in the By the Great
Horn Spoon Lit Trip. After downloading the .kmz file, check
out the place markers for Ch. 1: The Stoaways, Ch. 4: The Pig
Hunt, Ch. 7: The End of the Race, Ch. 8: Saved by a Whisker,
and Ch. 11: Jamoka Jack.
The Final Touch!
The final touch (sort of) is to used Google Earth's built-in
TERRAIN feature that appears in the LAYERS section of the
side bar. Notice how the islands in the San Francisco Bay and
even the hill in the foreground take on a 3D appearance.
(Unfortunately, this feature is controlled on the "local"
computer, so it does not "travel" with exported .kmz files so it
is a good idea to suggest this in the pop-up just in case the
user does not have the TERRAIN feature checked.
Capturing the Best Location View
http://www.GoogleLitTrips.com
Page 3 of 3
Snap Current View
Once you've zoomed, tilted, and rotated the view in Google Earth, open the Edit
Placemark window, click on the VIEW tab and then click on the SNAPSHOW
CURRENT VIEW tab.
Now, clicking on the placemarker will always take you to this exact view of the
location.
By fine-tuning the view of each location on a Lit Trip, viewers can be brought "into"
the setting alongside of the characters they are following. Compare the fine-tuned
view at the end of these exaamples with not just the paper map but also with the
Google Earth default view. The difference, and the student reaction, is amazing!
Capturing the Best Location View
http://www.GoogleLitTrips.com