1
DISPOSAL
When the operational life of your device is over, dispose off it in accordance with valid rules and regulations.
Your product is made of metal and plastic parts that may be recycled when separated.
1. Disassemble all parts.
2. Separate all parts according to the material they are made of (e.g. metals, rubber, plastics, etc.).
Take the separated parts to the recycling facility near you.
3. Electrical waste (used electrical power tools, electric motors, recharging equipment, electronics,
accumulators, batteries etc.).
Dear customer. In accordance with the valid regional rules and regulations describing the management of
electrical waste, electrical waste is considered dangerous.
Disposal of electrical waste must be therefore handled as dangerous waste in accordance with waste
management rules valid in the state you are in.
It is prohibited to mix electrical waste with regular household waste.
You may return your used electrical appliance to a recycling facility near you. More information about
electrical and dangerous waste disposal may be obtained from your local authority or from the Internet.
CAUTION
If the machine breaks down, send it back to the vendor for quick repair.
Please, enclose brief description of the defect. That makes repair easier. If the machine is still covered by
warranty, enclose the warranty card and proof of purchase receipt. After the warranty period expires, we
repair your machine for a special price.
To prevent possible damages during shipping, packed the machine carefully or use the original packaging
material. We are not liable for shipping damages due to incorrect packaging of your machine. If making
a claim at the shipping company the level and method of packaging plays a major role during claim evaluation
process.
Note: Pictures and contents in this manual may slightly differ from the actual product or accessories.
It is due to continuous improvement of our products. Such small differences have no effect on the product
functionality.
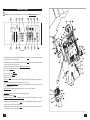
7. Close the wheel cover. After this cycle is over, the machine is fully calibrated. The digital display A (on the
control panel), showing the BALANCING INFORMATION for the inner side will show flashing symbol
"END CAL". This symbols reminds you that the self-calibration process is over (see PICTURE A and
PICTURE B).
8. NOTE: All information gathered throughout the self-calibration process are saved in the machine memory.
The calibration process may be repeated as many times as necessary or each time when you are not sure
that the machine works properly.
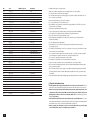
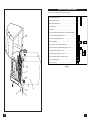
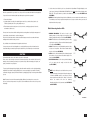
Static balancing, function ALU:
1. NORMAL BALANCING: This function is used for disk
balancing made out of alloy or light steel compositions. Place
balancing weight with a clamp on the disk (see PICTURE E).
2. ALU1: This function is used for disk balancing made out of alloy
or light steel compositions. Place an adhesive balancing weight
on the disk (see PICTURE E).
3. ALU2: This function is used for disk balancing made out of alloy
or light steel compositions. Place hidden external adhesive
weight on the disk (see PICTURE E).
4. ALU3: Used for combined balancing. Place a balancing weight
with a clamp on the outer rim and an adhesive weight on the
inner rim (see PICTURE E).
5. STATIC BALANCING: Used for motorcycle wheel balancing
or if you cannot place the weight on both disk sides
(see PICTURE E).
NOTE: Function ALU may be used each time when you need
to find out the value of the weight for different rim placement
or if function NORMAL cannot be used. Press key "A" and
select required function (ALU1, ALU2, ALU3). For each ALU
function the machine will show the balancing
information (weight) and its placement (see PICTURE A
and PICTURE B).
PICTURE E
16
13