1
Wireless Optical Mouse
W /Built in Receiver
Model NO. M01717-W
User Manual
©2007
Sakar International, Inc. All rights reserved. iConcepts, the iConcepts logo, and product names
referred to herein are the registered trademarks of iConcepts. Windows and the Windows logo are
registered trademarks of Microsoft Corporation. All other trademarks are the property of their respective
owners.
Table of Contents
Key Features………………………………………………………………………………………………….3
Product Specifications………………………………………………………………………………………..3
Installing Your Mouse………………………………………………………………………………………..4
A. Inserting batteries into your mouse…………………………………………………………….4
B. Connecting your USB receiver………………………………………………………………...4
C. Synchronizing Your Mouse With Your Receiver……………………………………………...5
Troubleshooting………………………………………………………………………………………………6
Warranty Card………………………………………………………………………………………………..8
Key Features
This mouse is compatible with IBM or PC compatible computers running operating systems
Windows 98SE or higher. No drivers are necessary to use the mouse, as it will operate as a plug and
play device. Simply plug the receiver into one of your computer’s USB ports, and it will be properly
recognized by your computer’s operating system.
With its compact size, you will find this mouse to be easily portable. It is ideal for a desktop PC or a
notebook computer.
Four modes of operations are used to lower the power consumption.
This mouse operates using a single channel at a frequency of 27 MHz with 256 IDs to prevent signal
interference.
With a transmission distance of up to 1.5 meters (about five feet) you can work at a comfortable
distance from your computer.
A USB interface allows you to plug the mouse into any USB port on your computer.
Its amazing 800 DPI optical resolution allows this mouse to be used on most surfaces.
Product Specifications
Product
Description
Wireless Optical Mouse w/Build in Receiver
Mouse Model Type No.
M01717-W
Movement Sensor
Optical Sensor
Resolution
800dpi
Operating Frequency
Distance
27MHz
Up to 1.5 meters (about 5 feet)
Power Supply
2*AAA Alkaline Batteries (Included)
Power Saving Operation
4 modes
Consuming Current
26mA @ 3V at full speed
Security ID Code
System Requirements
256 Sets
IBM or compatible PC
Windows 98SE/ME /2000//XP/Vista
Interface
USB1.1
Item
Installing Your Mouse
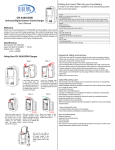
A. Inserting Batteries into Your Mouse
1. When you insert the batteries into the battery compartment please be sure that the batteries are inserted
with the correct polarity as indicated in the battery compartment ("+" and "-"). Once the batteries are
inserted and your battery compartment is closed, you should see a red light beneath the mouse, as the
optical sensor should be switched on.
2. To open the battery compartment when no batteries are inserted, simply hold the mouse upside down,
place your thumbs on either side of the mouse and push and slide upwards. (Figure 1). Once batteries are
installed opening the panel just requires pushing down on the panel under the scroll wheel (Figure 2).
3. Please note that the mouse will perform poorly when running on weak batteries. Therefore, if you
encounter performance issues please remove and replace the current batteries with a new set.
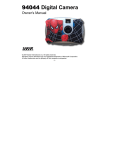
B. Connecting Your USB receiver
1. First, you will need to take your USB receiver out of the mouse so that it can be plugged into any one of
your computer’s USB ports. To do so you will have to push the button on top of the mouse. This button is
located next to the IConcepts logo on the mouse, and has a symbol with three curved lines and a dot on it.
Once you push this button, the USB receiver will swiftly slide out of your mouse.
2. Plug your USB receiver into one of your computer’s USB ports. Most computers will have multiple
USB ports, and you can plug the receiver into any USB port you choose. Make sure your computer is
turned on. When using Windows 98SE/2000, ME, XP, or Vista the mouse should be automatically
recognized by the operating system.
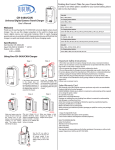
C. Synchronizing Your Mouse with Your Receiver
1. If you are not getting any response from your mouse after you have plugged in your USB receiver and
inserted batteries into your mouse, then you may need to synchronize your mouse. To do this, first note
that there is one button on the receiver, and another button underneath the mouse. The button underneath
the mouse is recessed and you may need a pen or paperclip to push it. These are the connect buttons. To
synchronize, first make sure your USB receiver is plugged in. Next, hold the mouse near the receiver. You
will then firmly push the connect button on the receiver, let go, and then immediately push the connect
button underneath your mouse and let go. Then the mouse and receiver will be synchronized and ready to
operate.
2. The mouse and receiver should remain synchronized when rebooting or switching off your computer, or
transferring the mouse to another computer. However it will be essential to resynchronize your mouse and
receiver when replacing the batteries. (Repeat Installing Your Mouse: Part C, Step 1.)
If you are experiencing problems with your mouse please do not return
it to the store. Please call Sakar Technical support at (877) 397-8200
Troubleshooting
If you are unable to get your mouse to power on please follow the steps below.
1. You need to insert 2 AAA batteries into your mouse. Be sure to use fresh batteries. Do not mix
2.
old and new batteries. Do not mix alkaline batteries with rechargeable batteries.
In order to insert your batteries into your mouse, you will need to open your mouse’s battery
compartment (see below).
3. Once the battery compartment is open, you can insert your batteries with the correct polarity as
indicated in the battery compartment ("+" and "-"). Once the batteries are inserted and your
battery compartment is closed, you should see a red light beneath the mouse, as the optical sensor
should be switched on.
4.
Please note that the mouse will perform poorly when running on weak batteries. Therefore, if you
encounter performance issues please remove and replace the current batteries with a new set.
If you are unable to get your computer to recognize your mouse please follow the steps
below.
1. Make sure to plug the mouse’s receiver into one of your computer’s USB ports. Make sure to turn
2.
on your computer. Once plugged in, you should see a mouse pointer on your computer screen. If
you do not, you might want to try a different USB port on your computer.
Once your receiver is plugged in and you see a mouse pointer on your screen, try moving your
mouse over a mouse pad or similar surface. If your pointer is not moving when you move your
mouse, you may have to synchronize your mouse with your receiver. (see below).
If you are experiencing problems with your mouse please do not return
it to the store. Please call Sakar Technical support at (877) 397-8200
Sakar Warranty Card
This warranty covers for the original consumer purchaser only and is not transferable. Products that fail to
function properly UNDER NORMAL USAGE, due to defects in material or workmanship. Your product
will be repaired at no charge for parts or labor for a period of one year.
What Is Not Covered by Warranty.
Damages or malfunctions not resulting from defects in material or workmanship and damages or
malfunctions from other than normal use, including but limited to, repair by unauthorized parties,
tampering, modification or accident.
What To Do When Service Is Required
When returning your defective product (postage pre-paid) for service, your package should include:
1. A detailed written description of the problem.
2. Your return address and telephone number (Daytime)
MAIL TO ADDRESS BELOW:
Sakar International
Attention: Service Department
195 Carter Drive
Edison, NJ 08817
You may also visit www.sakar.com for further assistance if necessary or call our tech support department
toll free at (877) 397-8200