1
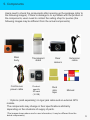
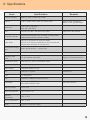
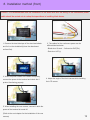
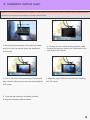
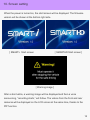
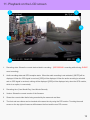
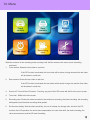
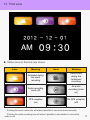
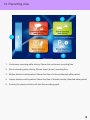
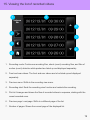
KRW 100 million Liability Compensation Insurance by Samsung Fire & Marine Insurance User Manual Users must read and understand the user manual before using the product to ensure user safety and for proper product use. Contents 1. Before using the product 2 25. Operation of the product 21 2. Precautions 3 26. Firmware updating 22 3. Features 6 27. PC viewer 25 4. Introduction 7 28. Black box environment setting 26 5. Components 8 29. Playback list generation 27 6. Specifications 9 30. SD card formatting 28 7. Precautions for installation 10 31. Full screen view 29 8. Installation method (front) 11 32. Screen enlargement 30 9. Installation method (rear) 12 33. Storage capacity comparison among 10. Screen setting 13 11. Playback on the LCD screen 14 34. Storage folders and file name 31 12. Menu 14 35. Warranty certificate 32 13. Time view 15 14. Recording view 15 15. Viewing of the list of recorded videos 16 16. Playback of the recorded video 16 17. Environment setting 17 18. System setting 17 19. Time setting 18 20. Video screen setting 18 21. Audio setting 19 22. SD card formatting (at the terminal) 19 23. Notice for formatting 20 24. Touch area correction 20 memory cards 30 1. Before using the product Users must read and understand the user manual before using the product to ensure user safety and for proper product use. The components of the product and the content of the user manual may change without a prior notice for the purpose of improving user convenience and product performance. Users are required to refer to the home page for relevant information. Product assurance and responsibilities The company will not be held responsible for problems that might occur in using the product without following the instructions in the user manual. - The company will not be held responsible for failure of the product, loss of data, and other losses that might occur while using the product. - Users need to continuously manage and pay attention to the micro SD card, which is the storage medium of this product. - It is not guaranteed that this product records all accidents. No event recording will occur if there is insignificant shock that would not activate the shock sensor. - If the product malfunctions due to a car accident or an external shock, the company will not be held responsible for any loss that could result from loss of recordings. - The product is for assisting in safe driving. The manufacturer will not take any responsibilities related to accidents. Warning Only regulated voltage should be used for the product. Otherwise, the product would malfunction, which could result to fire incidents. - Do not disassemble and modify the product arbitrarily. Otherwise, the product would malfunction and electrocution could happen. If the product needs maintenance work in the above case, it would be treated as a user error. (If repair is needed, contact our service center to get our A/S maintenance work) - Take precaution not to cut or damage the power cable of the terminal when attaching other electronics products inside a car. Otherwise, the product would malfunction that may result to electrocution and fire incidents. 3 2. Precautions Micro SD card Before removing or inserting the micro SD card (hereinafter, the SD card), the power must be switched off or the power jack must be removed, which will turn LED off. The card then can be separated for checking the data. - If the SD card is separated by force, the product could be damaged. Users should take precautions. - If the SD card is separated while the product is running, problems would occur in data storage, and the SD card would be damaged. - While in storage or being transported, the data could be damaged due to static electricity and external voltage. It should be kept in a card case. (Avoid using and placing it in an environment where temperature and humidity are high and corrosion could be caused). - Critical data must be kept in other storage units (HDDs, CDs, and mobile disks). - In order to check whether the product runs normally, the stored data should be checked more than once a week, and the SD card should be formatted more than twice a month. - As the SD card has a certain life span, problems could occur to the card itself if used for long, which could make it impossible to store the data normally. It is required to check the SD card and purchase an additional SC card if necessary. (※ When formatting and inserting the SD card into the product , a folder will be generated automatically, making it possible to record and store videos). How to remove the SD card When the main body power switch is turned off or the power jack is removed, the power for the main body will be turned off. When required to insert or separate the SD card, the main body power needs to be turned off and the follow the procedures shown below. ※ Removing the SD card 1. Turn off the product’ s main body power switch. 2. Check whether all the LEDs are turned off. 3. Remove the SD card after the LEDs are turned off completely . (The product would malfunction if the SD card is removed by force. Gently pushing it once would release it. However, it is still required to pay attention to the SD card as it could bounce off when trying to remove it) ※ Inserting the SD card 1. Insert the SD card into the SD card portal of the black box main body. 2. Connect the power jack to the black box main body and turn on the power switch. ※ The power switch must be turned off or the power jack must be removed before inserting or removing the SD card. 4 2. Precautions Using the product The following instructions should be observed in order to prevent the product and the micro SD card from malfunctioning and to prevent fires from taking place. - When the product is to be used for the first time after the package is opened, the SD card needs to be connected to a PC and to be formatted before being used. (※ When an SD card is purchased additionally and is to be used for the first time, it must be formatted before the use) - The device can be set easily by suing the LCD menu. - Considering that the temperature inside a car will go up drastically when the car is parked for long hours during summer, it is required to park the car, with its rear side facing the sun in order to avoid to direct sunlight or in an shaded area, which will help prevent the black box from malfunctioning. - Do not operate the terminal in the middle of activating. Park the car first in a stable location and then operate the terminal . - Do not touch the SD card or the terminal with oily and wet hands. - Do not push foreign substances into the terminal card inlet. - When required to clean the car or the terminal, soft and dry cloth should be used for cleaning, not water or volatile chemicals. - If the attachment location of the product is changed, the angle of the camera may be changed also. It is needed to adjust the angle of the camera after attaching the product and check the recording. - If there are problems with the product or the SD card, they should not be left attended. It is required to contact us for the A/S services or send them to us in order to get the problems resolved. - Avoid strong shocks onto the terminal. The terminal would be damaged or malfunction due to the shock. - Even when the product runs normally upon initial installation, it may not work normally when the location is changed. The product should be fixed firmly when installed. Once it is installed, do not move it by force or apply shock onto it. - Should use only an authentic SD card (MLC type and Class 6 or higher is recommended) When an unauthentic SD card is used, loss of data and failure of the product could happen, making it impossible to receive normal AS services. - The SD card is expendable and needs to be checked periodically. As it gets worn after being used for a certain period of time, its memory can get damaged partially, making it impossible for the recording process to take place. The recording needs to be checked as necessary and the card needs to be formatted periodically (once a week). If the card cannot be used normally, it needs to be replaced with new one (recommended: every six months). - In case of important data, they must be backed up and stored in an additional storage medium. 5 2. Precautions - Do not remove the SD card or turn off the power or the ignition while upgrading firmware. Otherwise, the product or the SD card would malfunction or loss of data would occur. - When required to remove the SD card from the product, the power button on the left side must be first turned off. If the SD card is removed while the power is on, the stored data could be damaged or lost, and possibly cause the product to malfunction. - All the rights to the software and hardware related to the product belongs to the company. Criminal punishment will be applied according to the laws and regulations for intellectual property management for illegal copying, processing, and distribution. - The product may be changed for the purpose of improving its performance without prior notice. - Updating for the product may vary depending on the company’s policy. If there is a change in the related policy, notification will be made through the home page. 6 3. Features 1280X720p (HD) - The front unit provides 1280X720p (HD) high-resolution real HD videos. - The rear unit provides 640X480 (VGA) videos. Supports 3.5-inch wide LCD touch screen (16:9) / PIP function (screen split) - LCD equipment for checking the videos and setting the functions of the terminal. - The videos from the front and rear units are to be split and displayed on the screen at the same time (PIP). The SD card / possible to format it internally - The SD card makes it easy to check the recorded video. - Recorded videos will be deleted sequentially through its overwrite function, starting with the older ones in individual folders. - A function for formatting the black box internally is provided to prepare for the malfunctioning of the SD card or for stably storing the videos in the memory. Easy to set the environment - Possible to set the environment of the black box directly through the LCD touch screen. Continuous recording / event recording - Continuous recording: every 1 minute - Event recording: During the continuous recording, the 20-second video of an event taken from 5 seconds before the shock to 15 seconds after it will be recorded separately. (*The recorded files are dated based on “year, month, day, and hour” to make it easy to look for a video) Recording while parked / event recording while parked - Recording while parked: While in the parking mode, when the camera sensor detects a motion, the 20-second video, taken from 5 seconds before the event to 15 seconds after it, will be recorded as a recording file created while parked. - Event recording while parked: While in the parking mode, when a shock is detected, the 20-second video, taken from 5 seconds before the event to 15 seconds after it, will be recorded as an event recording file created while parked. Supports the cut-off function as a measure against electrical discharging - As a measure against electrical discharging, the product supports a function for setting a cut-off voltage or time (timer). ◆ Supports voice announcement LCD auto off - When the device shifts to the parking mode, the LCD screen will automatically be turned off. External GPS (optional) - A PC viewer allows the video as well as the time, location, speed and directions to be checked. 7 4. Introduction Power cable connection GPS module connection [ Top view] External camera connection LED shows the activated state SD insertion part Speaker Power switch Camera [ Front view ] [ Side view ] 3.5-inch LCD [ Rear view ] 8 5. Components Users need to check the components after opening up the package (refer to the following images). If there is damage to or a problem with the product or the components, users need to contact the selling shop for queries (the following images may be different from the actual components). Main body Continuous power cable Transparent stand Productspecific SD card (16 GB) Rear camera Dual side tape Extension cable Manual ※ Options (sold separately): A cigar jack cable and an external GPS module The components may change in their specifications arbitrarily depending on the situations of supply of parts. (The images shown above are for user information; it may be different from the actual components). 9 6. Specifications Items Specifications Remarks Products (models) Smart-i (i-3500) / Smart-HD (i-3000) Camera Front: 2 million pixels / Rear: 0.3 million pixels Resolution Front: 1280 x 720p (HD) Rear: 640 x 480 (VGA) LCD 3.5-inch LCD, 480 x 320-wide touch panel Recording methods Continuous recording, event recording, recording while parked (motion/shock), manual recording video frame 1CH: Up to 30 frames for the front camera 2CH: Up to 15 frames individually for the front and rear cameras when activated at the same time Video/audio storage type Video: AVI file (H.264) / Audio: PCM Storage method Micro SD card (8–32 GB cards can be used) MLC type and class 6 or higher Activation state check LED and speaker embedded Supports voice announcement Acceleration sensor Three-axis (X, Y, and Z) acceleration sensor Audio recording Embedded microphone Audio output Embedded speaker (0.5 W) GPS Grade Surf-3 (option) Time RTC embedded Port DC(Power), CAM(Rear camera) and GPS Size/weight Main body: 96x62x17.5 mm Rear camera: 46x25x27 mm Working voltage DC 12–24 V Power consumption Up to 4 W at 2 CH Working temperature -20℃ to 70℃ Storing temperature -40℃ to 85℃ Player Supports an exclusive viewer Angle of view: 120-degree (based on the opposite angle) Supports the PIP function Support the mute function External type Stand not included 10 7. Precautions for installation It is recommended that the installation of the black box and the wiring of the continuous power cable should be carried out at a shop that specializes in installing black boxes. Install the device at an area with a flat surface. The ignition must be turned off while installing. Install the device in a safe and well-lighted area. The product requires wires to be buried. Before completing the burial of wires for installation, it is needed to supply the power and check whether the videos of the front and rear cameras are stored normally. When required to install the rear camera, it must be connected while the power cable is not connected to the black box. All the components necessary for the installation are packaged inside the product box. Check them before installing them. Check first whether the SD card is inserted correctly before turning on the power. Take precautions not to install the product at a location that will disturb the user’s view. Keep the windshield and rear window, where the product is installed, in clean state. Otherwise, the quality of the screen may be degraded. When a rear camera is attached onto the rear window, it would be impossible to record videos with desired quality because the window is tinted or lined with heat wires. Users need to pay attention to this when installing the black box. Once the system is installed, users need to remove the protective vinyl cover on the camera lens before using the system. 11 8. Installation method (front) Caution: It is recommended that the installation of the black box and the wiring of the continuous power cable should be carried out at a shop that specializes in installing black boxes. 1. Remove the dual side tape of the stand and attach and fix it on the windshield [clean the attachment surface first). 2. The cables for the continuous power can be differentiated as below - Black wire: Ground - Yellow wire: BAT(B+) - Red wire: ACC(+) 3. When the power cables are installed completely, connect the power to the terminal and check the if product functioning properly. 4. Adjust the angle of the front camera while checking the LCD screen. 5. When installing the rear camera, connect it while the power of the terminal is turned off. (Refer to the next chapter for the installation of the rear camera) 12 9. Installation method (rear) Caution: It is recommended that the installation of the black box and the wiring of the continuous power cable should be carried out at a shop that specializes in installing black boxes. 1. Remove the dual side tape of the stand and attach and fix it on the rear window [clean the attachment 2. Connect the rear camera and the extension cable. Connect the extension cable to the CAM socket of the main body of the terminal surface first). 3. Turn on the power of the main body of the terminal, 4. Adjust the angle of the front camera while checking then check the video from the rear camera through the the LCD screen LCD screen. 5. Once the rear camera is completely installed, arrange the extension cable and wires. 13 10. Screen setting When the power is turned on, the start screen will be displayed. The firmware version will be shown at the bottom right side. [ SMART-i Start screen [ SMARTHD Start screen ] [ Warning image ] After a short while, a warning image will be displayed and then a voice announcing, “recording starts,” will follow. The videos from the front and rear cameras will be displayed on the LCD screen at the same time, thanks to the PIP function. 14 11. Playback on the LCD screen 1 2 6 5 3 1. 4 Recording state: Shows the current state related to recording. . (RECORDING: recording while driving, EVENT: event recording) 2. Audio recording state and GPS reception state: When the audio recording is not activated, [MUTE] will be displayed. When the GPS signal is received, [GPS] will be displayed. When the audio recording is activated and no GPS signal is received, nothing will be displayed ([GPS] will be displayed only when the GPS module, which is an option, is connected). 3. Recording time (Year-Month-Day, Hour:Minute:Second) 4. Version: Shows the current version of the firmware. 5. Shows the current video that is being recorded by the camera in real time. 6. The front and rear videos can be checked at the same time by using the PIP function. Touching the small screen on the top right will cause a shift between the front and the rear PIP screens. 15 12. Menu While the screen is in the recording mode, touching it will shift the screen to the menu screen (recording 1. continues) Front camera: Shows the front video in real time. If the PIP function is activated, the front video will be shown in large size and the rear video will be shown in small size. 2. Rear camera: Shows the rear video in real time. If the PIP function is activated, the rear video will be shown in large size and the front video will be shown in small size. 3. Screen off: Turns off the LCD screen. Touching any part of the LCD screen will shift it to the menu screen. 4. Time view: Shifts to the time screen. 5. Recording view: Shows the videos recorded in the continuous recording, the shock recording, the recording while parked, and the shock recording while parked. 6. Environment setting: Sets the shock sensitivity, the cut-off voltage, the storage ratio, the time, the PIP function, the LCD operation, the touch area compensation, the rear video shift, the audio recording, the voice announcement, and the SD card formatting. 16 13. Time view Status icons on the time view screen Icons Meaning Icons Meaning Activated during the event recording Deactivated during the continuous recording Audio recording (mute off) No audio recording (mute on) GPS reception (on) No GPS reception (off) ※ Pushing the event notice icon will make it possible to record an event manually. ※ Pushing the audio recording icon will make it possible to set whether to record the audio or not. 17 14. Recording view 1 2 5 Shock recording while driving 3 4 AM 09:30 1. Continuous recording while driving: Shows the continuous recording files. 2. Shock recording while driving: Shows shock (event) recording files. 3. Motion detection while parked: Shows the files of motions detected while parked. 4. Impact detection while parked: Shows the files of shocks (events) detected while parked. 5. Pushing the previous button will start the recording again. 18 15. Viewing the list of recorded videos 1 5 6 2 7 3 6 4 1. Recording mode: Continuous recording files, shock (event) recording files, and files of motion (event) detection while parked are listed up and displayed separately. 2. Front and rear videos: The front and rear videos are to be listed up and displayed separately. 3. Previous menu: Shifts to the recording view menu. 4. Recording start: Ends the recording view function and restarts the recording. 5. File list: Arranges and shows the files of recorded videos in sequence, starting with the recent recorded ones. 6. Previous page / next page: Shifts to a different page of the list. 7. Number of pages: Shows the current page of the displayed list. 19 16. Playback of the recorded video 2 3 4 1 1. Screen for playing back recorded videos. 2. Shows the playback time (playback time / total time of the stored file). 3. File number: The number of the file that is played back currently and the total number of stored files. 4. Playback end: Shifts to the file list. 20 17. Environment setting 1 2 5 3 4 1. System setting: Sets the shock sensitivity, the battery cut-off voltage, the storage ratio of the files of recording while parked, and the time. 2. Screen setting: Sets the PIP function, the LCD screen, the touch area correction, and the rear video shift. 3. Audio setting: Sets the audio recording and the voice announcement. 4. SD card formatting: Formats the SD card internally. 5. Pushing the previous button will start the recording again. 21 18. System setting 1 2 5 3 4 1. Shock sensitivity setting: Sets the shock sensitivity that will be applied while driving (three stages: high, medium, and low). 2. Battery cut-off voltage setting: Selects among the cut-off voltages (four stages: 11.5 V, 11.7 V, 11.9 V, and 12.1 V) and cut-off time (four stages: 5 hours, 10 hours, 24 hours, and 48 hours). 3. Ratio for the recording while parked: Selects the ratio for the recording while parked (0%, 25%, and 50%). 4. Time setting: Sets the time for the black box directly. 5. Pushing the previous button will shift the screen to the menu screen. 22 19. Time setting 2 3 1 1. Selects the year, month, day, hour, minute, and second by using the shift button. 2. Pushing the previous button will save the time as set and shift the screen to the system setting menu. 3. Pushing the home button will save the time as set and end the menu mode and start the recording. 4. If the external GPS unit, an option, is purchased separately and connected, the time will be set automatically according to the GPS time when the GPS signal is received. 23 20. Video screen setting 1 2 5 3 4 1. Sets whether to use the PIP function. 2. LCD setting: Selects between shifting to the clock screen after 1 minute and displaying the video continuously. 3. Touch area correction: Corrects the LCD screen touch area. 4. Rear video shift: Sets whether to shift the rear video between the left side and the right side. 5. Pushing the previous button will shift the screen to the menu screen. 24 21. Audio setting 1 2 3 1. Sets whether to use the audio recording. 2. Sets whether to use the voice announcement. 3. Pushing the previous button will shift the screen to the menu screen. 25 22. SD card formatting (at the terminal) Pushing the [SD Format] icon on the environment setting screen will make it possible to format the SD card that is inserted into the terminal. 1. Pushing the “Confirm” icon will start the formatting process. 2. Pushing the “Cancel” icon will shift the screen to the environment setting screen. 3. Do not remove the SD card while formatting 4. The system will be rebooted automatically when formatting is completed. 5. If there is a problem with the SD card, a message will be displayed. 26 23. Notice for formatting The SD card can be used stably for a longer period when formatting it once every two weeks (recommended). The terminal provides a notification function for formatting at the right time to do so. 1. Until the card is formatted, a notice will be generated every time the vehicle is started. 27 24. Touch area correction This function is for correcting the coordinates for the touch area of the LCD screen. The function can be executed by pushing the touch area correction icon on the video screen setting menu. 1. Touch correctly and sequentially the points that would be indicated by the “+” mark on the LCD screen. 2. When the correction of the coordinates is completed, move to the video screen setting menu. ※ When the products is shipped from the factory, the coordinates are adjusted before the shipment. 28 25. Operation of the product Operation Operation Power on Update Operation state Boot up the terminal Voice announcement “Ding-dong. . . recording starts” Start: Update using the micro SD “Updating starts” card (check the updating through the LCD screen) End: ”Updating ends” LED indication LED is turned on blue while booting up LED blinks blue every 1 second while recording LED blinks blue while updating. When updating ends, LED is turned off and will be turned back on when the system restarts. Individually both at the front and rear units, totally 20second video from 5 Parking mode seconds before an incident to 15 seconds after it will be recorded and stored - Monitoring on: LED is turned on blue - Power off The last video will be stored using the backup battery, and then the set power is turned off. - LED is turned off Event Shock detection Manual recording “Ding-dong. . .” - - Video storing by detecting a motion/a shock : Led blinks blue quickly 29 26. Firmware updating [ Update through a PC viewer ] 1. The updated file can be copied onto the memory card automatically through the PC viewer. 2. Get the memory card formatted. However, it will be impossible to check the version of the firmware once formatted. It is recommended to progress the updating after checking the version of the firmware. 3. After getting the memory card formatted, push the [viewer, Firmware Updating] button at the top of the PC viewer main screen. 4. Check the version of the firmware at the update manager window. Check the storage location and push the [Update] button. 5. Get the memory card formatted (it will be impossible to check the version of the firmware once formatted) 6. When the formatting is completed, the updated file will be copied onto the memory card automatically. (File name: Smart_E3500_app.bin, Smart_E3500_boot.bin, Smart_E3500_memInfo.bin) 30 26. Firmware updating [ Update through a PC viewer] 7. Insert the SD card into the main body after the power for the black box is turned off. 8. Supply power to the black box. As shown below, a notification message that the firmware update is in progress will be displayed and the announcement “Updating starts” will be made at the same time when the updating starts. After a short while, the announcement “Updating is completed” will be made and then the black box will be restarted automatically. 9. When the black box gets restarted, folders will be created in the formatted memory card automatically. 10. However, once a phrase that says the file is wrong, the booting process repeats itself, it is required to store the firmware file in the micro SD card again and start the update again. 31 26. Firmware updating [Download the updated firmware from the home page] 1. Download the updated firmware file from the reference room of the home page of Innotek Korea ( http://www.smart01.com ) into a PC. 2. Store the firmware file into the micro SD card. Place the firmware file at the top position of the folder. (Firmware file name: Smart_E3500_app.bin, Smart_E3500_boot.bin, Smart_E3500_memInfo.bin) 3. Insert the SD card into the main body after the power for the black box is turned off. 4. Supply power to the black box. As shown below, a phrase for notifying that firmware update is in progress will be displayed and the announcement “Updating starts” will be made at the same time when updating starts. After a short while, the announcement “Updating is completed” will be made and then the black box will restart automatically. 5. When the black box is restarted, folders will be created in the formatted memory card automatically. 6. However, once a phrase that says the file is wrong, the booting process repeats itself, it is required to store the firmware file in the micro SD card again and progress the updating again. 32 27. PC viewer Functions of the viewer buttons ① ② ③ ④ ⑤ ⑥ ⑦ ⑧ ⑨ ① Viewer, firmware update ② Black box setting ③ Print ④ Capture ⑤ Minimize, end ⑥ Map on/off ⑦ Full screen ⑧ Speed/acceleration graphs ⑨ Playback list generation and SD card formatting [ Playback control ] [ M-times playback rate control ] [ Volume control ] 33 28. Black box environment setting (1) ◆ Environment setting: Connect the SD card, which stores the videos of the black box, to a computer and push the (SD card-shaped) button at the lower part. When the playback list comes up, push the [Confirm] button to execute. Then, the environment setting will be activated, making it possible to select among individual items. [ Basic settings ] - Continuous mode shock level: Medium - Parking mode shock level: Medium - Cut-off voltage: 11.9 V - Parking mode memory usage: 50% - Parking mode motion sensitivity level: Medium - Continuous mode video quality: High - Parking mode video quality: High - Audio recording: Enabled - Voice announcement: Enabled - PIP mode: Enabled - Rear video shift: Disabled 34 28. Black box environment setting (2) 1. Continuous mode shock level setting: Selects among the high, medium, and low levels (can be set from the terminal). 2. Parking mode shock level setting: Selects among the high, medium, and low levels. 3. Cut-off voltage setting: Selects between cut-off voltage and cut-off time (can be set from the terminal). - Four stages of the cut-off voltage: 11.5 V, 11.7 V, 11.9 V, and 12.1 V - Four stages of the cut-off time: 5 hours, 10 hours, 24 hours and 48 hours (However, when the cut-off time is selected, the parking mode will end regardless of the cut-off time if the working voltage goes below 11.5 V before reaching the cut-off time). 4. Parking mode memory usage selection: Selects among 50%, 25%, and 0% (can be set from the terminal). However, when the parking mode memory usage increases, the memory to be used for the continuous mode will decrease. 5. Parking mode motion sensitivity level: Selects among the high, medium, and low levels. 6. Continuous mode video quality / Parking mode video quality: Selects between high and low levels. However, when the video is recorded in “high” quality, the storage time will be shortened. 7. Audio recording: Sets whether to use the audio recording (can be set from the terminal). 8. Voice announcement: Sets whether to use the voice announcement (can be set from the terminal). 9. PIP mode: Sets whether to use the PIP function (can be set from the terminal). 10. Rear video shift: Sets whether to shift the rear video to the left side or to the right side (can be set from the terminal). 11. Black box time setting: Changes the black box time by applying the time of a PC. 12. Time setting for individual countries. 35 29. Playback list generation 1. Take out the SD card from the black box and connect I to a computer. 2. Pushing the button at the viewer main screen will make it possible to search through all the videos recorded in the SD card by the black box and show the playback list. 3. Tabs of the playback list: Selects the location and the types of videos. 4. SD location: Selects the location of the SD card that stores videos. 5. Video type: Selects the types of videos for the playback (Type: All, continuous file, event file, parking files, and parking event file) 6. Confirm: Brings the data selected from the playback list to the file list window of the main screen and starts the playback of the file. 7. Cancel: Ends the window of the playback list window. 36 30. SD card formatting Formatting through the PC viewer 1. Before formatting the SD card, users must copy important files into other storage media. 2. When pushing the button at the viewer main screen and selecting the [Disk format] tab, the SD card will be formatted. 3. Check whether the formatting drive is the one in which the SD card is connected to currently. Pushing the format start button will bring up the SD card format window. The window will show file size, file system type, current assignment unit, and postformatting assignment unit. The name of the SD card will be described as “SMART-HD” automatically. Pushing the start button will start the formatting. “Quick formatting” will be selected basically. “General formatting” may take longer hours depending on the specifications of PCs, which requires you to pay attention. Caution: When formatting the SD card in a PC by applying the general formatting method, users need to select “FAT32” at [File system] and 32 KB at [Assignment unit size]. 4. When formatting is completed, a window will come up for notifying about the completion. Push the confirm button and the close button to complete the process of formatting the SD card. 2 1 3 4 5 37 31. Full screen view ◆ Pushing the front/rear full screen button at the center of the PC viewer will shift the screen to a full screen. 1. Full screen mode: Pushing the [Front full screen] or [Rear full screen] button will change the screen mode to the full screen mode. 2. Back to main screen: Pushing the [Initial screen] button will shift the screen from the current full screen mode back to the main screen mode. 3. Full screen: Plays back the video in a maximized size according to the resolution of the monitor. 4. Pushing the [End] button on the full screen will end the viewer program immediately without shifting to the main screen. 38 32. Screen enlargement ◆ By clicking the screen during playback will bring up a red-colored screen enlargement box at the bottom left of the screen. It can be brought up while playing back in full screen. 1. By click the front or rear screen during playback will bring up a red-colored screen enlargement box on the screen. 2. Scrolling the mouse wheel forward or backward will enlarge or reduce the screen. 3. Moving the mouse while clicking it on the screen will move the box onto the target part of the screen. 39 33. Storage capacity comparison among memory cards Storage assignment in relation to assignment for parking ( Unit: MB ) Assignm ent for parking 50% 25% 0% Capacity Continuous Event Event while parked Parking 8 GB 3,148 500 3,148 500 16 GB 6,296 1,000 6,796 500 32 GB 13,092 1,500 14,092 500 8 GB 4,972 500 1,324 500 16 GB 9,944 1,000 3,148 500 32 GB 20,388 1,500 6,796 500 8 GB 6,796 500 0 0 16 GB 13,592 1,000 0 0 32 GB 27,684 1,500 0 0 40 34. Storage folders and file name Folder structure Connect the SD card that contains the recording to a PC. The continuous recording files are generated every 1 minute, and the event files, the files for parking, the files for the events while parked are to be generated every 20 seconds. There are a total of five folders and explanation about them are shown below. 1. Normal (Continuous) 2. Event (Event) 3. Parking (Motion while parked) 4. Parking Event (Shock while parked) 5. Config (Environment setting) Type and differentiation of file names 1 ㅇ File name: 2 3 4 5 mdr_20121201_093140_I2.avi 1) Date: Year/Month/Day 2) Time: Hour/Minute/Second 3) Modes: I – Videos of continuous recording E – Videos of event and manual recordings P – Videos of motions detected while parked PE – Videos of event recording 4) 1: 1 channel for the front side 2: two channels for the front and rear sides 5) Extension name: avi – H.264 video file 41 35. Warranty certificate ㅇ Product: Smart-i / Smart-HD ㅇ Model: I-3000 (Smart-HD) ㅇ Serial No.: I-3500 (Smart-i) ㅇ Date purchased: ㅇ Customer name: ㅇ Purchased at: (☎. (☎. ) ) We would like to thank you for purchasing the Smart-i/HD, a black box for cars. The company provides a warranty certificate for the product according to the regulations related to the compensation for the damage or loss that could occur to customers. ㅇ Please contact the agency or the selling shop when there is a problem with the product. ㅇ The warranty period is 1 year from the date of purchased. ㅇ If the date of purchase cannot be identified, the warranty period will be calculated one month after the manufacture date of the product. Please make sure that the date of purchase is filled out in the warranty form. ㅇ Warranty services will not be available in cases where the product malfunctions due to mishandling by users, high voltage, or natural disasters (rains, lightning, and force majeure) ㅇ The product can be refunded or replaced with a new one within 14 days from receipt of the product. ㅇ If refund is needed, please return the product to the shop without opening up the package. Once opened and used, the product will not be refunded. ㅇ The cost of returning the product will be handled by the customer. (Except for refund due to product defect) ㅇ The product is for a car. If it is used for other purposes, free A/S services will not be provided. ㅇ Supplier: Innotek Korea/ Rm#302, 235-4, Yuseon Bldg. Yongdap-dong, Seongdong-gu, Seoul ㅇ Contact for purchasing and queries: 070-7780-5023 ㅇ Manufactured by: Nadatel in Korea ㅇ Certificate No.: KCC-REM-IK1-I-3000 ㅇ Certificate for: Innotek Korea 42