1
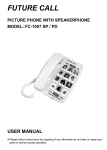
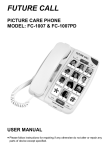
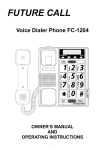
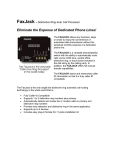
FUTURE CALL
PICTURE CARE PHONE
MODEL: FC-1007
USER MANUAL
• Please follow instructions for repairing if any otherwise do not alter or repair any
parts of device except specified.
IMPORTANT SAFETY INSTRUCTIONS
Before using your telephone equipment, basic safety precautions should always
be followed to reduce the risk of fire, electric shock and injury to persons including
the following:
1. Read and understand all instructions.
2. Follow all warnings and instructions marked on the product.
3. Unplug this product from the wall outlet before cleaning. Do not use liquid or
aerosol cleaners. Use a damp cloth for cleaning.
4. Do not use this product near water, for example, near a bath tub, wash bowl,
kitchen sink, or laundry tub, in a wet basement or near a swimming pool.
5. Do not place this product on an unstable cart, stand, or table. The product may
fall causing serious damage to the product.
6. Slots and openings in the enclosure and the back and bottom are provided for
ventilation, to protect it from overheating. These openings must not be blocked or
covered. The openings should never be blocked by placing the product on a bed,
sofa, rug, or other similar surface. This product should never be placed near or
over a radiator or heat register. This product should not be placed in a built-in
installation unless proper ventilation is provided.
7. This product should be operated only from the type of power source indicated
on the marking label. If you are not sure of the type of power supply to your home,
consult your dealer or local power company.
8. Do not allow anything to rest on the power cord. Do not locate this product
where the cord will be abused by persons walking on it.
9. Do not overload wall outlets and extension cords as this can result in the risk of
fire or electric shock.
10. Never push objects of any kind into this product through cabinet slots as they
may touch dangerous voltage points or short out parts that could result in a risk of
fire or electric shock. Never spill liquid of any kind on the product.
11.Do not disassemble this product, but take it to a qualified service technician or
service center when repair work is required. Opening or removing covers may
expose you to voltage or other risks. Incorrect reassembly can cause electric
shock when the appliance is subsequently used.
12. Unplug this product from the wall outlet and refer to qualified service personnel
under the following conditions:
A. When the power supply cord or plug is damaged or frayed.
B. If liquid has been spilled into the product.
C.If the product has been exposed to rain or water.
D.If the product does not operate normally by following the operating instructions.
Adjust only those controls that are covered by the operating instructions. Improper
adjustment of other controls may result in damage and may require extensive
work by a qualified technician to restore the product to normal operation.
E. If the product has been dropped or the enclosure has been damaged.
F. If the product exhibits a distinct change in performance.
13. Avoid using a telephone during an electrical storm. There may be a remote risk
of electric shock from lightning.
14. Do not use the telephone to report a gas leak in the vicinity of a leak.
15.Never install telephone wiring during a lightning storm.
16.Never install telephone jacks in wet locations unless the jack is specifically
designed for wet locations.
17.Never touch uninsulated telephone wires or terminals unless the telephone line
has been disconnected at the network interface.
SAVE THESE INSTRUCTIONS
GET TO KNOW YOUR PHONE
1. Receiver
2. Transmitter
3. Hook Switch
4. Memory Index Card
5. M1 Button
6. Normal / One Touch Switch
7. Ringer(Off / Lo / Hi) Switch
8. Ringer Indicator
9. 911 Button
10. Store Button
11. Key Button(1~9;*;0;#)
12. Redial Button
13. Photocall Button
14. Receiving Volume Control (Handset)
15. Flash Button
INSTALLATION
Coil Cord Connection
Insert coil cord into modular jack located on side housing. Connect the other end
into the modular jack located on handset.
Line Cord Connection
Insert the modular plug of the straight cord into the rear side of base unit, the
insert the other end of RJ11C plug into the wall jack.
Wall Mounting
Your PHONE is also designed to mount on a wall.
Position the wall mount slots on the bottom of the
base over the two studs of the wall plate. Pull down
to lock in place.
OPERATION
Receiving a Phone Call
Handset
1. When your phone rings, pick up the handset and use it like any basic
telephone.
2. Hang up the handset to release the telephone line when conversation is
completed.
Dialing a Call
Pick up the phone and wait for a dial tone, then press the keys for the number
you want to dial.
KEY FEATURE
Last Number Redial
Your PHONE remembers the last number dialed. If the number you dial is busy or
not being answered, hang up. To redial the last number automatically, press the
REDIAL button. NOTE: You can redial the same telephone number as many times
as required. However, once you dial another number, the previous number is
erased.
Ringer OFF / LO / HI
Your phone provides a ringer adjustment of High, Low or Off, when you don‘t want
to be disturbed, slide the switch to the off position. Now you can still make a
outgoing calls without being disturbed by incoming calls.
Flash
The FLASH button can be used to retrieve a new dial tone after ending a call. The
FLASH button is also a useful feature for special telephone services such as call
waiting and three party calling. Press briefly, release and perform the custom call
procedure.
NOTE : Call waiting is a service of your local telephone company.
Receiver Volume Control
On the front edge of your telephone you will find a slide volume control. This
control may be used to adjust the volume of received speech. With the control set
towards the right hand side of the phone, the received volume will be at its
maximum. With the control set to the left side, it will be at its minimum.
MEMORY FEATURE
To Program
Your PHONE is equipped with M1 & 911 memory key and ten 2 touch memory
keys for programming your most frequently dialed telephone numbers. You can
store up to 16 digits in the priority key button or in each of the numeric key button
(0 through 9), by following the steps outlined below:
1. Slide the Normal / One touch Switch to NORMAL position.
2. Place the volume control to the lowest setting (furthest left)
3. Lift the handset and place on side. Do not listen to the handset when
programming as you may hear some announcements. This is normal.
NOTE: ONCE YOU START PROGRAMMING YOU MUST NOT HESITATE
AS THIS MAY CAUSE THE NUMBER NOT TO BE PROGRAMMED….
4. Press and release STORE button.
5. Press the 0-9 keys for the telephone number you wish to store including area
code if needed.
6. Press and release the STORE button again.
7. Press the priority key M1 or (0-9) (pictures) where you want that telephone
number stored in.
8. Your number is now stored.
9. Replace handset.
10.To change a stored number, repeat the same process. The new number
will store over the old stored number.
A Memory Index Card is provided for your use in writing down the person‘s name.
Note: If you need to disconnect the 911 key you may program any other
number you wish or just the digit “1” into this key by following the above
points 1-5 push the 911 key for point 7 then points 8-9.
To Retrieve Memory Numbers
A. Priority Keys:
The priority key M1 is the one touch direct call key button. Pick up the handset and
depress the priority key M1 button which stores the telephone number you want to
dial. Your call will be automatically dialed.
B. Key button Memories:
Your phone provides the option of “Normal” or “One Touch” dialing mode.
Normal mode - To retrieve numbers stored in the key button,
pick up the handset and press the red PHOTOCALL button.
Then press the key button number (0-9) (pictures) which stores the
telephone number you want to dial. Your call will be automatically dialed.
One Touch mode - To retrieve numbers stored in the key button, Pick up the
phone and wait for a dial tone, then press the key button (pictures) which stores
the telephone number you want to dial. Your call will be automatically dialed.
Please note:
– Original Two touch memories will become one touch memories at ONE
TOUCH mode
– There will be no dialing (0-9) function when the ONE TOUCH mode is
selected
– You can not program any memories when in ONE TOUCH mode
Inserting Pictures (Photos)
1. Remove numbered plastic cover from each key 0-9.
2. You will need a pictures approximately 1” x 1” inch.
3. Place picture into key.
4. Replace plastic cover.
Extra Set of Plastic Picture Covers
You will find an extra set of clear plastic picture covers this is to be used if you
want to use only the photo memories only.
1. Remove numbered plastic cover from each key 0-9 and put them aside.
2. You will need a pictures approximately 1” x 1¼” inch.
3. Place picture into key.
4. Replace with new all clear plastic covers.
CONSUMER INFORMATION
This equipment complies with Part 68 of the FCC rules and the requirements
adopted by the ACTA On the bottom of this equipment is a label that contains,
among other information, a product identifier of US: 4VKTE09BFC-1007.
If requested, this number must be provided to the telephone company.
The applicable jacks (i.e. RJ11C) for this equipment are provided in the packaging
with each piece of approved equipment. The jacks are certified by Universal
Service Order Codes (USOC).
A plug and jack used to connect this equipment to the premises wiring and
telephone network must comply with the applicable FCC Part 68 rules and
requirements adopted by the ACTA. A compliant telephone cord and modular plug
are provided with this product. They are designed to be connected to a compatible
modular jack that is also compliant. See installation instructions for details.
The REN is used to determine the number of devices that may be connected to a
telephone line. Excessive RENs on a telephone line may result in the devices not
ringing in response to an incoming call. In most but not all areas, the sum of RENs
should not exceed five (5.0). To be certain of the number of devices that may be
connected to a line, as determined by the total RENs, contact the local telephone
company. [For products approved after July 23, 2001, the REN for this product is
part of the product identifier that has the format US:AAAEQ##TXXXX. The digits
represented by ## are the REN without a decimal point (e.g., 03 is a REN of 0.3).
For earlier products, the REN is separately shown on the label.]
If this equipment FC-1007 causes harm to the telephone network, the telephone
company will notify you in advance that temporary discontinuance of service may
be required. But if advance notice isn’t practical, the telephone company will notify
the customer as soon as possible. Also, you will be advised of your right to file a
complaint with the FCC if you believe it is necessary.
The telephone company may make changes in its facilities, equipment, operations
or procedures that could affect the operation of the equipment. If this happens the
telephone company will provide advance notice in order for you to make
necessary modifications to maintain uninterrupted service.
If you experience trouble with this equipment, disconnect it from the network until
the problem has been corrected or until you are sure that the equipment is not
malfunctioning.
Please follow instructions for repairing if any (e.g. battery replacement section);
otherwise do not alter or repair any parts of device except specified.
Connection to party line service is subject to state tariffs. Contact the state public
utility commission, public service commission or corporation commission for
information.
This equipment is hearing aid compatible.
NOTICE : If your home has specially wired alarm equipment connected to the
telephone line, ensure the installation of this equipment FC-1007 does not disable
your alarm equipment. If you have questions about what will disable alarm
equipment, consult your telephone company or a qualified installer.
WARNING : Changes or modifications to this unit not expressly approved by the
party responsible for compliance could void the user’s authority to operate the
equipment.
SERVICE
According to FCC regulation. This equipment which has been certified and
registered by the FCC, may only be repaired by authorized person, the FCC
certification may be voided. Should you encounter any problems, please call the
FUTURE CALL LLC.
Toll-free Customer Hotline for assistance:
1-888-934-CALL, Monday - Friday between 9:00 am - 6:00 pm PST
For general inquires, you can E-Mail to [email protected] or visit our website at
www.future-call.com
FOR WARRANTY AND OUT-OF WARRANTY SERVICE:
You may call our toll-free hot line on 1-888-934-CALL (1-888-934-2255) 9AM-6PM
PST or E-mail to [email protected]
QUESTIONS?
STOP...doesn’t take unit back to the store.
LOOK...for the toll-free “help” telephone number.
LISTEN... as our experts talk you through the problem.
For immediate answers to your questions regarding operation, missing parts or
installation call:
FUTURE CALL LLC
HOTLINE & E-MAIL AT:
1-888-934-CALL (2255) or [email protected]
LIMITED WARRANTY AND SERVICE
FUTURE CALL LLC. warrants this product to be free from defective materials or
factory workmanship and will replace or repair this unit or any part thereof, except
batteries, if it proves to be defective in normal use or service within 90 days from
date of original purchase. Our obligation under this warranty is the repair or
replacement of the defective instrument or any part thereof, except batteries. This
warranty will be considered void if unit is tampered with, improperly serviced, or
subjected to misuse, negligence or accidental damage. There are no other
express warranties other than those stated herein.
This warranty gives you specific legal rights, and you may also have other rights
which varies from state to state. TO OBTAIN SERVICE PLEASE E-MAIL US
ON [email protected] OR CALL US TOLL FREE 1-888-934-CALL (2255).
Between 9AM-6PM PST IF THE UNIT IS UNDER WARRANTY PROOF OF
PURCHASE MUST BE PROVEN.