1
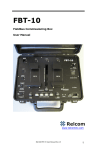
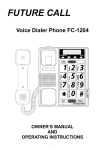
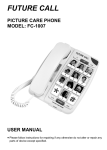
PRINTER’S INSTRUCTIONS:
INSTR,USER,PERS-3600B - LINEAR P/N: 228306 A - INK: PANTONE BLUE 072 & BLACK - MATERIAL: 20 LB. MEAD BOND - SIZE: 5.500” X 8.500” - SCALE: 1-1
User’s Manual
PERS-3600B
Personal Emergency Reporting System
Important! Please test your system once a month (See Page 4)
Table of Contents
System Components.......................2
Installation ..................................3
Testing .......................................4
In Case of Emergency .....................5
Pendant Replacement.....................6
Telephone Modes ..........................7
Reminder Messages ......................8
Activity Timer ...............................9
Testing Log ............................... 10
Important Information ................... 11
Service Information ..................... 12
System Components
Your system may contain these or additional components
EMERGENCY PENDANT
(SHOWN WITH WRIST STRAP)
TELEPHONE CORD
STATUS INDICATOR
EMERGENCY
CONSOLE
• NORMALLY OFF
• ON OR BLINKING,
CALL FOR SERVICE
POWER INDICATOR
• LIGHTS WHEN AC POWER IS PRESENT
• BLINKS SLOWLY WHEN BATTERY IS CHARGING
• BLINKS QUICKLY WHEN AC IS ABSENT
(MAKE SURE POWER SUPPLY IS PLUGGED
INTO AN UN-SWITCHED OUTLET AND THAT
THE BUILDING HAS POWER)
2
SENDING INDICATOR
• NORMALLY OFF
• FLASHES WHEN CONSOLE
IS PLACING A CALL
HOME INDICATOR
• NOT USED IN SOME INSTALATIONS
• LIGHTS WHEN ACTIVITY TIMER IS ON
• BLINKS SLOWLY WHEN LESS THAN 15 MINUTES
REMAIN ON THE ACTIVITY TIMER
• BLINKS QUICKLY WHEN THE ACTIVITY
TIMER HAS EXPIRED
Installation
Your system connects to the telephone line and power outlet
TELEPHONE LINE CONNECTION
1 PLACE THE CONSOLE IN A
CENTRAL LOCATION IN YOUR
HOME. BE SURE IT IS ON A
FLAT, STABLE SURFACE,
AWAY FROM OTHER ELECTRIC
DEVICES (FANS, RADIOS,
FLUORESCENT LAMPS, ETC.).
LINE
PHONE
REAR OF
CONSOLE
2 PLUG ONE END OF THE
TELEPHONE CORD INTO THE
"LINE" JACK ON THE REAR OF
THE CONSOLE.
3 PLUG THE OTHER END OF THE
CONNECT THIS JACK
(LABELED "LINE") TO YOUR
TELEPHONE WALL JACK
CONNECT THIS JACK
(LABELED "PHONE") TO
YOUR TELEPHONE
(OPTIONAL)
TELEPHONE CORD INTO YOUR
TELEPHONE JACK.
YOUR
TELEPHONE
WALL JACK
YOUR TELEPHONE
(OPTIONAL)
CONSOLE POWER CONNECTION
THE CONSOLE RECEIVES POWER
FROM THE SMALL SQUARE
POWER SUPPLY ATTACHED TO
THE CONSOLE'S POWER CORD.
PLUG POWER SUPPLY
INTO AN UN-SWITCHED
AC OUTLET
1 PLUG THE POWER SUPPLY INTO
AN UN-SWITCHED 120 VAC
POWER OUTLET (AN OUTLET
THAT'S NOT CONTROLLED BY A
WALL SWITCH).
3
Testing
It’s important to test your system at least once a month
BEFORE TESTING, CALL YOUR MONITORING COMPANY
TO NOTIFY THEM THAT YOU WILL BE TESTING
THE TEST CAN BE MADE FROM THE PENDANT OR CONSOLE
TESTING FROM THE PENDANT
1
PRESS THE PENDANT'S BUTTON UNTIL
YOU HEAR "EMERGENCY CALL BEING
PLACED" FROM THE CONSOLE'S
SPEAKER.
2
WAIT TO HEAR THE OPERATOR'S VOICE
FROM THE CONSOLE (THE WAIT SHOULD
NOT BE MORE THAN TWO MINUTES).
3
FOLLOW THE INSTRUCTIONS FROM THE
OPERATOR.
TESTING FROM THE CONSOLE
1
4
PRESS THE HELP BUTTON ON THE
CONSOLE ONE TIME. YOU WILL HEAR
"EMERGENCY CALL BEING PLACED" FROM
THE CONSOLE'S SPEAKER.
2
WAIT TO HEAR THE OPERATOR'S VOICE
FROM THE CONSOLE (THE WAIT SHOULD
NOT BE MORE THAN TWO MINUTES).
3
FOLLOW THE INSTRUCTIONS FROM THE
OPERATOR.
In Case of Emergency
A call for help can be made with the Pendant or Console
CALLING FOR HELP WITH THE PENDANT
1
IF YOU NEED HELP, PRESS THE BUTTON
ON THE PENDANT FOR AT LEAST TWO
SECONDS (NOTE: THE PENDANT MUST BE
WITHIN 150 FEET OF THE CONSOLE).
2
YOU WILL HEAR "EMERGENCY CALL
BEING PLACED" FROM THE CONSOLE'S
SPEAKER.
3
WAIT TO HEAR THE OPERATOR'S VOICE
FROM THE CONSOLE (THE WAIT SHOULD
NOT BE MORE THAN TWO MINUTES).
4
FOLLOW THE INSTRUCTIONS FROM THE
OPERATOR.
DO NOT PRESS CANCEL BEFORE
TALKING TO THE OPERATOR OR YOUR
CALL WILL NOT BE PLACED
CALLING FOR HELP WITH THE CONSOLE
1
IF YOU NEED HELP, PRESS THE HELP
BUTTON ON THE CONSOLE FOR AT
LEAST TWO SECONDS. DO NOT PRESS
THE HELP BUTTON MORE THAN ONCE
PER EMERGENCY.
2
YOU WILL HEAR "EMERGENCY CALL
BEING PLACED" FROM THE CONSOLE'S
SPEAKER.
3
WAIT TO HEAR THE OPERATOR'S VOICE
FROM THE CONSOLE (THE WAIT SHOULD
NOT BE MORE THAN TWO MINUTES).
4
FOLLOW THE INSTRUCTIONS FROM THE
OPERATOR.
DO NOT PRESS CANCEL BEFORE
TALKING TO THE OPERATOR OR YOUR
CALL WILL NOT BE PLACED
5
Pendant Replacement
Follow these steps to add a replacement Pendant to the Console
ONE PENDANT CAN BE ADDED AT A TIME USING THESE STEPS
CANCEL
BUTTON
ADDING A PENDANT
6
1
PRESS THE CANCEL BUTTON ON THE
CONSOLE FOR FIVE SECONDS
2
THE CONSOLE WILL ANNOUNCE "READY
TO LEARN SENSOR"
3
PUSH THE BUTTON ON THE NEW
PENDANT TO BE ADDED
4
THE CONSOLE WILL ANNOUNCE
"EMERGENCY SENSOR LEARNED"
5
TEST THE NEW SENSOR USING THE
STEPS ON PAGE 4
NEW
PENDANT
Telephone Modes
The Console can be used as a speakerphone
(This is an optional feature and may not be available on your system)
NOTE: SPEAKERPHONE MODE CAN ONLY BE USED ON INCOMING CALLS
AND WILL NOT FUNCTION WHEN THE CONSOLE IS OPERATING FROM
BACKUP BATTERY POWER. ATTEMPTING TO ANSWER WHILE THE CONSOLE
IS ON BACKUP POWER WILL CAUSE AN EMERGENCY ALARM.
1 WHILE THE TELEPHONE IS RINGING, ACTIVATING AN EMERGENCY
PENDANT OR PRESSING THE CONSOLE'S HELP BUTTON WILL ANSWER
THE TELEPHONE
2
YOU CAN TALK TO THE CALLER USING THE CONSOLE AS A
SPEAKERPHONE
WARNING: THE CONSOLE WILL NOT BE ABLE TO REPORT
AN EMERGENCY WHILE THE SPEAKERPHONE IS ACTIVE
NOTE: TO REPORT AN EMERGENCY WHEN THE SPEAKERPHONE IS IN USE, PRESS
EITHER THE HELP BUTTON OR A PENDANT BUTTON TO END THE PHONE CALL AND
THEN PRESS ONE OF THESE BUTTONS AGAIN TO REPORT THE EMERGENCY.
3 WHEN YOUR CALL IS FINISHED, PRESS THE HELP BUTTON OR PRESS A
PENDANT BUTTON TO HANG UP THE TELEPHONE (THE CONSOLE HAS A
TIMER THAT WILL END THE CALL AUTOMATICALLY AFTER A PRESET TIME)
AUTOMATIC ANSWER SPEAKERPHONE MODE CAN BE STARTED BY A CALLER
1 CALL THE CONSOLE'S NUMBER, LET IT RING THREE TIMES THEN HANG UP
2 WAIT ABOUT 10 SECONDS, THEN CALL THE CONSOLE A SECOND TIME
3 WHEN THE CONSOLE ANSWERS A TONE WILL SOUND FOR 8 SECONDS
4 WHEN THE TONE ENDS ENTER THE 4-DIGIT PASSWORD (1-2-3-4) OR _______
FOLLOWED BY THE "#" KEY
5 HAVE A CONVERSATION THROUGH THE CONSOLE'S SPEAKER
6 WHEN THE CALL IS FINISHED, PRESS "9" TO HANG UP (THE CONSOLE HAS
A TIMER THAT WILL END THE CALL AUTOMATICALLY AFTER A PRESET
TIME)
7
Reminder Messages
The Console can play voice messages at pre-set times
(This is an optional feature and may not be available on your system)
YOU CAN RECORD, PLAY, AND ERASE REMINDER MESSAGES. YOUR MONITORING
COMPANY SETS THE TIME REMINDER MESSAGES WILL AUTOMATICALLY PLAY
RECORDING REMINDER MESSAGES
1. PRESS AND RELEASE THE TEST BUTTON
TO ENTER TEST MODE
2. PRESS AND HOLD THE HOME BUTTON FOR
5 SECONDS (BE READY TO RECORD)
3. RECORD UP TO A 15 SECOND MESSAGE
(SPEAK AT NORMAL VOLUME, TWO FEET FROM CONSOLE)
4. PRESS THE HOME BUTTON TO STOP RECORDING
5. PRESS THE HOME BUTTON AGAIN TO PLAY THE
MESSAGE JUST RECORDED, PRESS THE HOME
BUTTON TWICE AND HOLD IT AFTER THE 2ND PRESS
TO RECORD ANOTHER MESSAGE IN THE NEXT
AVAILABLE MESSAGE NUMBER
6. REPEAT STEPS 2-5 FOR ADDITIONAL MESSAGES
(UP TO 8 MESSAGES ALLOWED)
7. PRESS AND RELEASE THE CANCEL BUTTON TO
EXIT TEST MODE
TEST PLAYING REMINDER MESSAGES
1. PRESS AND RELEASE THE TEST BUTTON
TO ENTER TEST MODE
2. PRESS AND RELEASE THE HOME BUTTON
3. THE CONSOLE WILL ANNOUNCE EACH MESSAGE
NUMBER, THEN PLAY THE RECORDED MESSAGE
4. PRESS THE HOME BUTTON TO ADVANCE TO
THE NEXT MESSAGE TO BE PLAYED
5. PRESS AND RELEASE THE CANCEL BUTTON TO
EXIT TEST MODE
NOTE: TIME SCHEDULING FOR PLAYING REMINDER
MESSAGES IS SET BY THE MONITORING COMPANY
ERASING ALL REMINDER MESSAGES
1. PRESS AND RELEASE THE TEST BUTTON
TO ENTER TEST MODE
2. PRESS AND HOLD THE HOME BUTTON FOR
MORE THAN 10 SECONDS
3. CAUTION! THE CONSOLE WILL ERASE ALL
REMINDER MESSAGES AND PLAYBACK SCHEDULES
4. PRESS AND RELEASE THE CANCEL BUTTON TO
EXIT TEST MODE
8
Activity Timer
The Console can check for lack of daily activity and automatically call
(This is an optional feature and may not be available on your system)
THE ACTIVITY TIMER DURATION IS SET BY YOUR MONITORING COMPANY
WHEN THE ACTIVITY TIMER IS RUNNING
1 THE HOME INDICATOR WILL LIGHT,
SHOWING THAT THE ACTIVITY TIMER IS
RUNNING
WHEN THE ACTIVITY TIMER IS RUNNING OUT OF TIME
2 THE HOME INDICATOR WILL BLINK AND
THE CONSOLE ANNOUNCES EVERY 10
SECONDS WHEN LESS THAN 15
MINUTES OF TIME REMAIN ON THE
ACTIVITY TIMER
RESETTING THE ACTIVITY TIMER TO PREVENT AN INACTIVITY CALL
3 YOU NEED TO PRESS THE HOME
BUTTON OR TRIGGER AN ACTIVITY
SENSOR BEFORE THE TIMER EXPIRES
TO PREVENT AN INACTIVITY CALL TO
THE MONITORING COMPANY
PRESSING THE HOME BUTTON
RESTARTS THE TIMER
9
Testing Log
Use this log to document your monthly system testing dates
DATES TESTED
_____________
____________
____________
_____________
____________
____________
_____________
____________
____________
_____________
____________
____________
_____________
____________
____________
_____________
____________
____________
_____________
____________
____________
_____________
____________
____________
_____________
____________
____________
WARNING! Battery Safety
Batteries must be recycled. Deliver the battery to an appropriate recycling facility or
ship it to the supplier in the replacement battery’s packing material.
CAUTION: Do not dispose of batteries in a fire. The batteries may explode.
CAUTION: Do not open or mutilate batteries. They contain an electrolyte, which
is toxic and harmful to the skin and eyes.
CAUTION: To avoid personal injury due to energy hazard, remove wristwatches
and jewelry such as rings when replacing batteries. Use tools with insulated
handles.
Replacement and Recycling of Batteries:
See your dealer for information on replacement battery kits and battery recycling.
NON-SPILLABLE BATTERY
Pb
Pb
CONTAINS SEALED LEAD ACID BATTERY
MUST BE RECYCLED
10
Important Information
System regulatory information
For United States Installations
Alarm Installation Notes to Installer:
This equipment complies with Part 68 of the FCC rules and/or the
requirements adopted by the Administrative Council for Terminal
Attachments (ACTA). On the bottom of this equipment is a label that
contains, among other information, a telephone products identifier in the
form FCC ID: EF4 ... or US: EF4 ... and ringer equivalence number (REN). If
requested, this information must be provided to the telephone company.
For products equipped with an RJ31X jack the line seize feature shall be
verified. Be certain the local telephone and incoming line connections
are not reversed. These lines are not reversed if the alarm dialer can
communicate with the central station.
A plug and jack used to connect this equipment to the premises wiring and
telephone network must comply with the applicable FCC Part 68 rules and
requirements as adopted by the ACTA. If provided, a compliant telephone
cord and modular plug is included with this product. The jacks and plugs
are designed to be connected to a compatible modular jack that is also
compliant. See installation instructions for details.
A ringer equivalence number code (REN) is used to determine the quantity
of devices that may be connected to the telephone line. Excessive RENs
on a telephone line may result in the devices not ringing in response to
an incoming call. If most, but not all areas, the sum of the RENs should
not exceed five (5.0). To be certain of the number of devices that may
be connected to the line, as determined by the total RENs, contact the
telephone company to determine the maximum REN for the calling area.
For products approved after July 23, 2001, the REN for this product is part
of the product identifier that has the format US: AAAEQ##TXXX. The digits
represented by the ## are the REN without a decimal point (e.g., 03 is REN
of 0.3). For earlier products, the REN is separately shown on the label.
If this equipment causes harm to the telephone network, the telephone
company will notify you in advance that temporary discontinuance of service
may be required. But if advance notice is not practical, the telephone company
will notify the customer as soon as possible. Also, you will be advised of your
right to file a complaint with the FCC if you believe it is necessary.
The telephone company may make changes in its facilities, equipment,
operations or procedures that could affect the operation of the equipment. If this
happens, the telephone company will provide advance notice in order for you to
make the necessary modifications in order to maintain uninterrupted service.
If trouble is experienced with this equipment, for repair and/or warranty
information contact Linear Corporation at 1-800-421-1587 for information
or a return product authorization (RPA). If the trouble is causing harm to the
telephone network, the telephone company may request you remove the
equipment from the network until the problem is resolved. User repairs must
not be made. Doing so voids warranty.
This equipment must not be used on telephone company provided public
coin service. Connection to party lines is subject to state tariffs. Contact your
state public utility commission for information. This equipment is hearing
compatible (HAC) to any HAC compatible attached handset telephones.
Alarm Dialing Equipment:
If your home has specially wired alarm equipment connected to the telephone
line, ensure that the installation of any other non-alarm devices does not
disable your alarm equipment. If you have questions about what will disable
alarm equipment, consult your telephone company or a qualified installer.
When Programming Emergency Numbers Or Making Test Calls To
Emergency Numbers.
1. Remain on the line and briefly explain to the dispatcher the reason for
the call.
2. Perform such activities in the off-peak hours, such as early mornings or
later evenings.
3. Follow the central station operator’s instructions for updated dialer
programming, if re-programming of the dialer is required.
Alarm dialing equipment must be able to seize the telephone line and
place a call in an emergency situation. It must be able to do this even if
other equipment (telephone(s), answering system, computer modem, etc.)
already has the telephone line in use. To do so, alarm dialing equipment
must be connected to a properly installed RJ31X that is electrically in series
with and ahead of all other equipment attached to the same telephone line.
If you have any questions concerning these instructions, you should consult
your telephone company or a qualified installer about installing the RJ31X
jack and alarm dialing equipment for you.
New Services Notes to User:
The installation and/or monitoring company shall be notified if new telephone
service, e.g. DSL, is installed.
For Canadian Installations
The Industry Canada (IC) label identifies certified equipment. This
certification means that the equipment meets certain telecommunications
network protective, operational and safety requirements. The IC does not
guarantee the equipment will operate to the user’s satisfaction.
Before installing this equipment, users should ensure that it is permissible
to be connected to the facilities of the local telecommunications company.
The equipment must also be installed using an acceptable method of
connection. In some cases, the company’s inside wiring associated with
a single line individual service may be extended by means of a certified
connector assembly (telephone extension cord). The customer should
be aware that compliance with the above conditions may not prevent
degradation of service in some situations.
Repairs to certified equipment should be made by an authorized Canadian
maintenance facility designated by the supplier. Any repairs or alterations
made by the user to this equipment, or equipment malfunctions, may give
the telecommunications company cause to request the user to disconnect
the equipment.
Users should ensure for their own protection that the electrical ground
connections of the power utility, telephone lines and internal metallic water
pipe system, if present, are connected together. This precaution may be
particularly important in rural areas.
CAUTION: Users should not attempt to make such connections
themselves, but should contact the appropriate electric inspection authority,
or electrician, as appropriate.
The Load Number (LN) assigned to each terminal device denotes the
percentage of the total load to be connected to a telephone loop which is
used by the device to prevent overloading. The termination on a loop may
consist of any combination of devices subject only to the requirement that
the total of the Load Number of all the devices does not exceed 100.
The Ringer Equivalence Number (REN) is used to determine the quantity
of devices that may be connected to the telephone line. Too many devices
may result in some devices not ringing in response to an incoming call. In
most, but not all areas, the sum of the REN’s should not exceed five (5.0).
To be certain of the number of devices that may be connected to the line,
contact the telecommunications company to determine the maximum REN
for the calling area
Refer to the equipment label for the unit’s load number or REN number.
Important Wireless Information
Linear radio controls provide a reliable communications link and fill an
important need in portable wireless signaling. However, there are some
limitations which must be observed.
• For U.S. installations only: The radios are required to comply with FCC
Rules and Regulations as Part 15 devices. As such, they have limited
transmitter power and therefore limited range.
• A receiver cannot respond to more than one transmitted signal at a time
and may be blocked by radio signals that occur on or near their operating
frequencies, regardless of code settings.
• Changes or modifications to the device may void FCC compliance.
• Infrequently used radio links should be tested regularly to protect against
undetected interference or fault.
• A general knowledge of radio and its vagaries should be gained prior
to acting as a wholesale distributor or dealer, and these facts should be
communicated to the ultimate users.
11
Service Information
For service refer to the information below
Your Monitoring Company:
Installation Warnings
• Be sure and test your system monthly.
• Do not bring any electrical appliances or electrical noise
generating devices (fluorescent lamps, motors, etc.) near
the Console.
• Do not use ammonia, benzene, thinner, or similar solvents,
or abrasive powder to clean the housing of the Console or
Pendant. Clean by wiping with a damp, soft cloth.
• The Console should be kept free of dust and moisture.
• The Console should not be located where direct sunlight
will shine on it.
• Avoid locating the Console in extremely hot or cold
locations.
Copyright © 2008
228306 A