1
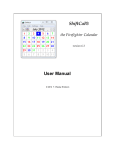
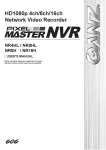
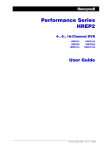
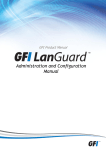
Recording Control
User Manual
Introduction ...........................................................................................................2
Using the Recording Control .................................................................................2
Pre-Recording Stage.........................................................................................3
Recording Stage................................................................................................4
Post-Recording Stage .......................................................................................4
Configuring the Recording Control Package.........................................................5
Recording Profiles .............................................................................................5
Properties ..........................................................................................................5
General Settings ............................................................................................5
Text Definitions ..............................................................................................8
Form Size ....................................................................................................10
Button Definitions.........................................................................................10
Update the Recording Control Package..............................................................10
Introduction
The Recording Control is a wrapper application that can be used in preproduction and production support workflows where it is required to control a
Black Box or Black Box Service working in stand-alone mode.
It provides an interface for the user to select the Recording Profile that should be
applied to the Black Box and control the recording process without using the
Black Box menus.
The Recording Control is customizable and allows AppSight customers to include
their own Recording Profiles in the package and also define the text displayed to
the user.
NOTE:
The Recording Control requires the Microsoft .NET Framework 1.1 (or above) installed. The Framework can
be downloaded from the Microsoft Web site
Using the Recording Control
The Recording Control package includes the Black Box that is required in each
package, so it is not required to send a separate installer to the end-user.
The Black Box package includes the binary files required for the GUI Black Box
and they are executed without installing anything on the end-user computer.
The Black Box Service package includes the installation files for the Black Box
Service, and if the Black Box Service is not available on the computer where the
package is launched, the end-user will be presented with a single installation
dialog to install the Black Box Service before the pre-recording stage. This dialog
will allow the end-user to select the installation folder for the Black Box Service:
The Recording Control process consists of 3 stages:
• Pre-recording – This is the stage where the user is presented with the
different Recording Profiles that can be applied to the Black Box.
Recording Control User Manual
Page 2 of 12
•
•
Recording – In this stage the Black Box is ready to capture the application
failure and the end-user can recreate the failure.
Post-recording – In this stage the problem is captured and the AppSight
log file is ready, so the end-user can submit it to the support team.
Pre-Recording Stage
When the Recording Control is launched, the end-user is presented with the
following dialog:
The end-user at this point should do the following:
1. Select the appropriate Recording Profile from the drop-down list.
2. Click on the Start Recording button.
Once the end-user clicks on the Start Recording button, the following dialog will
be displayed:
At this point the Black Box is launched using the selected Recording Profile.
Once the Black Box is ready, the end-user will be automatically redirected to the
next stage.
Recording Control User Manual
Page 3 of 12
Recording Stage
When the Black Box is ready for recording, the end-user is presented with the
following dialog:
At this point the end-user should recreate the failure on the machine that is
recorded and click on the Stop Recording button once the application failure
occurs.
Post-Recording Stage
When the end-user clicks on the Stop Recording button the following dialog will
be presented:
At this point the end-user is presented with the following options:
• Open folder containing the log file – This will open a Windows Explorer
window in the folder where the log is saved and focus on the file that
contains the application failure recording. This will allow the end-user to
easily submit the captured AppSight log to the support team for analysis.
• Start Recording – This option will take the user back to the pre-recording
stage, in case he needs to capture another application failure.
• Close – Close the Recording Control.
Recording Control User Manual
Page 4 of 12
Configuring the Recording Control Package
The Recording Control contains one configuration file to control all the different
settings and customization of the user interface. The configuration is defined in
the Settings.xml file located in the same folder as the Recording Control
executable.
The configuration file contains two sections:
• RecordingProfiles – This section defines the different Recording Profiles
available for the end-user.
• Properties – This section defines the different texts displayed to the enduser in the Recording Control and the size of the different components in
the dialog.
Note
After making any modification to the settings file, this file should be updated in the self-extractable packages.
Refer to the Update the Recording Control Package section to learn how to update the packages.
Recording Profiles
<RecordingProfile name="Microsoft Word" file="word.rpr" />
The RecordingProfiles section can contain different RecordingProfile
tags. Each contains the following attributes:
•
name – The name of the Recording Profile that will be displayed to the
user. This will typically be the application name or the specific scenario
that the Recording Profile is designed for.
•
file – The file name for the Recording Profile. The Recording Profile file
should be located in the RPR folder and distributed to the end-user as part
of the Recording Control package.
•
default=”true” – This property can be added to one of the entries to
define this as the default Recording Profile that will be used by the Black
Box.
Properties
General Settings
<Property key="BlackBox" value="BBx"/>
This property defines the type of Black Box that the Recording Control will use.
The following options can be defined in the value attribute:
•
BBx – This will configure the Recording Control to use the GUI Black Box.
•
BBxSvc – This will configure the Recording Control to use the Black Box
Service
<Property key="SaveFolder" value="MYDOCUMENTS"/>
Recording Control User Manual
Page 5 of 12
This property defines the folder where the Black Box will save the AppSight log
file. It supports some of the common special folders defined on the computer and
a specific folder. The following options can be defined in the value attribute:
•
DESKTOP – This will save the AppSight log to the user’s desktop.
•
MYDOCUMENTS – This will save the AppSight log to the user’s documents
folder.
• TEMP – This will save the AppSight log to the user defined temporary
folder.
• Defined path – You can define any other path for the AppSight log, such
as C:\, C:\Folder etc.
If a specific path is defined and it doesn’t exist on the end-user machine, the
MYDOCUMENTS will be used.
<Property key="ShowSavedFile" value="true"/>
This property defines if the link to open the folder containing the saved AppSight
log should be displayed or not (true/false)
<Property key="ShowCopyToClipboard" value="true"/>
This property defines if the “copy to clipboard” button should be displayed or not
(true/false). When the user clicks on this button the full path or file name of
the saved AppSight log will be copied to the clipboard (according to the
CopyLogName definition)
<Property key="CopyLogName" value="None"/>
This property defines if the path or file name should be copied to the clipboard
automatically once the AppSight log is saved.
Recording Control User Manual
Page 6 of 12
•
None – Do not copy anything automatically. If this value is set, and
ShowCopyToClipboard is set to true then the file name will be copied
when the user clicks on the “Copy” button.
•
File – Automatically copy to the clipboard the file name (including the
.asl extension) to the clipboard).
•
Full – Automatically copy to the clipboard the full path to the saved
AppSight log.
<Property key="AutoHideRprList" value="false"/>
This property defines if the Recording Profile dropdown should be displayed to
the user or not (true / false). This property can be used if there is only one
Recording Profile to select. If this is set to true and there are multiple Recording
Profiles the dropdown will be shown by default.
Make sure to set the StartRecordingInstructions accordingly if the user
will not be selecting anything from the dropdown list.
<Property key="WarnUser" value="false"/>
This property defines if a warning message should be displayed to the user
before the recording starts. The use must acknowledge the warning message
before the Black Box is launched. The text of the warning message displayed to
the user is defined in RecordingWarning
<Property key="AutoStart" value="false"/>
This property defines if the Black Box should be launched automatically and use
the default Recording Profile instead of waiting for the user to click on the Start
Recording button.
<Property key="StartTimer" value="5"/>
This property defines if the number of seconds to wait until the Black Box is
launched automatically (if AutoStart is set to true).
<Property key="BBxTimeout" value="5"/>
This property defines if the number of seconds to wait until the Recording Control
checks if the Black Box is ready.
<Property key="BBxRetries" value="3"/>
This property defines if the number of times to check if the Black Box is ready.
The interval (in seconds) between the retries is defined in BbxTimeout
<Property key="AppTopMost " value="0"/>
This property defines if the apperance of the Recording Control:
•
0 – Do not keep the Recording Control on top of all other windows.
Recording Control User Manual
Page 7 of 12
•
1 – Keep the Recording Control on top of all other windows until the
recording starts.
•
2 – Keep the Recording Contorl on top while not recording.
•
3 – Keep the Recording Contorl on top while not recording and
automatically minimize when the recording starts.
•
4 – Keep the Recording Control always on top of all other windows.
Text Definitions
<Property key="Title" value="Black Box Recording Control"/>
This property defines the text that is displayed in the title of the Recording
Control.
<Property key="StartRecordingInstructions" value="Select the recording
scenario that best fits your problem and click on the Start Recording
button:"/>
This property defines the instructions displayed in the Recording Control dialog in
the pre-recording stage. These instructions should guide the user to select the
appropriate Recording Profile from the drop-down list and click on the Start
Recording button.
<Property key="RecordingInstructions" value="Please wait while the
Black Box initializes."/>
This property defines the instructions displayed to the end-user when the Black
Box is initializing. These instructions should guide the end-user to wait for the
Black Box to initialize before recreating the application failure.
Recording Control User Manual
Page 8 of 12
<Property key="StopRecordingInstructions" value="Recreate your problem
and click on the Stop Recording after the problem occurs"/>
This property defines the instructions displayed to the end-user when the Black
Box is ready to record the application failure. These instructions should guide the
end-user to recreate the application failure and click on the Stop Button when
the failure occurs.
<Property key="FinishedRecordingInstructions" value="Send us the log
file created. Click the Close button to exit or Start Recording to
capture another problem."/>
This property defines the instructions displayed to the end-user when the
AppSight log is saved and ready for submission to the support team for analysis.
These instructions should guide the user on the method that the log file should
be sent to the support team.
<Property key="AutoStartRecordingInstructions" value="Recording will
begin in a few seconds..."/>
This property defines the instructions displayed to the end-user when the
recording starts automatically (when AutoStart is set to true).
<Property key="RecordingWarning" value="Screenshots of your entire
desktop will be captured in order to better troubleshoot our
Recording Control User Manual
Page 9 of 12
application. If you have any other application running in the
background, please minimize them or close them while recording."/>
This property defines the warning message displayed to the end-user before
launching the Black Box if WarnUser is set to true.
Form Size
<Property key="FormWidth" value="500"/>
This property defines the width of the Recording Control dialog.
<Property key="FormHeight" value="230"/>
This property defines the height of the Recording Control dialog.
Button Definitions
<Property key="BtnActionWidth" value="150"/>
This property defines the width of the Start / Stop Recording button.
<Property key="BtnStartText" value="Start Recording"/>
This property defines the text to display in the Start Recording button.
<Property key="BtnStopText" value="Stop Recording"/>
This property defines the text to display in the Stop Recording button.
<Property key="BtnCloseWidth" value="110"/>
This property defines the width of the Close button.
<Property key="BtnCloseText" value="Close"/>
This property defines the text to display in the Close button.
<Property key="BtnAutoStartText" value="Starting in "/>
This property defines the text to display in the Start Recording button when the
AutoStart property is set to true.
<Property key="BtnAutoStartingText" value="Initializing..."/>
This property defines the text to display in the Start Recording button when the
AutoStart property is set to true and the Black Box is launched.
Update the Recording Control Package
Before sending the Recording Control package to the end-user, you should
modify the configuration file according to your needs, define the Recording
Profiles that will be used and included those Recording Profile files in the
package itself. The definition of Recording Profiles and properties is described in
the Configuration chapter of this manual. This chapter describes how to update
Recording Control User Manual
Page 10 of 12
the Recording Control package with your customized configuration file and
Recording Profiles.
The Recording Control package is a self-extractable compressed file that can be
modified using WinRAR. This chapter will describe how to modify the package
using WinRAR.
1. From the WinRAR console select File Æ Open Archive
2. Select All archives including self-extracting from the Files of Type
drop-down and browse to the location of the appropriate Recording
Control package (BBx.exe for the Black Box or BBxSvc.exe for the Black
Box Service)
3. The WinRAR console will display the contents of the self-extractable
package:
4. Click on the Add button and browse to the modified Settings.xml file that
you would like to add to the package.
5. Make sure that the Add and replace files option is selected from the
Update mode drop-down list and click on the OK button.
Recording Control User Manual
Page 11 of 12
6. Double-click on the RPR folder:
7. Remove the Recording Profiles that are not required by right-clicking on
the file and selecting Delete files. Add the Recording Profiles that were
defined in the settings.xml file in this folder, by clicking on the Add button
and selecting the appropriate RPR files.
8. Close the WinRAR console and test the package before you send it to the
end-user. Double-click on the executable and make sure that all the
Recording Profiles are available and that the configured properties are
correct.
Recording Control User Manual
Page 12 of 12