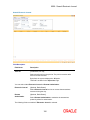
1
Oracle FLEXCUBE Branch Operations User Manual Release 4.5.0.0.0 Part No E52127-01 Branch Operations User Manual Table of Contents (index) 1. Branch Operations .................................................................................................................... 3 1.1. Operational Control and Cash Management Transactions .................................................. 4 1.2. Supervisor ............................................................................................................................ 7 1.2.1. 6001 - Batch Open ........................................................................................................ 7 1.2.2. 6002 - Branch Batch Close ........................................................................................... 4 1.2.3. 6005 - Branch Batch Confirm ....................................................................................... 6 1.2.4. 6009 - Force Close Branch Batch............................................................................... 10 1.2.5. 9888 - Set Initial Cash................................................................................................. 12 1.3. Vault Teller ........................................................................................................................... 3 1.3.1. 9003 - Open Vault Batch .............................................................................................. 3 1.3.2. 9009 - Buy Cash From Central Bank ............................................................................ 7 1.3.3. 9010 - Sell Cash To Central Bank .............................................................................. 11 1.3.4. 9006 - Close Vault Batch ............................................................................................ 15 1.3.5. IV003 - Inventory Inter-Branch Transfer ..................................................................... 21 1.4. Teller .................................................................................................................................. 25 1.4.1. 9001 - Open Teller Batch ............................................................................................ 25 1.4.2. 9007 - Buy Cash From Vault ...................................................................................... 30 1.4.3. 9008 - Sell Cash To Vault ........................................................................................... 34 1.4.4. 6201 - Cash Balancing ............................................................................................... 37 1.4.5. 7551 - Book Shortage ................................................................................................. 40 1.4.6. 7552 - Book Cash Overage ........................................................................................ 44 1.4.7. 9005 - Close Teller Batch ........................................................................................... 47 1.4.8. 6203 - TC Balancing* .................................................................................................. 54 1.4.9. 6202 - Inventory Balancing ......................................................................................... 58 1.4.10. 8007 - Book or Cancel Overage/Shortage ............................................................... 61 1.4.11. 9030- Buy Cash From Teller ..................................................................................... 65 1.4.12. 9013 Buy Inventory From Teller ............................................................................... 68 1.4.13. TIL02 - TIL Linkage Maintenance ............................................................................. 71 2. Other Transactions .................................................................................................................. 77 2.1. 4501 - Centralised Authorisation ........................................................................................ 78 2.2. BA995 - Single Account Transfer ....................................................................................... 83 2.3. BA999 - Bulk Account Transfer .......................................................................................... 86 2.4. 5514 - Change Data Entry Batch User............................................................................... 89 2.5. 5515 - List Batch Status ..................................................................................................... 92 2.6. 9800 - Print Spooled Documents ....................................................................................... 96 2.7. BA123 - Payment Verification Mandate Maintenance* ...................................................... 99 3. Inquiries .................................................................................................................................. 102 3.1. 7012 - Account No Check Digit Inquiry ............................................................................ 103 3.2. 7017 - Batch Status Inquiry .............................................................................................. 106 3.3. BAM95 - Branch Batch Status - Inquiry ........................................................................... 108 3.4. 7041 - Branch Totals Position .......................................................................................... 112 3.5. 7122 - Cross Rate Enquiry ............................................................................................... 116 3.6. 7008 - Last Ten Transactions .......................................................................................... 119 3.7. 7050 - Old To New Account Inquiry ................................................................................. 122 3.8. 6006 - Search Electronic Journal ..................................................................................... 125 3.9. 7040 - Teller Totals Position ............................................................................................ 134 3.10. 7015 - Teller Transactions Summary ............................................................................. 138 3.11. 6010 - View Teller Errors ............................................................................................... 141 4. Report Generation Transactions.......................................................................................... 144 4.1. BAM16 - Report Control Maintenance ............................................................................. 145 4.2. 7775 - Report Request ..................................................................................................... 150 4.3. 7780 - Advice/Report Cancel Request ............................................................................. 153 4.4. 7781 - Report Cancel All Tellers ...................................................................................... 156 Branch Operations User Manual 4.5. 7779 - Report Print All Tellers .......................................................................................... 159 4.6. 7778 - Advice/Report Status Inquiry ................................................................................ 163 Branch Operations 1. Branch Operations Branch operations form the key element of the financial service provider’s infrastructure, with an objective to augment customer service systems and improve internal efficiencies. Branch Operations (BROP) in FLEXCUBE Retail terminology covers internal activities done at branches where the customer is not involved. From the branch management perspective, the BROP module of FLEXCUBE Retail facilitates activities, which include controlling the branch vault, opening and closing the branch for the day, and monitoring the transactions done during the day teller-wise and generation of adhoc reports. FLEXCUBE Retail can work in the offline mode also. When the branch to the local office/ head office central data center link is down, the teller terminals are said to be off-line. In this mode, teller transactions may still be performed and stored at the branch. Later, when the link is up, the stored transactions may be automatically forwarded to the local office. For all the cash transactions, the system will ask for denomination details only when denomination tracking is enabled. Key Features FLEXCUBE Retail Banking Solution offers features in the BROP module that allows bank branches to perform internal activities. Branch Batch activities that involve opening and closing of the branch Cash Management transactions that include managing the teller and vault cash Authorisation control of teller transactions during the day Transactions can be customized to be executed "OFF-LINE" Inquiries pertaining to teller transactions and transaction batches Report-generation transactions, which include customer advices and statements as well as internal branch reports 3 Branch Operations Terminologies The following terminologies are used in the BROP module: Batch A batch is a bunch of transactions performed at a time as an activity by respective users at different levels in a bank. Certain parameters can be configured to define a batch for users at different levels such as, branch batch, vault batch and teller batch. Each user can perform the batch depending on the rights given to the user, and the kind of transactions she/he is going to perform. Branch Batch A branch batch is the process by which a supervisor initiates a branch open. The supervisor is allowed to open the branch for running the business for a particular posting date, and close the branch batch when all the transactions have been successfully processed to a logical end. The vault teller batch followed by the individual teller batch can start the activities, only after the branch batch is opened. The branch batch can be closed only if the individual teller batch followed by Vault teller batch is closed. The branch batch can be closed only once, for a particular posting date. Vault Batch A vault batch is a set of transactions performed by the vault teller or chief cashier during a posting date. All transactions such as buying cash from the Central Bank and the cashier of the bank, or selling cash to the Central Bank and the teller, and settling the cash with the Central Bank and the cashier are performed during the posting date before closing the vault batch. Teller Batch A teller batch is a set of transactions performed by an individual teller or the cashier. All transactions performed during a posting date should be closed only once. Split Day Processing If a branch batch could not be closed for a posting date due to an emergency, the system facilities the branch to open a branch batch for the next posting date to process the transaction. Thus, a branch can process the transactions for multiple days. Database Database in FLEXCUBE Retail, refers to organized data, stored on a server that can be searched and retrieved by a computer program. The database located at the Central office is known as Host database, and the database located at the branch level is known as Branch database. 4 6001 - Batch OpenOperational Control and Cash Management Transactions 1.1. Operational Control and Cash Management Transactions To mitigate or limit operational risks, the bank management implements a number of specific measures within the branch. This includes taking care of the sequence of activities performed by a branch for every posting date on FLEXCUBE Retail. The operational controls to initiate branch operations require clearly defined procedures establishing a control environment, which provides authorisation and authentication of transactions. FLEXCUBE Retail maintains cash balances both currency-wise and teller-wise. Every committed cash transaction taken to its logical end affects the previously mentioned cash balance. Hence, at any given point of time, the physical cash present with a teller has to match with that in the system. In addition, each of the above cash transactions passes GL entries to the cash GL thus affecting the cash GL balances. Thus the consolidated total of all the teller cash balances, together with the vault teller cash balance, has to match with the balance in the cash GL for that branch. In a cash balancing exercise for each teller, the system displays the system cash balance with that specific teller and requests for a match with the physical cash held by the teller. In case of a mismatch in the above exercise, the teller has to book an Overage or Shortage depending on the mismatch, and proceed with the cash balancing exercise. The functions could be broadly classified into: Supervisor Functions 4 6001 - Batch OpenOperational Control and Cash Management Transactions Vault Teller Functions 5 6001 - Batch OpenOperational Control and Cash Management Transactions Teller Functions Ideally, in a bank, a supervisor opens the branch batch and then the vault teller performs cash activities. The tellers then open their respective batches and buy cash from the vault teller. At the end of the processing day after all the transactions are completed, the tellers sell cash to the vault teller, if required, and then close their respective batches. After which the vault teller closes the vault batch and then the supervisor closes the branch batch for that day. 6 6001 - Batch OpenSupervisor 1.2. Supervisor 1.2.1. 6001 - Batch Open Using this option the branch operations can be initiated for a specified date. This option can be executed from any workstation by any supervisor with access rights. The tellers will not be able to perform any branch operations till the branch batch is opened by the supervisor. The system allows the branch to be active for a maximum of two consecutive posting dates at a time by specifying the current and the next posting dates. Although a branch batch can be opened for two consecutive days teller batches can be opened only for one posting date at any given time. The teller batch can be opened for the next posting date, only when it has been closed for the current posting date or it has not been opened for the current posting date. The teller batches cannot be opened for a posting date till the branch batch is opened for that date. When a branch batch is closed for a day by the supervisor the next working day is determined automatically by the system based on the branch calendar present in the branches. Definition Prerequisites BA090 - Bank Calendar Maintenance Modes Available Not Applicable To open a branch batch 1. Type the fast path 6001 and click Go or navigate through the menus to Transaction Processing > Internal Transactions > Batch > Batch Open. 2. The system displays the Batch Open screen. 7 6001 - Batch OpenSupervisor Batch Open Field Description Field Name Description Posting Date [Mandatory, dd/mm/yyyy] Type the posting date to open a new branch batch. By default the system displays the current date. In case of a split day processing, the system displays the current posting date. Change this date to a new posting date if the user wants to open a new branch for the next posting date. Opening of the branch batch for a particular date indicates to the head office that the branch is open for business operations for the selected date. 3. Click the Ok button. 8 6002 - Branch Batch CloseSupervisor 1.2.2. 6002 - Branch Batch Close Using this option, the branch batch has to be closed after confirming that all branch transactions have been accounted for in the account books, through the Confirming Branch Batch (Fast Path: 6005) option. The branch batch can be closed to stop the operations for a specified date using the Branch Batch Close option. All the teller batches and the vault batches of that branch have to be closed before closing the branch batch for that posting date. In case of split days, where the branch batch is opened for two consecutive posting dates, the branch batch should be closed in the ascending order, i.e. the branch batch with the previous posting date should be closed first followed by the branch batch with the later posting date. The posting date for closing a branch batch should be the same date on which the respective branch batch was opened. Definition Prerequisites 9005 - Close Teller Batch 9006 - Close Vault Batch Modes Available Not Applicable To close a branch batch 1. Type the fast path 6002 and click Go or navigate through the menus to Transaction Processing > Internal Transactions > Batch > Branch Batch Close. 2. The system displays the Branch Batch Close screen. Branch Batch Close 4 6002 - Branch Batch CloseSupervisor Field Description Field Name Description Posting Date [Mandatory, dd/mm/yyyy] Type the posting date to close an open branch batch. By default, the system displays the date for which the branch batch is open. Closing of the branch batch for a particular date indicates to the head office that the branch is now closed for business operations for the selected date. This date should be the same date for which the branch batch is opened. 3. Click the Ok button. 5 6005 - Branch Batch ConfirmSupervisor 1.2.3. 6005 - Branch Batch Confirm Transactions done at the branch are posted through the branch database. These posted transactions are picked up by services running on the FLEXCUBE Retail Application Server and are finally posted in the host database. This synchronization ensures that ideally, all transactions performed at the branch and posted through the branch database are also present in the host database. However in some situations, all transactions posted in the branch database do not get posted in the host database. This happens when the link between the branch database and the host database goes down or when the requisite services fail to pick up such branch transactions. There can also be a possibility that the transaction posted through the branch database has hit the host database but the transaction has not been completed due to a drop in the link between host and branch databases. In this case, the number of transactions posted at host will be more than the number of transactions posted in the branch. Such cases give rise to a mismatch between the branch and the host in terms of the count and value of transactions. Branch batch confirmation is a system check to tally the number and amount of transactions processed at the branch with the number and amount of transactions posted to the host database. The details which are used for comparison include the total number of transactions, total amounts of credits and debits, the number of transfer transactions and the number of reversal of transfer transactions, credit reversals and debit reversals during the day. This supervisor option can be run from any workstation by any supervisor with access rights. This is essential to ensure that all transactions taken place at the branch have been accounted in the bank books. This is an inquiry option and can be run from any workstation, any time, any number of times and by any supervisor having access rights. Definition Prerequisites 6001 - Batch Open Modes Available Not Applicable To confirm a branch batch 1. Type the fast path 6005 and click Go or navigate through the menus to Transaction Processing > Internal Transactions > Batch > Branch Batch Confirm. 2. The system displays the Branch Batch Confirm screen. Branch Batch Confirm 6 6005 - Branch Batch ConfirmSupervisor Field Description Field Name Description Posting Date [Mandatory, dd/mm/yyyy] Type the posting date to tally the transactions that have been posted on that date. The system, by default, displays the corresponding branch batch date, which has been opened or re-opened. The Branch Batch Confirmation is a system check to tally the count and value of transactions that have been posted, both in the branch and the host databases. This is essential to ensure that all the transactions that have taken place at the branch have been accounted for in the books of account. 7 6005 - Branch Batch ConfirmSupervisor Field Name Description Branch Totals [Display] This column displays the details of the transactions that were carried out by all the bank tellers at the branch level. The details include the number of transactions, the total credits and debits amount, the number of transfer transactions, the number of transfer transaction reversals and the number of credit reversals and debit reversals at the end of the current posting date. Host Totals [Display] This column displays the details of the transactions that were carried out at the branch level and were successfully posted to the host database. The details include the number of transactions, the total credits and debits amount, the number of transfer transactions, the number of transfer transaction reversals and the number of credit reversals and debit reversals at the end of the current posting date. 3. Click the Ok button. 4. The system displays the details of the branch batch confirmation. 8 6005 - Branch Batch ConfirmSupervisor Branch Batch Confirm 5. If there is any outstanding transaction pending then the system displays a message "Some instrument are outstanding for Inward Clearing run". The branch batch confirmation will not proceed unless the transaction is completed. 6. Click the Close button. 9 6009 - Force Close Branch BatchSupervisor 1.2.4. 6009 - Force Close Branch Batch Using this option you can close the branch batch by the branch manager/ supervisor and stop the operations for a specified date, if the normal Branch Batch Close (Fast Path: 6002) option fails. Once the branch batch is closed, it cannot be reopened for the same date. Prior to closing the branch batch, the branch manager or the authorized supervisor has to ensure that all teller batches and vault batches have been closed, and the mismatch displayed in the Branch Batch Confirm (Fast Path: 6005) option has been noted down for further investigation. This is the last option that can be performed for a posting date. However, you can generate reports after running this option. Definition Prerequisites 6001 - Batch Open 6005 - Branch Batch Confirm 9005 - Close Teller Batch 9006 - Close Vault Batch Modes Available Not Applicable To close the branch batch forcefully 1. Type the fast path 6009 and click Go or navigate through the menus to Transaction Processing > Internal Transactions > Batch > Force Close Branch Batch. 2. The system displays the Force Close Branch Batch screen. 10 6009 - Force Close Branch BatchSupervisor Force Close Branch Batch Field Description Field Name Description Posting Date [Mandatory, dd/mm/yyyy] Type the posting date to force close the branch batch for that particular date. By default, the system displays the date for which the branch batch is open. Closing of the branch batch for a particular date indicates to the head office that the branch is now closed for business operations for the selected date. This date should be the same date for which the branch batch is opened. 3. Click the OK button. 11 9888 - Set Initial CashSupervisor 1.2.5. 9888 - Set Initial Cash Using this option, the supervisor can set the cash position of each teller at the time of initial implementation of the Oracle FLEXCUBE branch or at the time of the branch database setup after a branch database crash. This has to be done for all the currencies for which the teller will carry out the transactions. Definition Prerequisites BAM25 - Currency Definition Teller IDs to be created. Modes Available Not Applicable To set initial cash 1. Type the fast path 9888 and click Go or navigate through the menus to Transaction Processing > Internal Transactions > Cash > Set Initial Cash. 2. The system displays the Set Initial Cash screen. Set Initial Cash 12 9888 - Set Initial CashSupervisor Field Description Field Name Description Teller Id [Mandatory, Drop-Down] Select the user identification of the teller for whom the initial cash has to be set from the drop-down list. Txn Ccy [Mandatory, Drop-Down] Select the currency in which the initial cash has to be set from the drop-down list. Amount [Mandatory, Numeric, 13, Two] Type the amount which has to be set as initial cash for the teller. 3. Select the currency from the drop-down list. 4. Enter the initial amount. Set Initial Cash 5. Click the Ok button. 13 9003 - Open Vault Batch 1.3. Vault Teller 1.3.1. 9003 - Open Vault Batch Using this option the vault teller can open a vault batch for a specified date. The vault teller is the main cashier of a branch and can be opened from any workstation. For any given posting date only one vault batch can be opened. To open another vault batch, the first one should be closed. All the tellers buy additional cash or inventory and sell their excess cash or inventory to this teller. The cash/inventory balancing is automatically initiated and the balances are displayed on the screen for confirmation. The system will default the cash balances on opening a vault batch. Definition Prerequisites 6001 - Batch Open BAM97 - Currency Codes Cross Reference Modes Available Not Applicable To open a vault batch 1. Type the fast path 9003 and click Go or navigate through the menus to Transaction Processing > Open Vault Batch. 2. The system displays the Open Vault Batch screen. 3 9003 - Open Vault Batch Open Vault Batch Field Description Field Name Description Batch Date [Mandatory, Pick List, dd/mm/yyyy] Select the posting date, to open the vault batch on that date, from the pick list. By default, the system displays the current posting date. Opening of the vault batch for a particular date indicates that all transactions performed by the vault will be stamped with the selected date. This date should be the same date for which the branch batch is opened. 3. Click the Ok button. The system displays the batch opening cash/inventory position for the vault batch. 4 9003 - Open Vault Batch Cash Field Description Column Name Description Currency [Display] This column displays the currencies in which the bank deals. Total Cash [Display] Cash Available [Display] This column displays the total cash for a particular currency, physically present in the bank vault, at the beginning of the current posting date. This field displays the cash for a particular currency, which is available in the vault at the beginning of the current posting date, as calculated by the system. The amount displayed in this column depends on the cash transactions that were carried out by the vault till the last posting date. 4. Click the Inventory tab to view the inventory position at the beginning of the day. 5 9003 - Open Vault Batch Inventory Field Description Column Name Description Stock Code [Display] This column displays the inventory code. Description [Display] This column displays a short description for the inventory. Denomination [Display] This column displays the denomination of the inventory. Face Value [Display] This column displays the value of the stock. Face Value = Quantity * denomination. Available Quantity [Display] This column displays the quantity of stock available with the vault teller at the beginning of the current posting date. 5. Click the OK button. 6 9009 - Buy Cash From Central Bank 1.3.2. 9009 - Buy Cash From Central Bank The vault teller is the main cashier of a branch. All the tellers will buy additional cash or TC's and will sell their excess cash or TC's to this teller. The vault teller can open a vault batch for a specified date using the Open Vault Batch (Fast Path: 9003) option. Using this option, after opening the vault batch, the vault teller can get cash from the Central Bank and deposit it into the vault. Once the cash is bought from the Central Bank, the system updates the cash position. This transaction is performed by a vault teller. Definition Prerequisites 9003 - Open Vault Batch BAM97 - Currency Codes Cross Reference Denomination details should be maintained in case denomination-tracking facility is being used. Modes Available Not Applicable To buy cash from central bank 1. Type the fast path 9009 and click Go or navigate through the menus to Transaction Processing > GLTransactions > Cash > Buy Cash From Central Bank. 2. The system displays the Buy Cash From Central Bank screen. 7 9009 - Buy Cash From Central Bank Buy Cash From Central Bank Field Description Field Name Description Currency [Mandatory, Drop-Down] Select the currency in which the vault teller wants to buy cash, from the Central Bank, from the drop-down list. For example, the vault teller can buy USD from the Central Bank. Ccy Rate [Display] This field displays the exchange rate, at which the currency will be purchased from the Central Bank. The currency rate is derived for the option selected in the Currency field. This field displays the effective exchange rate of the selected currency against the local currency of the bank. If the selected currency is the local currency of the bank, the value in this field is defaulted as 1. The rates are defined in the currency table and can be changed by the teller within the variance set at the template level. 8 9009 - Buy Cash From Central Bank Field Name Description Amount [Mandatory, Numeric, 13, Two] Type the amount that the vault teller wants to purchase from the central bank. Cheque No [Optional, Numeric, 12] Type the cheque number against which the cash will be given to the branch by the Central Bank. Narrative [Mandatory, Alphanumeric, 40] Type the narration of the transaction. The system displays the default narration "Buy Cash From Central Bank". The vault teller can change the narration, if required. CIT Vault Code [Optional, Pick List] Select the CIT vault code from the pick list. The system displays the CIT vault codes maintained in the CIT Vault Codes Maintenance (Fast Path:CIT01 ) option in the pick list. CIT Vault Name [Display] This field displays the CIT vault name corresponding to the option selected in the adjacent field. 3. Select the currency from the drop-down list. 4. Enter the amount. 9 9009 - Buy Cash From Central Bank Buy Cash From Central Bank 5. Click the Ok button. 6. The system displays the message "Authorisation required. Do you want to continue". Click the OK button. 7. The system displays the Authorization Reason screen. 8. Enter the relevant information and click the Grant button. 9. The system displays the transaction sequence number. The transaction number is system generated that uniquely identifies each transaction performed by a teller and can be used for tracking the transaction. Click the Ok button. 10. The system displays the Document Receipt screen. 11. If you want to print the receipt, select the record that needs to be printed. The system displays the message "Do You Want To Print". Click the Ok button. OR Click the Cancel button. 12. Click the Close button. Note: For more information on Authorisation transactions, refer to the FLEXCUBE Introduction User Manual. 10 9010 - Sell Cash To Central Bank 1.3.3. 9010 - Sell Cash To Central Bank Using this option the vault teller can sell cash to the Central Bank from the vault after all the tellers have sold the additional cash to the vault teller. The vault teller cannot close the batch if some excess cash remains at the end of the day. The amount of cash to be sold by the vault teller cannot exceed the amount of cash held by the vault teller at that point of time. This transaction could be performed even if the vault teller has less cash than the assigned limit. After the cash is sold to the Central Bank, the system updates the cash position of the vault teller. If the system maintained cash position is less than the input amount to be sold to the Central Bank, the system displays an error message in which case the transaction should be retried with the correct amount. Definition Prerequisites 9003 - Open Vault Batch Denomination details should be maintained in case denomination tracking facility is being used. Modes Available Not Applicable To sell cash to central bank 1. Type the fast path 9010 and click Go or navigate through the menus to Transaction Processing > GL Transactions > Cash > Sell Cash To Central Bank. 2. The system displays the Sell Cash To Central Bank screen. 11 9010 - Sell Cash To Central Bank Sell Cash To Central Bank Field Description Field Name Description Currency [Mandatory, Drop-Down] Select the appropriate type of currency that the vault teller wants to sell, to the Central Bank, from the drop-down list. For example, the vault teller can sell USD from Central Bank. Ccy Rate [Display] This field displays the exchange rate at which the currency will be sold to the Central Bank. The currency rate is derived for the option selected in the Currency field. This field displays the exchange rates of the selected currency against the local currency of the bank. If the selected currency is the local currency of the bank, the value in this field is defaulted as 1. The rates are defined in the currency table and can be changed by the teller within the variance set, at the template level. 12 9010 - Sell Cash To Central Bank Field Name Description Amount [Mandatory, Numeric, 13, Two] Type the amount that the vault teller wants to sell to the Central Bank. Narrative [Mandatory, Alphanumeric, 40] Type the narration of the transaction. The system displays the default narration "Sell Cash From Central Bank". The vault teller can change the narration, if required. CIT Vault Code [Optional, Pick List] Select the CIT vault code from the pick list. The system displays the CIT vault codes maintained in the CIT Vault Codes Maintenance (Fast Path: CIT01) option in the pick list. CIT Vault Name [Display] This field displays the CIT vault name corresponding to the option selected in the adjacent field. 3. Select the currency from the drop-down list. 4. Enter the amount. 13 9010 - Sell Cash To Central Bank Sell Cash To Central Bank 5. Click the Ok button. 6. The system displays the message "Authorisation required. Do you want to continue". Click the Ok button. 7. The system displays the Authorization Reason screen. 8. Enter the relevant information and click the Grant button. 9. The system displays the transaction sequence number. The transaction number is system generated that uniquely identifies each transaction performed by a teller and can be used for tracking the transaction. Click the Ok button. 10. The system displays the Document Receipt screen. 11. If you want to print the receipt, select the record that needs to be printed. The system displays the message "Do You Want To Print". Click the Ok button. OR Click the Cancel button. 12. Click the Close button. Note: For more information on Authorisation transactions, refer to the Oracle FLEXCUBE Introduction User Manual. 14 9006 - Close Vault Batch 1.3.4. 9006 - Close Vault Batch Using this option the vault batch can be closed for a specified date The vault teller can log in and close the vault batch from any workstation. The system will allow the vault teller to close a vault batch only if all teller batches are closed. Cash balancing is done automatically and cash balances are displayed on the screen for confirmation. There is also a limit, different from the teller cash limit, on the cash that can be held by the vault teller. If the cash held by the vault teller exceeds the specified limit at the end of the day, the excess cash should be sold to the Central Bank. The vault teller can close the batch only after all the tellers of the branch have sold their excess cash to the vault and have closed their respective teller batches. If there is a difference in the actual total cash/inventory with the vault teller and the cash/inventory available as shown by the system, the vault teller will have to book overage/shortage for the difference before closing the vault batch, till the differences are closed out. Definition Prerequisites 9003 - Open Vault Batch All the teller batches have to be closed. Modes Available Not Applicable To close a vault batch 1. Type the fast path 9006 and click Go or navigate through the menus to Transaction Processing > Internal Transactions > Batch > Close Vault Batch. 2. The system displays the Close Vault Batch screen. 15 9006 - Close Vault Batch Close Vault Batch Field Description Field Name Description Posting Date [Mandatory, Pick List, dd/mm/yyyy] Select the posting date, to close the vault batch, from the pick list. By default, the system displays the current posting date. Closing of the vault teller batch for a particular date indicates that the vault teller has completed the transactions and the balancing of cash for the selected date. This date should be the same date for which the vault batch is opened. 3. Click the Ok button. The system displays the batch closing cash position for the vault batch. 16 9006 - Close Vault Batch Cash Field Description Column Name Description Currency [Display] This column displays the currencies in which the bank deals. Total Cash [Mandatory, Numeric, 13, Two] Type the total cash for a particular currency, physically present in the bank vault, at the beginning of the current posting date. Cash Available [Display] This column displays the cash for a particular currency, which is available in the vault at the closing of the current posting date, as calculated by the system. 17 9006 - Close Vault Batch Column Name Description Overage/Shortage [Display] This column displays the difference in the amount between the total cash and the available cash with the vault teller, at the end of the current posting date. Based on this difference the overage or the shortage amount is displayed. An overage indicates that the physical cash with the vault teller is more than the available cash as calculated by the system. A shortage indicates that the available cash calculated by the system, is more than the physical cash present with the vault teller. 4. Enter the total cash. 5. Click the Inventory tab to view the inventory position. 18 9006 - Close Vault Batch Inventory Field Description Column Name Description Stock Code [Display] This column displays the inventory code. Description [Display] This column displays a short description for the inventory. Denomination [Display] This column displays the denomination of the inventory available with the vault teller at the end of the current posting date. Total Quantity [Mandatory, Numeric, 10] Type the quantity of physical stock available with the vault teller. This value should match with the count displayed in the Available Quantity column. If there is a mismatch, the vault teller cannot close the batch. 19 9006 - Close Vault Batch Column Name Description Face Value [Display] This column displays the value of the stock. Face Value = Quantity * denomination. Available Quantity [Display] This column displays the quantity of stock available with the vault teller as calculated by the system. Overage/Shortage [Display] This column displays the quantity of stock that is booked as overage or shortage. Booked Overage [Display] This column displays the quantity of stock which is booked as overage on the previous day in the system. Booked Shortage [Display] This column displays the quantity of stock which is booked as shortage on the previous day in the system. 6. Enter the total quantity available with vault teller. 7. Click the OK button. Note: The system will not allow the vault batch to be opened in case the physical cash/inventory entered is not the same as the system cash/inventory. 20 IV003 - Inventory Inter-Branch Transfer 1.3.5. IV003 - Inventory Inter-Branch Transfer Using this option you can transfer inventory across branch vaults and from HO to branch vault and vice versa. When stocks are transferred, confirmation of physical receipt of stock is required, till that time, stocks are considered as in transit. This transfer is initiated by vault teller. Definition Prerequisites BAM03 - Branch Master Maintenance IVM01 - Stock Codes Modes Available Not Applicable To transfer inventory across branches 1. Type the fast path IV003 and click Go or navigate through the menus to Transaction Processing > Internal Transactions > Inventory > Inventory Inter-Branch Transfer. 2. The system displays the Inventory Inter-Branch Transfer screen. 21 IV003 - Inventory Inter-Branch Transfer Inventory Inter-Branch Transfer Field Description Field Name Description Transfer Type [Mandatory, Radio Button] Click the appropriate transfer type option. The options are: Stock Code Send Receive Return [Mandatory, Pick List] Select the stock code from the pick list. From Branch [Conditional, Drop-Down] Select the branch from the drop-down list. This field is enabled if Receive option is selected in the Transfer Type section. Denomination [Mandatory, Pick List] Select the inventory denomination from the pick list. 22 IV003 - Inventory Inter-Branch Transfer Field Name Description To Branch [Conditional, Drop-Down] Select the branch from the drop-down list. This field is disabled if Receive option is selected in the Transfer Type section. Quantity [Mandatory, Numeric, 10] Type the quantity of the inventory to be transferred. Series Number [Mandatory, Numeric, 12] Type the series number of the inventory to be transferred. Start Number [Mandatory, Numeric, 10] Type the valid start number of the inventory. End Number [Display] This field displays the end number of the inventory. Total Value [Mandatory, Numeric, 10] Type the total value of the inventory. Total Value = Denomination value * quantity of stock. Adjustment Reason [Optional, Alphanumeric, 40] Type the adjustment reason. 3. Select the transfer type and stock code. 4. Select the branch code from the drop-down list. 5. Select the denomination from the pick list. 6. Enter the quantity, series number, start number and total value. 7. Enter the appropriate information in the relevant field. 23 IV003 - Inventory Inter-Branch Transfer Inventory Inter-Branch Transfer 8. Click the Start Session button. 9. Click the Ok button. 10. The system displays the message "Authorisation Required. Do You Want to continue". Click the Ok button. 11. The system displays the Authorization Reason screen. 12. Enter the relevant information and click the Grant button. 13. The system displays the message "Transaction completed successfully". Click the OK button. 24 9001 - Open Teller Batch 1.4. Teller 1.4.1. 9001 - Open Teller Batch Using this option the teller batch can be opened on a specified date. A teller can initiate the teller batch with the current cash and inventory position that has been retained from the previous day or start with zero cash or inventory and subsequently buy stock from the vault. The system will default the cash balances on opening a teller batch. Definition Prerequisites 6001 - Batch Open 9019 - Transfer Stocks Modes Available Not Applicable To open a teller batch 1. Type the fast path 9001 and click Go or navigate through the menus to Transaction Processing > Open Teller Batch. 2. The system displays the Open Teller Batch screen. Open Teller Batch 25 9001 - Open Teller Batch Field Description Field Name Description Posting Date [Mandatory, Pick List, dd/mm/yyyy] Select the posting date, to open the teller batch for that day, from the pick list. By default, the system displays the current posting date. Opening of the teller batch for a particular date indicates to the system that all transactions performed by the teller will be stamped with the selected date. This date should be the same date for which the branch batch is opened. TIL ID and Name [Mandatory, Pick list] Select the TIL Id and name from the drop-down list. The value in the pick list are TIL Id and name as maintained in TIL ID Maintenance screen. If a teller id is already linked to a TIL ID, the TIL ID will be defaulted in text box, else it will be blank and teller can select the TIL to be linked to his/ her ID. The TIL ID's maintained in the branch to which the teller belongs will only be displayed. The TIL ID's which are in available state can only be linked. 3. Select the TIL Id and name from the drop-down list. 4. Click the OK button. 5. The system displays the batch opening cash position for the teller. 26 9001 - Open Teller Batch Cash Field Description Column Name Description Currency [Display] This column displays the currencies in which the bank deals. Total Cash [Display] This column displays the total cash for a particular currency, physically present with the teller, at the beginning of the current posting date. Cash Available [Display] This column displays the cash for a particular currency, which is available with the teller at the beginning of the current posting date, as calculated by the system. The amount displayed in this column depends on the transactions carried out by the teller till the last posting date. 5. Click the Inventory tab to view the batch opening inventory position for the teller. 27 9001 - Open Teller Batch Inventory Field Description Column Name Description Stock Code [Display] This field displays the inventory code. Description [Display] This column displays a short description for the inventory. Denomination [Display] This column displays the denomination of the inventory available with the teller at the beginning of the current posting date. Face Value [Display] This column displays the value of the stock. Face Value = Quantity * denomination. Available Quantity [Display] This column displays the quantity of stock available with the teller at the beginning of the current posting date. 28 9001 - Open Teller Batch Column Name Description [Mandatory, Drop Down] TIL ID and Name 6. Select the TIL Id and name from the drop-down list. The value in the drop-down are TIL Id and name as maintained in TIL ID Maintenance screen. If a teller id is already linked to a TIL ID, the TIL ID will be defaulted in text box, else it will be blank and teller can select the TIL to be linked to his/ her ID. The TIL ID's maintained in the branch to which the teller belongs will only be displayed. The TIL ID's which are in available state can only be linked. Click the OK button. 29 9007 - Buy Cash From Vault 1.4.2. 9007 - Buy Cash From Vault Using this option you can get cash from the vault. After completing this transaction, the system updates the cash position of the vault teller and the teller. If the vault teller's cash position is less than the total cash requested by the teller, the system displays an error message and the teller should perform this transaction after the vault has been replenished. The teller can buy any amount up to the amount available with vault. If the amount exceeds the maximum limit that the teller is allowed to retain with him/her, the system will prompt the teller to sell the excess cash to the vault using Sell Cash to Vault (Fast Path: 9008) option. Definition Prerequisites 9003 - Open Vault Batch Denomination details should be maintained in case denomination tracking facility is being used. Modes Available Not Applicable To buy cash from vault 1. Type the fast path 9007 and click Go or navigate through the menus to Transaction Processing > Internal Transactions > Cash > Buy Cash From Vault. 2. The system displays the Buy Cash From Vault screen. 30 9007 - Buy Cash From Vault Buy Cash From Vault Field Description Field Name Description Currency [Mandatory, Drop-Down] Select the currency in which the teller wants to buy cash from the vault from the drop-down list. The drop-down list displays only those currencies in which the teller can deal. Total Required Cash [Mandatory, Numeric, 13, Two] Type the amount that the teller needs to buy from the vault teller. The teller position will get updated as soon as the transaction is completed. If the amount exceeds the maximum limit that the teller is allowed to retain with him/her, the system prompts the teller to sell the excess cash to the vault using Sell Cash to Vault (Fast Path: 9008) option. This can be done either immediately or before the teller batch is closed for the posting date. 31 9007 - Buy Cash From Vault Field Name Description Narrative [Optional, Alphanumeric, 40] Type the narration for the transaction. The system displays the default narration "Buy Cash From Vault". The teller can change the narration, if required. 3. Select the currency from the drop-down list. 4. Enter the total required cash. 32 9007 - Buy Cash From Vault Buy Cash From Vault 5. Click the Ok button. 6. The system displays the transaction sequence number. The transaction number is system generated that uniquely identifies each transaction performed by a teller and can be used for tracking the transaction. Click the OK button. 7. The system displays the Document Receipt screen. 8. If you want to print the receipt, select the record that needs to be printed. The system displays the message "Do You Want To Print". Click the Ok button. OR Click the Cancel button. 9. Click the Close button. 33 9008 - Sell Cash To Vault 1.4.3. 9008 - Sell Cash To Vault Using this option you can sell cash at any point of time during the day, if the cash held exceeds the limit set at the template level for any currency. The system will prompt you with regard the cash limit has exceeded and request the teller to sell the additional cash to the vault. You can perform this activity any time during the day or before closing the batch for the posting date. This transaction can be performed even if you have less cash than the assigned limit. The cash position is updated after this transaction is completed. Definition Prerequisites 9001 - Open Teller Batch 9003 - Open Vault Batch Modes Available Not Applicable To sell cash from vault 1. Type the fast path 9008 and click Go or navigate through the menus to Transaction Processing > Internal Transactions > Cash > Sell Cash To Vault. 2. The system displays the Sell Cash To Vault screen. Sell Cash To Vault 34 9008 - Sell Cash To Vault Field Description Field Name Description Currency [Mandatory, Drop-Down] Select the currency in which the teller wants to sell cash to the vault from the drop-down list. The drop-down list displays only those currencies in which the teller can deal. Total Cash to be Sold [Mandatory, Numeric, 13, Two] Type the amount that the teller needs to sell to the vault. The teller position gets updated as soon as the transaction is complete. If the amount exceeds the maximum limit that the teller is allowed to retain with him/her, the system prompts the teller to sell the excess cash to the vault. This can be done immediately or before the teller batch is closed for the posting date. Narrative [Mandatory, Alphanumeric, 40] Type the narration for the transaction. The system displays the default narration "Sell Cash To Vault". The teller can change the narration, if required. 3. Select the currency from the drop-down list. 4. Type the total cash to be sold. 35 9008 - Sell Cash To Vault Sell Cash To Vault 5. Click the Ok button. 6. The system displays the transaction sequence number. The transaction number is system generated that uniquely identifies each transaction performed by a teller and can be used for tracking the transaction. Click the OK button. 7. The system displays the Document Receipt screen. 8. If you want to print the receipt, select the record that needs to be printed. The system displays the message "Do You Want To Print". Click the Ok button. OR Click the Cancel button. 9. Click the Close button. 36 6201 - Cash Balancing 1.4.4. 6201 - Cash Balancing Using this option you can check if the physical cash held by a teller / vault teller matches with the system cash for that teller as per Oracle FLEXCUBE. This can be verified anytime during the day or before closing the teller batch. This option displays approved currencies in which the teller / vault teller can perform transactions. The total amount for a particular currency available in the cash drawer / vault should be entered to check the overage/shortage of cash amount maintained in the system. In case of an overage/shortage for a particular currency, the teller should perform the transaction in the Book Cash Overage (Fast Path: 7552) option or Book Shortage (Fast Path: 7551) option and then perform the cash balancing transaction again. Definition Prerequisites 9003 - Open Vault Batch 9001 - Open Teller Batch Modes Available Not Applicable To view cash balance 1. Type the fast path 6201 and click Go or navigate through the menus to Transaction Processing > Internal Transactions > Batch > Cash Balancing. 2. The system displays the Cash Balancing screen. 37 6201 - Cash Balancing Cash Balancing Field Description Column Name Description Currency [Display] This column displays the currency codes in which the teller / vault teller can perform transactions. Total Counted Cash [Mandatory, Numeric, 13, Two] Cash Available [Display] Type the total cash for the particular currency, which is physically present with the teller on the current posting date. This column displays the cash available with the teller, as calculated by the system, on the current posting date. 38 6201 - Cash Balancing Column Name Description Overage/Shortage [Display] This column displays the difference in the amount between the total counted cash and the available cash with the teller. Based on this difference, either the overage or shortage amount is displayed. 3. Overage: If the physical cash held by the teller in a particular currency exceeds the amount of cash in that currency for the teller as shown by the system, the excess amount of that currency is known as overage. The overage amount is displayed with a '\' sign. Shortage: If the physical cash held by the teller in a particular currency is less than the amount of cash in that currency for the teller as shown by the system, the shortage amount of that currency is known as shortage. The shortage amount is displayed with a '-' sign. Enter the total counted cash for the respective currencies. Cash Balancing 4. Click the OK button. 5. If there is an overage/shortage the system will display the cash not balanced message. 6. Click the Close button. 39 7551 - Book Shortage 1.4.5. 7551 - Book Shortage Using this option the teller / vault teller can book the shortage, if the actual/physical cash present with the teller / vault teller is less than the system cash. While booking a shortage, the system lowers the cash balance and brings it in sync with the physical cash balance with the teller by passing the difference to a cash shortage GL. Once the system cash and the physical cash are synchronized, the teller has to perform the cash balancing. Definition Prerequisites 9001 - Open Teller Batch 9003 - Open Vault Batch BAM56 - Currency Code Maintenance Modes Available Not Applicable To book a shortage 1. Type the fast path 7551 and click Go or navigate through the menus to Transaction Processing > GL Transactions > Cash > Book Shortage. 2. The system displays the Book Shortage screen. 40 7551 - Book Shortage Book Shortage Field Description Field Name Description Currency [Mandatory, Drop-Down] Select the currency for which the teller wants to book the shortage from the drop-down list. The drop-down list displays only those currencies in which the teller can deal. Amount [Mandatory, Numeric, 13, Two] Type the shortage amount. The system will reduce the calculated cash balance by this amount, to synchronize the same with the cash balance, which is physically held by the teller. Narrative [Mandatory, Alphanumeric, 40] Type the narration of the transaction. The system displays the default narration "Book Shortage". The vault teller can change the narration, if required. 41 7551 - Book Shortage Field Name Description Reference Number [Mandatory, Alphanumeric, 16] Type the reference number for the transaction. 3. Select the currency from the drop-down list. 4. Enter the amount and the reference number for the shortage. Book Shortage 5. Click the Ok button. 6. The system displays the message "Authorisation Required. Do you want to continue". Click the OK button. 7. The system displays the Authorization Reason screen. 8. Enter the required information and click the Grant button. 9. The system displays the transaction sequence number. The transaction number is system generated that uniquely identifies each transaction performed by a teller and can be used for tracking the transaction. Click the OK button. 10. The system displays the Document Receipt screen. 11. If you want to print the receipt, select the record that needs to be printed. The system displays the message "Do You Want To Print". Click the Ok button. OR Click the Cancel button. 42 7551 - Book Shortage 12. Click the Close button. Note: For more information on Authorisation transactions, refer to the Oracle FLEXCUBE Introduction User Manual. 43 7552 - Book Cash Overage 1.4.6. 7552 - Book Cash Overage Using this option the teller / vault teller has to book the physical cash held in a particular currency, which exceeds the cash in that currency as shown by the system. The teller can close the batch for a posting date only if the cash balances tally. While booking a cash overage, the system increases the cash balance and brings it in sync with the physical balance with the teller, by passing the difference to a cash overage liability GL. Definition Prerequisites BAM56 - Currency Codes Maintenance The vault batch and the teller batch should be opened for the posting date. Modes Available Not Applicable To book an overage 1. Type the fast path 7552 and click Go or navigate through the menus to Transaction Processing > GL Transactions > Cash > Book Cash Overage. 2. The system displays the Book Cash Overage screen. Book Cash Overage 44 7552 - Book Cash Overage Field Description Field Name Description Currency [Mandatory, Drop-Down] Select the currency for which the teller wants to book the overage from the drop-down list. Amount [Mandatory, Numeric, 13, Two] Type the overage amount. The system will increase the system-calculated cash balance by this amount, to synchronize the same with the cash balance, which is physically held by the teller. Narrative [Mandatory, Alphanumeric, 40] Type the narration. The system displays the default narration "Book Cash Overage". The vault teller can change the narration, if required. Reference Number [Mandatory, Alphanumeric, 16] Type the reference number for the transaction. 3. Select the currency from the drop-down list. 4. Enter the amount and the reference number for the transaction. 45 7552 - Book Cash Overage Book Cash Overage 5. Click the Ok button. 6. The system displays the message "Authorisation Required. Do You Want to Continue". Click the Ok button. 7. The system displays the Authorization Reason screen. 8. Enter the relevant information and click the Grant button. 9. The system displays the transaction sequence number. The transaction number is system generated that uniquely identifies each transaction performed by a teller and can be used for tracking the transaction. Click the Ok button. 10. The system displays the Document Receipt screen. 11. If you want to print the receipt, select the record that needs to be printed. The system displays the message "Do You Want To Print". Click the Ok button. OR Click the Cancel button. 12. Click the Close button. Note: For more information on authorisation transactions, refer to the Oracle FLEXCUBE Introduction User Manual. 46 9005 - Close Teller Batch 1.4.7. 9005 - Close Teller Batch Using this option you can close the teller batch for the given posting date. The system allows the teller batch to be closed for the day only when all the transactions are successfully processed. In case any transaction is pending, like an unauthorised or an incomplete batch data entry, the system prompts you to either complete or reverse the transactions so that the teller can close the batch for the day. In addition to this, there is a specified limit on the cash that a teller can retain at the end of the day. The bank maintains the specified limit for each currency. Whenever a transaction is performed or while closing the teller batch, the system checks the cash balances for each currency with the respective limits and prompts the teller in case of violation. If the limit is exceeded, the teller sells the excess cash to the main vault, to bring his cash holding within the retention limit. After selling the excess cash the teller has to ensure that the physical cash held, is same as that shown by the system. For a teller, if there is a difference in the physical cash/inventory and that calculated by the system, the overage or shortage has to be booked accordingly and only then each teller can close the teller batch for that day. Before closing the teller batch, the teller should ensure completion of all the incomplete batches for consolidated cheques, outward clearing batches, inward clearing batches, etc. This is applicable if the teller has done the header transaction of the consolidated cheque deposit but has not performed the detailed data entry of consolidated cheques. Once it is closed, the teller batch cannot be re-opened for the same posting date. Definition Prerequisites 9001 - Open Teller Batch 9003 - Open Vault Batch Modes Available Not Applicable To close a teller batch 1. Type the fast path 9005 and click Go or navigate through the menus to Transaction Processing > Internal Transactions > Batch > Close Teller Batch. 2. The system displays the Close Teller Batch screen. 47 9005 - Close Teller Batch Close Teller Batch Field Description Field Name Description Posting Date [Mandatory, Pick List, dd/mm/yyyy] Select the posting date, for which the teller batch is to be closed, from the pick list. By default, the system displays the current posting date. Closing of the teller batch for a particular date indicates that the teller has completed the transactions and the balancing of cash for the selected date. This date should be the same date for which the teller batch is opened. TIL ID and Name [Display] This field displays the TIL Id if it is linked to the logged in Teller Id and its name. This field displays as blank, if no TIL ID is linked. 48 9005 - Close Teller Batch Field Name Description Delink [Conditional, Check Box] Select the Delink Checkbox to Delink the TIL ID and Name from the Teller. 3. Click the Ok button. The system displays the cash details. 4. Enter the total cash. 49 9005 - Close Teller Batch Cash Field Description Column Name Description Currency [Display] This column displays the currencies in which the bank deals. Total Cash [Mandatory, Numeric, 13, Two] Type the total cash for a particular currency, physically present with the teller, at the end of the current posting date. This amount should match with the cash displayed in the Cash Available column. If there is a mismatch in the amounts, the teller cannot close the batch. Cash Available [Display] This column displays the amount for a particular currency, which is available with the teller at the end of the current posting date. This amount is calculated by the system and depends on the transactions carried out by the teller on the current posting date. 50 9005 - Close Teller Batch Column Name Description Overage/Shortage [Display] This column displays the difference in the amount between the total cash and the available cash with the teller, at the end of the current posting date. Based on this difference the overage or the shortage amount is displayed. An overage indicates that the physical cash with the teller is more than the available cash as calculated by the system. A shortage indicates that the available cash calculated by the system, is more than the physical cash present with the teller. 5. Click the Inventory tab to view the closing inventory position for the teller. 6. Enter the total quantity. 51 9005 - Close Teller Batch Inventory Field Description Column Name Description Stock Code [Display] This column displays the inventory code. Description [Display] This column displays a short description for the inventory. Denomination [Display] This column displays the denomination of the inventory available with the teller at the end of the current posting date. Total Quantity [Mandatory, Numeric, 10] Type the quantity of stock available with the teller. This value should match with the count displayed in the Available Quantity column. If there is a mismatch, the teller cannot close the batch. 52 9005 - Close Teller Batch Column Name Description Face Value [Display] This column displays the value of the stock. Face Value = Quantity * denomination. Available Quantity [Display] This column displays the quantity of stock available in the system. Overage/Shortage [Display] This column displays the quantity of stock that is booked as overage or shortage. Booked Overage [Display] This column displays the quantity of stock which is booked as overage on the previous day in the system. Booked Shortage [Display] This column displays the quantity of stock which is booked as shortage on the previous day in the system. 7. Click the Ok button. 8. Click the Close button. Note: If there is an overage/shortage, the system will display the cash/stock not balanced message. 53 6203 - TC Balancing* 1.4.8. 6203 - TC Balancing* Bank may buy and sell Traveler's cheques from the existing customers as well as walk-in customers. Balancing the TC is a prerequisite for the teller before closing the teller batch for the day. Using this option, tellers authorized to deal with TC, balance their physical TC in custody with the system count at the beginning of the branch operations. During the day the count is altered vide TC purchases and sales. Balancing the TC is a prerequisite for the teller before closing the teller batch for the day. In case of any overage/shortage of TC, the same is displayed in the screen for the user for reconciliation and balancing. Definition Prerequisites Issuer Maintenance (Fast Path: BAM09) BAM56 - Currency Codes Maintenance Bank Codes Maintenance (Fast Path: BAM20) Modes Available Not Applicable To inquire on TC balancing 1. Type the fast path 6203 and click Go or navigate through the menus to Transaction Processing > Internal Transactions > Batch > TC Balancing. 2. The system displays the TC Balancing screen. 54 6203 - TC Balancing* TC Balancing Field Description Field Name Description Issuer Code [Mandatory, Drop Down] Select the issuer bank from the drop down. The same is maintained by the Issuer Maintenance (Fast Path- BAM09) option. Currency [Mandatory, Drop Down] Select the currency of the TC in custody of the teller Denominations [Display] The denomination of the TC is displayed in this field. TCs of various denominations will be available with the teller. User Count [Mandatory, Numeric, 20] Enter the number of TCs of the selected currency and denomination available with the teller. 55 6203 - TC Balancing* Field Name Description Amount [Display] The total value of the TCs of the displayed denomination is displayed in this field. System Count [Display] This field displays the system count of the TC of the denomination specified. Amount [Display] This field displays the amount of the TC as per the system count. Total [Display] This field displays the user and system totals across denomination and amount. Overage / Shortage [Display] This field displays overage/shortage in TC denomination/amount if any. 3. Select the issuer code and currency from the drop down list. 4. Enter user count denomination-wise. 56 6203 - TC Balancing* TC Balancing 5. Click the Ok button. 6. If there is any overage, the system displays the message “TC Not Balanced". 7. Click the Cancel button. 57 6202 - Inventory Balancing 1.4.9. 6202 - Inventory Balancing Using this option you can perform inventory balancing during the day. The total physical inventory quantity belonging to a particular stock is updated after performing the inventory transactions for the day. Once the total quantity is entered, the system compares the total physical quantity with the available system quantity and calculates an Overage/ Shortage (if any). The system also displays any previously booked overage/shortage. Before closing the teller batch, you must book/cancel inventory overage/shortage and tally the inventory balance. Definition Prerequisites Not Applicable Modes Available Not Applicable To view the inventory balancing details: 1. Type the fast path 6202 and click Go or navigate through the menus to Transaction Processing > Internal Transactions > Batch > Inventory Balancing. 2. The system displays the Inventory Balancing screen. 58 6202 - Inventory Balancing Inventory Balancing Field Description Column Name Description Stock Code [Display] This column displays the inventory code. Description [Display] This column displays a short description for the inventory. Denomination [Display] This column displays the denomination of the inventory available with the teller. Total Quantity [Mandatory, Numeric, 10] Type the quantity of physical stock available with the teller. Face Value [Display] This column displays the value of the stock. Face Value = Quantity * denomination. Available Quantity [Display] This column displays the quantity of stock available in the system. 59 6202 - Inventory Balancing Column Name Description Overage/Shortage [Display] This column displays the quantity of stock that is booked as overage or shortage. Booked Overage [Display] This column displays the quantity of stock which is booked as overage on the previous day in the system. Booked Shortage [Display] This column displays the quantity of stock which is booked as shortage on the previous day in the system. 3. Enter the total quantity of physical inventory available with the teller. Inventory Balancing 4. Click the Close button. 60 8007 - Book or Cancel Overage/Shortage 1.4.10. 8007 - Book or Cancel Overage/Shortage Oracle FLEXCUBE monitors the inventories held by tellers to keep track of available stocks. While closing a teller batch, if the teller realizes that physical quantity in hand is not matching with the system count and teller is not able to find the details of inventory causing shortage or overage, the teller can book overage or shortage of the inventory using this option. When shortage is booked, the quantity of the inventory for which shortage is booked is reduced from tellers inventory count and the status of such inventory is updated as ‘Shortage’ and it is not available for issuance. When an overage is booked, the quantity booked as overage gets added to the Tellers inventory count and the status of such inventory is updated as ‘Overage’ and it will not be available for issue. When overage or shortage is booked, reconciliation is done manually on the subsequent day and the reason for shortage or overage is identified. The shortage or overage booked is cancelled by using this option. By reverting the booking of shortage/overage, the status and count of the teller inventory is reverted back to original. The status of the inventory for which the shortage/overage was booked has to be updated in the Stock Adjustment (Fast Path: IV002) option. Definition Prerequisites Not Applicable Modes Available Not Applicable To book or cancel overage/shortage 1. Type the fast path 8007 and click Go or navigate through the menus to Transaction Processing > Internal Transaction > Inventory > Book or Cancel Overage/Shortage. 2. The system displays the Book or Cancel Overage/Shortage screen. 61 8007 - Book or Cancel Overage/Shortage Book or Cancel Overage/Shortage Field Description Field Name Description Teller ID [Display] This field displays the teller ID. Option [Mandatory, Drop-Down] Select the inventory adjustment option from the drop-down list. The options are: Stock Code Book Overage Book Shortage Cancel Overage Cancel Shortage [Mandatory, Drop-Down] Select the stock code from the drop-down list. Denomination [Mandatory, Numeric, 10] Type the denomination of the inventory. 62 8007 - Book or Cancel Overage/Shortage Field Name Description Quantity [Mandatory, Numeric, 10] Type the quantity of the inventory. Face Value [Display] This field displays the face value of the inventory. Face value = denomination * quantity 3. Select the inventory adjustment option and stock code from the drop-down list. 4. Enter the denomination and quantity. 63 8007 - Book or Cancel Overage/Shortage Book or Cancel Overage/Shortage 5. Click the Ok button. 6. The system displays the message "Transaction Sequence number is ". Click the OK button. 64 9030- Buy Cash From Teller 1.4.11. 9030- Buy Cash From Teller Using this screen branch teller can buy cash from another teller in the same branch. When the screen is opened, the Teller ID of the teller who has logged on is defaulted in the teller id field and is in disabled state. This transaction is always done with reference to a TIL ID. Definition Prerequisites TIL01 TIL02 Modes Available Not Applicable To Buy Cash from Teller 1. Type the fast path 9030 and click Go or navigate through the menus to Transaction Processing > Internal Transactions > Cash > Buy Cash from Teller. 2. The system displays the Buy Cash From Teller screen. Buy Cash From Teller 65 9030- Buy Cash From Teller Field Description Field Name Description Teller Id [Alphanumeric, Text box ] This field will default the Teller Id of the teller who is logged in (buying teller) TIL ID and Name [Alphanumeric, Text box ] This field has TIL ID and the name linked to the logged in teller id (buying teller) From Teller [Alphanumeric, Drop Down] This drop down contains only the tellers of same branch having TIL ID linked to them Currency [Alphanumeric, Drop Down] The drop down contains currencies Total Cash Required [Numeric, Text box ] Using this field the buying teller will input the amount required. Narrative [Alphanumeric, Text box ] The system displays the default narration "Buy Cash From Teller”. The teller can change the narration, if required 3. Fill in the required details in the fields present on the screen. 66 9030- Buy Cash From Teller Buy Cash From Teller 4. 5. 6. Click on OK button. The System will display Transaction number on a Pop up., click on OK button now. The transaction is completed successfully. 67 9013 Buy Inventory From Teller 1.4.12. 9013 Buy Inventory From Teller Using this screen branch teller can buy inventory from another teller in the same branch. When the screen is opened, the Teller ID of the teller who has logged on is defaulted in the teller id field and is in disabled state. This transaction is always done with reference to a TIL ID. Definition Prerequisites TIL01 TIL02 Modes Available Not Applicable To Buy Inventory from Teller 1. Type the fast path 9013 and click Go or navigate through the menus to Transaction Processing > Internal Transactions > Inventory > Buy Inventory from Teller. 2. The system displays the Buy Inventory From Teller screen. 68 9013 Buy Inventory From Teller Field Description Field Name Description Teller Id [Alphanumeric, Text box ] This field will default the Teller Id of the teller who is logged in (buying teller) TIL ID and Name [Alphanumeric, Text box ] This field has TIL ID and the name linked to the logged in teller id (buying teller) From Teller [Alphanumeric, Drop Down] This drop down contains only the tellers of same branch having TIL ID linked to them Stock Codes [Alphanumeric, Drop Down] Select the Stock Code for the stock or inventory which you want to buy from the drop down list. Quantity [Numeric, Text box ] Enter the Quantity of stocks which you want to buy. Start No. [Numeric, Text box ] Type the start number in the stock series. This number onwards the stock has to be transferred. End No. [Display, Numeric, Text box] This field displays the end number of the series. The end number is calculated and generated by the system depending on the quantity and the start number specified. For example, If Quantity = 100 and Start No = 50 Then End No = 149 69 9013 Buy Inventory From Teller Field Name Description Face Value [Display, Numeric, Text box] The field ‘Face Value’ displays the value of the inventory. Face Value = Denomination * Quantity. Narrative [Alphanumeric, Text box ] The system displays the default narration "Buy Cash From Teller”. The teller can change the narration, if required 3. Fill in the required details in the fields present on the screen. Buy Inventory From Teller 4. 5. 6. Click on OK button. The System will display Transaction number on a Pop up., click on OK button now. The transaction is completed successfully. 70 TIL02 - TIL Linkage Maintenance 1.4.13. TIL02 - TIL Linkage Maintenance Using this screen user will be will be able to link / delink the TIL ID to teller ID or ATM Terminal ID.On selecting the teller ID radio button, the teller ID of the teller who is logged in will be defaulted in the Teller ID field and will be disabled. If a TIL is already linked to the teller, Option value as ‘Delink TIL ID’ will be displayed in "Option"field which will be in a non editable state. Similarly, If option value is to link the TIL, 'Link TIL ID will be displayed and will be non editable state in this case, only TIL's available to the teller will be displayed in TIL ID picklist of the branch to which teller belongs and will be in a non editable state. Definition Prerequisites TIL01 - TIL ID Maintenance Modes Available Not Applicable To Link / De-Link the TIL ID 1. Type the fast path TIL02 and click Go or navigate through the menus to >Global Definitions> Internal Transactions> TIL> TIL Linkage Maintenance 2. The system will display TIL Linkage Maintenance screen. 71 TIL02 - TIL Linkage Maintenance TIL Linkage Maintenance Field Description Field Name Description Teller Id [Mandatory, Drop Down] Select the option whether to link the TIL to teller or ATM Terminal ID ATM Terminal Id [Mandatory, Radio Button] Select the option whether to link the TIL to teller or ATM Terminal ID Teller Id [Display. Alphanumeric, Text box ] This field will default the Teller Id of the teller who is logged in. This field is Non-Editable. This field will be blank and disabled if the option ATM Terminal ID is selected . 72 TIL02 - TIL Linkage Maintenance Field Name ATM Terminal Id Description [Alphanumeric, Pick list] This field will display the values maintained in ATM02, The ATM terminal ID already linked will not be displayed .This field will be blank and disabled if the option Teller ID is selected . Option [Display, Drop Down] This field will display the status of the TIL whether Linked or DeLinked. TIL ID [Mandatory, Numeric,Picklist] This field will have TIL IDs ,If a TIL is already linked, the TIL No. field will display the linked TIL No. to the Teller Id and will allow to delink the TIL. In case of no TIL is linked, teller will be allowed to link a TIL from the picklist. Name [Alphanumeric, Textbox] This field will show the corresponding TIL Name of the selected TIL number. Column Name Currency [Display] This column displays the currencies in which the bank deals. Total Cash [Mandatory, Numeric, 13, Two] Type the total cash for a particular currency, physically present with the teller, at the end of the current posting date. This amount should match with the cash displayed in the Cash Available column. If there is a mismatch in the amounts, the teller cannot close the batch. Cash Available [Display] This column displays the amount for a particular currency, which is available with the teller at the end of the current posting date. This amount is calculated by the system and depends on the transactions carried out by the teller on the current posting date. 73 TIL02 - TIL Linkage Maintenance Field Name Description Overage/Shortage [Display] This column displays the difference in the amount between the total cash and the available cash with the teller, at the end of the current posting date. Based on this difference the overage or the shortage amount is displayed. An overage indicates that the physical cash with the teller is more than the available cash as calculated by the system. A shortage indicates that the available cash calculated by the system, is more than the physical cash present with the teller. 3. Select the option whether to link the TIL to teller or ATM Terminal ID by clicking on the respective radio button. 4. The teller ID field will default the Teller Id of the teller who is logged in. This field is NonEditable. This field will be blank and disabled if the option ATM Terminal ID is selected. 5. On selecting the ATM Terminal ID, the ATM terminal ID field will be enabled and values will be displayed accordingly in the pick list. 6. The Option field will display the status of the TIL whether Linked or De-Linked. 7. Select the TIL ID using the pick list. 8. The Name field will display the corresponding TIL Name of the selected TIL number. 9. Click on OK button, the system will prompt you with a “Transaction completed successfully” message on a pop up. 10. Click on the "Inventory" Tab to view the Opening Inventory 74 TIL02 - TIL Linkage Maintenance TIL Linkage Maintenance - Inventory Field Description Column Name Description Stock Code [Display] This column displays the inventory code. Description [Display] This column displays a short description for the inventory. Denomination [Display] This column displays the denomination of the inventory available with the teller at the end of the current posting date. Total Quantity [Mandatory, Numeric, 10] Type the quantity of stock available with the teller. This value should match with the count displayed in the Available Quantity column. If there is a mismatch, the teller cannot close the batch. 75 TIL02 - TIL Linkage Maintenance Column Name Description Face Value [Display] This column displays the value of the stock. Face Value = Quantity * denomination. Available Quantity [Display] This column displays the quantity of stock available in the system. Overage/Shortage [Display] This column displays the quantity of stock that is booked as overage or shortage. Booked Overage [Display] This column displays the quantity of stock which is booked as overage on the previous day in the system. Booked Shortage [Display] This column displays the quantity of stock which is booked as shortage on the previous day in the system. 76 Other Transactions 2. Other Transactions The tellers and supervisors of the bank can perform ancillary activities in FLEXCUBE Retail. This system facilitates the bank in transferring the CASA account (single account or multiple accounts) from one branch to another branch, changing the ownership of unauthorised batch and printing spooled documents. 77 4501 - Centralised Authorisation 2.1. 4501 - Centralised Authorisation Centralised authorization is a security enhancing setup which can be enabled in Oracle FLEXCUBE for providing additional authorizations when predefined reasons are encountered in online transactions by a group of supervisors, preferably from those located centrally. This level of authorization is subsequent to and in addition to the local/remote authorization which would have been provided for the transaction to confirm the overrides. The predefined reasons are defined in the branch database in an internal table called ba-authreason-mast table. Centralised authorization is done by a specific transaction which can be accessed only by certain supervisors as identified in the Security Management System (SMS) setup. Supervisors accessing this transaction can identify the transaction(s) to be authorised by using from branch, transaction code, customer id and account number combination. The centralised authorization process is divided into the following steps namely: If auto-authorization is disabled: Step Activity By Activity Description A Teller Teller performs online transaction from the branch. If system encounters conditions requiring local/remote authorization, transaction will proceed to step B. If system does not encounter any conditions requiring local/remote authorization but encounters centralised authorization requirement, system will proceed to step D. B Supervisor Supervisor approves the transaction using local authorization or remote authorization. If local authorization is provided, system proceeds for further processing. C Teller Teller resubmits the approved transaction from the Electronic Journal, for transactions sent for remote authorization. System encounters reasons requiring central authorization. Teller sends the transaction for central authorization. D Supervisor Supervisor access the central authorization transaction and authorizes the transaction waiting for authorization. E Teller Teller resubmits the approved transaction from the Electronic Journal and completes the transaction. 78 4501 - Centralised Authorisation If auto-authorization is enabled: Step Activity By Activity Description A Teller Teller performs online transaction from the branch. If system encounters conditions requiring local/remote authorization, transaction will proceed to step B. If system does not encounter any conditions requiring local/remote authorization but encounters centralised authorization requirement, system will proceed to step D. B Supervisor Supervisor approves the transaction using local authorization or remote authorization. If local authorization is provided, system proceeds for further processing. C Teller System encounters reasons requiring central authorization. Teller sends the transaction for central authorization. D Supervisor Supervisor access the Central authorization transaction and authorizes the transaction waiting for authorization. At Local Branch: The supervisor authorizes the transaction done by the teller locally or remotely. For more information on Local and Remote authorization refer to Local Authorization and Remote Authorization earlier in this chapter. Definition Prerequisites Not Applicable Modes Available Not Applicable To perform centralised authorisation 1. Type the fast path 4501 and click Go or navigate through the menus to Transaction Processing > Internal Transactions > Authorisation > Centralised Authorisation. 2. The system displays the 4501 - Centralised Authorisation screen. 79 4501 - Centralised Authorisation Centralised Authorisation Field Description Field Name Description From Branch [Optional, Numeric, Four] Type the From branch. To Branch [Optional, Numeric, Four] Type the To branch. Mnemonic [Optional, Pick List] Select the task code from the pick list. Customer Id [Optional, Numeric, 10] Type the customer ID. Account No [Optional, Numeric, 16] Type the account number. Teller Id [Optional, Alphanumeric] Type the id of the teller whose records are to be authorised. 80 4501 - Centralised Authorisation Column Name Description Txn Date [Display] This column displays the transaction date. Txn Time [Display] This column displays the transaction time. Branch [Display] This column displays the branch code. User Id [Display] This column displays the user id. SeqNo [Display] This column displays the sequence number. Mnem [Display] This column displays the mnemonic code. Cust Id [Display] This column displays the customer id. Account No [Display] This column displays the account number. Description [Display] This column displays the account description. Ccy [Display] This column displays the account currency. Amount [Display] This column displays the transaction amount. State [Display] This column displays the transaction status. Authorizer [Display] This column displays the authorizer id. 3. Enter the details based on which a search is to be performed. 4. Click the Fetch button. The system displays all the transactions sent for authorization based on the filter criteria. 81 4501 - Centralised Authorisation Centralised Authorisation 5. Click the transaction to view the transaction details. 6. The system displays the transaction details screen. The supervisor cannot modify any details on the screen. 7. Click the Grant button to authorize the transaction. 8. Click the Deny button to deny authorization of the transaction. 9. The system displays the Authorization Reasons screen. 10. Select the reason from the drop-down list and type the comments. 11. Click the Ok button. 82 BA995 - Single Account Transfer 2.2. BA995 - Single Account Transfer Using this option, a bank can transfer a CASA/TD/Loan account from one branch to another, if the customer initiates the transfer. An existing sub-branch/outlet is updated to a branch/subbranch. The account number of the effected accounts will not change but the branch to which the account reports will change It is not possible to transfer an account from one product to another product. Also account transfer will be disallowed for the accounts which are members of the group linked in the Group Accounts Maintenance (Fast Path: CHM24) option. Definition Prerequisites BAM03 - Branch Master Maintenance The branch and transfer branch product should be the same. Modes Available Add By Copy, Add, Modify, Delete, Cancel, Amend, Authorize, Inquiry. For more information on the procedures of every mode, refer to Standard Maintenance Procedures. To transfer a single account from one branch to another 1. Type the fast path BA995 and click Go or navigate through the menus to Transaction Processing > Internal Transactions > Others > Single Account Transfer. 2. The system displays the Single Account Transfer screen. 83 BA995 - Single Account Transfer Single Account Transfer Field Description Field Name Description Account Number [Mandatory, Numeric, 16] Type the account number that has to be transferred to another branch. The account name is populated in the corresponding field. Account Status [Display] This field displays the account status. Product Code [Display] This field displays the product code under which the account opened. Branch Name [Display] This field displays the name of the home branch where the account is currently held. 84 BA995 - Single Account Transfer Field Name Description Transfer Branch Name [Mandatory, Pick List] Select the name of the branch, to which the account is to be transferred, from the pick list. 3. Click the Add button. 4. Enter the account number and press the <Tab> key. 5. Select the branch name from the pick list. Single Account Transfer 6. Click the Ok button. 7. The system displays the message "Record Added...Authorisation Pending...". Click the Ok button. 8. The single account transfer record is added once the record is authorised. 85 BA999 - Bulk Account Transfer 2.3. BA999 - Bulk Account Transfer Using this option the bank can transfer all Oracle FLEXCUBE accounts across products from one branch to another branch when a branch is closed or merged. This screen allows an existing sub-branch/outlet to merge with another existing sub-branch/outlet. Multiple existing subbranches/outlets can also merged with another existing sub-branch/outlet. Bulk account transfer can be used for each of the multiple branches intended to be merged. (FLEXCUBE currently do not support bulk merging of branches). An existing sub-branch/outlet is updated to a branch/subbranch. Part of individual accounts in an existing sub-branch/outlet is moved to a new or existing sub-branch/outlet. The account numbers of the affected accounts do not change but the branch to which they report to get changed. It is not be possible to transfer accounts from one product to another. This option can also be used when banks decide to open special type of branches catering to specific customer needs and decides to transfer the existing accounts from other branches to the new branch. Definition Prerequisites BAM03 - Branch Master Maintenance Modes Available Add By Copy, Add, Modify, Delete, Cancel, Amend, Authorize, Inquire. For more information on the procedures of every mode, refer to Standard Maintenance Procedures. To add the bulk account transfer 1. Type the fast path BA999 and click Go or navigate through the menus to Transaction Processing > Internal Transactions > Others > Bulk Account Transfer. 2. The system displays the Bulk Account Transfer screen. 86 BA999 - Bulk Account Transfer Bulk Account Transfer Field Description Field Name Description Transfer Date [Mandatory, Pick List, dd/mm/yyyy] Select the date when the bulk account will be transferred from the pick list. By default, the system displays the current date as the transfer date. Branch Name [Mandatory, Pick List] Select the branch from where all the accounts across the products have to be transferred to another branch from the pick list. The name for the selected branch code is displayed in the adjacent field. Transfer Branch Name [Mandatory, Pick List] Select the branch to which all the accounts across the products have to be transferred from the pick list. The name for the selected branch code is displayed in the adjacent field. 87 BA999 - Bulk Account Transfer 3. Click the Add button. 4. Enter the transfer date. 5. Select the branch name and the transfer branch name from the pick list. Bulk Account Transfer 6. Click the Ok button. 7. The system displays the message "Record Added". Click the OK button. 88 5514 - Change Data Entry Batch User 2.4. 5514 - Change Data Entry Batch User Using this option the ownership of an unauthorised batch can be changed from one teller to another , as system does not allow tellers to work on batches not owned by them. This is done when the original teller who had done the transaction is not available and the batch needs to be modified. In such situations, this option is used to transfer the ownership of the unauthorised batch to another teller or user. The owner of the Voucher Entry branch cannot be changed by using this option. Definition Prerequisites Branch batch to be opened and teller batch opened for the change. Modes Available Not Applicable To change the data entry batch user 1. Type the fast path 5514 and click Go or navigate through the menus to Transaction Processing > Internal Transactions > Data Entry > Change Data Entry Batch User. 2. The system displays the Change Data Entry Batch User screen. Change Data Entry Batch User 89 5514 - Change Data Entry Batch User Field Description Field Name Description Batch Type [Mandatory, Pick List] Select the type of data entry batch that needs to be inquired from the pick list. The options are: Consolidated Cheque Deposit ICC Data Entry Inward Clearing Data entry MICR-Serial No Xref maintenance OCC Data Entry Outward Clearing Cheque Data Entry Post Dated Cheque Batch Data Entry These options are taken from a static pick list. Batch Number [Mandatory, Pick List] Select the appropriate batch number, which needs to be transferred to the new teller from the pick list. Current Teller Id [Display] This field displays the ID of the current teller. This is automatically retrieved by the system upon entering the batch number. This shows the current maker of the batch from whom the batch needs to be transferred. New Teller Id [Mandatory, Drop-Down] Select the appropriate teller ID to which the batch is to be transferred from the drop-down list. 3. Select the batch type and batch number from the pick list. 4. Select the new teller ID from the drop-down list. 90 5514 - Change Data Entry Batch User Change Data Entry Batch User 5. Click the OK button. 6. The system displays the teller changed message. Click the OK button. 91 5515 - List Batch Status 2.5. 5515 - List Batch Status Using this option you can view the status of all data entry batches, except Voucher Entry batches, done by the various tellers in that branch for the current posting date. A teller can view the status of all batches owned by him. A supervisor will be able to check the status of all batches owned by tellers under his preview. The system provides information on teller ID, batch number, batch status, count, document number and the total transaction amount. Definition Prerequisites Teller batches to be opened. Modes Available Not Applicable To list the batch status 1. Type the fast path 5515 and click Go or navigate through the menus to Transaction Processing > Internal Transactions > Data Entry > List Batch Status. 2. The system displays the List Batch Status screen. List Batch Status 92 5515 - List Batch Status Field Description Field Name Description Batch Type [Mandatory, Pick List] Select the type of data entry batch that needs to be inquired from the pick list. The options are: Consolidated Cheque Deposit ICC Data Entry Inward Clearing Data entry MICR-Serial No Xref maintenance OCC Data Entry Outward Clearing Cheque Data Entry Post Dated Cheque Batch Data Entry Consolidated DD / BC Issue These options are taken from a static pick list. Teller Id [Optional, Pick List] Select the teller ID for whom the status of data entry batches needs to be inquired from the pick list. Batch Number [Optional, Pick List] Select the number of the batch, which has to be inquired from the pick list. The system populates the batch numbers based on the selected teller ID. Column Name Description SrlNo [Display] This column displays the running serial number generated by the system. TellerId [Display] This column displays the user ID of the teller who has performed the data entry batch. BatchNum [Display] This column displays the number of the batch depending on the batch type selected. 93 5515 - List Batch Status Column Name Description Batch Status [Display] This column displays the status of the selected batch. The options are: Count Authorised Validated Unauthorised Reversed [Display] This column displays the count denotes the total number of instruments entered in the batch. DocNo [Display] This column displays the document number or the header number associated with the consolidated batch. This number is automatically generated by the system while entering the header details and is attached to the batch. Currency [Display] This column displays the transaction currency of the batch. Amount [Display] This column displays the total transaction amount of the batch. 3. Select the batch type from the pick list. 4. Enter the other relevant details. 5. Click the Ok button. 6. The system displays the batch status. 94 5515 - List Batch Status List Batch Status 7. Click the Close button. 95 9800 - Print Spooled Documents 2.6. 9800 - Print Spooled Documents Using this option the spooled documents can be printed. These documents pertain to the branch transactions performed by a teller during the day. The spooled document is printed in the following situations: If the teller wants to spool all documents, and then print them together at a later time during the day If the customer asks for another copy of the document If the supervisor wants to print a document belonging to a particular teller Definition Prerequisites Not Applicable Modes Available Not Applicable To print spooled documents 1. Type the fast path 9800 and click Go or navigate through the menus to Transaction Processing > Internal Transactions > Reports > Print Spooled Documents. 2. The system displays the Print Spooled Documents screen. Print Spooled Documents 96 9800 - Print Spooled Documents Field Description Field Name Description Teller Id [Display] This field displays the ID of the teller who has logged in. The system displays the documents spooled by the teller who has logged in. In case of a supervisor login, the system displays the spooled documents of any teller associated under his/her supervision. This field is editable, in case of a supervisor login. Posting Date [Mandatory, Pick List, dd/mm/yyyy] Select the posting date, for which the teller needs to print the spooled documents, from the pick list. By default, the system displays the current posting date. Column Name Description SeqNo [Display] This column displays the sequence number generated by the system while performing the actual transaction. Doc Num [Display] This column displays the number of documents to be printed. Desc [Display] This column displays the description given to the document. For example, a receipt for payment received. Doc Date [Display] This column displays the date of the document. It is normally the transaction posting date. Num Print [Display] This column displays the number of copies of the document that need to be printed. Doc Type [Display] This column displays the document type. Different numbers are given for different types of documents based on their description. Print/View [Optional, Check Box] Select the Print/View check box to print/view the document. 3. Select the posting date from the pick list. 4. Click the Get button. 97 9800 - Print Spooled Documents 5. The spooled document details are displayed on the screen. Print Spooled Documents 6. Select the check box against the relevant transaction, and click the Print or View button depending on whether you want to print or view the document/report. 7. Click the Close button. 98 BA123 - Payment Verification Mandate Maintenance* 2.7. BA123 - Payment Verification Mandate Maintenance* Using this option you can maintain payment verification mandate within the system and warn the teller to verify the transactions' credentials while doing the large amount of debit transactions. You can ascertain that for transactions exceeding a certain amount, payment verification is always done. Definition Prerequisites 8053 - Customer Addition 8054 - Time Deposit Account Opening Modes Available Add, Modify, Delete, Cancel, Amend, Authorize, Inquiry. For more information on the procedures of every mode, refer to Standard Maintenance Procedures. To add new payment verification mandate 1. Type the fast path BA123 and click Go or navigate through the menus to Global Definition > Master > Payment Verification Mandate Maintenance. 2. The system displays the Payment Verification Mandate Maintenance screen. Payment Verification Mandate Maintenance 99 BA123 - Payment Verification Mandate Maintenance* Field Description Field Name Description Account Number [Mandatory, Pick List, Numeric, 16] Select the account number of CASA/RD/TD account of the customer for which the payment verification mandate has to be setup from the pick list or enter it. It should be a valid CASA/RD/TD account. Payment Verification Mandate Details Payment Verification Amount [Mandatory, Numeric, 13, Two] Type the amount above which the verification needs to be performed. Payment verification amount mandate will always be maintained in the account currency. Contact Person 1 [Optional, Alphanumeric, 120] Type the name of the primary contact person to be contacted to confirm the payment. Contact Person 1 Telephone No. [Optional, Alphanumeric, 30 ] Contact Person 2 [Optional, Alphanumeric, 120 ] Type the telephone number of the primary contact person. Type the name of the secondary contact person to be contacted to confirm the payment. Contact Person 2 Telephone No. [Optional, Alphanumeric, 30] Type the telephone number of the secondary contact person. 3. Click the Add button. 4. Select the account number of the customer from the pick list. 5. Enter the payment verification amount and other relevant information. 100 BA123 - Payment Verification Mandate Maintenance* Payment Verification Mandate Maintenance 5. Click the Ok button. 6. The system displays the message "Record Added...Authorisation Pending.". Click the Ok button. 101 Inquiries 3. Inquiries Transaction inquiries display detailed information about a transaction performed by the user. This section explains how the system allows the user to view information about branch operations. The user can view the status of the transactions performed by the teller, branch-wise transactions, the errors committed by the tellers, last few transactions performed by each teller, reversal of transactions, etc. through various inquiry screens. 102 7012 - Account No Check Digit Inquiry 3.1. 7012 - Account No Check Digit Inquiry The account number of a customer could consist of the bank code (two digits), branch code (four digits), a running serial number (six digits) and a check digit (two digits). The order of these entities as well as the weightage for each position in the account number for calculation of the check digits depends on the setup done in an internal table of Oracle FLEXCUBE. Using this option you can retrieve the actual account number when the teller queries on an account, without giving the check digit(s). When the teller enters the account number without the check digit(s), the system automatically populates the check digits. Definition Prerequisites Not Applicable Modes Available Not Applicable To view the account number check digit 1. Type the fast path 7012 and click Go or navigate through the menus to Transaction Processing > Account Transactions > CASA Account Transactions > Inquiries > Account No Check Digit Inquiry. 2. The system displays the Account No Check Digit Inquiry screen. 103 7012 - Account No Check Digit Inquiry Account No Check Digit Inquiry Field Description Field Name Description Module [Mandatory, Drop-Down] Select the appropriate FLEXCUBE Retail module from the dropdown list.. The options are: Account No LN: Loans TD: Term Deposit CH: CASA Account CI: Customer Information [Mandatory, Numeric, 16] The account number of the customer, without the check digits. The system will display the check digits. 3. Select the module from the drop-down list. 4. Type the account number and press the <Tab> key. 104 7012 - Account No Check Digit Inquiry Account No Check Digit Inquiry 5. The system displays the check digits of the account number. Click the Close button. 105 7017 - Batch Status Inquiry 3.2. 7017 - Batch Status Inquiry Using this option you can view the status of all the batches pertaining to the tellers and the vault tellers according to the posting dates in that particular branch. The status displays whether a particular teller, vault batch or branch batch is opened or closed. Apart from this, the inquiry also displays the open batch of the previous posting date. The batch can be opened simultaneously for maximum two posting dates. This option is used by the supervisor/manager of the branch to find out the overall status of all batches. Definition Prerequisites 9001 - Open Teller Batch 9003 - Open Vault Batch Modes Available Not Applicable To view the batch status 1. Type the fast path 7017 and click Go or navigate through the menus to Transaction Processing > Internal Transactions > Inquiries > Batch Status Inquiry. 2. The system displays the Batch Status Inquiry screen. Batch Status Inquiry 106 7017 - Batch Status Inquiry Field Description Column Name Description Posting Date [Display] This column displays the posting date for which a batch has been opened or closed earlier. A batch can be opened for two consecutive dates. The system will not allow the user to open a batch for more than two consecutive days. User ID [Display] This column displays the ID of the user whose batch is opened or closed for the respective posting date. User Name [Display] This column displays the name of the user corresponding to the user ID whose batch is opened or closed for the respective posting date. Category [Display] This column displays the category of the user. The options are: Batch Status Teller Branch Vault [Display] This column displays the status of the batch. The options are: 3. Open Closed Click the Cancel button. 107 BAM95 - Branch Batch Status - Inquiry 3.3. BAM95 - Branch Batch Status - Inquiry Using this option, you are provided with the status of all the branch batches opened and closed branch-wise, for all posting dates with the date and the time of opening and closure. This inquiry displays the status of all the branch batches on the various process dates and does not display the status of the teller batch. The data can be filtered branch-wise and status-wise. Inquiry can be performed for: All batches that are Open All batches that are Closed All batches that are Confirmed All Batches irrespective of their status Definition Prerequisites 6001 - Batch Open Modes Available Not Applicable To view the branch batch status 1. Type the fast path BAM95 and click Go or navigate through the menus to Transaction Processing > Internal Transactions > Inquiries > Branch Batch Status-Inquiry. 2. The system displays the Branch Batch Status - Inquiry screen. 108 BAM95 - Branch Batch Status - Inquiry Branch Batch Status - Inquiry Field Description Field Name Description Branch Code [Mandatory, Drop-Down] Select the code of the branch from the drop-down list. The list contains the short name of all the branches of the bank. Branch Status [Mandatory, Drop-Down] Select the status of the branch from the drop-down list. This will filter the inquiry result on the basis of the selected branch status. The options are: All Batch Open Batch Close Batch Confirm 109 BAM95 - Branch Batch Status - Inquiry Column Name Description Branch Code [Display] This column displays the code of the branch selected in the Branch Code field. Branch Name [Display] This column displays the name of the selected branch. Txn Date [Display] This column displays the date on which the transaction was performed. Txn Time [Display] This column displays the system time when the transaction was posted in the branch. Date Post [Display] This column displays the posting date for which the branch batch was opened, closed or confirmed. Batch Status [Display] This column displays the batch status. The options are: All Batch Open Batch Close Batch Confirm If the inquiry has been filtered on the basis of the batch status, this column displays the value selected in the Branch Status field. For example, if you select the Batch Open option in the Batch Status field, this column displays the batches with an open status. 3. Select the branch code and the branch status from the drop-down list. 4. The system displays the branch batch status. 110 BAM95 - Branch Batch Status - Inquiry Branch Batch Status - Inquiry 5. Click the Close button. 111 7041 - Branch Totals Position 3.4. 7041 - Branch Totals Position Using this option, the total amount and the number of debit and credit cash transactions for a particular branch can be viewed. Details of transfer transactions for a given currency and for the current posting date are also displayed. There is a separate position for the vault teller of the branch and a common position for the total of all the other tellers of the branch. Definition Prerequisites 9001 - Open Teller Batch 9003 - Open Vault Batch Modes Available Not Applicable To view branch totals position 1. Type the fast path 7041 and click Go or navigate through the menus to Transaction Processing > Internal Transactions > Inquiries > Branch Totals Position. 2. The system displays the Branch Totals Position screen. Branch Totals Position 112 7041 - Branch Totals Position Field Description Field Name Description Currency [Mandatory, Drop-Down] Select the currency to view the transactions done in that currency from the drop-down list. For example, if you select USD, the system will display the transaction done in USD. Posting Date [Mandatory, dd/mm/yyyy] Type the posting date. By default, the system displays the current posting date. The date should be the one of the dates for which the batches are open. Transactions Type [Display] This field displays the type of transaction carried out by the teller in the selected currency. Opening Balance Vault [Display] This field displays the opening balance amount of the branch vault in the selected currency. Teller [Display] This field displays the opening balance amount of all the branch tellers, for the cash transaction in the selected currency. Debits Vault [Display] This field displays the total cash debit in a branch vault for a particular posting date in the selected currency. Teller [Display] This field displays the total debit in cash transactions performed by all the branch tellers for a particular posting date in the selected currency. Count Vault [Display] This field displays the total count of cash debits in the vault of a branch for a particular posting date in the selected currency. Teller [Display] This field displays the total count of the debit cash transactions performed by all branch tellers for a particular posting date in the selected currency. 113 7041 - Branch Totals Position Field Name Description Credits Vault [Display] This field displays the total cash credit in a branch vault for a particular posting date in the selected currency. Teller [Display] This field displays the total credit in cash transactions performed by all the tellers of a branch for a particular posting date in the selected currency. Count Vault [Display] This field displays the total count of cash credit in a branch vault for a particular posting date in the selected currency. Teller [Display] This field displays the total count of the credit cash transactions performed by all branch tellers for a particular posting date in the selected currency. Closing Balance Vault [Display] This field displays the closing balance amount of the branch vault in the selected currency. Closing Balance = (Opening Balance + Credit balance) – Debit balance Teller [Display] This field displays the closing balance amount of all branch tellers, for the cash transaction in the selected currency. Closing Balance = (Opening Balance + Credit balance) – Debit Balance For example, if the opening balances of all branch tellers is 1,00,000 and there was a credit transaction of 50,000 and a debit transaction of 25,000. Thus, the closing balance will be as follows: Closing Balance = (1,00,000 + 50,000) – 25,000 Therefore, the closing balance will be 1,25,000. Transfer Amount [Display] This field displays the amount of the funds transferred by the teller for a particular posting date in the selected currency. 114 7041 - Branch Totals Position Field Name Description Transfer Count [Display] This field displays the count of the funds transferred by the teller for a particular posting date in the selected currency. 3. Select the currency from the drop-down list. 4. Enter the posting date and click the Ok button. 5. The system displays the branch totals position details. Branch Totals Position 6. Click the Close button. 115 7122 - Cross Rate Enquiry 3.5. 7122 - Cross Rate Enquiry Using this option you can search and view the exchange rate between two different currencies, against the bank’s local currency. This option also displays the cross rate between two currencies. Cross rate is helpful when three currencies are involved. For instance, many countries recognize the major currencies, viz. US Dollar, EURO, Yen and Great Britain Pound for export or import billing. For example, an Arab Emirates company raises the bill in AED currency for exporting goods to India. At the time of payment, the Indian bank will calculate the equivalent cross rate from AED currency to USD currency. The amount derived in US Dollar will be converted to Indian Rupees, and that amount in Indian Rupees will be debited to the importer’s account. Definition Prerequisites BAM25 - Currency Definition Exchange rates of all currencies with respect to the local currency for the respective posting date should be defined. Modes Available Not Applicable To view the cross rate 1. Type the fast path 7122 and click Go or navigate through the menus to Transaction Processing > Internal Transactions > Inquiries > Cross Rate Enquiry. 2. The system displays the Cost Rate Enquiry screen. 116 7122 - Cross Rate Enquiry Cost Rate Enquiry Field Description Field Name Description Source Currency [Mandatory, Drop-Down] Select the currency, which is to be converted from the drop-down list. Target Currency [Mandatory, Drop-Down] Select the currency against which the exchange rates need to be obtained from the drop-down list. Source Ccy Rate [Display] This field displays the source currency exchange or conversion rate against the local currency of the bank. Dest Ccy Rate [Display] This field displays the target currency exchange or conversion rate against the local currency of the bank. 117 7122 - Cross Rate Enquiry Field Name Description Cross Rate [Display] This field displays the rate of conversion of the source currency against the conversion rate of the target currency in terms of the bank’s local currency. 3. Select the source currency and the target currency from the drop-down list. 4. Click the Ok button. 5. The system displays the cross rate details. Cost Rate Enquiry 6. Click the Close button. 118 7008 - Last Ten Transactions 3.6. 7008 - Last Ten Transactions Using the option a teller can view the details of the last ten monetary transactions performed on the posting date. You can enquire the transactions for the current or for next posting date. The system provides details on transaction type, date of transaction with time, account number, currency of the transaction, transaction amount and Dr/Cr indicator. Definition Prerequisites 9001 - Open Teller Batch Modes Available Not Applicable To view the last ten transactions 1. Type the fast path 7008 and click Go or navigate through the menus to Transaction Processing > Internal Transactions > Inquiries > Last Ten Transactions. 2. The system displays the Last Ten Transactions screen. Last Ten Transactions 119 7008 - Last Ten Transactions Field Description Field Name Description User No [Display] This field displays the user ID of the teller who has logged in. Only those transactions performed by the teller who has logged in are displayed. Date [Mandatory, Numeric, dd/mm/yyyy] Type the posting date of the transaction. By default, the system displays the current posting date. Column Name Description Seq No [Display] This column displays the sequence number pertaining to the transaction carried out by the teller. Type [Display] This column displays the type of transaction performed by the teller. Txn Date [Display] This column displays the date on which the teller performed the transaction. TxnTime [Display] This column displays the system time when the teller performed the transaction. Acct No [Display] This column displays the account numbers for which the teller has performed the transactions. Ccy [Display] This column displays the code of the currency in which the teller performed the transaction. Txn Amt [Display] This column displays the amount for which the transaction was performed in the transaction currency. 120 7008 - Last Ten Transactions Column Name Description Dr / Cr [Display] This column displays whether the transaction performed was a debit transaction or a credit transaction. The options are: D: Debit transactions C: Credit transactions 3. Enter the posting date of the transaction. 4. Click the OK button. 5. The system displays the details of the last ten transactions. Last Ten Transactions 6. Click the Close button. 121 7050 - Old To New Account Inquiry 3.7. 7050 - Old To New Account Inquiry When the bank has migrated from a different system to Oracle FLEXCUBE or from an old Oracle FLEXCUBE release to a new Oracle FLEXCUBE release, the account number of all customer accounts might need to be changed. Using this option you can support the transition period wherein customers quote the old account numbers at the branch to perform transactions. It determines the new account number on which the transaction(s) are to be performed. The system also provides the customer name for proper verification of old to new account. Definition Prerequisites Not Applicable Modes Available Not Applicable To view the new account number 1. Type the fast path 7050 and click Go or navigate through the menus to Transaction Processing > Internal Transactions > Inquiries > Old To New Account Inquiry. 2. The system displays the Old To New Account Inquiry screen. Old To New Account Inquiry 122 7050 - Old To New Account Inquiry Field Description Field Name Description Old Account Number [Mandatory, Alphanumeric, 16] Old Deposit Number [Mandatory, Alphanumeric, 16] Flexcube Acct No [Display] Type the old account number of the customer which has to be changed. Type the old deposit number of the customer. This field displays the details of the FLEXCUBE Retail account number after entering the old account number. Flexcube Dep No [Display] This field displays the details of the FLEXCUBE Retail deposit number. Customer Name [Display] This field displays the name of the customer who holds the account. 3. Enter the old account number and deposit number. 4. Click the Ok button. 5. The system displays the new account number. 123 7050 - Old To New Account Inquiry Old To New Account Inquiry 6. Click the Close button. 124 6006 - Search Electronic Journal 3.8. 6006 - Search Electronic Journal The tellers and the supervisors can view the status of all the transactions performed by them during the posting date for which the teller batch is opened. The teller can view the status of only those transactions done by them. However, the supervisor can view the status of all the transactions done by all the tellers. Using this option, the teller can also reverse the transaction posted by him during the day. This option can be used to view the list of all transactions. The incomplete transactions are those transactions that have been initiated by the teller and require authorization for completion. After performing a transaction which needs authorisation, the system prompts the teller to send the transaction for remote authorisation or for local authorisation. If the user selects remote authorisation, the system prompts the user to select a supervisor. After the teller selects the supervisor, and confirms sending the transaction for authorisation, the supervisor can view the transaction on their terminal by using this option. The Teller ID drop-down list in this option displays a list of tellers and the vault tellers who have sent the transactions for authorisation to that supervisor. Whenever any transaction is sent for remote authorisation, the transaction sequence number is displayed at the teller / vault teller level. After the authorisation of a transaction, the screen remains unchanged, so that the supervisor can select the next transaction for authorisation. This screen allows Partial Reversal for transactions that take place through a. b. Cash Deposit ( Fast Path - 1401) Cash Withdrawal (Fast Path - 1001 and Fast Path - 1013) It also allows Same Day/ Any Day Partial Reversal for following transactions a. b. CASA fund transfer ( Fast Path - 1006) GL fund transfer (Fast Path - 1005and Fast Path - 1008) Definition Prerequisites Existence of Transactions for authorisation / reversal Modes Available Not Applicable To view and authorize the records sent for remote authorization 1. Type the fast path 6006 and click Go or navigate through the menus to Transaction Processing > Internal Transactions > Inquiries > Search Electronic Journal. 2. The system displays the Search Electronic Journal screen. 125 6006 - Search Electronic Journal Search Electronic Journal Field Description Field Name Description Teller ID [Conditional, Pick list] Select the teller Id from the pick list. The pick list contains teller IDs from all the branches. By default, the system displays the All option. This field is enabled in the Supervisor login. You can select either Electronic Journal or Remote Authorization. Electronic Journal [Optional, Radio Button] Select Electronic Journal to view or reverse the transactions executed during the day. Remote Authorization [Optional, Radio Button] Select Remote Authorization to authorize the transactions posted by tellers for authorization. The following fields are enabled if Electronic Journal is selected. 126 6006 - Search Electronic Journal Field Name Description Branch Posting Date [Mandatory, dd/mm/yyyy] Type the branch posting date for which the inquiry is to be made. This date should be one of the dates for which the batches are open.The field accepts back dated postings as well. The system by default displays the current posting date. Host Process Date [Mandatory, dd/mm/yyyy] Type the host process date for which the inquiry is to be made. Account No [Optional, Numeric, 16] Type the account number. From Sequence No [Mandatory, Numeric, Four] To Seq No [Mandatory, Numeric, Four] Type the start number for the sequence range. Type the end number for the sequence range. From Txn Time [Mandatory, HH:MM:SS] Type the start time of the time rage. To Txn Time [Mandatory, HH:MM:SS] Type the end time of the time rage. From Amount [Mandatory, Numeric, 13, Two] Type the from amount. To Amount [Mandatory, Numeric, 13, Two] Type the to amount. Mnemonic [Optional, Pick List] Select the mnemonic code, to filter the transactions carried out by the teller, from the pick list. The pick list displays the mnemonic codes of all the transactions that are maintained in Oracle FLEXCUBE. Incomplete Transactions [Optional, Check Box] Remote Authorized Transactions [Optional, Check Box] Column Name Description Select the check box to view the list of incomplete transactions. Select the Remote Authorized Transactions check box to view the list of transactions which have been remotely authorized. 127 6006 - Search Electronic Journal Column Name Description Seq No [Display] This column displays the sequence number of the transactions carried out by the teller. Txn Code [Display] This column displays the mnemonic code for the transactions carried out by the teller. Txn Time [Display] This column displays the system time when the transaction was posted in the branch. Account No [Display] This column displays the account number on which the transaction was carried out by the teller. Ccy [Display] This column displays the currency in which the transaction was done. State [Display] This column displays the status of the transaction. Amount [Display] This column displays the amount in the transaction currency. User ID [Display] This column displays the unique identification of the teller who has committed the transaction. Print Receipt [Link] Click the Click to Print link to print the document receipt. For more information on Document Receipt screen, refer to the Common Screens option available in the Oracle FLEXCUBE Introduction User Manual. 3. Select Electronic Journal option and click the Fetch button to reverse a transaction, if required. 128 6006 - Search Electronic Journal Search Electronic Journal 4. Double-click the sequence number in the Seq No column. 5. The system displays the relevant screen through which the transaction was performed. 129 6006 - Search Electronic Journal Cash Deposit - Correction Reverse 6. Click the Reverse button to reverse the transaction. The system displays the message "Transaction Completed Successfully". 7. Click the Correction Reverse button for same day reversal. This button is enabled only for same day reversal (i.e. when branch posting date field in Search Electronic Journal ( Fast Path- 6006) screen is same as that of current system date). 8. Click the Partial Reverse button to pass the accounting entry with negative amount inputted in transaction amount field This button is enabled only for partial reversal of transactions.( Partial button is enabled only when the Amount Field is modified ) 9. Correction reverse’ and ‘Reverse’ button are invisible for partial reversal, as shown below -- 130 6006 - Search Electronic Journal Partial Reverse To view and authorize the records sent for remote authorization 1. Select Remote Authorization option and click the Fetch button. 131 6006 - Search Electronic Journal Remote Authorization 2. Double-click the sequence number in the Seq No column. 3. The system displays the relevant screen. 132 6006 - Search Electronic Journal 4. Click the Grant button to authorize the transaction. The system displays the dialog box for confirming amount. 5. Enter the amount and click Ok button. The system displays the authorization screen. 6. Enter the relevant information. 7. Click Grant button for record authorization. 133 7040 - Teller Totals Position 3.9. 7040 - Teller Totals Position Using this option a teller can view his/her own position and the total transactions performed by any teller for a particular currency on the posting date. A supervisor can view the position of any teller in his/her branch. This inquiry is only for teller cash and funds transfer position. Cash and transfer transaction details are grouped separately. The total transaction count and amount are provided. You can enquire the transactions for the current or for next posting date. Cash and transfer transaction details are grouped separately. The total transaction count and amount are provided by the system. Definition Prerequisites 9001 - Open Teller Batch Modes Available Not Applicable To view the teller position and the total transactions performed by the teller 1. Type the fast path 7040 and click Go or navigate through the menus to Transaction Processing > Internal Transactions > Inquiries > Teller Totals Position. 2. The system displays the Teller Totals Position screen. Teller Totals Position 134 7040 - Teller Totals Position Field Description Field Name Description Teller Id [Display] This field displays the user ID of the teller who has logged in. In case of a supervisor login, the supervisor can view transaction details of all the tellers under his/her supervision. This field is editable in case of a supervisor login. Currency [Mandatory, Drop-Down] Select the currency, to view the total of all the transaction amounts with that currency from the drop-down list. For example, if you select USD, the system will display the total of all the transaction amounts, for transactions that have USD as their transaction currency. Posting Date [Mandatory, Numeric, dd/mm/yyyy] Type the posting date. By default, the system displays the current date. Txn Type Cash Opening Balance [Display] This field displays the opening balance amount of the teller for the cash transaction in the selected currency. Debits [Display] This field displays the total debit in cash transactions performed by a teller for a particular posting date in the selected currency. Count [Display] This field displays the total count of the debit cash transactions performed by a teller for a particular posting date in the selected currency. Credits [Display] This field displays the total credit amount of cash transactions performed by a teller for a particular posting date in the selected currency. Count [Display] This field displays the total count of the credit cash transactions performed by a teller for a particular posting date in the selected currency. 135 7040 - Teller Totals Position Field Name Description Closing Balance [Display] This field displays the closing balance amount of the teller for the cash transaction in the selected currency. Closing Balance = (Opening Balance + Credit balance) – Debit balance For example, if the opening balance of a teller is 1,00,000 and the teller had a credit transaction of 50,000 and a debit transaction of 25,000. Then, the closing balance will be as follows: Closing Balance = (1,00,000 + 50,000) – 25,000 Therefore, the closing balance will be 1,25,000. Transfer Amount [Display] This field displays the amount of the funds transferred by the teller for a particular posting date in the selected currency. This field displays the funds transferred from one CASA Account to another. Transfer Count [Display] This field displays the count of the funds transferred by the teller for a particular posting date in the selected currency. This field displays the count of funds transferred from one CASA Account to another. 3. Select the currency from the drop-down list. 4. Click the OK button. 5. The system displays the teller totals position details. 136 7040 - Teller Totals Position Teller Totals Position 6. Click the Close button. 137 7015 - Teller Transactions Summary 3.10. 7015 - Teller Transactions Summary Using this option the summary of all transactions performed by the teller on the current posting date for a specified currency can be viewed. A teller can view his/her own position. A supervisor can view the position of any teller in his/her branch. You can enquire the transactions for the current or for next posting date. The system provides information on transaction type, description, number of transactions, total amount and service charge. Definition Prerequisites BAM15 - Transaction Mnemonic Codes BAM25 - Currency Definition 9001 - Open Teller Batch Modes Available Not Applicable To view the teller transactions summary 1. Type the fast path 7015 and click Go or navigate through the menus to Transaction Processing > Internal Transactions > Inquiries > Teller Transactions Summary. 2. The system displays the Teller Transactions Summary screen. Teller Transactions Summary 138 7015 - Teller Transactions Summary Field Description Field Name Description User No [Display] This field displays the user ID of the teller who has logged in. Only those transactions performed by the teller who has logged in are displayed. Currency [Mandatory, Drop-Down] Select the currency to view the total of all the transaction amounts with that currency from the drop-down list. For example, if you select USD, the system will display the total of all the transaction amounts, for transactions that have USD as their transaction currency. Date [Mandatory, dd/mm/yyyy] Type the posting date. By default, the system displays the current posting date. Column Name Description Description [Display] This column displays the description of the transactions carried out by the teller. The description is maintained in the Transaction Mnemonic Codes (Fast Path: BAM15) option. Type [Display] This column displays the type of transaction carried out by the teller. No Txns [Display] This column displays the number of transactions of a particular type carried out by the teller for a particular posting date. Total Amount [Display] This column displays the total amount for a particular type of transaction, carried out by the teller for a particular posting date. Service Charge [Display] This column displays the total service charge amount for a particular type of transaction, carried out by the teller for a particular posting date. 3. Select the currency from the drop-down list. 4. Enter the posting date and click the OK button. 5. The system displays the teller transaction summary. 139 7015 - Teller Transactions Summary Teller Transactions Summary 6. Click the Close button. 140 6010 - View Teller Errors 3.11. 6010 - View Teller Errors Using this option errors committed by the branch tellers can be viewed . The screen displays the overage or shortage booked by the teller on any day. This is a report on the differences a teller has encountered between the actual cash present with the teller and the cash calculated by the system. A supervisor can view the teller errors for all tellers. Definition Prerequisites The teller branch should be open for the current posting date. Modes Available Not Applicable To view the teller errors 1. Type the fast path 6010 and click Go or navigate through the menus to Transaction Processing > Internal Transactions > Inquiries > View Teller Errors. 2. The system displays the View Teller Errors screen. View Teller Errors 141 6010 - View Teller Errors Field Description Field Name Description Teller Id [Mandatory, Drop-Down] Select the user identification of the teller from the drop-down list. By default, this field displays the user ID of the teller who has logged in. The supervisor can view transaction details of all the tellers associated under his/her supervision. Date [Mandatory, dd/mm/yyyy] Type the appropriate date range to filter the transaction errors committed by the teller. The value in the To Date field should be greater than the From Date field. Currency [Mandatory, Drop-Down] Select the currency to view the total of all the transaction amounts with that currency from the drop-down list. For example, if you select USD, the system will display the total of all the transaction amounts, for transactions that have USD as their transaction currency. Error Amount [Mandatory, Numeric, 13, Two] Type the amount range to filter the transaction errors by amount, committed by the teller for a particular currency. The value in the End amount field should be greater than the Start amount field. By default, the system displays the amount range as 0.00 to 999,999,999.00. Column Name Description TxnDate [Display] This column displays the date on which the transaction has taken place. Type [Display] This column displays the type of transaction performed by the teller. Currency [Display] This column displays the currency in which the transaction has taken place. Amount [Display] This column displays the transaction amount. 142 6010 - View Teller Errors 3. Select the appropriate teller id and currency from the drop-down list. 4. Select the from date and to date from the pick list. 5. Enter the error amount. 6. Click the OK button. 7. The system displays the teller error details. View Teller Errors 8. Click the Close button. 143 Report Generation Transactions 4. Report Generation Transactions Management, operational staff and customers need reports to acquire information or status of the transactions/activities performed on the system. Every bank branch is responsible for issuing an advice to their customers against every transaction performed in their respective accounts. By default, all the reports, adhoc and batch, are generated in the central FLEXCUBE Retail application server. This section deals with maintaining the report control, requesting for the reports and advices and generating or canceling the requested reports and advices. 144 BAM16 - Report Control Maintenance 4.1. BAM16 - Report Control Maintenance Using this option the setup can control the generation of various reports by Oracle FLEXCUBE. Reports can be generated as adhoc reports or batch reports. The adhoc reports are generated on demand or online using the Report Request (Fast Path: 7775) option from a branch terminal. The batch reports are automatically generated during the end of day or beginning of day operations. You can also maintain the module to which the report belongs to and the frequency of generation of reports in this option. Definition Prerequisites Not Applicable Modes Available Add, Modify, Delete, Cancel, Amend, Authorize, Inquire. For more information on the procedures of every mode, refer to Standard Maintenance Procedures. To add the report control details 1. Type the fast path BAM16 and click Go or navigate through the menus to Global Definitions > Other > Report Control Maintenance. 2. The system displays the Report Control Maintenance screen. Report Control Maintenance 145 BAM16 - Report Control Maintenance Field Description Field Name Description Report Id [Mandatory, Alphanumeric, 10] Type the report ID. The report ID is a unique number that is manually assigned. Once assigned, it helps to identify the report in FLEXCUBE Retail. Module [Mandatory, Drop-Down] Select the module to which the report belongs from the drop-down list. The options are: Report/Advice LN: Stands for Retail Loan TD CH: Stands for CASA ST: Stands for Settlement GL COL: Stands for Online CCI: Stands for Customer Information CAP: Stands for Application Processing CBS: Stands for Security based to users CBA: Stands for Bank Global CSM: Stands for Security Management CTP: Stands for Transaction Processing CTS: Stands for Tax Deduction at Source CAT: Stands for ATM [Mandatory, Drop-Down] Select the name of the advice/report for which the request has been maintained from the drop-down list. The options are: R: for a Report A: for an Advice 146 BAM16 - Report Control Maintenance Field Name Description Report Type [Mandatory, Drop-Down] Select the type of report from the drop-down list. The report type indicates the logical period in the FLEXCUBE Retail life cycle for generation of the report. The options are: Report Name EOD: The report is automatically printed during EOD BOD: The report is automatically printed during BOD Adhoc: The report will be available for adhoc printing Branch: The report will be available in the branch for adhoc printing. [Mandatory, Alphanumeric, 40] Type the name of the report. Print Flag [Optional, Check Box] Select the Print Flag check box to send the report automatically to the printer for printing. If the check box is cleared, the reports are spooled for future printing. Delete Flag [Optional, Check Box] Select the Delete Flag check box to delete the spooled report file after printing it. Total Copies [Mandatory, Numeric, Two] Type the number of copies of the report that are to be printed. Frequency [Mandatory, Drop-Down] Select the frequency at which the report is to be generated from the drop-down list. The options are: Daily Weekly Fortnightly Monthly Bimonthly Quarterly Half-yearly Yearly 147 BAM16 - Report Control Maintenance Field Name Description Priority [Mandatory, Numeric, One] Type the priority level of the report. The reports will be printed according to their priority level. Access Level [Mandatory, Numeric, Two] Type the access level of the report. This is used to indicate the number of lines per page in the report. The level is usually any number between 0 and 60. File Id. This field is for future use. Invocation Var 1 to 5 [Optional, Alphanumeric, 40] Type the parameters to be requested at the time of report generation. These parameters can customize the report generation. 3. Click the Add button. 4. Enter the report ID and press the <Tab> key. 5. Select the report type, module, report/advice and the frequency from the drop-down list. 6. Enter the name of the report and the invocation variance. 148 BAM16 - Report Control Maintenance Report Control Maintenance 7. Click the Ok button. 8. The system displays the message "Record Added...Authorisation Pending...Click Ok to Continue". Click the OK button. 9. The report control details are added once the record is authorised. 149 7775 - Report Request 4.2. 7775 - Report Request Using this option reports and advices can be requested. The request for two types of reports can be given, viz. adhoc reports and batch reports. The adhoc reports are generated on demand or on request, while the batch reports are automatically generated at the end of day or beginning of day. The user can select the report type and the module to display the report categories. Each category has different reports, displayed along with their ID and title. The user can select the desired report from the list to generate it. For more information, please refer to the respective module wise Reports Manual. Definition Prerequisites BAM16 - Report Control Maintenance Modes Available Not Applicable To request for a report 1. Type the fast path 7775 and click Go or navigate through the menus to Transaction Processing > Internal Transactions > Reports > Report Request. 2. The system displays the Report Request screen. 150 7775 - Report Request Report Request Field Description Field Name Description Types of report Select the appropriate option to generate the report. The options are: Adhoc Reports Batch Reports By default, the Adhoc Reports option is selected. Adhoc Reports [Mandatory, Radio Button] Click Adhoc Reports to generate and view an adhoc report. Batch Reports [Mandatory, Radio Button] Click Batch Reports to view EOD/BOD reports and advices for a particular batch. Column Name Description 151 7775 - Report Request Column Name Description Report Group [Display] This column displays the different report groups under the different modules. 3. Select the appropriate option for the report type.. 4. Click the appropriate tab for which you can generate/view reports. The system displays the report group lists. 5. Double-click the appropriate report group. The system displays the report title, and the corresponding report ID. 6. Double-click the report title. The system displays the Input Parameters screen. The number of input parameters will be determined by the nature of report, which is required. 7. Enter the relevant information and click the Generate/View button. Note: Oracle Flexcube supports report generation in PDF, HTML and Excel formats. Based on the system configuration the reports can be generated in any of the above mentioned format. 152 7780 - Advice/Report Cancel Request 4.3. 7780 - Advice/Report Cancel Request Using this option, you can cancel advice/report request transactions that are sent for printing /viewing of generated ad-hoc advice /report. In this option, only those requests placed by a particular user login ID can be cancelled. Definition Prerequisites BAM16 - Report Control Maintenance 7775 - Report Request Modes Available Not Applicable To perform the advice/report cancel request 1. Type the fast path 7780 and click Go or navigate through the menus to Transaction Processing > Internal Transactions > Reports > Advice/Report Cancel Request. 2. The system displays the Advice/Report Cancel Request screen. 153 7780 - Advice/Report Cancel Request Advice/Report Cancel Request Field Description Field Name Description Teller ID [Display] This field displays the user ID of the teller who has logged in. Only those transactions performed by the teller who has logged in will be displayed. In case of a supervisor login, the supervisor can view all the report/advice requests of any teller associated under his/her supervision. This field is editable, in case of a supervisor login. Column Name Description ID [Display] This column displays the ID of the advice or report for which the request has been maintained. The report ID is added and maintained in the Report Control Maintenance (Fast Path: BAM16) option. 154 7780 - Advice/Report Cancel Request Column Name Description Report/ Advice Name [Display] This column displays the name of the advice/report for which the request has been maintained. R/A [Display] This column displays whether the request has been maintained for an advice or a report. The options are: Select R: for a Report A: for an Advice [Optional, Check Box] Select the check box to cancel the corresponding advice/report. 3. Select the appropriate check box in the Select column. Advice/Report Cancel Request 4. Click the OK button. 5. The system will cancel the advice/report request. Click the Close button. 155 7781 - Report Cancel All Tellers 4.4. 7781 - Report Cancel All Tellers Using this option, a supervisor can cancel advice/report request transactions sent by all users for printing /viewing of generated ad-hoc advice /report. A supervisor can cancel advice/report requests in certain circumstances such as high load on network or if reports are not required urgently. Definition Prerequisites BAM16 - Report Control Maintenance 7775 - Report Request Modes Available Not Applicable To cancel the advice/report request for all the tellers 1. Type the fast path 7781 and click Go or navigate through the menus to Transaction Processing > Internal Transactions > Reports >Report Cancel All Tellers. 2. The system displays the Report Cancel All Tellers screen. 156 7781 - Report Cancel All Tellers Report Cancel All Tellers Field Description Column Name Description ID [Display] This column displays the ID of the advice or report for which the request has been maintained. The report ID is added and maintained in the Report Control Maintenance (Fast Path: BAM16) option. Report/ Advice Name [Display] R/A [Display] This column displays the name of the advice/report for which the request has been maintained. This column displays the displays if the request is maintained for an advice or a report. The options are: R: for a Report A: for an Advice 157 7781 - Report Cancel All Tellers Column Name Description User ID [Display] This column displays the user ID of the teller/supervisor who has placed the request for the advice/report. Select [Optional, Check Box] Select the check box to cancel the advice/report. 3. Select the appropriate check box in the Select column. Report Cancel All Tellers 4. Click the Ok button. 5. The system will cancel all the teller's advice/report request. Click the Close button. 158 7779 - Report Print All Tellers 4.5. 7779 - Report Print All Tellers Using this option you can view the advice/report status that is requested by all users through the Report Request (Fast Path: 7775) option. Once the report/advice is selected for viewing, it cannot be viewed again by using this option. Definition Prerequisites BAM16 - Report Control Maintenance 7775 - Report Request Modes Available Not Applicable To view the report and advice status 1. Type the fast path 7779 and click Go or navigate through the menus to Transaction Processing > Internal Transactions > Reports > Report Print All Tellers. 2. The system displays the Report Print All Tellers screen. 159 7779 - Report Print All Tellers Report Print All Tellers Field Description Column Name Description ID [Display] This column displays the ID of the report or advice for which the request has been made. Report/ Advice Name [Display] This column displays the name of the report/advice for which the request has been made. R/A [Display] This column displays whether the request has been maintained for a report or an advice. The options are: User ID R: for a Report A: for an Advice [Display] This column displays the user ID of the teller/supervisor who has placed the request for the report/advice. 160 7779 - Report Print All Tellers Column Name Description Select [Optional, Check Box] Select the check box to view the report/advice. 3. Select the appropriate check box in the Select column. Report Print All Tellers 4. Click the OK button. 5. The system displays the report. 161 7779 - Report Print All Tellers Report 6. Select the Print option from the File menu. 7. The system displays the Print dialog box. 8. Select the appropriate parameters and click the Print button. 9. Click the Close button. 162 7778 - Advice/Report Status Inquiry 4.6. 7778 - Advice/Report Status Inquiry Using this option the advice /reports are displayed which are requested by the user login Id, through the Reports Request (Fast Path: 7775) option. The user who has requested the advices/reports can view the status and generate the advices or reports. The supervisor can view all the report/advice requests of any teller associated under his/her supervision. In this case, select the teller from the drop-down list whose transaction details you want to view. For more information, please refer to the respective Module wise Reports Manual. Definition Prerequisites BAM16 - Report Control Maintenance 7775 - Report Request Modes Available Not Applicable To view the advice/report status 1. Type the fast path 7778 and click Go or navigate through the menus to Transaction Processing > Internal Transactions > Reports > Advice/Report Status Inquiry. 2. The system displays the Advice/Report Status Inquiry screen. 163 7778 - Advice/Report Status Inquiry Advice/Report Status Inquiry Field Description Field Name Description Teller ID [Display] This field displays the user ID of the teller who has logged in. Only those report generation requests performed by the teller who has logged in will be displayed. In case of a supervisor login, the supervisor can view all the report/advice requests of any teller associated under his/her supervision. In this case, select the teller whose transaction details you want to view, from the drop-down list. This field is editable, in case of a supervisor login. Column Name Description 164 7778 - Advice/Report Status Inquiry Column Name Description ID [Display] This column displays the ID of the advice or report for which the request has been made. The report ID is added and maintained in the Report Control Maintenance (Fast Path: BAM16) option. Report/ Advice Name [Display] R/A [Display] This column displays the name of the advice/report for which the request has been made. This column displays whether the request has been maintained for an advice or a report. The options are: Select R: for a Report A: for an Advice [Optional, Check Box] Select the check box to view the corresponding advice/report. 3. Select the appropriate check box in the Select column 165 7778 - Advice/Report Status Inquiry Advice/Report Status Inquiry 4. Click the View button. 5. The system displays the report. 166 7778 - Advice/Report Status Inquiry Report 6. Select the Print option from the File menu. 7. The system displays the Print dialog box. 8. Select the appropriate parameters and click the OK button. 167 Branch Operations User Manual Oct 2012 Version : 4.5.0.0.0 Oracle Corporation World Headquarters 500 Oracle Parkway Redwood Shores, CA 94065 U.S.A. Worldwide Inquiries: Phone: +1.650.506.7000 Fax: +1.650.506.7200 www.oracle.com/ financial_services/ Copyright © 2012 Oracle and/or its affiliates. All rights reserved. No part of this work may be reproduced, stored in a retrieval system, adopted or transmitted in any form or by any means, electronic, mechanical, photographic, graphic, optic recording or otherwise, translated in any language or computer language, without the prior written permission of Oracle Financial Services Software Limited. Due care has been taken to make this document and accompanying software package as accurate as possible. However, Oracle Financial Services Software Limited makes no representation or warranties with respect to the contents hereof and shall not be responsible for any loss or damage caused to the user by the direct or indirect use of this document and the accompanying Software System. Furthermore, Oracle Financial Services Software Limited reserves the right to alter, modify or otherwise change in any manner the content hereof, without obligation of Oracle Financial Services Software Limited to notify any person of such revision or changes. All company and product names are trademarks of the respective companies with which they are associated.