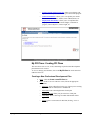
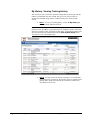
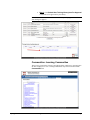
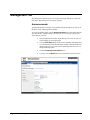
1
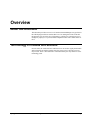
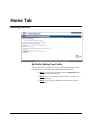
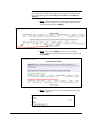
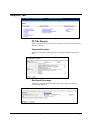
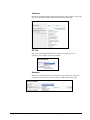
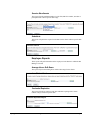
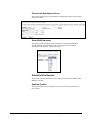
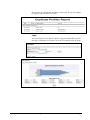
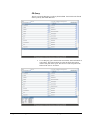
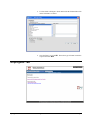
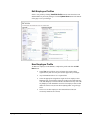
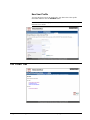
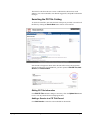
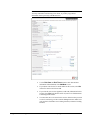
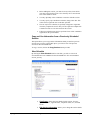
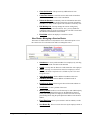
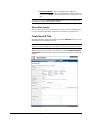
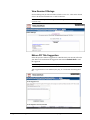
Spring 2008-2009 School Year
STI PD AL
PD Manager User Manual
Information in this document is subject to change without notice. Student and school data used herein are fictitious
unless otherwise noted.
The contents of this document are the property of STI. This information is intended for users of the STI suite of products
only. Reproduction or redistribution of these materials to anyone other than STI customers or users of STI Software is
prohibited without prior written consent from STI.
© 2004-2009 Software Technology, Inc. All rights reserved.
Microsoft, Windows, Word and Internet Explorer are registered trademarks or trademarks of Microsoft Corporation in
the United States and other countries.
Other product and company names herein may be the trademarks of their respective owners.
Software Technology, Inc.
USA Technology and Research Park
307 University Boulevard North
Bldg. IV, Suite 400
Mobile, AL 36688
(800) 844-0884
This document was last modified on April 28, 2009. Any subsequent changes made to the STI applications described
herein will be discussed in the release notes that accompany each product’s update.
Contents
Overview
1
About this Document ................................................................................................................. 1
Terminology of Classes and Sections ........................................................................................ 1
Home Tab
2
Getting Started ........................................................................................................................... 2
My Profile: Editing Your Profile................................................................................. 2
My PD Plans: Creating PD Plans ................................................................................ 3
My Sessions: Viewing the Session Schedule Calendar ............................................... 4
My History: Viewing Training History ....................................................................... 6
Communities: Learning Communities......................................................................... 7
Management Tab ....................................................................................................................... 8
Announcements ........................................................................................................... 8
Career Objectives ........................................................................................................ 9
Evaluations .................................................................................................................. 9
Locations ................................................................................................................... 11
Programs.................................................................................................................... 14
References ................................................................................................................. 14
Suggestions................................................................................................................ 15
Enrollments ............................................................................................................... 16
Process Session Payments ......................................................................................... 18
Manage My LEA Preferences ................................................................................... 20
Merge Duplicate Profiles........................................................................................... 21
Reports Tab.............................................................................................................................. 23
PD Title Reports ........................................................................................................ 23
Employee Reports ..................................................................................................... 25
Administrative Reports.............................................................................................. 26
Employees Tab ........................................................................................................................ 29
Search for Employee Profiles .................................................................................... 30
Edit Employee Profiles.............................................................................................. 31
New Employee Profile .............................................................................................. 31
New User Profile ....................................................................................................... 32
PD Titles Tab........................................................................................................................... 32
Searching the PD Title Catalog ................................................................................. 33
Create New PD Title ................................................................................................. 37
View Session Offerings............................................................................................. 38
Make a PD Title Suggestion...................................................................................... 38
Index
Spring 2008-2009 School Year STI PD AL
39
STI_0428091347
Contents • iii
Overview
About this Document
This document provides an overview of functions that PD Managers may perform in
the STI PD program. Please note that there are a few management roles in the STI
PD program. One role is the role of PD Manager, which gives a manager access to
manage any employee’s or professional development for the entire school district or
LEA.
Terminology of Classes and Sections
In some states, the words PD Titles and PD Sessions are used to signify the PD titles
and sessions that are taught. In other states, the terms Courses and Class Sessions
may be used. There is not a difference in the functionality; the only difference is the
terminology used.
Spring 2008-2009 School Year STI PD AL
STI_0428091347
Overview • 1
Home Tab
Getting Started
My Profile: Editing Your Profile
This area allows users to manage basic aspects of their individual profile, such as
Login Information, Contact Information and Employment Information.
2 • Home Tab
STI_0428091347
•
Step 1: To view or edit your Profile click on the My Profile link on
the menu bar under the Home tab.
•
Step 2: Click on one of the three links available to view/edit your
profile information.
•
Step 3: View or edit your information. There are three options to
choose from:
Spring 2008-2009 School Year STI PD AL
o
Login Username and/or Password - allows you to change your
login name and/or password used to log in to the STI PD program.
o
Contact Information - allows you to view/update your contact
information, such as Name, Address, Date of Birth, Phone, etc.
o
Employment Information - allows you to view/update basic
employee information such as Grades Taught, Credentials in
progress, Career Objective, Classes taught, etc.
My PD Plans: Creating PD Plans
This area allows users to view, create, and manage any Professional Development
plans that have been created.
To view or manage your PD Plans, click on the My PD Plan link on the menu bar
under the Home tab.
Creating a New Professional Development Plan
Spring 2008-2009 School Year STI PD AL
•
Step 1: Click the Create a new PD Plan link.
•
Step 2: In the Create New PD Plan screen, fill out the appropriate
information.
o
Plan Type: Select a Plan Type for the type of plan you are creating.
Options include AL PEPE, LEA or PERSONAL.
o
Plan Name: Enter a meaningful name for this plan.
o
Position (optional): Enter your job at the time of this plan.
o
Date Range: Enter a date range for which this PD Plan will be
applicable.
o
Status: Select a current status for this Plan (Pending, Active or
Inactive).
STI_0428091347
Home Tab • 3
•
When finished click the Create Now button to create your Plan.
Note: Any PD Plans you have created will display in the My PD Plans screen. Each
plan will display under the appropriate status. Some examples are shown below.
Managing a Professional Development Plan
Now that you have created a PD Plan, you may manage that plan by clicking the
Manage or Edit links provided.
•
Step 1: Click on the Manage link to manage this plan.
•
Step 2: To add a new area to the plan, click the New Area link.
•
Step 3: Select the area type and give it a name that is meaningful to
you. Also, you may type in the PD Goals & Objectives; select Goals &
Objectives by Reference; type in any proposed activities; add Proposed
PD Titles; enter a timeline; type in the appropriate Assessment
Methods; and add Progress Check Dates.
•
Step 4: When you are done, click the Save button. If desired, you
may also Cancel your changes or completely Delete the area.
My Sessions: Viewing the Session Schedule
Calendar
This area allows users to view what PD class sessions are being offered on specific
dates. They can view this in a calendar view or a list view.
4 • Home Tab
STI_0428091347
•
Step 1: To view your schedule of sessions, click the My Sessions
link on the menu bar under the Home tab.
•
Step 2: Choose the session you wish to view: Sessions Enrolled
(sessions you are enrolled in to attend) or Sessions Taught (sessions in
which you are the lead instructor).
Spring 2008-2009 School Year STI PD AL
•
Step 3: To view the details of a specific session in the calendar, click
on that session.
Note: You may use the navigational links (Previous Week, Next Week or
Current Week) above the calendar to move to different weeks. You may also view
sessions in a list view by clicking the Go to List View link.
Spring 2008-2009 School Year STI PD AL
•
Step 4: If you would like to indicate a time of year during which a
session could be offered to better suit your needs, click on the Submit
Session Request button in the top right corner of the Session
Information screen.
•
Step 5: At the bottom of the screen, you may view any previous
session requests that you have made. These requests may be deleted at
any time if desired.
STI_0428091347
Home Tab • 5
My History: Viewing Training History
This area allows users to track their personal Training History and keep up with the
number of Credit/Hours they have earned. This gives a list of any sessions an
employee has attended, along with the Credit/Hours they have earned for that
session.
•
Step 1: To view your training history, click on the My History link
on the menu bar under the Home tab.
Note: The training history screen outlines the name, date and location of your
training sessions. In addition, your proficiency level, attendance, points, credits and
status are provided. To filter your history by date range, enter the desired dates in the
Start Date and End Date fields and then click the Filter by Date Range button.
You may leave one or both fields empty.
•
6 • Home Tab
STI_0428091347
Step 2: You may scroll to the bottom of the page to view and submit
new training items for approval. These history items are generally items
that take place outside your LEA but this could also be used for any
other history items as well.
Spring 2008-2009 School Year STI PD AL
•
Step 3: Click Submit New Training History Item For Approval
to add items to be approved for your history.
Note: These additional sessions will then be added as pending approval items from
your manager to approve.
Communities: Learning Communities
The Learning Communities feature is provided to allow employees to post messages
for other employees to view. Learning communities may be accessed from either
Communities link.
Spring 2008-2009 School Year STI PD AL
STI_0428091347
Home Tab • 7
Management Tab
Most management options may be accessed by clicking the Management tab in the
main menu. The Management Tools page will open.
Announcements
Announcements allow a manager to post announcements that employees will see on
the Home screen when logged into STI PD.
To create an announcement, click the Announcements link or tab and perform the
steps listed below. Announcements you create may be viewed only by those users
who belong to your LEA.
8 • Home Tab
STI_0428091347
•
Give the announcement a title. In the Message box, enter any text you
wish to display for users upon login.
•
Click the Pick Date buttons and select the beginning and ending dates
to set the duration of the announcement’s display. Announcements will
display from 12:01 a.m. of the specified Start Date until 12:01 a.m. of
the specified Expire Date.
•
Click the Create Announcement button.
•
You may view and Delete previous announcements in the list below.
Spring 2008-2009 School Year STI PD AL
Career Objectives
Managers can create Career Objectives that may be attached to an employee’s profile
to track any career objectives that an employee has.
This tab allows a manager to create additional Career Objectives. The Career
Objectives listed here may be selected in the Career Objectives field in the Employee
Profile. Note that some Career Objectives are pre-installed in the STI PD program.
•
To modify an existing objective, click the edit button.
•
Click Create New Career Objective to add a new Career Objective
to the list.
Evaluations
In this area, managers can create, view and manage evaluations to evaluate PD
sessions, PD Titles, and Instructors.
The Evaluations tab will list any evaluations that have been created. Here you may
edit, preview, view responses or e-mail the evaluation to participants.
Evaluations may be attached to PD sessions or e-mailed to employees to evaluate
sessions, PD Titles, instructors, etc.
Spring 2008-2009 School Year STI PD AL
STI_0428091347
Home Tab • 9
•
There are two views in the Manage Evaluations screen. You may view
evaluations you have personally created under the My Evaluations side
of the screen (left side). On the right side of the screen, you will see
evaluations created by other users. Note that evaluations created by
other users not only pertain to others in your LEA but also (for some
states) other LEA’s in your state as well. You are permitted to copy,
email and view anonymous responses of evaluations created by others.
Creating a New Evaluation
•
Click Create a New Evaluation. In the next screen, enter the name
and description of the evaluation and click the Continue button.
•
Enter your list of questions in the area provided for question text. Then
choose an answer set to apply to that question. You may add or edit
answer sets as well.
Note: The evaluation status should be flagged as Active if you wish to attach the
evaluation to a class or e-mail it to a list of participants.
•
After you have made any changes to an evaluation, be sure to click the
Update button to save those changes.
Managing Evaluations
Once an evaluation has been created, you may choose to Edit the evaluation or
Preview it; view Responses of the evaluation; and Email the evaluation to
employees.
10 • Home Tab
STI_0428091347
•
Edit: Editing an evaluation is essentially the same as creating one. You
may modify, add or delete questions in your evaluation. Be sure to
click the Update button after any changes are made.
•
Preview: Allows you to preview how the evaluation appears to those
who take the evaluation.
Spring 2008-2009 School Year STI PD AL
•
Responses: Allows you to view anonymous responses to the
evaluation. You may see responses for specific sessions or dates; or
you may view all responses that have been given for that evaluation.
•
Email: Gives you the ability to e-mail an evaluation to employees for
them to take the evaluation. Responses are saved under E-mailed
Evaluations.
Copying Evaluations
You may copy any evaluations created by other users. To do this, click on the Copy
link next to any evaluation that you want to make a copy of.
Once you have done this, a new evaluation will be placed in My Evaluations under
the name of _My_Copy_(name of evaluation you copied). You may then edit that
evaluation and rename it.
Locations
Locations exist in the program to track the Location in which employees reside (i.e.
High School, Elementary School, etc) and to track the locations in which training
sessions take place.
Locations (school sites) are usually imported into the database as part of the data
import during the pre-implementation process. A manager may search and edit
existing locations or create a new location.
Note: It may be necessary to enter district office locations.
Spring 2008-2009 School Year STI PD AL
STI_0428091347
Home Tab • 11
Creating a New Location
•
Click Create a New Location: When a new location is added, select
the Location Usage from the pull-down menu.
•
The School Code is the cost center code for the location.
•
An internet URL should be specified if there is a Web site associated
with the location.
•
You may enter the LEA for the location if you are a State PD Manager.
Otherwise, it will be filled in for you.
•
Click Add Now when all appropriate information has been entered.
Note: For Location Usage, only locations specified as District+Training or Training
Location are available as locations to which sessions may be assigned. Only those
specified as District+Training or District School or Office are available as locations
which users may be assigned.
12 • Home Tab
STI_0428091347
Spring 2008-2009 School Year STI PD AL
Search and Edit Locations
You may search and edit locations by clicking on the Search and Edit Locations
link. From the search screen, you may enter criteria to search for locations. Leave
search fields blank to view all locations.
•
You may edit a location by clicking the Edit link provided.
•
You may add rooms to a location by clicking the View Rooms link.
This allows you to specify rooms in which a training session will occur
at this location. When creating and editing a session, the actual room
where the session will occur may be specified (in addition to the
location).
Note: If the desired room has not been previously entered, the user may select Other
and enter a new room name when creating a session. The system will create the
specified room during the scheduling of the session.
•
Spring 2008-2009 School Year STI PD AL
To add a new room, enter a room number or name in the space
provided and then click Create Now.
STI_0428091347
Home Tab • 13
Programs
Programs is an optional feature. Once you create one or more programs, PD Titles
may be added to the programs so that users may search PD Titles by program. This
allows employees to locate any specific PD Titles that fall under a particular
program.
•
Click the Create A New Program link to add a program to the list.
•
You may Edit any existing programs from the program list.
References
Some references, which are typically set by the various states, are pre-installed with
the program. As a manager, you may create new references (or standards) that you
may use to align with PD Titles. By doing this, you will be able to generate reports
on PD activities and histories by reference or by standard. For more information, see
“PD Title Reports” on page 23.
References may be added to PD Titles. Users may then search the PD Title Catalog
by Reference.
Note: In some states, references that display are only those that are state-wide. Do
not edit or delete a reference that was not created by you personally.
Adding a New Reference
14 • Home Tab
STI_0428091347
•
To add a new reference, click on the Add New link.
•
Enter a name for the references. Then enter an abbreviation and a
description, and designate whether the reference you are entering is a
group of references or an individual reference. The click Create Now.
•
To add the references that fall under a reference area from the Manage
screen, click on the Add link.
Spring 2008-2009 School Year STI PD AL
•
Repeat process as necessary.
Suggestions
PD Title and Session suggestions may be viewed and flagged as viewed after a
manager has reviewed a suggestion. These suggestions will be limited to those
submitted by users in your LEA (unless you are a State PD Manager). This area
allows you to view Course and Class suggestions made by employees in your LEA.
You may then flag a status of NEW, REVIEWED, NOTED or ARCHIVED for each
suggestion.
Spring 2008-2009 School Year STI PD AL
STI_0428091347
Home Tab • 15
Enrollments
This screen will list any users who have pending requests for approval to enroll in a
session. To process a request, click the Process This Request link. To
correspond with the user, you may click on his or her email address, or you may look
up the user’s contact info by clicking the View/Edit Profile link.
Please Note: Only users who have been flagged as requiring enrollment approval
(see the section “New Employee Profile” on page 31 for more information) will
appear on this list.
•
Click on the Click Here To Process This Request link to process
a request.
•
To process a session enrollment request, review the request information
on the Process screen and be sure to select the appropriate approval
status in the form. When you are ready, click the Process Now
button.
•
An e-mail will be generated and sent to the user when you process this
request. Any comments you enter will also be sent.
Approve Training
Employees have the ability to submit training records for activities they have
completed that are not offered within the PD system (outside courses, workshops,
etc). This area allows the manager to review those activities and approve them after
determining that they qualify for credit. Any approved items are added to the
employee’s training history.
16 • Home Tab
STI_0428091347
Spring 2008-2009 School Year STI PD AL
Approve Employee Training History
The first step in this process is to search for employees. You may enter search
criteria here or check the box beside the option Search only those employees who
have pending approvals and/or Search for active employees only. Only those
employees who have submitted training history requests will appear in the search
results.
View Submitted Training History
In the employee list, click the View Submitted Training History link to view this
information for applicable employees.
Note: Also shown are the numbers of pending requests and total requests.
Spring 2008-2009 School Year STI PD AL
STI_0428091347
Home Tab • 17
Approve Status
To approve a training status, check the Approved? box or click the Modify link.
When finished, click the Update Approved Status button.
You may also submit a new Training History item for an employee from this screen
as well.
Process Session Payments
In this area of the program, you may record a Payment that an employee has made
for a session they have attended or will attend. Payment information that has been
submitted and/or processed is listed here. To view or process payments, click the
View link. Please note that you may only manage payments for those courses that
were created by your LEA.
18 • Home Tab
STI_0428091347
Spring 2008-2009 School Year STI PD AL
You will see a list of all payments from this screen: Newly submitted, In-process,
Approved and Refunded. To view any of these payments, click on the View link.
Review and Process New Payments
Each payment will be listed along with the user and session information. You may
view or print out individual entries by clicking on the View Details link or the
Print link.
To print more than one payment, select the checkboxes for each payment and then
click the Print Selected Items button at the bottom of the screen.
Once the payment information has been printed, you will want to mark the selected
items as processed. To do so, make sure the appropriate checkboxes are selected and
enter any desired comments (which will be recorded for each selected item). Next,
click the Mark As In Process button.
Approve or Decline Payments
After a payment item is in-process, you will want to mark it as either approved or
declined. To do this, click the View link for In-process items to bring up the screen
below.
You may approve or decline items by first selecting the appropriate checkboxes to
the left of your items and then clicking either the Approve Selected Items or
Decline Selected Items button.
Spring 2008-2009 School Year STI PD AL
STI_0428091347
Home Tab • 19
Manage My LEA Preferences
•
Enrollment Approval Required: Determines which is used on an
Employees Profile. Options include changing the value of the
Enrollment Approval Required for everyone. Note that this will change
the value for all employees in your LEA. Select a value from the dropdown box and click the Change button.
•
Email Recipients: Determines who will receive e-mail notifications
about employees. Be sure to click the Update button to save any
changes you make.
•
Award Lead Instructor Additional Credit: Determines how much
extra credit to assign for lead instruction.
Note: Whatever amount is entered will by multiplied by the number of hours that the
course is worth. Entering a 1 will only award the instructor the hours that the course
is worth.
20 • Home Tab
STI_0428091347
Spring 2008-2009 School Year STI PD AL
Merge Duplicate Profiles
This area allows the PD Manager to merge any duplicate profiles for their district.
Note: If an employee profile is currently in another district, please contact STI to
have the profile moved to the current district.
Spring 2008-2009 School Year STI PD AL
•
Step 1: Select where you want to search for duplicates (All Locations
within a district or a Specific Location within a district). Click Search.
•
Step 2: A list of employees with duplicate profiles will display. If all
of the duplicate profiles are not listed for your district, this means that
the social security numbers on the profiles do not match.
•
Step 3: Click on the link Reconcile Duplicate Profiles to the
right of the employee name
•
Step 4: A screen will appear with both profiles listed for the one
employee. The profile(s) on the bottom will be merged into the profile
on the top. The profile on the top will be the profile that is kept. This
will include the username and password that is attached to the top
profile.
STI_0428091347
Home Tab • 21
IMPORTANT: This process is irreversible. Make sure that the profiles for the
same employee are merged. The merging process will merge all credit history for
both profiles into one profile. Do Not Merge Two Profiles For Two Different
Employees.
22 • Home Tab
STI_0428091347
•
Step 5: After the PD Manager has verified that the duplicate profiles
listed are the same employee. Put a check mark beside the profile(s)
that need to be merged and click Merge.
•
Step 6: Once you click Merge, you will receive a verification
message. Make sure that these profiles are for the same employee and
click Confirm.
•
Step 7: The user will then receive a message stating that the merge
has been completed.
Spring 2008-2009 School Year STI PD AL
Reports Tab
PD Title Reports
These reports will pull information on the PD Titles in the district in which the PD
Manager is located.
Completed Sessions
This report will pull all sessions that have been completed within a specific date
range.
Enrollment Percentage
This report will pull all enrollees within a specific date range by PD Title, By
Location or By Instructor.
Spring 2008-2009 School Year STI PD AL
STI_0428091347
Home Tab • 23
Instructor
This report will pull information based on the instructor, the instructor’s school code,
title content previously taught, and/or the PD Titles previously taught.
PD Title
This report will pull all PD Titles based on grade level, proficiency levels,
references, course subjects, or taken by employee.
Sessions
This report will pull all sessions by session delivery type, grade level, instructors,
proficiency levels, references, or course subjects within a specific date range.
24 • Home Tab
STI_0428091347
Spring 2008-2009 School Year STI PD AL
Session Enrollments
The report will pull enrollment numbers by PD Title, PD Title number, start date or
participant name within a specific date range.
Substitute
This report will pull of the request for substitutes in the district within a specific date
range.
Employee Reports
These reports will pull information on the employees in the district in which the PD
Manager is located.
Average Hours Drill-Down
The report will print the training hours within a date range for the district.
Credential Expiration
The report will pull any employee who has credentials expiring with a certain
number of days, based on a specific date.
Spring 2008-2009 School Year STI PD AL
STI_0428091347
Home Tab • 25
Professional Development Hours
The report will pull a range of professional development hours within a specific date
range for the district.
Uncertified Employees
The report will pull all employees that will have their certification deadline has
expired within the selected amount of time. The employee must be marked
‘uncertified’ on their profile to pull on this report.
Administrative Reports
These reports will pull information on the employees in the district in which the PD
Manager is located.
Duplicate Profiles
The report will pull a list of all employees who have more than one profile in the
user’s district.
26 • Home Tab
STI_0428091347
Spring 2008-2009 School Year STI PD AL
The report may be pulled in PDF, XLS, RTF or TXT format. It may also be pulled
by employee SSN, Last Name or Location.
Login
The report will pull a list of employees that have logged in STIPD within a specific
date range. It will display as a login list, day of the week and hour of the day graph.
Spring 2008-2009 School Year STI PD AL
STI_0428091347
Home Tab • 27
PD Query
The user can use the PD Query to pull any field in STPD. Each field can be filtered
down to pull any data within that field.
•
28 • Home Tab
STI_0428091347
To use PD query, put a check beside each field for which information is
to be pulled. The order in which you select the field is the order in
which it will print on the report. The first five results will print on the
bottom of the screen. See below:
Spring 2008-2009 School Year STI PD AL
•
To filter within a field, put a check mark beside the field and then click
on the field name. See below:
•
Once the filter is set, click OK. Then select type of format in which to
export to and click Run.
Employees Tab
Spring 2008-2009 School Year STI PD AL
STI_0428091347
Home Tab • 29
Search for Employee Profiles
Enter search criteria in the spaces provided, or search for all employee profiles by
clicking the Search Now button with no criteria entered.
All users/employees matching your criteria will be listed. For each user, you may
click the View/Edit Profile link to edit the profile. Similarly, you may view the
user’s Training History Reports and Training History List.
You may create a downloadable file that may be used to create mailing labels (using
MS Word or similar word processing software). To do this, click the Generate
Mailing Labels link at the top of the list. The mailing labels can be printing using
the employee home address or the location address.
30 • Home Tab
STI_0428091347
Spring 2008-2009 School Year STI PD AL
Edit Employee Profiles
Select a user profile by clicking View/Edit Profile from the search results screen
and then make any necessary changes. Click the Update Now button at the bottom
of the page to save your changes.
New Employee Profile
To add a new employee to the database, complete the profile and click the Add
Now button.
Spring 2008-2009 School Year STI PD AL
•
Select Yes for Enrollment Approval Required to require online
registrations by this user to be processed for approval by a manager.
•
Any field marked with an * is a required field.
•
Select the appropriate assigned user login role for an employee. PD
Managers may work with any employees in their LEA; Principals may
work with Employees at their locations; and Instructors may work with
any Employees who attend their sessions. If an employee does not fall
under one of these roles, do not check anything under Assigned Login
Roles.
•
Instructors are those employees who instruct PD sessions (not
necessarily instructors at a school).
STI_0428091347
Home Tab • 31
New User Profile
You may add users who are not employed by your district here. Enter profile
information and then click the Add Now button.
Note: Users who are not employees cannot currently enroll for sessions but may be
instructors for a session.
PD Titles Tab
32 • Home Tab
STI_0428091347
Spring 2008-2009 School Year STI PD AL
The PD Titles tab allows the user to enter or edit PD titles; add sessions; enroll
students; view session schedules; enter PD title suggestions; and update confirmation
messages.
Searching the PD Title Catalog
To search for a PD Title, enter search criteria in the spaces provided, or search for all
PD Titles by clicking the Search Now button with no criteria entered.
Search results will appear as shown below. Results reflect criteria selected earlier
from the search screen. For each PD Title, you have options to Edit PD Title, Add
Session, or View Schedule.
Editing PD Title Information
Click Edit PD Title and make changes as necessary. Click the Update Now button
to save. You may attach references and programs here.
Adding a Session to a PD Title Record
Click Add Session to enter the session schedule for the PD title.
Spring 2008-2009 School Year STI PD AL
STI_0428091347
Home Tab • 33
Note: There are two options to choose from when adding a Session to a PD Title.
You may either add a session using a New Form, or you may copy and use
information from a previously scheduled session.
34 • Home Tab
STI_0428091347
•
Use the Pick Date and Pick Time buttons to enter date and time
information. When finished, click Add Now to save.
•
If you do not wish for users to enroll online for this session, select No
in the Allow Online Enrollment field.
•
If you wish for users to enter payment (credit card) information for this
session, select Yes in the Enable Online Payment Form field and enter
a default payment amount.
•
You must also enter a Location for this session. If the location you wish
to select is not listed, go to the Locations Management area and be sure
your location is listed there as a Training location (or District+Training
location).
Spring 2008-2009 School Year STI PD AL
•
Before adding this session, you must select any LEA(s) from which
users may enroll for this session. Users from any LEA’s not selected
here will be unable to enroll.
•
You may optionally select evaluations to associate with this session.
•
You may specify a pre-enrollment evaluation, along with a date. This
will be sent to registered users on the date specified.
•
The On completion evaluation, if specified, will appear to registrants
when they complete the session. They will be required to complete this
evaluation in order to view their status for this session.
•
Follow-up evaluations may also be specified. These will be e-mailed to
registrants on the specified dates.
Copy and Use Information from a Previously Scheduled
Session
This option allows you to copy and use information already created in a previous
session. Once you have selected this option, you will see a list of all previous
sessions for the selected PD Title.
To copy a session, click on the Copy Session button provided.
View Schedule
By clicking the View Schedule link for a PD Title, you will see a list of all
sessions that have been scheduled for the selected PD Title. For each scheduled
session, you may:
Spring 2008-2009 School Year STI PD AL
•
View Roster: Shows the roster details for this session. You may
update attendance, registrant status, completion status, etc., from this
screen.
•
Edit Session Information: Allows you to change the session details.
STI_0428091347
Home Tab • 35
•
Close the Session: This prevents any additional users from
enrolling.
•
Cancel the Session: Cancels the session and e-mails all enrollees
(as well as instructors) a notice of the cancellation.
•
Delete the Session: Permanently erases all information entered for
this session. This includes enrollee information, payment information,
attendance, etc. Only use this option if the session was created by error.
•
Edit Waiting List: You may manage the session waiting list by
adding and removing users from the list. Also, you may disable the
waiting list feature if you do not wish for users to be able to enroll after
the maximum enrollment has been reached.
•
Enroll Now: Allows an employee to enroll in a session.
View Roster: Managing a Session Roster
This feature is found on the Session Information screen. Select this option to view
the current roster for a selected session and/or to manage that roster.
36 • Home Tab
STI_0428091347
•
Attendance: You may mark attendance for an employee by selecting
the checkboxes under each date he/she attended.
•
Credit: You may enter the Hours of Credit Granted for each employee.
•
Status: You may set a current class status for an employee, such as
Currently Enrolled, Completed Course, Withdrew from Course and
Dropped Course.
•
Add a New Student: Allows addition of students to this roster
•
Add Many Students: Allows addition of students based on
employee number.
•
Print Sign In Sheet: Prints a sign-in sheet with current students on
roster.
•
Print Roster: Creates a printout of the roster.
•
Mailing Labels: Produces a text file that may be used with third-party
programs such as Microsoft Word to use the Mail Merge feature to
create your mailing labels for employees on this roster. The user may
print mailing labels using the participant home address or the location
address.
•
Email Enrollees: Allows you to send an e-mail to student(s) on this
roster.
•
Sort Roster By: The user can sort the roster by the employee name or
the location name.
Spring 2008-2009 School Year STI PD AL
•
Delete from Roster: There are deletion options under each
participant name on the roster. The PD Manager can check these boxes
and then click Update at the bottom of the roster to delete all users are
once.
Note: Be sure to click the Save Roster Changes link to save your changes after
any modifications have been made to the roster.
Roster-Wide Updates
This area allows for changes to be made to entire roster at one time, without having
to go to each student individually. This feature is located at the top of the roster.
Create New PD Title
Enter the information for the new PD Title and click the Add Now button. You may
then add the session schedule for the class.
Note: The information entered here when creating a new PD Title will allow for
Employees to search for PD Titles in the PD Title Catalog that meet specific criteria.
When you first create a PD Title, you do not have the option to Attach Programs
or Reference. This may be done after the PD Title has been created, by editing the
PD title.
Spring 2008-2009 School Year STI PD AL
STI_0428091347
Home Tab • 37
View Session Offerings
Session offerings may be shown in either Calendar or List view. Click on the desired
class to edit Session information or to enroll in that class.
Note: You have the option of viewing session offerings for all LEA’s or for your
own LEA only.
Make a PD Title Suggestion
Select this option to submit a suggestion for a PD Title that is not currently offered in
your district. Fill out the PD Title suggestion form and click Submit Now to send
the suggestion.
Note: This option is available for ALL employees.
After suggestions have been submitted, they may be viewed under the Management
tab.
38 • Home Tab
STI_0428091347
Spring 2008-2009 School Year STI PD AL
My PD Plans
Creating PD Plans 3
My Profile
Editing Your Profile 2
My Sessions
Viewing the Session Schedule Calendar 4
Index
N
New Employee Profile 31
New User Profile 32
O
Overview 1
A
P
About this Document 1
Administrative Reports 26
Announcements 8
PD Title Reports 23
PD Titles Tab 32
Process Session Payments 18
Programs 14
C
R
Career Objectives 9
Communities
Learning Communities 7
Create New PD Title 37
References 14
Reports Tab 23
S
E
Search for Employee Profiles 30
Searching the PD Title Catalog 33
Suggestions 15
Edit Employee Profiles 31
Employee Reports 25
Employees Tab 29
Enrollments 16
Evaluations 9
T
Terminology of Classes and Sections 1
G
V
Getting Started 2
View Session Offerings 38
H
Home Tab 2
L
Locations 11
M
Make a PD Title Suggestion 38
Manage My LEA Preferences 20
Management Tab 8
Merge Duplicate Profiles 21
My History
Viewing Training History 6
Spring 2008-2009 School Year STI PD AL
STI_0428091347
Index • 39