1
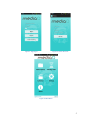
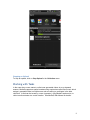
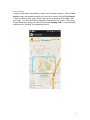
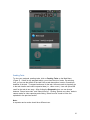
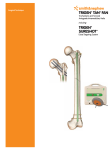
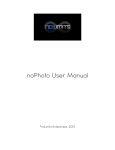
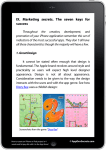
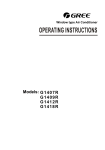
MediaQ
MediaQ Mobile User Manual
Feb. 2014
Table of Contents
INTRODUCTION ....................................................................................................................................... 3 REQUIREMENTS ....................................................................................................................................... 4 USER ACCOUNTS ..................................................................................................................................... 4 CREATING AN ACCOUNT ........................................................................................................................................... 4 LOGGING IN ................................................................................................................................................................. 4 MEDIA COLLECTION ............................................................................................................................... 6 RECORDING VIDEO .................................................................................................................................................... 6 VIDEO LIST .................................................................................................................................................................. 6 STOPPING AN UPLOAD .............................................................................................................................................. 8 WORKING WITH TASKS ......................................................................................................................... 8 TASK INQUIRIES ......................................................................................................................................................... 9 PENDING TASKS ...................................................................................................................................................... 10 SETTINGS ................................................................................................................................................ 11 ABOUT US ............................................................................................................................................... 11 2
Introduction
MediaQ is a novel online media management system to collect, organize, share, and
search mobile multimedia contents using automatically tagged geospatial metadata.
User-generated-videos can be uploaded to the MediaQ from users’ smartphones,
iPhone and Android, and displayed accurately on a map interface according to their
automatically sensed geospatial and other metadata. MediaQ consists of MediaQ
server and mobile app for a smartphone using iPhone or Android OS. It allows video
uploads from user’s smartphone to be automatically geo-tagged on a map, while also
adding its recorded real time and indicating the specific direction a camera was pointed.
So media contents can be exactly mapped on the map with accurate viewing direction of
images. Moreover, if users are signed up to participate, MediaQ allows a requester to
send out requests for specific contents that will automatically ping participants near an
interested location to alert them to get out their phones and start recording.
The MediaQ system provides the following distinct features.
1. Individual frames of videos (or any meaningful video segments) are automatically
annotated by objective metadata which capture four dimensions in the real world:
the capture time (when), the camera location and viewing direction (where),
keywords (what) and people (who). We term this data W4-metadata which can
be obtained by utilizing camera sensors, geospatial and computer vision
techniques.
2. A new approach of collecting multimedia data from the participating users has
been implemented using spatial crowdsourcing, which allows media content to
be collected in a coordinated manner for a specific purpose.
3. Flexible video search features are implemented using W4 metadata, such as
directional queries for selecting multimedia with a specific viewing direction.
MediaQ has been developed by the Integrate Media Systems Center at the University of
Southern California at Los Angeles, CA, U.S. More details about the project can be
found at mediaq.usc.edu.
3
Requirements
MediaQ app is available for both Android and iOS smartphones with a camera to capture
videos and sensors to detect geospatial properties such as GPS receiver and digital
compass. MediaQ app requires Internet connection for normal operation from either
cellular network or WiFi network. Internet connection is necessary for logging into the
MediaQ server. Due to the potential high cost of transmitting large amounts of video
data over cellular network, we recommend users to use WiFi network for video
uploading. Video recording and uploading requires a significant amount of memory
space and wireless bandwidth on the phone so it is user’s responsibility to use the
resources of the phone while using MediaQ.
This manual is mainly for Android smartphones. Especially, MediaQ app for Android is
working only with Android version 4+. Thus, older Android phones are not supported.
User Accounts
Only registered users can use MediaQ. Currently, any user with a valid email address
can register. The account information can be used for both MediaQ web service and
mobile app.
Creating an Account 1. When the MediaQ app is launched, you will see the option to Register in the
initial screen as shown in Figure 1.
2. After clicking Register, enter your username, email address, and password on
the screen seen in Figure 2. Then, push the “Sign Up” button.
Logging In Once a successful registration is done (i.e., no error message), the app shows the initial
screen as shown in Figure 1. Enter username and password to log in. After
successfully logging, you will see the main menu as shown in Figure 3.
4
Figure 1: Signing In
Figure 2: Create Account
Figure 3: Main Menu
5
Media Collection
Recording Video In order to record a video, click on Collection > Record from the main menu. Click the
red record button to start recording. Figure 4 shows an example of camera view. As a
default, you can see the captured sensor values on the camera mode screen, which
might help you in capturing more accurate geospatial metadata by considering the signal
strength. If it annoys you, simply tab the screen then it disappears. To finish the
recording, click the black stop button. You will then be able to see a pop-up menu
showing Preview, View Trajectory, Upload, Export, Delete, or Cancel.
Note:
Acquiring accurate GPS locations is critical in managing media contents in MediaQ.
However, getting accurate GPS signals takes some amount of time (several seconds to
tens of seconds depending on surrounding environment) after turning on the camera
mode for video recording. It is recommended to check the location accuracy before
recording, if possible. “Indoor” button is only working inside specific building we have
WiFi fingerprints. So, do not use it for now.
Figure 1: Video Recording
Video List To view the videos you have recorded using MediaQ, click on Collection > Video List.
If videos have not been uploaded yet, they will not be marked with a green check mark.
You can choose to Preview, View Trajectory, Upload, Export, or Delete a video by
tapping on one of the videos in the list. When you push the upload menu for uploading
the recorded video to MediaQ server, a pop-up window appears to set the privacy level
of the video. Currently, there are three different levels: public (all MediaQ user can see
the uploaded video), private (only the user who uploaded video can see), and group
6
(users who are in the same group as the user who uploaded the video can see). And
the user can add manual keyword(s), if he wants, before uploading the selected video.
Each keyword does not allow space between words and comma should be used as
delimiter in case multiple keywords are input. When the OK button is pushed in the
“Privacy Level” window, the actual uploading begins. The status of uploading will be
shown in the Android notifications window as a progressive bar with the number of
bytes. When the uploading is successfully done, the status bar disappears without any
further message. However, in other cases, an error message will appear in the
notification window.
Figure 5: Video List
Figure 6: Privacy Level
7
Figure 7: Uploading Video
Stopping an Upload To stop an upload, click on Stop Upload in the Collection menu.
Working with Tasks
In the case when a user wants to collect user-generated-videos in an on-demand
manner, MediaQ supports a spatial crowdsourcing mechanism called GeoCrowd, which
assigns geospatial tasks to multiple users who are willing to participate in the data
collection. A task can be issued by a user (requester), using MediaQ web service, to
collect media contents at a certain location. See MediaQ Web Manual for details.
8
Task Inquiries In order to take and be responsible for a task, you must post an inquiry. Click on Task
Inquires, select the area about which you would like to inquire, and click Post Inquiry.
In order to select an area, grab a corner of the square by pressing and holding it with
your finger. You will now be able to adjust the dimensions of the square. Then, when
you are assigned to task(s), they will be listed under Pending Tasks. For an automatic
notification, see “Settings” for background service.
Figure 8: Task Inquiry
9
Figure 9: New Task
Pending Tasks To view your assigned, pending tasks, click on Pending Tasks on the Main Menu
(Figure 3). If there is any assigned task(s), you will see the list of tasks. By selecting
one, you can see the details of the task such as task description, location, issued time,
deadline of the task. To respond and serve for the task, the user needs to physically go
to the task location and collect requested data (i.e., video or text). User can upload the
result for the task in two ways. After clicking the Respond button, one can choose
between “Record new video” and “Select from list”. Clicking “Record new video” leads to
camera mode for video capturing and clicking “Select from list” leads to Video List
explained in the previous section.
Note:
A requestor and a worker should be a different user.
10
Figure 10: Pending Tasks
Settings
In the Settings menu you can turn on/off Background service of the automatic
notification from the MediaQ server. Without turning on this, the user cannot receive the
task assignment notifications.
About Us
MediaQ has developed and maintained by the Integrated Media System Center (IMSC)
at the University of Southern California, Los Angeles, California, U.S. For more
information or if you have any questions please contact [email protected].
11