1
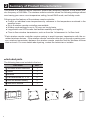
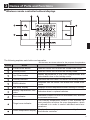
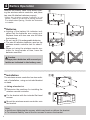
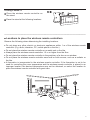
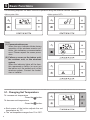
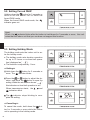
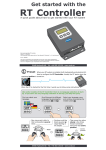
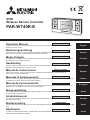
ATW
Wireless Remote Controller
PAR-WT40R-E
Operation Manual
FOR USER
For safe and correct use, please read this operation manual thoroughly before operating the PAR-WT40R-E
wireless remote controller.
Bedienungsanleitung
FÜR NUTZER
Lesen Sie sich zur sicheren und korrekten Verwendung diese Bedienungsanleitung bitte sorgfältig durch,
bevor Sie die drahtlose Fernbedienung PAR-WT40R-E verwenden.
Mode d'emploi
POUR LES UTILISATEURS
Pour garantir une utilisation sûre et appropriée, lisez attentivement le présent mode d'emploi avant d'utiliser la
télécommande sans fil PAR-WT40R-E.
Handleiding
VOOR DE GEBRUIKER
Voor een veilig en juist gebruik moet u deze handleiding goed doorlezen alvorens de PAR-WT40R-E
draadloze afstandsbediening in gebruik te nemen.
Manual de instrucciones
PARA EL USUARIO
Para un uso correcto y seguro del control remoto inalámbrico PAR-WT40R-E, lea este manual de
instrucciones antes de su utilización.
Manuale di funzionamento
PER L'UTENTE
Manual de Funcionamento
PARA O UTILIZADOR
Per un uso corretto e sicuro del dispositivo, leggere attentamente il presente manuale di funzionamento prima
di utilizzare il comando remoto senza fili PAR-WT40R-E.
Para uma utilização segura e correcta, é favor ler cuidadosamente este manual de funcionamento antes de
trabalhar com o controlador remoto sem fios PAR-WT40R-E.
Brugsvejledning
TIL BRUGER
Användarmanual
FÖR ANVÄNDAREN
Læs venligst denne brugsvejledning grundigt inden betjening af den trådløse fjernbetjening PAR-WT40R-E af
hensyn til sikker og korrekt brug.
För säker och korrekt användning, var god läs denna användarmanual noggrant innan du använder PARWT40R-E-fjärrkontrollen.
Bruksanvisning
FOR BRUKEREN
Les denne bruksanvisningen nøye før du bruker PAR-WT40R-E-fjernkontrollen i bruk, for å sikre trygg og riktig
bruk.
Käyttöopas
KÄYTTÄJÄLLE
Turvallisen ja asianmukaisen käytön varmistamiseksi lue tämä käyttöopas huolellisesti ennen langattoman
PAR-WT40R-E-kaukosäätimen käyttöä.
English
Deutsch
Français
Nederlands
Español
Italiano
Português
Dansk
Svenska
Norsk
Suomi
Contents
1. Safety Precautions...............................2
5. Basic Functions....................................8
2. Summary of Product Characteristics....4
5.1.Changing Set Temperature..............8
3. Names of Parts and Functions.............5
5.2.Setting Forced DHW......................10
4. Before Operation..................................6
5.3.Setting Holiday Mode.....................10
6. Specifications.....................................11
7. Q & A . ................................................11
1
Safety Precautions
Read thoroughly the following Safety Precautions before use.
●The following hazardous classification shows the likelihood and severity of hazards if a person does not follow the instructions contained on the following signs.
Warning
Indicates a hazardous situation which, if a person does not follow the instructions, could result in death or serious injury.
Caution
Indicates a potentially hazardous situation that, if a person does not follow
the instructions, may result in bodily injury or property damage.
●Always keep this instruction manual ready at hand for quick reference. Provide this manual
to the technician or installer in the event that the device is transferred or repaired. Or, if the
ownership changes, hand this manual to the next owner.
Warning
Check installation of the device.
The device must not be modified or repaired by the user.
Stop operation when the device
is malfunctioning.
The device must not be disposed of by the user.
Do not short out or insert alkaline batteries with polarity
reversed. Also, do not disassemble, heat, or throw batteries
in fire.
Ensure that the device is installed on a rigid and stable place
to prevent the device from falling.
Modification or improper repair could cause electrical shock or
fire and the like. For repair, contact the dealer where you purchased the device. Operating the malfunctioning device without repairing it could
cause breakdown, electrical shock, fire or the like. Should anything abnormal, such as burning smell, occur, stop operation
immediately, turn off power, and contact the dealer. To dispose of the device, contact the dealer.
Strong alkaline electrolyte that leaks could get into your eye, or
explode, or generate heat. Injury, burns, or breakdown of the
device could result. Should strong alkaline electrolyte come in
contact with the skin or clothes, flush electrolyte with clean water. For the electrolyte that gets into your eye, flush with clean
water and seek medical attention immediately.
Caution
Do not drop the device.
This could break the case or affect the device enough to make
it inoperable.
Do not wipe the device with
benzine, thinner, and a chemical
impregnated cloth or the like.
Do not put hazardous materials
around the device.
Discoloration and damage to the device could result.
If the dirt is hard to remove, wipe it with a well wrung-out cloth
with diluted mild detergent, and dry moisture with a dry cloth.
Avoid installing the device in the place where inflammable gas
may leak. Should leaked gas build up around the device, fire
or explosion could result.
Direct contact with the control board inside is hazardous and
also could result in fire, breakdown, and reduction in operating
performance.
Do not use the device in particular environments where the
following substances are present in large amounts: oil, vapour,
organic solvent, corrosive gas (such as ammonia, sulphuric
compounds, and acid or the like) , or where acid or alkali solution, or particular sprays are used frequently. This could affect
operating performance, or cause corrosion which could result
in electrical shock, breakdown, smoke generation, or fire.
(e.g. around kitchen sink, gas cooker, bath room, wash stand
or the like)
Electric shock or breakdown may result.
Do not disassemble the device.
Do not use the device in particular environments.
Do not use sharp objects to
press the buttons.
Do not wash the device with wa- Electric shock or breakdown may result.
ter or solution or the like.
Do not touch the device with wet Electric shock or breakdown may result.
hands.
Always observe the operating Always observe the operating temperature and humidity requiretemperature and humidity re- ments. Otherwise severe damage to the device could result. For
quirements.
more details, refer to the specification table in this manual.
Observe the following to handle batteries properly, which otherwise could result in explosion, leakage of electrolytic liquid, or heat generation.
1) Do not charge the batteries.
2) Place the batteries with correct polarities.
3) Do not mix up new and old batteries or different types of batteries.
4) When the batteries have run out, remove them from the device immediately.
Disposal
This symbol mark is for EU countries only.
This symbol mark is according to the directive 2002/96/EC Article 10 Information for users and Annex IV, and/or to the directive 2006/66/EC Article 20 Information for end-users
and Annex II.
Your MITSUBISHI ELECTRIC product is designed and manufactured with high quality materials and components which can be recycled and/or reused. This symbol means that electrical
and electronic equipment, batteries and accumulators, at their end-of-life, should be disposed
of separately from your household waste. If a chemical symbol is printed beneath the symbol, this chemical
symbol means that the battery or accumulator contains a heavy metal at a certain concentration.
This will be indicated as follows: Hg: mercury (0.0005%), Cd; cadmium (0.002 %), Pb: lead (0.004%)
In the European Union there are separate collection systems for used electrical and electronic products,
batteries and accumulators.
Please, dispose of this equipment, batteries and accumulators correctly at your local community waste collection/recycling centre.
Please, help us to conserve the environment we live in!
2
Summary of Product Characteristics
This device is a wireless remote controller system that wirelessly transmits to the indoor unit*
at a frequency of 868 MHz. The wireless remote controller allows the following settings without
ever leaving your room: room temperature setting, forced DHW mode, and holiday mode.
Following are the features of the wireless remote controller:
●Control on individual room temperatures by reference to the temperature monitored in the
specified room.
●Up to 8 wireless remote controllers connectable.
●Holiday mode settings for up to 72 hours on hourly basis.
●Large switch and LCD screen that facilitate usability and legibility.
●Floor-to-floor wireless transmission, such as from the 1st basement to 1st floor level.
*Each wireless remote controller requires pairing to avoid improper transmission with the unrelated wireless devices. If the wireless remote controller does not go through a pairing process, wireless transmission between the wireless remote controller and the wireless receiver
does not work. For more details about pairing, contact the technician or installer.
■ Included parts
The following items are included in the box.
Part name
Nos.
Wireless remote controller
1
Stand
1
Bracket
1
Flat head screw 4.1 × 16
4
Size AA alkaline battery
2
Instruction manual
1
3
Names of Parts and Functions
■ Wireless remote controller buttons/displays
The following explains each button and operation.
*All the items are shown above for the purpose of explanation.
Number
Name
Operation
Forced DHW button
Sets the indoor unit to enter the forced DHW mode.
Holiday button
Sets the indoor unit to enter the holiday mode.
Up / Down button
Makes adjustments of the room temperatures and
sets duration time in the holiday mode.
Holiday indicator
Indicates that the indoor unit enters the holiday mode.
DHW indicator
Indicates that the indoor unit enters the forced DHW
mode.
Set temp. display
Displays the set temperature when heating or cooling.
Battery replacement indicator
Indicates when to replace batteries.
Error indicator
Indicates a failure or error on the indoor unit, such as
a communication error.
Target room indicator
The internal temperature sensor in this wireless remote controller monitors the room temperature, which
is referred to in order to control individual room temperatures.
Room temperature display
Displays the room temperature measured by the wireless remote controller.
4
Before Operation
Remove the battery case cover before placing the wireless remote controller, and place
two size AA alkaline batteries properly.
*When the wireless remote controller is not
paired, it has to go through a pairing process.
For details about pairing, contact the technician
or installer.
■ Batteries
●Lighting of the battery life indicator indicates that the batteries are running out.
Replace them with two new size AA alkaline batteries.
●Do not use Ni-Cd rechargeable batteries.
●The size AA alkaline batteries used on the
wireless remote controller last for about 1
year .
●When not using the wireless remote controller for long periods of time, have the
batteries removed.
Caution
Always place batteries with correct polarities as indicated in the battery case.
■ Installation
The wireless remote controller has two methods of installation, using an included bracket
or stand.
<< Using a bracket >>
Determine the positions for installing the
wireless remote controller.
Fix the bracket with the included flat head
screws.
Mount the wireless remote controller onto
the bracket.
Note)
● Avoid over-tightening the screws, which may break or deform the bracket.
● To enhance stability, use all the four screws to secure the bracket.
<<Using a stand >>
Place the wireless remote controller on
the stand.
Place the stand at the following locations.
■ Locations to place the wireless remote controllers
Observe the following when determining the installing locations.
●Do not place any other electric or electronic appliances within 1 m of the wireless remote
controller. (E.g. radio, television, PC, mobile phone or the like.)
●Do not place the wireless remote controller on a metal rack or the like.
●Always place the wireless remote controller 1.5 m or higher from the floor.
●Do not place the wireless remote controller in the periphery of a door or an window.
●Do not place the wireless remote controller near heat or cold sources, such as a radiator or
the like.
● A thermistor is incorporated in the wireless remote controller. If the thermistor is set to be
used for controlling the room temperature and the wireless remote controller is placed in an
improper location, the desired temperature may not be obtained, so select the location to
place the wireless remote controller with great care.
1.50m
5
Basic Functions
The following explains the basic functions operable using the wireless remote controller.
<Main system ON>
<Main system OFF>
Note)
(1) Communication error
When the error indicator blinks during
operation of the wireless remote controller, this indicates a communication
error. Please repeat the same procedure.
(2) Failure or error on the indoor unit,
the outdoor unit, or the wireless
system
When the indicator lights all the time,
this represents a failure (or error) on
the indoor unit, the outdoor unit, or the
wireless system. Contact the technician or installer.
5.1. Changing Set Temperature
To increase set temperature
: Press the
button.
To decrease set temperature
:Press the
button.
●Each press of the button adjusts the set
temperature by 1°C.
●The set temperature ranges from 10 to 30°C.
*When the indoor unit enters an operating
mode that disables temperature setting, the
set temp. display shows “
”. In that
case, the
and
buttons are not active,
so the set temperature can not be changed.
When the indicator lights, this indicates
that the wireless remote controller is set as
that of a target room.
<<What’s target room?>>
●The indoor unit controls the temperatures, by reference to the temperature in a target room.
●The target room can be fixed or changed according to time, using a schedule function.
●The number of rooms that can be set to as a target room is always limited to one.
When setting a target room, use the main controller.
Indoor Unit
Kitchen
Bed room
RC
Address2
Living room
RC
Address1
*The above figure shows the examples when the living room is set as a target room RC 1 (wireless
remote controller 1) , and when the bed room is set as a target room RC 2 (wireless remote controller 2) .
5.2. Setting Forced DHW
Holding down the
button for 3 seconds or
more to set the indoor unit to enter the
forced DHW mode.
When the forced DHW mode ends, the
indicator goes out.
Note)
When the
indicator blinks after the button is held down for 3 seconds or more, this indicates that the indoor unit that you use does not support this function.
5.3. Setting Holiday Mode
The holiday mode sets the indoor unit to enter the holiday mode.
●The holiday mode sets duration operation
for up to 72 hours or no-time-limit operation (displayed as “
”).
●The duration is adjusted by 1 hour.
<<Setting>>
Hold down the
button for 3 seconds or
more. The
indicator blinks.
Press the
or
button to adjust the duration, and press the
button to save the
setting. When the set duration shows “
”,
this indicates no time limit operation is set.
When transmission starts, the
indicators blink.
,
and
The
indicator stops blinking to complete the setting.
<<Cancelling>>
To cancel the mode, hold down the
button for 3 seconds or more while the indoor
unit is operating in the holiday mode.
10
6
Specifications
Item
Description
Power source
3V DC (size AA alkaline battery × 2)
Operating temperature and humidity requirements
Temperatures: 0 to 40°C
Humidities: 30 to 90%RH (no condensation)
Net weight
0.20 kg (batteries excluded)
Dimension (W × H × D)
140 mm × 75 mm × 18 mm
Holiday mode setting unit
1 hour
Display
LCD digital screen
7
Q&A
Fault symptom
The LCD displays nothing.
Possible cause
No batteries are placed.
Batteries are placed incorrectly.
The battery replacement indicator lights.
The LCD displays
“OFF”.
The wireless remote
controller does not
transmit to the indoor
unit successfully.
The LCD displays an
error indication all the
time.
The desired room temperature is not obtained.
Batteries are running out.
The batteries are running
out, and need replacement.
Solution
Ensure that the batteries are placed in the
battery case and no foreign objects are
caught between the terminals.
Check whether the batteries are placed with
correct polarities as shown in the battery
case.
Replace with new batteries.
Replace with new batteries.
The main system is off.
Through the main controller, turn on the
main system again.
Batteries are running out.
Signal is weak.
Replace with new batteries
While repositioning the wireless remote
controller slightly, operate the wireless remote controller.
Contact the technician or installer.
Failure or error on the indoor unit, the outdoor unit,
or the wireless system.
Failure or error on the indoor unit, the outdoor unit,
or the wireless system.
Contact the technician or installer.
Batteries are running out.
The wireless remote controller is placed in an improper location.
Replace with new batteries.
By reference to “■ Locations to place the
wireless remote controllers” in “4. Before
Operation” in this manual, reposition the
wireless remote controller.
Contact the technician or installer.
The wireless remote controller is not set as that of a
target room.
Other
Contact the technician or installer.
11
This product is designed and intended for use in the residential,
commercial and light-industrial environment.
The product at hand is
based on the following
EU regulations:
• Low Voltage Directive 2006/95/EC
• Electromagnetic Compatibility Directive
2004/108/EC
• R&TTE Directive 1999/5/EC
Please be sure to put the contact address/telephone number on
this manual before handing it to the customer.
HEAD OFFICE: TOKYO BLDG., 2-7-3, MARUNOUCHI, CHIYODA-KU, TOKYO 100-8310, JAPAN
Authorized representative in EU: MITSUBISHI ELECTRIC EUROPE B.V.
HARMAN HOUSE, 1 GEORGE STREET, UXBRIDGE, MIDDLESEX UB8 1QQ, U.K.
BH79R517H01