1
IBM PowerXCell™ 8i Accelerator Board
GigaAccel 180
User’s Manual
Copyright © Fixstars Corporation. All rights reserved.
Thank you for purchasing GigaAccel 180.
This “GigaAccel 180 User’s Manual” describes how to set up, configure, and
start up the GigaAccel 180.
Included accessories
Please confirm that the following items are included in the package.
(1) GigaAccel 180
(2) Serial cable
(3) Ethernet crossover cable
(4) Yellow Dog Enterprise Linux Install DVD
(For customers who bought the license)
Copyright © Fixstars Corporation. All rights reserved.
Table of Contents
1
Introduction........................................................................ 1
2
Names of Each Parts ......................................................... 2
2.1
Interfaces ........................................................................................................................... 2
2.2
LED descriptions............................................................................................................... 4
3
Connection of GigaAccel 180 ............................................. 5
3.1
Preparations ...................................................................................................................... 5
3.2
Directions of connection .................................................................................................... 5
4
Installation of GigaAccel 180
(NFS) ............................... 8
4.1
Preparations ...................................................................................................................... 8
4.2
Disable services ................................................................................................................. 8
4.3
Network settings ............................................................................................................... 9
4.4
Prepare to create boot image and disk image .................................................................. 9
4.5
Installation of necessary services ..................................................................................... 9
4.6
NFS service settings ........................................................................................................ 10
4.7
DHCP service settings ..................................................................................................... 10
4.8
TFTP service settings ...................................................................................................... 10
4.9
Restart GigaAccel 180..................................................................................................... 11
4.10
Installation of Yellow Dog Enterprise Linux ............................................................... 11
4.11
Start up GigaAccel 180 ................................................................................................. 12
4.12
Network installation of additional packages ............................................................... 13
4.13
DVD installation of additional packages ..................................................................... 15
5
Installing GigaAccel 180 (CIFS) ...................................... 17
5.1
Preparations .................................................................................................................... 17
5.2
Creating new account ..................................................................................................... 17
5.3
Network settings ............................................................................................................. 18
5.4
Firewall settings ............................................................................................................. 20
5.5
Create boot file and file system ...................................................................................... 20
5.6
Configuration of Folder Sharing .................................................................................... 21
5.7
Installation of TFTP Service .......................................................................................... 24
5.8
TFTP Service settings ..................................................................................................... 24
5.9
Installation of Terminal Software .................................................................................. 26
5.10
Start up Terminal Software .......................................................................................... 26
Copyright © Fixstars Corporation. All rights reserved.
5.11
Start up GigaAccel 180 ................................................................................................. 27
5.12
Network installation of additional packages ............................................................... 28
5.13
DVD installation of additional packages ..................................................................... 30
6
Upgrading YDEL ............................................................. 31
7
Start Up PCI Express Driver (for Linux host) ................ 32
7.1
PCI Express driver overview .......................................................................................... 32
7.2
Host machine set up ...................................................................................................... 32
7.3
Start up PCI Express ...................................................................................................... 33
7.4
Stop PCI Express driver ................................................................................................. 33
7.5
Reset PCI Express driver ............................................................................................... 33
Appendix A – Installing GigaAccel 180 (Fedora7)................ 34
A.1
Preparations ................................................................................................................... 34
A.2
Host settings ................................................................................................................... 34
A.3
Network settings ............................................................................................................ 35
A.4
Installation of necessary services .................................................................................. 35
A.5
Prepare disk image......................................................................................................... 35
A.6
NFS service settings ....................................................................................................... 36
A.7
Prepare the boot image .................................................................................................. 36
A.8
DHCP service settings .................................................................................................... 36
A.9
TFTP service settings ..................................................................................................... 37
A.10
Start up GigaAccel 180 ................................................................................................ 38
Appendix B – GigaAccel 180 Specifications ......................... 39
Appendix C – Using Serial Console ...................................... 41
Appendix D – Common Console Commands ........................ 42
Appendix E – Troubleshooting .............................................. 43
E.1
Connection troubleshooting ........................................................................................... 43
E.2
Start up troubleshooting ................................................................................................ 43
E.3
Operational troubleshooting .......................................................................................... 44
E.4
Console screen errors ..................................................................................................... 44
Copyright © Fixstars Corporation. All rights reserved.
1 Introduction
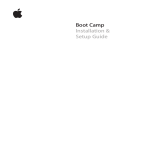
GigaAccel 180 is an accelerator board based on IBM’s PowerXCell 8i
processor. The board has 4GB of DDR2 SDRAM, two 1 Gigabit Ethernet Ports,
one x16 PCI Express interface, and it can run Linux. This makes it possible to
put the vastly superior floating-point calculation capabilities of PowerXCell 8i
on a standard workstation. Since this accelerator board does not have a hard
disk drive, it network boots by obtaining the boot image from the boot server
through a TCP/IP network.
GbE
GbE
Broadcom
BCM5704
PCI-X
IBM
South bridge
x16 PCI Express
GigaAccel 180 System Block Diagram
1
Copyright © Fixstars Corporation. All rights reserved.
IBM
PowerXCell 8i
DDR2
SDRAM
2
Names of Each Parts
2.1 Interfaces
Main interfaces are as follows.
x16 PCI Express
eth1
eth0
Serial Port
Power port
(1) x16 PCI Express: Connector to host machine
2
Copyright © Fixstars Corporation. All rights reserved.
(2) eth0, eth1: Network interfaces
eth0 is used for network booting and hard disk mounting.
eth0(T1)
eth1(T2)
(3) Power port: Connector for AUX 12V 8-pin
This board is also compatible with 2x3 power connectors, please use the pins
outlined in blue when using a 2x3 connector.
Power port (2x3pin) Power port (2x4pin)
3
Copyright © Fixstars Corporation. All rights reserved.
(4) Serial port (3 pin): RS232C cable connector part
Pins are “T2OUT”, “GND”, and “R2IN” from top to bottom in the picture below.
Serial port
2.2 LED descriptions
Various LEDs light up on the side of the board with Ethernet ports when
GigaAccel 180 is powered on. These LEDs indicate the current status of GigaAccel
180.
⑦
⑥
⑤
④ ③② ①
(1) eth1 activity light: Turns on or flashes when there is activity.
(2) eth2 link light: Turns on when cable is connected.
(3) eth0 activity light: Turns on or flashes when there is activity.
(4) eth0 link light: Turns on when cable is connected.
(5) Error light (orange light): Turns on when there is hardware error. Check
cable and other parts for interference.
(6) Normal status light (green light)
(7) Normal status light (green light)
4
Copyright © Fixstars Corporation. All rights reserved.
3
Connection of GigaAccel 180
This section explains the instructions for connecting GigaAccel 180 onto
the host machine. The target host machine must have a x16 PCI Express
interface (2 slots), and an AUX 12V 6-pin power connector for PCI Express.
3.1 Preparations
Prepare the following cables which are included in the packaging.
y Serial cable
y Ethernet crossover cable
If possible, please work by using "Static electricity prevention wristband (SANWA
SUPPLY TK-SE6)" etc. to prevent damage due to static electricity when connecting
GigaAccel 180.
3.2 Directions of connection
(1)
Connect the 3-pin end of the serial cable to the board’ serial port. 9-pin side
is put out from an empty slot to the outside of the host machine.
Serial connector(9-pin)
Serial connector(3-pin)
* Connect the marked end to the outside
[Note] If the host machine has no serial port(9-pin side), please connect the serial cable
to the USB port by using USB-serial conversion cable.
5
Copyright © Fixstars Corporation. All rights reserved.
(2)
Open the computer case, confirm that an x16 PCI Express slot is available,
then remove that slot cover and the slot cover below it.
(3)
Insert GigaAccel 180 into the empty x16 PCI Express slot.
x16 PCI Express slot
[Note] PCI-express connectors must be handled with care. If the connector is not
installed firmly on the slot, GigaAccel180 may not function correctly.
(4)
Attach the PCI Express AUX 12V 6-pin power connector to GigaAccel 180.
AUX12V 6-pin power connector
6
Copyright © Fixstars Corporation. All rights reserved.
(5) Connect serial port (9pin) that was left outside of the host machine. When
you use USB-serial conversion cable, please connect it to the usb port on the
host machine.
Serial Connector(9pin)
(6) Connect the Ethernet cable (crossover) to the eth0 port of GigaAccel 180.
The port will be used for network booting and NFS mounting. In the following
picture, the host machine has DHCP server, TFTP server and NFS server.
GigaAccel 180 eth0
Host machine eth0
7
Copyright © Fixstars Corporation. All rights reserved.
4
Installation of GigaAccel 180 (NFS)
This section describes how to create the GigaAccel 180 disk image and how
to install it to GigaAccel 180. If you are using an OS other than Yellow Dog
Enterprise Linux for GigaAccel 180, please skip this section.
Also, this instruction assumes that CentOS5.4 is installed on the host
machine (x86, 64 bit). For connecting GigaAccel 180, please refer to “3
Connection of GigaAccel 180”.
[Note] Ensure that the kernel version of the host machine is the latest version. This is
necessary for the PCI-Express driver.
4.1 Preparations
Prepare the following items for this section.
y
Yellow Dog Enterprise Linux for GigaAccel 180 Install DVD
y
IP address for external network connection
Establish external network connection as described below. Have an IP address
ready for the host to make the external network connection.
“4.5 Installation of necessary services”
4.2 Disable services
Disable the host machine firewall.
# service iptables stop
# chkconfig iptables off
Disable SELinux on the host machine.
# setenforce 0
# vi /etc/selinux/config
(setting value)
SELINUX=disabled
8
Copyright © Fixstars Corporation. All rights reserved.
4.3 Network settings
Perform host machine network configurations as follows. eth0 will be used for
communications (NFS mount, etc.) with GigaAccel 180. Assign the IP address
(192.168.2.10) beforehand.
# vi /etc/sysconfig/network-scripts/ifcfg-eth0
(setting value)
DEVICE=eth0
ONBOOT=yes
BOOTPROTO=static
IPADDR=192.168.2.10
NETMASK=255.255.255.0
4.4 Prepare to create boot image and disk image
Set the DVD (Yellow Dog Enterprise Linux for GigaAccel 180) into the host
machine.
Create the installer directory, and mount the DVD drive to the installer directory.
# mount /dev/cdrom /mnt -o ro
# mkdir -p /nfsroot/ydlinstaller
# mount /mnt/iso/ydel-X.X.X-cell.iso /nfsroot/ydlinstaller -o loop
Copy the installer boot image to “/tftpboot”.
# mkdir -p /tftpboot
# cp /nfsroot/ydlinstaller/images/netboot/ppc64.img /tftpboot
4.5 Installation of necessary services
Install necessary services which are dhcp, nfs-utils, rpcbind, xinetd, and tftp-server.
Also, enable these services to start automatically upon start up.
#
#
#
#
yum install dhcp nfs-utils rpcbind xinetd tftp-server
chkconfig dhcpd on
chkconfig xinetd on
chkconfig nfs on
9
Copyright © Fixstars Corporation. All rights reserved.
4.6 NFS service settings
Edit the NFS service configuration file as follows.
# vi /etc/exports
(setting value)
/nfsroot 192.168.2.11(rw,sync,no_root_squash,no_all_squash)
/nfsroot/ydlinstaller 192.168.2.11(rw,sync,no_root_squash,no_all_squash)
Restart the NFS services after editing the configuration file.
# service nfs restart
4.7 DHCP service settings
Edit the DHCP configuration file as follows.
# cp /usr/share/doc/dhcp-*/dhcpd.conf.sample /etc/dhcpd.conf
# vi /etc/dhcpd.conf
(setting value)
ddns-update-style ad-hoc;
subnet 192.168.2.0 netmask 255.255.255.0 {
host ga180 {
hardware ethernet 01:23:45:67:89:A0; ← GigaAccel 180 eth0 MAC address
fixed-address 192.168.2.11;
← IP address assigned to GigaAccel 180
next-server 192.168.2.10;
← IP address of TFTP server
filename “ppc64.img”;
← Boot image file name
}
}
GigaAccel 180 eth0 MAC address is printed on the side of GigaAccel 180 as “1ST
MAC:--- ”.
Set the DHCP service start up option as follows.
# vi /etc/sysconfig/dhcpd
(setting value)
DHCPDARGS=eth0
Restart the DHCP service after editing the configuration file.
# service dhcpd restart
4.8 TFTP service settings
Edit the xinetd configuration file as follows so that the TFTP service will start
automatically.
10
Copyright © Fixstars Corporation. All rights reserved.
# vi /etc/xinetd.d/tftp
(setting value)
service tftp
{
disable = no ← change "yes" to "no"
(Do not change other parameters)
}
Restart xinetd after editing its configuration file.
# service xinetd restart
4.9 Restart GigaAccel 180
Restart GigaAccel 180 from the serial console (minicom). The serial baud rate is
115200. For serial console settings, please refer to “Appendix C – Using Serial
Console”.
Start up the serial console.
# minicom
Pressing ‘s’ while GigaAccel 180 is running will display the command prompt.
* When you configure the host machine, GigaAccel 180 may fail to boot. In this case,
press ‘Enter’ key and then the commad prompt is displayed.
Set the environment variables using the following command.
0 > setenv boot-file root=/dev/ram
Reboot GigaAccel 180.
0 > reboot
After the reboot is complete, Yellow Dog Enterprise Linux installer screen will be
displayed on screen.
* For the common console commands, please refer to “Appendix D – Common Console
Commands”.
4.10 Installation of Yellow Dog Enterprise Linux
About installation of Yellow Dog Enterprise Linux, refer to URL
http://us.fixstars.com/support/solutions/ydel_6.x/ydel_configure_host_nohd.sh
tml.
11
Copyright © Fixstars Corporation. All rights reserved.
4.11 Start up GigaAccel 180
If the installation of GigaAccel 180 is complete, GigaAccel 180 will start up during
the host machine start up. Follow the instructions below to login to GigaAccel 180.
(1) Console login
Shortly after the host machine has started up the GigaAccel 180 OS will also
start up, and a login prompt appear in the console window. Then you can login
as follows.
Login name:
“root”
Password:
Password entered during installation process
* To login GigaAccel 180 and to operate, we recommend ssh login described in the
following.
(2) SSH login
Shortly after the host machine has started up the GigaAccel 180 OS will also
start up. After Giga Accel 180 has booted, you can perform SSH login.
Login IP address:
192.168.2.11
Login name:
“root”
Password:
Password entered during installation process
Also, the current GigaAccel 180 status can be confirmed using serial console.
Please refer to “E.2 Start up troubleshooting” for troubleshooting.
12
Copyright © Fixstars Corporation. All rights reserved.
4.12 Network installation of additional packages
This section describes how to network install using yum. Ensure that
configuration settings allow GigaAccel 180 to connect to an external network. Also,
make sure to have on hand the Yellow Dog Enterprise Linux user name and
password which were notified separately.
* To connect to the external network, login to GigaAccel 180, and then, configure
“/etc/sysconfig/network-scripts/ifcfg-eth1” file, activate eth1 (by “ifup eth1” command).
About setting, please refer to manual related to Linux.
Please input your Yellow Dog Enterprise Linux user name and password in
baseurl in the following 3 files. And then, please save them.
# vi /etc/yum.repos.d/yellowdog-base.repo
[base]
name=Yellow Dog Linux 6 Base
baseurl=http://USERNAME:[email protected]/cell/yum/6.0/base/
enabled=1
gpgcheck=0
gpgkey=file:///etc/pki/rpm-gpg/RPM-GPG-KEY
# vi /etc/yum.repos.d/yellowdog-extras.repo
[extras]
name=Yellow Dog Linux 6 Extras
baseurl=http://USERNAME:[email protected]/cell/yum/6.0/extras/
enable=1
gpgcheck=0
gpgkey=file:///etc/pki/rpm-gpg/RPM-GPG-KEY
# vi /etc/yum.repos.d/yellowdog-updates.repo
[updates]
name=Yellow Dog Linux 6 Updates
baseurl=http://USERNAME:[email protected]/cell/yum/6.0/updates/
enabled=1
gpgcheck=0
gpgkey=file:///etc/pki/rpm-gpg/RPM-GPG-KEY
* In the above example, Yellow Dog Enterprise Linux user name is “USERNAME” and
password is “PASSWORD”.
Now, if your Network has proxy server, you need to configure the proxy server.
According to the enviroment of the proxy server, add the following.
# vi /etc/yum.conf
proxy=http://(PROXY Server Address):(Port Number)
proxy_username=(username for proxy server)
proxy_password=(password for proxy server)
13
Copyright © Fixstars Corporation. All rights reserved.
Similarly, if you get the file by wget, it is necessary to configure the proxy server.
According to the enviroment of the proxy server, add the following.
# vi /etc/wgetrc
http_proxy=http://(PROXY Server Address):(Port Number)
proxy_user=(username for proxy server)
proxy_passwd=(password for proxy server)
After the configuration is complete, install package(s) with the yum command.
Install the necessary package(s) at this time. in the following example, the gcc
package is being installed.
# yum install gcc
14
Copyright © Fixstars Corporation. All rights reserved.
4.13 DVD installation of additional packages
This section describes how to install packages from DVD using the yum command.
Ensure that the installer DVD is placed in the host machine DVD drive.
Create the mount directory on the host.
# mkdir -p /nfsroot/media/DVD
Add the following line to the NFS service configuration file.
# vi /etc/exports
(setting value)
#/nfsroot/media/DVD 192.168.2.11(rw,sync,no_root_squash,no_all_squash)
After editing the configuration file, restart the NFS service.
# service nfs restart
Mount the installer DVD and the installer image on the host.
# mount /dev/cdrom /mnt -o ro
# mount /mnt/iso/ydel-X.X.X-cell.iso /nfsroot/media/DVD -o loop
* The following actions will be performed on the GigaAccel 180.
Create the mount directory on the host.
# mkdir -p /media/DVD
Mount the installer DVD on the GigaAccel 180.
# mount 192.168.2.10:/nfsroot/media/DVD /media/DVD -o ro
Create the yum repo file.
# vi /etc/yum.repos.d/yellowdog-dvd.repo
[dvd]
name=Yellow Dog Linux DVD
baseurl=file:///media/DVD
enable=1
gpgcheck=0
gpgkey=file:///etc/pki/rpm-gpg/RPM-GPG-KEY
Disable other yum repo files.
#
#
#
#
cd
mv
mv
mv
/etc/yum.repos.d
yellowdog-base.repo yellowdog-base.repo.disabled
yellowdog-extras.repo yellowdog-extras.repo.disabled
yellowdog-updates.repo yellowdog-updates.repo.disabled
15
Copyright © Fixstars Corporation. All rights reserved.
Install package(s) using the yum command. Install the necessary package(s) at
this time.
* In this example, the gcc package is installed.
# yum install gcc
Following the installation of necessary packages, unmount the installer DVD
from GigaAccel 180.
# umount /media/DVD
* The following actions will be performed on the host.
Comment out or delete the one line added to NFS service configuration file.
# vi /etc/exports
(setting value)
#/nfsroot/media/DVD 192.168.2.11(rw,sync,no_root_squash,no_all_squash)
After editing the configuration file, restart NFS service.
# service nfs restart
Unmount the installer image and the installer DVD from host.
# umount /nfsroot/media/DVD
# umount /mnt
Finally, remove the installer DVD from the DVD drive.
16
Copyright © Fixstars Corporation. All rights reserved.
5
Installing GigaAccel 180 (CIFS)
This section describes how to set up CIFS boot in GigaAccel 180. If you are
using nfs boot, there is no need to read this section.
The OS is Yellow Dog Enterprise Linux on GigaAccel 180.
It is assumed that Windows XP Professional is installed on the host
machine(x86, x86_64). For connecting GigaAccel 180, please refer to “3
Connection of GigaAccel 180”.
5.1 Preparations
Have the following items on hand for this section
y
File system for CIFS(ga180-ydel6.0-cifsroot.ext3.192.168.2.11)
y
boot file for CIFS(ga180-cifsroot-X.X.XX-X.ydl.X.img)
(2 files above is in
GigaAccel 180 Install DVD > WindowsSupport > CIFS)
y
IP addresses for connecting to the external network
Follow the instructions below to connect eth1 port to the external network.
IP address must be available to connect to the external network from both
the host and GigaAccel 180.
“5.4 Installation of necessary services”
* The file name for CIFS is "ga180-ydel6.0-cifsroot.ext3." + "IP address of GigaAccel
180". This IP address is assigned by the DHCP server when GigaAccel180 boots up.
Therefore, you must prepare a CIFS file system for each GigaAccel180 installed. If
you have multiple GigaAccel180s installed, please copy the CIFS file system and
use it.
5.2 Creating new account
Create new account to access to CIFS in the host machine. If you set default value
to the boot file for CIFS, create account which name is “root”, and password is
“passw0rd”.
17
Copyright © Fixstars Corporation. All rights reserved.
5.3 Network settings
Perform host machine network configurations. Open “Control Panel” > “Network
and Internet Connections” > “Network Connections”.
“Local Area Connection” will be used for the external network connection
(assigned IP address by DHCP server) and “Local Area Connection 2” will be used
for communications with GigaAccel 180. In “Local Area Connection 2”, assign the
IP address (192.168.2.10) beforehand.
Local Area Connection
18
Copyright © Fixstars Corporation. All rights reserved.
Local Area Connection 2
19
Copyright © Fixstars Corporation. All rights reserved.
5.4 Firewall settings
Turn off Windows Firewall for communications with GigaAccel 180. Open
“Control Panel” > “Security” > “Windows Firewall”.
Open “Advance” tab and clear the check box for “Local Area Connection 2”.
5.5 Create boot file and file system
Perform creating CIFS boot file and file system for CIFS of GigaAccel 180. Insert
“GigaAccel 180 Install DVD” in the host machine.
Copy boot file (ga180-cifsroot-X.X.XX-X.ydl.X.img) for CIFS to “c:¥tftpboot” folder.
(If this folder does not exist, create this folder.)
Copy file system for CIFS to “c:¥CIFS” folder. (If this folder does not exist, create
this folder.)
20
Copyright © Fixstars Corporation. All rights reserved.
5.6 Configuration of Folder Sharing
Perform sharing the folder(c:¥CIFS) which you created and put the file system in
it. Here is how to configure file sharing.
1.
Right click CIFS folder.
2.
Select “Share…”
3.
Then opened “Sharing” tab in “CIFS Properties”. Click “Advanced
Sharing…”.
21
Copyright © Fixstars Corporation. All rights reserved.
4.
Then opened “Advaced Sharing” window.
Select “Share this folder”, and then click “Permissions” button.
5.
Then opened “Permissions for CIFS” window.
Click “Add…” button.
22
Copyright © Fixstars Corporation. All rights reserved.
6.
Type “root” in the object names to select, and then click “OK” button.
7.
Select “root” user and check the “Full Control” box.
* You are recommended to delete “Everyone” user in security.
23
Copyright © Fixstars Corporation. All rights reserved.
5.7 Installation of TFTP Service
This section describes the procedures to install the tftpd32 service edtion that is a
free software. Go to tftpd32 download page, and download “tftpd32 service edition”
(zip file format).
After downloading tftpd32, unpack the .zip archive and install tftpd32 along the
install guide. (You can install by the following command. “tftpd32_svc –install”)
The service name is ”Tftpd32 service edition”.
After complete installation, start tftpd32 service. Open “Control Panel” > “System
and Maintenance” > “Administrative Tools” > “Services”. You can start it in the
Services page.
5.8 TFTP Service settings
Run tftpd32_gui.exe in the unpacked folder and configure as follows. If the
firewall warning appears, close firewall warning.
After tftpd32 start, click “Setting” button.
tftpd32 start page
24
Copyright © Fixstars Corporation. All rights reserved.
In the setting window, configure as follows.
Parameter 1
Base Directory
Parameter 2
-
Global Settings
-
Syslog server
-
DHCP Options
-
TFTP Security
Timeout
Max Retransmit
Tftp port
Local ports pool
Option negotiation
PXE Compatibility
Show Progress bar
Translate Unix file names
Bind TFTP to this address
Allow ‘\’ As Virtual root
Use anticipation window of
TFTP
configuration
Advanced
TFTP Options
Value 1
C:\tftpboot
TFTP Server
DHCP Server
Turn off all
Persistant leases
Bind DHCP to this address
(192.168.2.10)
Read Only
3
6
69
Empty
Check
Uncheck
Check
Check
Check(192.168.2.10)
Check
Check(8192 byte)
After configuration click “OK” button and re-start “tftpd32_gui.exe”.
The next section describes the DHCP setup. Click “DHCP Server” tab, and then
configure as follows. After configuration, click “Save” button and save the settings.
Parameter
IP pool starting address
Size of pool
Boot File
WINS/DNS Server
Default router
Mask
Domain Name
Additional Option
Value
192.168.2.11
1
ga180-cifsroot-X.X.XX-X.ydl.X.img
Empty
Empty
255.255.255.0
Empty
Empty
*1 If you install two GigaAccel 180, set Size of pool to 2.
*2 If “Additional Option” is left blank, IP adress of host workstation will be set to
“192.168.2.10”, CIFS mount account will be “root” and the password will be “passw0rd”.
If you want to modify them, set all of them as follows.
Additional Option
The first field : 17
The second field : //{Host IP Address}/{Shared Folder} /cifs -o user={Account
name},password={Password}
(ex:default value)
The second field : //192.168.2.10/CIFS /cifs -o user=root,password=passw0rd
[Note] You can enter the second field in less than 63 characters. If an invalid value is
entered, GigaAccel 180 can not boot. If GigaAccel 180 can not boot, please refer to the
troubleshooting.
25
Copyright © Fixstars Corporation. All rights reserved.
5.9 Installation of Terminal Software
To confirm the boot status of GigaAccel 180 (to show Serial Console), terminal
software is necessary. This section describes the installation of “Tera Term
Pro”(http://ttssh2.sourceforge.jp/index.html.en). Go to the download page and
download the installer. Run the installer and install with the default settings.
5.10 Start up Terminal Software
After install, a shortcut icon will be created. Double-click it and run teraterm.
First setup the serial port. In “New Connection” window, select “Serial (Port:
COM1)”, and then click “OK” button.
New connection window
After serial console appears, Select menu “Setup” > “Serial port…”. Then “Serial
port setup” window is opened.
In “Serial port setup” window, configure as follows.
Parameter
Port
Baud rate
Data
Parity
Stop
Flow control
Transmit delay
Value
COM1
115200
8 bit
none
1 bit
none
0msec/char 0msec/line
Click “OK” button, and select menu “Setup” > “Save setup…”. Then complete
setting.
26
Copyright © Fixstars Corporation. All rights reserved.
5.11 Start up GigaAccel 180
The following operation is needed when we boot GigaAccel180 for the first time.
Once Giga Accel 180 boots successfully, there is no need to set it again.
* When GigaAccel180 fails to boot, please investigate the reason.
1.
Start up teraterm
Start up teraterm. And in “New connection” window, select “Serial (Port:
COM1)” and click “OK” button.
Console window is opened. Then press “Enter” key. Command prompt “0 >” of
GigaAccel 180 appears.
* If the command prompt does not appear, open “Control Panel” > “System and
Maintenance” > “Administrative Tools” > “Services”, and then right-click “Tftpd32
service edition”, select “Properties”. In “Startup type”, select “Manual” from the
drop down menu (to prevent from starting up automatically with starting up the
host machine). And reboot the host machine. Then, open serial console window by
tera term, and type “Esc” key.
2.
Configure boot option
To boot GigaAccel 180 in CIFS mode, it is necessary to configure the boot
option. Type the following command.
0 > setenv boot-file root=/dev/ram ramdisk=131072
0 > reboot
3.
Console login.
In the console window, boot logs will appear. If “ga180 login:” appears, it means the
boot was successful. In default configuration you can log in as the “root” user and
password is “passw0rd”. (“0” is zero.)
* When GigaAccel 180 is running you can log in by ssh. The default IP address of
GigaAccel 180 is “192.168.2.11” (this is assigned by the DHCP feature of tftpd32).
27
Copyright © Fixstars Corporation. All rights reserved.
5.12 Network installation of additional packages
It is possible that CIFS doesn’t have packages needed in your enviroment. In this
case, you can use yum to add packages. Ensure that configuration settings allow
GigaAccel 180 to connect to the external network. Also, make sure to have on hand
the Yellow Dog Enterprise Linux user name and password which were notified
separately.
Please input your Yellow Dog Enterprise Linux user name and password in
baseurl in the following 3 files. And then, please save them.
# vi /etc/yum.repos.d/yellowdog-base.repo
[base]
name=Yellow Dog Linux 6 Base
baseurl=http://USERNAME:[email protected]/cell/yum/6.0/base/
enabled=1
gpgcheck=0
gpgkey=file:///etc/pki/rpm-gpg/RPM-GPG-KEY
# vi /etc/yum.repos.d/yellowdog-extras.repo
[extras]
name=Yellow Dog Linux 6 Extras
baseurl=http://USERNAME:[email protected]/cell/yum/6.0/extras/
enable=1
gpgcheck=0
gpgkey=file:///etc/pki/rpm-gpg/RPM-GPG-KEY
# vi /etc/yum.repos.d/yellowdog-extras.repo
[extras]
name=Yellow Dog Linux 6 Extras
baseurl=http://USERNAME:[email protected]/cell/yum/6.0/extras/
enable=1
gpgcheck=0
gpgkey=file:///etc/pki/rpm-gpg/RPM-GPG-KEY
* In the above example, Yellow Dog Enterprise Linux user name is “USERNAME” and
password is “PASSWORD”.
Now, if your Network has proxy server, you need to configure the proxy server.
According to the enviroment of the proxy server, add the following.
# vi /etc/yum.conf
proxy=http://(PROXY Server Address):(Port Number)
proxy_username=(username for proxy server)
proxy_password=(password for proxy server)
28
Copyright © Fixstars Corporation. All rights reserved.
Similarly, if you get the file by wget, it is necessary to configure the proxy server.
According to the enviroment of the proxy server, add the following.
# vi /etc/wgetrc
http_proxy=http://(PROXY Server Address):(Port Number)
proxy_user=(username for proxy server)
proxy_passwd=(password for proxy server)
After the configuration is complete, install package(s) with the yum command.
Install the necessary package(s) at this time. in the following example, the gcc
package is being installed.
# yum install gcc
29
Copyright © Fixstars Corporation. All rights reserved.
5.13 DVD installation of additional packages
This section describes how to install packages from DVD using the yum command.
Ensure that the installer DVD is placed in the host machine DVD drive(d:).
Now we will configure the sharing of the DVD drive(d:). The shared name is
“DVD”.
* The following actions will be performed on the GigaAccel 180.
Create the mount directory.
# mkdir -p /media/DVD
CIFS Mount the Installer DVD and mount install image on the GigaAccel 180.
# mount -t cifs //192.168.2.10/DVD /mnt -o ro
# mount /mnt/iso/ydel-X.X.X-cell.iso /media/DVD -o loop
Create the yum repo file.
# vi /etc/yum.repos.d/yellowdog-dvd.repo
[dvd]
name=Yellow Dog Linux DVD
baseurl=file:///media/DVD
enable=1
gpgcheck=0
gpgkey=file:///etc/pki/rpm-gpg/RPM-GPG-KEY
Disable other yum repo files.
#
#
#
#
cd
mv
mv
mv
/etc/yum.repos.d
yellowdog-base.repo yellowdog-base.repo.disabled
yellowdog-extras.repo yellowdog-extras.repo.disabled
yellowdog-updates.repo yellowdog-updates.repo.disabled
Install package(s) using the yum command. Install the necessary package(s) at
this time.
* In this example, the gcc package is installed.
# yum install gcc
Following the installation of necessary packages, unmount the installer DVD and
the install image from GigaAccel 180.
# umount /media/DVD
# umount /mnt
Finally, remove the installer DVD from the DVD drive in the host workstation.
30
Copyright © Fixstars Corporation. All rights reserved.
6
Upgrading YDEL
About upgrading YDEL, please refer to URL
http://us.fixstars.com/support/solutions/ydel_6.x/upgrade_6_0_to_6_1.shtml.
[Note] If you use Windows enviroment, you can not upgrade from YDEL6.0 to YDEL6.1.
31
Copyright © Fixstars Corporation. All rights reserved.
7
Start Up PCI Express Driver (for Linux host)
This section describes how to start up PCI Express driver for Linux host. If
you are using Windows host, please skip this section.
7.1 PCI Express driver overview
If the OS of the host machine is Linux, installing the PCI Express driver will
allow TCP/IP communications with GigaAccel 180 via PCI Express. However, to
conduct TCP/IP communications, the driver must be running on both the host
machine and GigaAccel 180.
[Note] Currently, the compatible kernel version is 2.6.18-164.6.1.el5.
Please download the following files from
http://www.fixstars.com/products/gigaaccel180/support/index.html. You must have the
GigaAccel180 support site account in order to access the web site. The account information
should be sent separately.
y
PCI Express driver source RPM
triblade-kmod-2.6.28-1.ydl.1.src.rpm
axon-1.0.18-1.ydl.1.src.rpm
7.2
Host machine set up
Install packages necessary for the build.
# yum install rpm-build kernel-devel gcc
Decompress the downloaded triblade-kmod-2.6.28-1.ydl.1.src.rpm.
# rpm –ivh triblade-kmod-2.6.28-1.ydl.1.src.rpm
Build the pxcab driver that is compatible with kernel version.
# cd /usr/src/redhat
# rpmbuild -bb --define 'kversion X.X.X-X.X.X.X' \
--define 'kvariants ""' SPECS/triblade-kmod.spec
When the build succeeds, install it.
# rpm -ivh RPMS/x86_64/kmod-triblade-2.6.28-1.ydl.1.\
x86_64.rpm
Install the downloaded axon-1.0.18-1.ydl.1.src.rpm.
# rpm -ivh axon-1.0.18-1.ydl.1.src.rpm
# rpmbuild -bb SPECS/axon.spec
# rpm -ivh RPMS/x86_64/axon-1.0.18-1.ydl.1.x86_64.rpm
32
Copyright © Fixstars Corporation. All rights reserved.
When the installation succeeds, load modules.
# modprobe axon
# modprobe apnet
# lsmod | grep apnet
apnet xxxxx 0
axon
xxxxx 1 apnet
7.3 Start up PCI Express
Start driver using the following command. Enter the following command on both
the host side and the GigaAccel 180 side.
# service pxcab start
To change the PCI Express driver IP address, edit the following file.
* The default IP addresses are set to “192.168.1.1” for the host and “192.168.1.2” for
GigaAccel 180.
# vi /etc/sysconfig/network-scripts/ifcfg-apnet0
Restart the driver if the IP address was changed.
# service pxcab restart
7.4 Stop PCI Express driver
Stop the PCI Express driver with the following command. (On both the host and
GigaAccel 180)
# service pxcab stop
[Note] If the driver was stopped on both the host and GigaAccel 180, then use the following
command on both the host and GigaAccel before starting the drivers again.
# modprobe axon
# modprobe apnet
# lsmod | grep apnet
apnet xxxxx 0
axon
xxxxx 1 apnet
7.5 Reset PCI Express driver
Resetting the PCI Express driver will reboot GigaAccel 180.
* Perform this only on the host.
# service pxcab reset
33
Copyright © Fixstars Corporation. All rights reserved.
Appendix A – Installing GigaAccel 180 (Fedora7)
This section describes how to create the GigaAccel 180 disk image and how
to install GigaAccel 180 so that it can start up. If you are using an OS other
than Fedora 7 for GigaAccel 180, then skip this section.
It is assumed that Fedora 7 is installed on the host machine. For connecting
GigaAccel 180, please refer to “3 Connection of GigaAccel 180”.
[Note] Ensure that the kernel version of the host machine is between 2.6.22-5 ~ 2.6.23-17.
This is necessary for the PCI-Express driver, later on.
A.1 Preparations
Have the following items on hand for this section.
Download the following files from
ftp://linuxpatch.ncsa.uiuc.edu/pxcab/Fedora7/ppc64/.
y GigaAccel 180 kernel boot image(zImage file).
zImage-X.X.XX-X.YYYYMMDD.pxcab.img. (Please use the latest file.)
y Fedora7 file system for GigaAccel 180
Fedora-7-image-pxcab-UI.tgz
y GigaAccel 180 kernel RPM
kernel-X.X.XX-X.YYYYMMDDpxcab.ppc64.rpm (Please use the latest file.)
IP addresses for connecting to the external network
Follow the instructions below to connect to the external network. 2 IP
addresses must be available to connect to the external network from both
the host and GigaAccel 180.
“A.4 Installation of necessary services”
A.2 Host settings
Disable the host machine firewall.
# service iptables stop
# chkconfig iptables off
Disable SELinux on the host machine.
# setenforce 0
# vi /etc/selinux/config
(setting value)
SELINUX=disabled
34
Copyright © Fixstars Corporation. All rights reserved.
A.3 Network settings
Perform host machine network configurations. eth0 will be used for
communications (NFS mount, etc.) with GigaAccel 180. Assign the IP address
(192.168.2.10) beforehand.
# vi /etc/sysconfig/network-scripts/ifcfg-eth0
(setting value)
DEVICE=eth0
ONBOOT=yes
BOOTPROTO=static
IPADDR=192.168.2.10
NETMASK=255.255.255.0
A.4 Installation of necessary services
Install necessary services which are dhcp, nfs-utils, rpcbind, xinetd, and tftp-server.
Also, enable these services to start automatically upon start up.
#
#
#
#
yum install dhcp nfs-utils rpcbind xinetd tftp-server
chkconfig dhcpd on
chkconfig xinetd on
chkconfig nfs on
A.5 Prepare disk image
Decompress the Fedora7 file system for GigaAccel 180 which was downloaded
beforehand into “/nfsroot” folder.
# mkdir -p /nfsroot
# cd /nfsroot
# tar zxf Fedora-7-image-pxcab-UI.tgz
Copy GigaAccel 180 kernel RPM into the file system for GigaAccel 180.
# cp kernel-X.X.XX-X.YYYYMMDDpxcab.ppc64.rpm /nfsroot/Fedora7-pxcab-UI/tmp
35
Copyright © Fixstars Corporation. All rights reserved.
A.6 NFS service settings
Edit the NFS service configuration file as below.
# vi /etc/exports
(setting value)
/nfsroot 192.168.2.11(rw,sync,no_root_squash,no_all_squash)
Restart the NFS services after editing the configuration file.
# service nfs restart
A.7 Prepare the boot image
Prepare the boot image for GigaAccel 180. Copy GigaAccel 180 kernel boot image
downloaded beforehand to “/tftpboot” folder.
# ls /tftpboot
zImage-X.X.XX-X.YYYYMMDD.pxcab.img
A.8 DHCP service settings
Edit the DHCP configuration file as follows.
# cp /usr/share/doc/dhcp-*/dhcpd.conf.sample /etc/dhcpd.conf
# vi /etc/dhcpd.conf
(setting value)
ddns-update-style ad-hoc;
subnet 192.168.2.0 netmask 255.255.255.0 {
host ga180 {
hardware ethernet 01:23:45:67:89:A0; ← GigaAccel 180 eth0 MAC address
fixed-address 192.168.2.11;
← IP address assigned to GigaAccel
180
next-server 192.168.2.10;
← IP address of TFTP server
option root-path "192.168.2.10:/nfsroot/Fedora7-pxcab-UI,
tcp,hard,nfsvers=3,rsize=32768,wsize=32768"; ← NFS mount Path
}
}
36
Copyright © Fixstars Corporation. All rights reserved.
MAC address of GigaAccel 180 eth0 is printed on the side of GigaAccel 180 as “1ST
MAC: ~”
Set the DHCP service start up option as follows.
# vi /etc/sysconfig/dhcpd
(setting value)
DHCPDARGS=eth0
Restart the DHCP service after editing the configuration file.
# service dhcpd restart
A.9 TFTP service settings
Edit the xinetd configuration file as below so that TFTP service will start
automatically.
# vi /etc/xinetd.d/tftp
(setting value)
service tftp
{
disable = no ← change "yes" to "no"
(Do not change other parameters)
}
Restart xinetd after editing its configuration file.
# service xinetd restart
37
Copyright © Fixstars Corporation. All rights reserved.
A.10 Start up GigaAccel 180
This section describes how to network boot GigaAccel 180.
(1) Restart host machine
The power source of GigaAccel 180 needed to start it up comes from the host
machine, so it needs to be rebooted.
(2) Perform SSH login
Shortly after the host machine has started up the GigaAccel 180 OS will also
start up. When that is complete you can perform SSH login into GigaAccel
180 through such methods as terminal software.
Login IP address:
192.168.2.11
Login name, password:
“root”, “passw0rd” (passw0rd contains a ‘0’ –
zero)
Also, the current GigaAccel 180 status can also be confirmed using serial
console. Please refer to “Appendix C – Using Serial Console” if using serial
console. Please refer to “E.2 Start up troubleshooting” for troubleshooting.
(3) Installing kernel module
In this step, we assume there is the GigaAccel 180 RPM in /tmp. First, we
install it.
# cd /tmp
# rpm -ivh kernel-X.X.XX-X.YYYYMMDDpxcab.ppc64.rpm
(4) Restart the host machine
Log out of GigaAccel 180, and then, restart the host machine.
38
Copyright © Fixstars Corporation. All rights reserved.
Appendix B – GigaAccel 180 Specifications
GigaAccel 180 hardware specifications are as follows.
GigaAccel 180 complies with “PCI Express Card Electromechanical
Specification” and “PCI Express x16 Graphics 150W-ATX Specification” in
almost all cases.
Hardware specifications
CPU
Main memory
Cell companion chip
I/O interface
Power
Cooling
External frame
Main Processor
IBM PowerXCell 8i Processor
Processor count
1
Core clock
2.8GHz
PPU core count
1
SPU core count
8
Memory interface clock
800MHz
Memory
PC800 DDR2 SDRAM
Volume
4GB
Channel count
2
Data path
16 bytes / channel
Peak transfer rate
25.6 GB/s (total)
ECC
Yes
Type
IBM Southbridge
16x PCI Express
1
1Gbps Ethernet
2
Serial port
1
Maximum power consumption
150W
Auxiliary power supply
Yes (12V 8-pin power connector)
Fan
Blower fan with heatsink
Fan controller
Yes
Length
111mm
Width
312mm
Slot count
2
39
Copyright © Fixstars Corporation. All rights reserved.
Operating environment
GigaAccel 180 operating environment is as below.
Temperature:
10 ~ 40 °C
Humidity:
5 ~ 95 % (Non condensing)
Altitude:
-400 ~ 3000 m
40
Copyright © Fixstars Corporation. All rights reserved.
Appendix C – Using Serial Console
The status check of GigaAccel 180 can be done by using the serial console
(minicom). To use the serial console, a serial cable is necessary.
* Skip Appendix B if the host doesn’t use a Linux OS.
minicom is configured as follows.
# minicom –s
Serial port setup
A Serial Device
: /dev/ttyS0
F - Hardware Flow Control : No
(Do not change other parameters)
Modem and dialing parameter setup
A - Init string … (space)
B - Reset string … (space)
C - Dialing prefix #1 … (space)
D - Dialing suffix #1 … (space)
E - Dialing prefix #2 … (space)
F - Dialing suffix #2 … (space)
G - Dialing prefix #3 … (space)
H - Dialing suffix #3 … (space)
I - Connect string … (space)
J - No connect strings … (space)
K - Hang-up string … (space)
L - Dial cancel string … (space)
(Do not change other parameters)
Save setup as dfl
Exit
After completing minicom configurations, start minicom.
# minicom
41
Copyright © Fixstars Corporation. All rights reserved.
Appendix D – Common Console Commands
Press the ‘s’ key during GigaAccel 180 start up to display the command prompt.
The following describes the common commands.
Command
Description
boot
Start from the reading of boot image.
reset-all (or ‘reboot’)
Restart from the open firmware boot.
version
Display open firmware version.
printenv
Display environmental information of the open
firmware.
setenv [parameter] [value]
Set environmental variables of the open firmware.
42
Copyright © Fixstars Corporation. All rights reserved.
Appendix E – Troubleshooting
This section contains solutions for various cases. Please refer to this when
faced with problems.
E.1 Connection troubleshooting
GigaAccel 180 does not fit into host machine
-
Confirm that the workstation is compatible and that it is operational.
E.2 Start up troubleshooting
GigaAccel 180 does not power on (LED doesn’t light)
-
Confirm that power connector is attached.
See “3.2 Directions of connection”
GigaAccel 180 OS does not start up (cannot make SSH connection)
-
Confirm that host eth0 and GigaAccel 180 eth0 are both connected with an
Ethernet crossover cable.
See “3.2 Directions of connection”
-
Confirm that DHCP server, TFTP server, NFS server, and other services are
running.
See “4.5 Installation of necessary services”
-
Confirm that NFS server settings are correct.
See “4.6 NFS service settings”
-
Confirm that DHCP server settings are correct.
See “4.7 DHCP service settings”
-
Confirm that TFTP server settings are correct.
See “4.8 TFTP service settings”
-
If none of the above solutions solve the problem, then confirm start up from
console screen by connecting via serial cable. Refer to “E.4 Console screen
errors” for console screen errors.
Permission error when performing SSH login into GigaAccel 180
-
Confirm that SELinux is disabled in GigaAccel 180.
See “4.2 Disable services”
43
Copyright © Fixstars Corporation. All rights reserved.
E.3 Operational troubleshooting
“rpmdb: mmap: Input/output error” error message during “yum” or “rpm”
command.
-
Delete all “/var/lib/rpm/__db.00*” files, and try the command again.
“conflicts” error during “yum update”
-
Use the “rpm -e” command to uninstall the appropriate package.
E.4 Console screen errors
Listed here are common errors that appear on the serial console.
Freezes while displaying the message “Trying to load: root=/dev/ram …
Bootloader 1.6”.(*1)
-
Confirm that the host eth0 and GigaAccel 180 eth0 are connected with an
Ethernet crossover cable.
*1 When the host OS is Windows, freezes while displaying the message “Trying to
load: root=/dev/ram ramdisk=131072 from: net … Bootloader 1.6”.
See “3.2 Directions of connection”
Freezes during the countdown after the “Press CTRL-A Z for help on
special keys” message
-
Confirm that DHCP service is running.
See “4.5 Installation of necessary services”
-
Confirm that DHCP service settings (GigaAccel 180 MAC address) are
correct.
See “4.7 DHCP service settings”
“E3005 (net) ICMP ERROR “port unreachable”” message
-
Confirm the settings (“/etc/init.d/tftp”) of TFTP server (Linux).
See “4.8 TFTP service settings”
“E3008 (net) Can’t obtain TFTP server IP address” message
-
TFTP boot is failing since no IP address was assigned from DHCP server.
Confirm DHCP server settings. Also confirm that it is not connected to
another DHCP server.
See “4.7 DHCP service settings”
“IP-Config: Got DHCP answer from 0.0.0.0, . . .” message
-
Attempting to obtain IP address from a DHCP server other than the one
intended. Remove the Ethernet cable connected to eth1, or enter “> setenv
44
Copyright © Fixstars Corporation. All rights reserved.
boot-file root=/dev/ram”(*2) in console command prompt and press enter, then
reboot. The reboot command is “> reboot”.
*2 When the host OS is Windows, enter “> setenv boot-file root=/dev/ram
ramdisk=131072”.
See “Appendix D – Common Console Commands”
“E3407 : Load failed” message
-
Failed to read boot image. Confirm TFTP server settings and firewall
settings.
See “4.2 Disable services”
See “4.8 TFTP service settings”
“Root-NFS : Server returned error” message
-
Error occurred during NFS mount. Check the NFS server error log
(/var/log/message)
“kernel panic – not syncing : No init fount” message
-
GigaAccel 180 disk image is incorrect. Confirm the directory structure at
NFS mount path.
“mount: Mounting /cifs/ga180root-cifs.ext3.xxx. xxx. xxx. xxx on /sysroot failed:
No such file or directory” message appear, and reboot over again.
-
Confirm the configuration of tftpd32 Additional Option.
Confirm that the shared folder name is correct.
Confirm that user account or password is correct.
See “5.8 TFTP service settings”
Freezes while displaying the message “Mounting CIFS filesystem ...”
-
Confirm the configuration of tftpd32 Additional Option.
Confirm that host IP address is correct.
See “5.8 TFTP service settings”
45
Copyright © Fixstars Corporation. All rights reserved.
x
The contents of this document may change without notice.
x
The contents of this document are for the standard use and configuration of GigaAccel
180, but it does not guarantee the actual operations of the device. Therefore,
customers are liable when using this device. Fixstars is not liable for any damages, etc.
incurred from the use of this device.
x
Technical information printed on this document does not indicate that Fixstars or any
third party has granted permission to use or apply the intellectual property such as
patents and copyrights. Also, this document does not guarantee in any way the use of
third party intellectual properties and other rights. Therefore, Fixstars is not liable
for any damages to third party intellectual properties or other rights incurred by the
use of this document or device.
x
If the product featured in this document is considered to be restricted cargo or
technology under Foreign Exchange and Foreign Trade Control Law, approval based
on said law will be necessary to export said product.
x
IBM, BladeCenter, and PowerPC are all trademarks or registered trademarks of IBM.
x
PLAYSTATION, PS3, and Cell Broadband Engine are all trademarks or registered
trademarks of Sony Computer Entertainment Inc.
x
Linux is a trademark or registered trademark held by Linus Torvalds.
x
PCI Express is a trademark or registered trademark of PCI-SIG.
x
Fedora and Redhat are trademark or registered trademark of Red Hat, Inc.
x
Yellow Dog Enterprise Linux is a trademark or registered trademark of Terra Soft
Solutions, Inc.
x
Other products and company names printed in this document may belong to their
trademark or registered trademark rights holder.
12 Jan 2010 Ver.17
46
Copyright © Fixstars Corporation. All rights reserved.