1
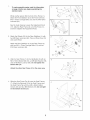
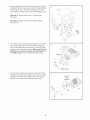
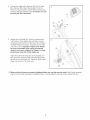
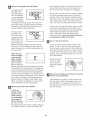
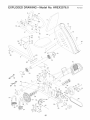
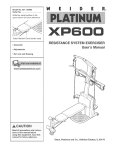
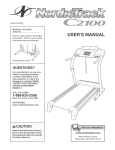
8.
Connect the Upper Wire Harness (36) to the Lower
Wire Harness (65)_ Attach the Upright (13) to the
Frame (1) with three M8 x 25mm Button Screws (33)
and three M8 Split Washers (59). Be careful to avoid
pinching the Wire Harnesses.
8
13
36
,
Identify the Left Pedal (24), which is marked with a
"Left" sticker. Firmly tighten the Left Pedal counterclockwise into the left arm of the Crank (31). Tighten
the Right Pedal (not shown) clockwise into the right
arm of the Crank. Important: Tighten both PedaJs
as firmly as possible. After using the exercise
cycle for one week, retighten the Pedals. For best
performance, keep the PedaJs tightened.
31
25
Adjust the Left Pedal Strap (25) to the desired position, and press the end of the Left Pedal Strap onto
the tab on the Left Pedal (24). Adjust the Right Pedal
Strap (not shown) in the same way.
24
Tab
10. Make sure that aH parts are properly tightened before you use the exercise cycle. Note: Some hardware
may be left over after assembly is completed. Place a mat beneath the exercise cycle to protect the floor.
7