1
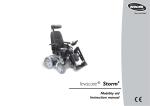
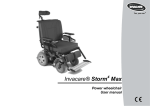
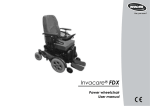
12
Maintenance
The term „Maintenance“ means any task performed to ensure that a medical device is in good
working order and ready for use as intended. Maintenance encompasses different areas, such as
everyday care and cleaning, inspection checks, repair tasks and refurbishment.
NOTE:
Have your vehicle checked once a year by an authorised Invacare® dealer in order to maintain
it's driving safety and roadworthiness.
12.1
Cleaning the mobility device
When cleaning the mobility device, pay attention to the following points:
• Only use a damp cloth and gentle detergent.
• Do not use any abrasive or scouring agents.
• Do not subject the electronic components to any direct contact with water.
• Do not use any high-pressure cleaning devices.
Disinfection
Spray or wipe disinfection using a tested and recognised product is permitted. A list of the current
permitted disinfectants is available from the Robert Koch Institute at http://www.rki.de.
123
12.2
Inspection checks
The following table lists inspection checks that should be performed by the user and their intervals.
If the mobility device fails to pass one of the inspection checks, please refer to the chapter
indicated or contact your authorised Invacare® dealer. A more comprehensive list of inspection
checks and instructions for maintenance work can be found in the Service Manual for this device,
which can be obtained from Invacare®. That Manual, however, is intended to be used by trained
and authorised service technicians, and describes tasks which are not intended to be performed by
the user.
12.2.1 Before each use of the mobility device
124
Item
Signal horn
Lighting system
•
•
Batteries
•
Inspection check
Check for correction function.
•
Check that all lights, such as turn indicators, •
headlamps and tail lights, are functioning
correctly.
Make sure the batteries are charged. See
•
the User Manual provided with your remote
for a description of the Battery Charge
Indicator.
Action
Contact your dealer.
Contact your dealer.
Charge the batteries
(see chapter
"Charging the
batteries" on page
116).
12.2.2 Weekly
Item
Armrests /side parts •
Tyres (pneumatic)
•
•
Inspection check
Check that armrests are
firmly attached in their
holders and do not wobble.
Check that the tyres are
undamaged.
Check that the tyres are
inflated to the correct
pressure.
•
•
•
•
•
Tyres (punctureproof)
•
Check that the tyres are
undamaged.
•
Action
Tighten the screw or clamping lever
that holds the armrest (see chapter
"Adjusting the armrests and the " on
page 47).
Contact your dealer.
Contact your dealer.
Inflate the tyre to the correct
pressure (see chapter "Technical
specifications" on page 151).
Repair the inner tube if you have a
flat tyre (see chapter "Repair
Instructions" on page 127) or
contact your dealer to have it
repaired.
Contact your dealer.
125
12.2.3 Monthly
Item
All upholstered parts •
Removable legrests •
•
126
Castors
Drive wheels
•
•
Electronics and
connectors
•
Inspection check
Check for damage and wear.
Check whether the legrests can be fixed
securely and whether the loosening
mechanism is properly operable (see
chapter "Adjusting footrests and
legrests" on page 77).
Check that all adjustment options function
properly (see chapter "Adjusting footrests
and legrests" on page 77).
Check that castors rotate and swivel freely.
Check that the drive wheels rotate without
wobbling. It is easiest to have someone
stand behind the mobility device and
observe the drive wheels as you drive away
from them to do this.
Check all cables for damage and all
connecting plugs for snug fit.
•
•
Action
Contact your dealer.
Contact your dealer.
•
Contact your dealer.
•
•
Contact your dealer.
Contact your dealer.
•
Contact your dealer.
12.3
Repair Instructions
Important information about maintenance work tools!
Some maintenance work which is described in this manual and can be carried out by the user
without problems require the correct tools for proper work. If you do not have the correct tool
available we do not recommend that you try to carry out the relevant work. In this case, we
urgently recommend that you contact an authorised specialist workshop.
The following are instructions on maintenance and repairs that can be performed by the user. For
the specifications of spare parts please see "Technical specifications" on page 151, or consult
the Service Manual, available from Invacare® (in this connection please see the addresses and
phone numbers in section "How can you get in touch with Invacare®?" on page 3). In case you
require assistance, please contact your Invacare® Dealer.
12.3.1 Reparing a flat tyre
WARNING: Danger of damage or injury if the vehicle is accidentally set into motion during
repairs!
• Switch the power off (ON/OFF Button)!
• Engage the motors!
• Secure the vehicle against rolling away by placing wedges under the wheels!
127
12.3.1.1 Repairing a flat tyre (front)
Requirements:
• Allen key 5 mm
• Open-end spanner 24 mm
• Repair kit for inner tubes or a new inner tube.
• Talcum powder
Remove the wheel
• Jack the vehicle up and place a block of wood
underneath it to prop it up.
• Remove the plastic cap (1).
• Loosen and remove the nut (2) using the openend spanner.
• Remove the washer (3).
• Take the wheel off of the fork assembly.
NOTE
Re-assembly is done in reverse order. Make sure that the wheel is put back on the same side it
was on, and that it runs in the same direction it did before it was removed.
128
Repair the flat tyre
EXPLOSION HAZARD!
The wheel explodes if the air is not left out before dismantling!
• It is imperative that you let the air out of the tyre before dismantling it (press the pin in the
middle of the valve downwards)!
• Remove the valve cap.
• Let the air out of the tyre completely by pressing the pin in
the centre of the valve in.
• Remove the 5 Allen screws (1)
• Take the tyre and the inner tube off of the rim halves.
• Repair the inner tube and re-fit, or replace it with a new
one.
NOTE
In case the old inner tube is to be repaired and used again, and it happens to get wet during
repair, then it is easier to re-fit it if you powder it lightly with talcum powder.
129
• Place the rim halves in the tyre from the outside.
• Pump up the tyre a little.
• Re-position the Allen screws in the rim and tighten them firmly. Make sure the inner tube does
not get pinched between the rims halves!
• Check to make sure that the tyre is squarely in place on the rim.
• Pump up the tyre to the recommended tyre pressure.
• Check to make sure that the tyre is still squarely and snugly in place on the rim.
• Screw the valve cap back on.
• Refit the wheel.
130
12.3.2 Repairing a flat tyre at the front (tyre type 280/250-4)
Requirements:
• Allen key 5 mm
• Open-end spanner 13 mm
• Repair kit for inner tube tyres or a new inner tube
• Talcum powder
Removing the wheel
• Jack up the mobility device (place a wooden wedge
under the frame).
• Loosen and remove the screw (1) using the Allen key
on one side and the open-ended spanner on the
other side (for countering).
• Pull the wheel from the fork
NOTE
Installation is carried out in reverse order. Please ensure that the wheel is re-fitted on the same
side and in the same running direction as removed.
131
Repairing a flat tyre
• Remove the valve cap.
• Exhaust the air from the tyre by pressing the spring pin in
the valve.
• Loosen and remove the 5 Allen screws (1).
• Remove the tyre with the inner tube from the rim halves.
• Repair the tube and re-fit or fit new tube
NOTE
If the old tube is to be repaired and re-fitted and has become wet during repair work, powdering
the hose with some talcum powder can simplify the fitting procedure.
• Re-insert the rim halves into the tyre from the outside.
• Inflate the tyre a little.
• Re-position the Allen screws and screw rim together tightly. Make sure the
inner tube does not get pinched between the rims halves!
• Check the exact fit of the tyre.
• Inflate the tyre to the prescribed air pressure.
• Re-check the exact fit of the tyre.
• Screw on the valve cap.
• Refit the wheel.
132
12.3.2.1 Repairing tyre punctures (wheel rim type 3.00-8")
Injury hazard! If the wheel has been insufficiently tightened during assembly, it can
become loosened during driving!
• When reassembling the drive wheels, tighten the Allen screws at a torque of 30 Nm!
• Secure all screws using a suitable blocker (e.g. Loctite 243)!
Requirements:
• Allen key – open-ended spanner 6 mm
• Torque wrench
• Repair kit for tyre repair or a new inner tube
• Talcum powder
• Screw blocker Loctite (e.g. Loctite 243)
Removing the wheel
• Block up the vehicle (place wooden blocks under frame).
• Unscrew the screw (1).
• Remove the wheel from the hub.
133
NOTE
Re-assembly is done in reverse order. Ensure that the tyre is replaced on the same side and in
the same travel direction as it was previously mounted.
Repairing the flat tyre
EXPLOSION HAZARD!
The wheel will explode if you do not let the air out of the tyre before removing the wheel!
• Always let the air out of the tyre before removing it (press in the pin in the middle of the
valve)!
• Unscrew valve cap.
• Depressurise tyre completely by pressing in the pin in
the valve .
• Remove the 5 cylinder head screws (back of the
wheel, 2.
• Remove the rim halves from the tyre.
• Remove the inner tube from the tyre.
• Repair inner tube and replace, or insert new.
NOTE
If the old inner tube is to be repaired and re-used, and has become wet during repair, you can
make replacement easier by sprinkling the inner tube with a little talcum powder.
134
• Insert the wheel rim halves from outside into the tyre.
• Pump a little air into the inner tube.
• Reinsert the cylinder head screws and tighten to10 Nm. Avoid crushing the inner tube!
• Ensure that the tyre outer is seated correctly.
• Pump the tyre up to the prescribed pressure.
• Ensure that the tyre outer is seated correctly again.
• Screw the valve cap back on.
• Refit the wheel.
135