1
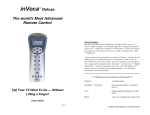
User Manual
1
INTRODUCTION
The Northeast Wisconsin Property Reporting System (NEWPRS) is a secure web-based database using today’s
latest technology to electronically manage and store purchases from pawnshops, resale shops, and salvage
yards.
Wisconsin State Statute 134.71 requires pawnshop and resale shops to complete a property transaction form for
each transaction. Wisconsin State Statute 134.405 regulates scrap metals sales. NEWPRS replaces the hard
copy transaction form and electronically captures the information and stores the data. With approved username
and passwords, law enforcement can easily search the transaction forms of all pawnshops and resale shops that
use NEWPRS.
Resale shops using point of sales software can send their data automatically through a batch file that is
compatible with NEWPRS, eliminating any hardship to the business. Businesses not using point of sale
software can log into www.NEWPRS.com and manually enter their daily activity. This printable, searchable
database stores the information for businesses and can assist in recording keeping, inventory, and accounting.
NEWPRS is set up for three separate access or security settings: resale shops/salvage yards, law enforcement,
and agency administrators. Resale shops only have access and searching function for their business. Law
enforcement has the ability to search the entire system. They can also set up future searches so that if they are
looking for an item/person and that item/person sells an item to a supporting NEWPRS business, the officer will
be notified by email. Agency administrator has the same ability as law enforcement along with access to
usernames and passwords for businesses and officers within their jurisdiction.
2
How to use NEWPRS and this Manual
Please read the definition on page 3 to understand the terminology.
Definitions………………………………………..
Page 4
Sign up and Sign in process………………………. Page 5
Resale shops/Scrap Metals Dealers…….….……..
Transaction number…………………...…..
Seller information……………..………..…
Add item………………………………..…
Add photo…………………………………
Printing the transaction……………………
Searches……………………………..…….
Page 6
Page 6
Page 7
Page 8
Page 9
Page 11
Page 12
Salvage yards/Scrap metal dealers……………….. Page 13
Law enforcement…………….……………………. Page 15
One time search……………………………. Page 15
Future search………………………………. Page 17
Agency administrator……………………………… Page 18
3
DEFINITIONS
NEWPRS stands for Northeast Wisconsin Property Reporting System. Although the name represents
Northeast Wisconsin where it was developed, the system is powerful enough to cover all of Wisconsin and even
the country.
System Administrator is a person employed to maintain and operate the NEWPRS program and web page.
The duties of a system administrator are to set up and approve agency administrators (law enforcement). They
are also responsible for any technical problems and improvements and validating any XML batch files.
Agency Administrators are the persons responsible for approving and maintaining username and passwords
for officers within their department. They will also sign up and approve access for new and existing businesses
within their jurisdiction.
NOTE: Wisconsin State Statute 134.71(8)(e) states that the information collected may only be shared with
another law enforcement agency. To maintain the integrity of NEWPRS, agency administrators may only give
access to the law enforcement side of NEWPRS to law enforcement officers. For non-sworn personnel (such as
crime analyst, records, etc.) department’s policy and procedures will dictate access to NEWPRS.
Law enforcement permission is the access level that a sworn officer is given to the NEWPRS system. This
access is by a unique username and password given by the agency administrator. The agency administrator may
give a unique username and password to each officer or a general username and password for a group of
officers. This is determined by the agency administrator or department policy and procedure.
Resale shop for NEWPRS purposes is considered any of the following: pawnbrokers, secondhand article
dealers or secondhand jewelry dealer, and salvage yard/ scrap metal dealers.
Resale Permission is the access level for resale shops to the NEWPRS system. To gain access, a username and
password must be assigned by the law enforcement agency where the business is located. Contact your local
police department and ask for the NEWPRS agency administrator or pawn detail.
4
Sign Up and Sign in Process
On the internet, go to WWW.NEWPRS.com. A login screen appears.
Click on Client Software.
Enter your username and password
which was previously supplied by
your agency administrator. Press
enter or click the log in button.
Law Enforcement
If your agency is not signed up for NEWPRS Click here.
Resale Shops
If you do not have a username or password, contact your local Police Department.
If your business is using a point of sale software and you would like to send the data through a batch file, please
contact your local law enforcement agency.
On the top of the page is a link to view other city/county ordinances, Wisconsin State Statute, the user manual,
and other news and highlights.
5
Resale Shops/Scrap Metal Dealers
Transaction Number
1. Enter a transaction number.
This is a unique number
assigned by you for the
item/s you are
buying/pawning.
This number should be
attached to the item for
identification purposes.
If a photo is required, the
transaction number must
match the photo. (See photo
section)
Note: you will not be able to
save without a transaction
number.
2. Enter the date and time.
When a new transaction is opened the current date and time is automatically displayed.
6
Seller’s Information
1. Enter the driver’s license
(DL) number and the state of
the DL.
2. Press the DL Auto fill button.
If the subject has ever sold an item to any business in the NEWPRS system, NEWPRS will auto fill the
information.
3. If the person is not in the system enter all the sellers’ information in NEWPRS.
NOTE:
a.
b.
c.
d.
Remember to look at the driver’s license photo! Is the photo the person selling the item?
Ask the seller what his/her current address is and update entry.
Add the phone number.
Remember to hit save and close when finished.
* New Feature. A phone number has been added to this field. Please ask for the phone number and enter the
information.
4. The note field is for your
convenience to add anything
unique about the transaction.
Remember you MUST hit
save changes or you’ll lose
the information.
7
Add Item
1. To add a new item, click on the appropriate blue text on the side of the screen, i.e.; Add Jewelry for a ring to
be entered.
A warning pops up asking you if you want to add the item and a reminder to save the changes.
2. Click OK to accept the request.
3. Use the drop down menus to add the appropriate information.
4. When you are completed, click the save
button. Your transaction has been
saved and you can see the item under
the transaction.
5. Complete the rest of the form.
You can add another item to this
transaction, add a photo or start a
new transaction.
Reminder to press the Save Changes button.
8
Add Photo
1. Take a photo of the item you want to enter. The photo size only needs to be 2”x2” (200 x 200 pixels.)
Note: The photo must be saved as a jpg file. (This is the most common photo file and most cameras are
defaulted to save as a jpg file. Please consult your camera manual on how to save as jpg file.)
2. Save the photo to your computer.
3. Rename the photo to be the transaction number along with what type of item it is. In this example the
item would be renamed 100a_ring.
4. Click on the photo tab.
5. Enter the proper item category
and item type.
6. Press choose file.
7. A browser will open up that will allow
you to search your computer for the
saved photo. Highlight the file and press
open.
9
8. You should see that NEWPRS identified the file. If this is the correct file press the Upload button.
9. NEWPRS loads the file and you should
see the following.
a. Transaction number
b. Seller
c. Item
d. Photo
e. Photo name
Note: After you saved the transaction you only have 24 hours to make any changes
or edit the transaction. After 24 hours the transaction is locked and no changes can
be made.
10
Printing the Transaction
1. Click on the transaction number on the left
side of the screen.
2. Click on the printable receipt button at the
bottom of the page.
3. A printable copy of your transaction
will appear.
Notes: Check with your local ordinance or
law enforcement about filling out and
maintaining this record.
Law enforcement does not require you to
fill out the item price. This was added by
request of several businesses. After printing
the receipt, you can write in the purchase price
of the item.
11
Searches
You can search your records by any of the fields filled out including seller’s name, date, article type, transaction
number, etc.
1. Click on the searches tab.
2. Click on the instance search tab.
3. Click on clear search button.
4. Enter a date or date range.
5. Enter the appropriate fields. i.e.
If you are searching a name,
press the seller info tab and enter
the subject name. Then press the search tab.
Congratulations. You now know how to enter a transaction, load a photo, print the
transaction and search your records.
12
Salvage Yards/Scrap Metal Dealers
The process for salvage yards and scrap metal dealers is the same as Resale shops. Follow the instruction above
starting on page 4. The following will assist in adding scrap metal:
Adding Scrap Metal
Be sure to add the transaction number and sellers information.
1. Press the add scrap button.
2. A warning will ask if you want to enter a new transaction along with a reminder to hit the save button.
Click OK to accept.
3. Choose the type of metal and the form of the metal from the drop down tab.
Type
13
Form
4. Enter the weight of the
item in pounds.
5. Enter the license plate
and state of the vehicle
bringing in the item/s.
6. Enter a description of
the item.
7. Complete the rest of the
form.
Reminder to hit the Save Changes button when complete.
14
Law Enforcement
There are two types of searches – one for a one-time search and the other to perform searches over a period of
time. (Future search)
One Time Search
1. Click the Searches tab and then the
Instant Search.
2. Determine the city or area you want to
search. The default is all groups. You
can narrow that search down just to
your city.
3. Enter the date range you want to search.
Note: Businesses using point of sale
software, the results will not show until
the following day. (The data is sent
between midnight and 6:00 am the
following day.)
•
•
The date on the transaction will be the correct date, but the data will not show up until the next day.
Businesses entering the data by hand the data shows up after you hit the save button.
4. Enter ‘Search Criteria.’ You can select criteria from one or all of the sections (Seller, Jewelry, Other
Article, Firearm and scrap.)
0
Note: Your search will contain more or less information, depending on the detail level of your
search, i.e. a search for “Nick” will return all names with Nick in them – including Nickols,
Nickelodeon, Nick, Knickers, etc.; however, a search with a first and last name will narrow the
results significantly.
5. Click on the search button at the bottom of the screen.
15
6.
Your results will be separated by four
columns, Group, Business, Transaction date,
and Seller. The total results are shown in
blue text at the bottom of the screen.
7. Double click on the item to see the
transaction or highlight the results and click
load transaction.
If this not the item you were looking for, just
click the search tab to get back to your list.
8. The results shown are the same as how the
business entered it.
To view descriptions of that item or seller just
click on the item.
9. To print a report for your case file press the
transaction report at the bottom of the screen.
16
Future Search
1. Click on My Searches.
2. Enter the ending date you want the system to search for. i.e. 30 days out.
3. Enter the search name. i.e. case
number.
4. Enter an email address where you
the results sent to.
5. Enter ‘Search Criteria.’ You can select criteria from one or all of the sections (Seller, Jewelry, Other
Article, Firearm and scrap.)
6.
Click the Create Search tab. Your search will appear in the list.
Note: Your search cannot be edited. You must delete the search and start a new entry.
If you want to stop / delete a search early, highlight the search and press the ‘delete selected search’
NEWPRS will run the search in the middle of the night and send any results to your email address.
17
Agency Administrator
To sign up process is the same for both officers and businesses except for the permissions granted.
1. Press the Administrate tab.
2. Press the Add user tab.
3. Enter the officer name or business
name.
Notes: If you have more than one
business in your jurisdiction with the
same name, please add a designator
after the name. i.e. Jewelry – East
Town Mall or Jewelry – Main St.
The officer’s name may be
designated as a shift, group, precinct,
etc.
4. Enter the address, city, state, zip and
phone.
5. Enter the username and password.
6. Enter an email address for the
business.
7. Click the box for security permission.
8. Click the save button. The entry should show up in the box at the bottom of the screen.
NOTE: Wisconsin State Statute 134.71(8)(e) states that the information collected may only be shared with
another law enforcement agency. To maintain the integrity of NEWPRS, agency administrators may only
give access to the law enforcement side of NEWPRS to law enforcement officers. For non-sworn personnel
(such as crime analyst, records, etc.) department’s policy and procedures will dictate access to NEWPRS.
18