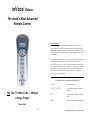
1
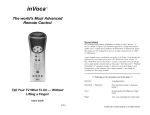
inVoca
™
Deluxe
The world's Most Advanced
Remote Control
Macros Explained
One of the powerful features of inVoca is its ability to utilize "macros." A
macro is simply a sequence of commands triggered by a single button push or
spoken word. A simple macro might be "0" followed by "7" followed by "Enter"
(for tuning your TV) reduced by a macro to a single command such as "ABC"
or "Millionaire."
A more complex macro would allow you to play a VCR tape. To do this the old
fashioned way you would need to press "TV" then"Power" then "0" then "3"
then "VCR" then "power" then "play." A macro would allow you to do all this
with a single spoken command such as "play tape." Isn't that easier? "Multiple
String Macros," explained on page 30, permit you to do such things as surf
between three or four channels with a single command — very handy for
watching New Year's Day football!
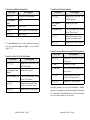
L Following are the conventions used in this guide 7
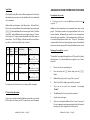
Tell Your TV What To Do — Without
Lifting a Finger!
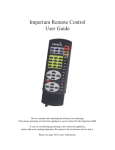
[Button]
An inVoca button
[Button1] ÿ [Button2]
Press and release button 1, then press
button 2
Word
Prompts spoken by inVoca are in light
italics
Word
Your voice commands are in dark italics
Users Guide
V1.7
© 2000 Innotech Systems Inc. All rights reserved.
The World's Most Advanced Remote Control
Using technology so advanced that it has been used in
interplanetary space probes, the inVoca™ Voice Operated Remote
Control uses the sound of your voice to control your TV, VCR, Cable
Box, Satellite — and even your home theater! The inVoca converts
your spoken words into infrared remote control signals using proven,
accurate, voice recognition technology.
The inVoca can recognize up to 50 commands and is so automated
it can perform multi-step operations from a single spoken command!
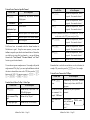
Key Features
! Complete Home Theater Universal Remote Control
– Operates with voice commands or button presses
– Controls up to eight devices including TV, VCR,
Cable/DSS, DVD, and most popular audio components.
! User-Trained Voice Recognition
– Language and accent independent
– Map any voice command to any button
– Train up to 50 voice commands
! Easy Set-Up
– Friendly "Voice Prompts" talk you through the set up
– Simple training process combines macros and voice
commands
– Handy "Auto-Search" feature finds the right code for your
entertainment device
! Digital display indicates status - simplifies operation
! Four Independent "Personalities"
– Every family member has their own personal voice
commands and favorite channels
! Powerful Macro Capability
– A single voice command can send multiple button
presses
– Multi-String Macros send out different button sequences
on subsequent commands
– Up to 50 macros
! Favorite Channel Selection
! Channel Scan for Hands Free Surfing
! Non-Volatile Memory retains set-up without the battery
! Priority Press™ simplifies commands and reduces button
presses
! Fast Volume™ for rapid voice-controlled volume changes
inVoca User Guide - Page 4
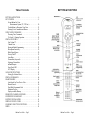
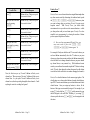
Table of Contents
BUTTONS & FUNCTIONS
BUTTONS & FUNCTIONS . . . . . . . . . . . . . . . . . . . . . . . . . . . 6
SET UP GUIDE . . . . . . . . . . . . . . . . . . . . . . . . . . . . . . . . . . . . 8
Set up inVoca For Your
Entertainment System (TV, VCR etc.) . . . . . . . . . . . . 10
Teach inVoca to Recognize Your Voice . . . . . . . . . . . . . . 12
Training Voice Commands and Macros . . . . . . . . . . . . . . 12
USING VOICE COMMANDS . . . . . . . . . . . . . . . . . . . . . . . . 24
Choosing Voice Commands . . . . . . . . . . . . . . . . . . . . . . . 25
To Cancel A Training Operation . . . . . . . . . . . . . . . . . . . . 26
SPECIAL FEATURES . . . . . . . . . . . . . . . . . . . . . . . . . . . . . . 27
Fast Volume™ . . . . . . . . . . . . . . . . . . . . . . . . . . . . . . . . . 27
Channel Scan . . . . . . . . . . . . . . . . . . . . . . . . . . . . . . . . . . 28
Erasing inVoca's Programming . . . . . . . . . . . . . . . . . . . . . 29
Microphone Sensitivity . . . . . . . . . . . . . . . . . . . . . . . . . . . 29
Multi-String Macros . . . . . . . . . . . . . . . . . . . . . . . . . . . . . 30
Priority Press™ . . . . . . . . . . . . . . . . . . . . . . . . . . . . . . . . 32
Auto-Mute . . . . . . . . . . . . . . . . . . . . . . . . . . . . . . . . . . . . 35
Personalities (keywords) . . . . . . . . . . . . . . . . . . . . . . . . . . 36
Setting up Personalities . . . . . . . . . . . . . . . . . . . . . . . . . . 36
inVoca Prompts . . . . . . . . . . . . . . . . . . . . . . . . . . . . . . . . 38
Front Panel LED . . . . . . . . . . . . . . . . . . . . . . . . . . . . . . . 41
LCD Display . . . . . . . . . . . . . . . . . . . . . . . . . . . . . . . . . . 41
ADVANCED FUNCTIONS . . . . . . . . . . . . . . . . . . . . . . . . . . 43
Setting Up a Button Macro . . . . . . . . . . . . . . . . . . . . . . . . 43
SPECIAL COMMANDS . . . . . . . . . . . . . . . . . . . . . . . . . . . . . 46
SEARCH MODES . . . . . . . . . . . . . . . . . . . . . . . . . . . . . . . . . 48
Auto Search for Your Device Code . . . . . . . . . . . . . . . . . . 48
Manual Search . . . . . . . . . . . . . . . . . . . . . . . . . . . . . . . . . 50
Read Back Programmed Code . . . . . . . . . . . . . . . . . . . . . 51
Substitute Devices . . . . . . . . . . . . . . . . . . . . . . . . . . . . . . 51
Display available Memory . . . . . . . . . . . . . . . . . . . . . . . . 52
FREQUENTLY ASKED QUESTIONS . . . . . . . . . . . . . . . . . . 54
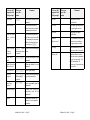
SUGGESTED VOCABULARY . . . . . . . . . . . . . . . . . . . . . . . 58
BATTERY INSTALLATION . . . . . . . . . . . . . . . . . . . . . . . . . 61
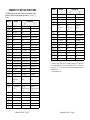
INDEX OF DEVICE CODES . . . . . . . . . . . . . . . . . . . . . . . . . 62
SUMMARY OF BUTTON FUNCTIONS . . . . . . . . . . . . . . . . 79
INDEX . . . . . . . . . . . . . . . . . . . . . . . . . . . . . . . . . . . . . . . . . . 81
inVoca User Guide - Page 5
inVoca User Guide - Page 6
LED
The multi-function LED will flash different colors,
depending on the specific operation. See pages 10, 41.
SET UP GUIDE
LCD Display Digital display shows inVoca status. See pages 10, 41.
[TV/CD]
[CBL/SAT]
[Audio/Aux]
[VCR/DVD]
Device Button, used to select the device to be
controlled. For example, after pressing [TV/CD],
inVoca will control your TV. Press [TV/CD] a second
time to control your CD player.
[Wake_up]
Used to "wake up" inVoca from its power-saving
"sleep mode." See page 24.
[Power]
Used to turn your TV, VCR, etc. on and off.
[Mute]
Mutes the TV. Also used for Auto-Mute (page 35).
[Prev]
Switches the selected device to the previously tuned
channel.
[SCAN]
Macro buttons. See page 43
[Learn/M]
Learn Macro Button. See "Advanced Features,"
page 30.
[PROG]
Program button. Used for setting up the inVoca.
See Set-up Guide, Special Features, and advanced
features.
[Train]
Used in "training" voice commands. See "Voice Set
Up," page 12.
[¢]
Used for various functions. When you see [¢]
followed by another button (for example, [¢] ÿ
[1]), press and release the [¢] button, then press
the [1] button.
[Æ]
See above
Function
Buttons
1
Used for Auto-Search. See page 48.
Perform the desired functions on your entertainment
devices.
inVoca User Guide - Page 7
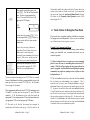
1
Set up inVoca for your entertainment system
2
Teach inVoca to recognize your voice
3
Set up macros
Set up inVoca for your system (TV, VCR etc.)
The inVoca, just like any universal remote control, needs to be
set up to operate with the entertainment components you wish
to control. Once the inVoca is set up to operate with the
components, you can then "train" the inVoca to recognize and
respond to your voice commands. (See page 10)
inVoca’s Channel Scan feature means hands-free
channel surfing — you can even tell inVoca how
long to stop at each channel! See page 28.
[F1] - [F4]
[Auto]
Setting up the inVoca is as easy as:
2
Teach inVoca to recognize your voice
The powerful voice recognition capability of inVoca is usertrained for language and accent independence. Before you can
use inVoca, you will need to teach it to recognize your voice
commands.
You may optionally train the inVoca to respond differently to
up to four family members or "personalities." Because every
person using the inVoca will probably have a different speech
pattern pitch, the inVoca will provide the best results when
"trained" to respond to each family member. In addition,
inVoca's use of "personalities" allows all family members to
have their own favorite channels and word choice (Page 12).
3
Set up macros
Any word may be set up to initiate either a single button press
(for example [V+] to turn up the volume) or a "macro." A
inVoca User Guide - Page 8
"macro" is simply a sequence of multiple button presses
initiated with one command (See "Macros Explained," page 2).
For example:
[TV/CD] ÿ [1] ÿ [7]
tells inVoca to switch into TV mode, then turns the TV to
channel 17.
1. Set up inVoca For Your
Entertainment System (TV, VCR etc.)
Before using the inVoca you will need to install four new AA alkaline
batteries (see page 61), then set it up for the entertainment
components you wish to control, such as your TV, VCR, and Cable
or DSS box.
1.
Press the device button for the device you
wish to program. The LED will flash red
once. The LCD display will show the
device selected.
[TV/CD] ÿ [0] ÿ [3]ÿ [VCR/DVD] ÿ [PLAY]
tells the TV to switch to channel 3, then instructs the VCR to
start playing a tape.
As you will see, the user-friendly inVoca set-up combines
training commands and macros into one simple operation.
(Page 12)
[TV/CD],
[CBL/SAT],
[VCR/DVD], or
[Audio/Aux]
Pressing the device button a second time
will select the alternative device for that
button. (Press [TV/CD] once to select TV.
Press [TV/CD] again to select CD.)
The device selected will switch between the
two alternative selections each time you
press the device button. For example,
pressing [TV/CD] a third time will select
TV again.
2.
[PROG]
Press the [PROG] button.
The LED will flash red twice. The word
“Program” will show on the second line of
the LCD Display with a flashing cursor.
LCD
Display:
3.
[1]ÿ [2]ÿ [3]
inVoca User Guide - Page 9
TV
Program_
Type in the 3-digit code for your TV, VCR,
etc. The codes can be found in the Code
List section beginning at page 62. The LED
will flash red once for each digit pressed.
The digits will be displayed as they are
entered.
inVoca User Guide - Page 10
4.
[PROG]
After you have entered the correct code,
press [PROG]. The LED will flash red three
times. You have now programmed the
device. The words “Device Saved” will
appear in the LCD display.
LCD
Display:
TV
Device Saved
Test the device by pressing [Power]. If it
does not respond to the [Power] button, try
the next code in the list for your system's
manufacturer.
5. [TV/CD],
[CBL/SAT],
[VCR/DVD], or
[Audio/Aux]
latest models, and the last codes are the oldest. You may have to try
several codes in order to find the correct code. If you cannot find
the correct code, refer to the Auto Search/Manual Search (See page
48) feature or the Frequently Asked Questions section of this
manual (page 54).7
2. Teach inVoca to Recognize Your Voice
The powerful voice recognition capability of inVoca is user-trained
for language and accent independence. Before you can use inVoca,
you will need to teach it to recognize your voice.
Be sure to test a variety of buttons to
ensure they all work. Many devices use
similar remote control codes and
occasionally some commands will not work
properly. If this occurs, try the next code
in the list for your system's manufacturer.
Training Voice Commands and Macros
The user-friendly, yet powerful inVoca training system combines
training your individual voice commands and macros into one
combined operation.
Repeat steps one through four for each
device you wish to program: TV, VCR,
Cable box, etc., up to eight devices.
please be sure the room is reasonably quiet and lower the TV
volume. While the inVoca employs the latest state-of-the-art in
speech recognition, it will nonetheless have difficulty recognizing
commands if two people are speaking at once or if there is other
background noise. 7
You are not restricted to using just one TV, VCR etc. A powerful
feature of the inVoca is the ability to program multiple devices of the
same type such as two or more TV's, VCR's etc. See Substitute
Devices (page 51) for details.
When programming inVoca to control TV/VCR combination units
("Combo's"), you may need to set up the TV and VCR codes
separately. If all the functions do not work, first select the
appropriate TV code and program the TV selection button, then select
the appropriate VCR code and program the VCR button.
L The codes in the back of this manual are arranged by
manufacturer and listed in order of age. The first codes are the
inVoca User Guide - Page 11
L Before training inVoca to recognize your voice commands,
L The closer inVoca is located to you the better the chance inVoca
has of hearing and understanding your commands. This is
especially true in a noisy room. Remember inVoca is trying to
understand what you are saying over the sounds coming out of the
TV. In general, you will have best results when inVoca is between
12 and 36 inches from your mouth in a quiet room, and between 12
and 24 inches in a noisy room. You may adjust this somewhat with
the microphone sensitivity switch (page 29). For best results, you
should try to hold inVoca at the same distance from your mouth
during training as you will when you are using it and train inVoca
in the same room as your entertainment system .
inVoca User Guide - Page 12
If the television or receiver sound is very loud, you may need to hold
inVoca less than 12 inches away, or talk louder than normal for
inVoca to be able to hear you. 7
You Do This
inVoca Response
Say the same word
again
If the two words
match, inVoca
will say "Press a
button." The
display will show
"Train ends."
L Special Note To First Time inVoca Users 7
Please remember to speak the same when you are training
inVoca as you will when you actually are using inVoca, and
hold inVoca the same distance from you when training as you
will during normal use.
If, like many new users, you speak unusually clearly and
slowly during training, inVoca may not recognize your
commands when you later speak normally. For consistent
results, speak naturally at all times! As with all voice operated
products, you will achieve the best results with practice.
To train your first command (Teach inVoca to turn on the TV) follow
these steps:
Train inVoca to Turn on the TV
You Do This
Press the [Train]
button
Press the first button
that you wish to
associate with the
voice command
([TV/CD] in this
example) within 15
seconds.
inVoca will respond with, "Button
accepted. Press another button."
Press the next button
in the sequence (in this
example, [Power])
within 15 seconds.
inVoca will say, "Button accepted.
Press another
button." The second
TRAIN ends
line of the display
Power
will show "Power."
Since you have now
completed the
sequence, press the
[Train] button.
Since you have created a sequence of
more than one
button, inVoca will
TV
say, "macro
assigned." The top
line of the display
will now show "TV."
inVoca Response
inVoca will say, "Say a word." When the
inVoca is ready to listen, the LED will
light green.
The top line of the display will continue
to display the last device you selected. If
this is not the device you will be selecting
with the voice command, don't worry,
you will change it below.
Say a one or two-word inVoca will ask you to repeat the
voice command. For command.
example, "TV Power."
inVoca User Guide - Page 13
TRAIN ends
The top line of the
TRAIN ends
display will show
TV
"Train ends." The
second line will
show the last button pressed, in this case
"TV."
The voice-command TV Power is now assigned to the macro sequence
[TV/CD] ÿ [Power], and is equivalent to pressing the [TV/CD]
button, then the [Power] button.
inVoca User Guide - Page 14
To program inVoca to turn your cable box on and off, follow the
above procedure, but substitute the [CBL/SAT] button, and use the
command "Cable Power" as follows:
Train inVoca to Turn on the Cable Box
You Do This
Press the [Train] button
inVoca Response
inVoca will say, "Say a word."
When the inVoca is ready to listen,
the LED will light green.
Train inVoca To Select The Cable Box
You Do This
inVoca Response
Press [Train]
"Say a word." LED will light green.
Say "Cable"
"Repeat"
Say "Cable" again.
"Press a button"
Press [CBL/SAT]
"Button accepted. Press another button"
Press [Train]
"Button assigned"
Say a one or two-word
voice command. For
example, "Cable Power."
inVoca will ask you to repeat the
command.
Say the same word again
If the two words match, inVoca will
say "Press a button."
Press the first button that
you wish to associate with
the voice command
([CBL/SAT] in this
example) within 15
seconds.
inVoca will respond with, "Button
accepted. Press another button."
The top line of the display will show
"Train ends." The second line will
show the last button pressed, in this
case "Cable."
Train inVoca To Select The Television
Press the next button in the
sequence (in this example,
[Power]) within 15
seconds.
inVoca will say, "Button accepted.
Press another button." The second
line of the display will show
"Power."
Press [TV/CD]
"Button accepted. Press another button"
Press [Train]
"Button assigned"
Since you have now
completed the sequence,
press the [Train] button.
Since you have created a sequence
of more than one button, inVoca will
say, "macro assigned."
The voice-command Cable Power is now assigned to the macro
sequence [CBL/SAT] ÿ [Power], and is equivalent to pressing the
[CBL/SAT] button, then the [Power] button.
Now, using the same procedure, let's set up the most common
commands.
inVoca User Guide - Page 15
(As with any universal remote control, you will need to let inVoca
know what device it is to control. For example, if you use a cable or
DSS box to change channels, remember to train the [CBL/SAT] button
as above, and select "Cable" or "DSS" prior to changing channels.)
You Do This
inVoca Response
Press [Train]
"Say a word." LED will light green.
Say "television"
"Repeat"
Say "television" again. "Press a button"
Train inVoca To Make The Volume Louder
You Do This
inVoca Response
Press [Train]
"Say a word." LED will light green.
Say "Louder."
"Repeat"
Say "Louder" again.
"Press a button"
Press [V+]
"Button accepted. Press another button"
Press [Train]
"Button assigned"
inVoca User Guide - Page 16
Train inVoca to Make The Volume Softer
You Do This
inVoca Response
Press [Train]
Say a word. LED will light green.
Say the command
"Softer."
"Repeat."
Say "Softer"again.
Train inVoca To Go Down A Channel
You Do This
inVoca Response
Press [Train]
inVoca will say, "Say a word." The
LED will light green.
inVoca will say "Repeat."
"Press a button"
Say the command
"Previous."
Press [V-]
"Button accepted. Press another button"
Say "Previous" again.
Press [Train]
If the two commands match, inVoca
will say "Press a button."
"Button assigned"
Press [CH-]
inVoca will respond with, "Button
accepted. Press another button."
Press [Train]
inVoca will say, "Button assigned."
L To make inVoca get louder or softer rapidly without having to
repeat the commands Louder and Softer, see Fast Volume™
(page 27) 7
Train inVoca to Scan Channels (see page 28 for Scan operation.)
Train inVoca To Go Up To The Next Channel
You Do This
inVoca Response
Press [Train]
inVoca will say, "Say a word." The
LED will light green.
Say the command "Next
Channel."
inVoca will say "Repeat."
Say "Next Channel"again. If the two commands match, inVoca
will say "Press a button."
Press [CH+]
inVoca will respond with, "Button
accepted. Press another button."
Press [Train]
inVoca will say, "Button assigned."
inVoca User Guide - Page 17
You Do This
inVoca Response
Press [Train]
inVoca will say, "Say a word." The LED
will light green.
Say "Scan."
inVoca will say "Repeat."
Say "Scan"again.
If the two words match, inVoca will say
"Press a button."
Press [SCAN]
inVoca will respond with, "Button
accepted. Press another button."
Press [Train]
inVoca will say, "Button assigned."
Using this procedure, you can set up both simple or complex
sequences. For example, let us now set up a simple macro to turn the
TV to channel 33 to watch Nickelodeon (you will need to substitute
the correct channel number for your location):
inVoca User Guide - Page 18
Train inVoca to Tune to a Specific Channel
You Do This
inVoca Response
Press [Train]
inVoca will say, "Say a word." The LED
will light green.
Say "Nickelodeon"
"Repeat"
Say
"Nickelodeon"again.
"Press a button."
Press [3]
"Button accepted. Press another button"
Press [3]
"Button accepted. Press another button"
Press [Train]
"Macro assigned."
You'll never have to remember what the channel number for
Nickelodeon is again! Using the same sequence, you may train
inVoca to respond to your other favorite channel choices. Remember,
you don't have to set up all of your channels — you can still change
channels with "Next Channel," "Previous Channel," and "Scan."
Just set up your favorite channels.
You can also set up more complex macros. For example, with just the
single command "Play Tape," you can set up the inVoca to switch the
television to channel three, turn on the VCR, then press the [play]
button on the VCR. The macro sequence is: [TV/CD] ÿ [0] ÿ
[3]ÿ [VCR/DVD] ÿ [POWER] ÿ [PLAY].
Teach inVoca A Macro To Play A Video Tape
You Do This
You Do This
inVoca Response
Press [TV/CD]
inVoca will respond with, "Button
accepted. Press another button."
Press [0]
inVoca will respond with, "Button
accepted. Press another button."
Press [3]
inVoca will respond with, "Button
accepted. Press another button."
The above commands switch the TV to channel three. Now we
need to turn on the VCR power and press Play.
Press [VCR/DVD]
inVoca will respond with, "Button
accepted. Press another button."
Press [POWER]
inVoca will respond with, "Button
accepted. Press another button."
Press [PLAY]
inVoca will respond with, "Button
accepted. Press another button."
Press [Train]
inVoca will say, "Macro assigned."
Remember that to select the second device on a device button, for
example CD, you need to press the [TV/CD] twice. For example:
Train inVoca to Turn on the CD Player
You Do This
Press the [Train]
button
inVoca Response
inVoca Response
inVoca will say, "Say a word." When the
inVoca is ready to listen, the LED will
light green.
Press [Train]
inVoca will say, "Say a word." The
LED will light green.
Say the command "Play
Tape"
inVoca will say "Repeat."
Say a one or two-word inVoca will ask you to repeat the
voice command. For command.
example, "CD Power."
Say "Play Tape"again.
inVoca will say "Press a button."
Say the same word
again
inVoca User Guide - Page 19
If the two words
TRAIN ends
match, inVoca will
say "Press a
button."
inVoca User Guide - Page 20
You Do This
inVoca Response
Press the first button
that you wish to
associate with the
voice command. In
this example, press
[TV/CD] twice within
15 seconds.
inVoca will respond with, "Button
accepted. Press another button."
The top line of the
TRAIN ends
display will show
CD
"Train ends." The
second line will show "CD."
Press the next button
in the sequence (in this
example, [Power])
within 15 seconds.
inVoca will say, "Button accepted.
Press another
button." The second
TRAIN ends
line of the display
Power
will show "Power."
To complete the
sequence press the
[Train] button.
Since you have created a sequence of
more than one button, inVoca will say,
"macro assigned."
CD
The top line of the
display will show
"CD."
Train inVoca To Select The CD Changer
You Do This
inVoca Response
Press [Train]
"Say a word." LED will light green.
Say "CD Changer"
"Repeat"
Say "CD changer"
"Press a button"
Press [TV/CD] twice
"Button accepted. Press another button"
Press [Train]
"Button assigned"
If you are using inVoca to control a stereo receiver, you will need to
train the [Audio/Aux] button to select your receiver. To use the
channel and volume buttons to control your receiver, you simply select
it then issue the channel and volume commands.
Train inVoca To Select The Receiver
You Do This
inVoca Response
Press [Train]
"Say a word." LED will light green.
Say "Receiver"
"Repeat"
Say "Receiver" again. "Press a button"
The voice-command CD Power is now assigned to the macro
sequence [TV/CD] ÿ [TV/CD] ÿ [Power], and is equivalent to
pressing the [TV/CD] button twice followed by the [Power] button.
Press [Audio/Aux]
"Button accepted. Press another button"
Press [Train]
"Button assigned"
To train inVoca to select your CD changer, so that you can use the
Play, Fast Forward etc. commands to control your CD changer:
Using the above procedure, you should train inVoca to respond to
your choice of commands for the different components of your home
theater system.
inVoca User Guide - Page 21
inVoca User Guide - Page 22
When you are programming a new voice command or keyword,
inVoca will ask you to say a word. You must choose a voice
command that is easy for you to remember and is distinct from any
other voice command. inVoca will warn you if you speak to soon, or
too softly. inVoca will always ask you to repeat the command. This
is to insure that the command was correctly recorded. For example,
a background noise that you did not notice may have been recorded as
part of the command. You may be asked to repeat the command
several times before inVoca is convinced that it has a good sample.
If the command or keyword is similar to one already recorded, inVoca
will ask you to "Choose a different word."
See “Choosing Voice Commands” (Page 25) for some guidelines in
selecting commands.
USING VOICE COMMANDS
L To maximize battery life, the inVoca will "sleep" when not in use.
Remember to "wake up" the inVoca by pressing the [Wake_up]
button before giving the inVoca a voice command. When you first
wake up inVoca, it will remain awake for 60 seconds as it listens for
the first voice command. Each time inVoca recognizes a command,
it will remain awake for another 60 seconds as it listens for the next
command. (This time is adjustable. See page 47) 7
L Please be sure the room is reasonably quiet — while the inVoca
employs the latest state-of-the-art in speech recognition, it will
nonetheless have difficulty recognizing commands if two people are
speaking at once or if there is other background noise. 7
L inVoca requires a brief period of silence before it can recognize
a voice command. 7
The inVoca will immediately listen for remote commands when the
[Wake_up] button is pressed. The LED will light green indicating
that it is listening for a voice command. The LCD Display will
indicate the last device (TV, VCR, Cable box, etc.) you have
selected.
The closer inVoca is to you, the better the chance it has of hearing
and understanding your commands, especially in a noisy room.
Remember inVoca is trying to understand what you are saying over
the sounds coming out of the TV. In general, you will have best
results when inVoca is between 18 and 36 inches from your mouth
in a quiet room, and between 12 and 24 inches in a noisy room. You
may adjust this with the microphone sensitivity switch (page 29).
L As with any remote control, the infrared LEDs must be pointing
at the device to be controlled when either a button is pressed or a
voice command is utilized. 7
inVoca User Guide - Page 23
inVoca User Guide - Page 24
Choosing Voice Commands
inVoca allows you to associate any voice command with any button.
While it might be tempting to program a voice command for every
button, this is usually not recommended because in operation you
would then need to pause, say the first number, then pause and say the
next number. It is more useful program a voice command to a macro
button. For example you can use the command "HBO" to set your
cable box to channel 17 (or whatever channel HBO is on your
neighborhood). You could program the voice command as "Channel
17" but "HBO" is usually easier to remember. Use commands that
are easy to remember!
Try to choose voice commands that are distinct from one another. For
example, "CSPN" and "ESPN" will probably sound too similar for
most speakers. Changing one of these to something that sounds
different (for example, C-SPAN instead of CSPN) will provide better
results. Multi-syllable or two-word commands work better than short
words because inVoca has more information to work with and can
better understand the command. For example "Quiet" and "Silent" are
better word choices than "Mute" because they contain more sound
information. Also, having commands of different length will make it
easier for inVoca to distinguish them.
Changing and Deleting Voice Commands
From time to time you may wish to delete or change a voice
command. For example, you may decide you would prefer a different
command that is easier to say or remember. Sometimes, if a
command is not working well, there may have been some background
noise when you recorded the command, and performance will be
improved if you erase, then re-record it.
To delete a voice command:
1. Press and release the [Æ] button, then press the [Train] button.
2. inVoca will respond with “Beep. Say a word.”
3. Say the command you wish to erase.
4. inVoca will respond with "button erased" or "macro erased."
To Cancel A Training Operation
You may elect not to train a command after you have pressed the
[Train] button, or after beginning to erase a personality. If you do
not speak after pressing the [Train] button, inVoca will respond
three times with the words "too soft." You have the choice of waiting
for inVoca to repeat this phrase or you may simply press any button
to cancel the operation.
You may wish to associate the words "Louder" and "Softer" with the
volume-up and volume-down buttons. But for some people "louder"
sounds a lot like "power" (at least a far as inVoca is concerned), so
you may inadvertently shut off your TV instead of making it louder.
Using the words "TV Power" or "power on" will make it easier for
inVoca to distinguish the commands. Also, remember if you make the
TV too loud, inVoca may have a hard time hearing your commands
over the sound of the TV.
"Next Channel" and "Previous Channel" will often provide better
results than "channel up" and "channel down." See "Suggested
Vocabulary" (page 58) for more suggestions.
inVoca User Guide - Page 25
inVoca User Guide - Page 26
SPECIAL FEATURES
Fast Volume™
Fast Volume is a unique feature of inVoca that makes remote control
of volume especially fast and convenient. Fast Volume sends multiple
volume up or down commands with a single button push or just one
spoken command. To use Fast Volume simply press [¢] ÿ [V+]
(louder) or [¢] ÿ[V-] (softer) to have inVoca send four volume up
or down commands at one time. For even faster volume adjustment,
[Æ] ÿ[V+] or [Æ] ÿ[V-] sends eight volume up or down
commands.
To train inVoca to use Fast Volume:
1.
2.
3.
4.
5.
6.
7.
8.
9.
Be sure the room is reasonably quiet.
Press and release the [Train] button
inVoca will prompt you by saying "Say a word"
Wait for the LED to light up green before you speak.
Say a one or two word voice command. For example, "Much
Louder"
The inVoca will ask you to repeat the command.
Say the same command again.
If the two commands match, inVoca will say "Press a button."
Press and release [¢], then press [V+]. inVoca will say,
"Button accepted. Press another button.” Press [Train].
inVoca will respond with “button assigned.
Repeat the above steps with the voice command "Very Soft," and with
the button sequence [¢] ÿ [V-] for rapidly lowering the volume.
Channel Scan
Channel Scan gives you hands free channel surfing. Once you have
pressed the [SCAN] button or spoken the channel "scan" command,
inVoca will send out a [CH+] (Channel Up) or [CH-] (Channel
Down) command every few seconds until you issue another voice
command (such as "scan") or press any button other than 1-9, [CH+]
or [CH-].
The scan will be up if the last channel button you pressed was [CH+],
or down if the last channel button you pressed was [CH-]. The
normal speed of the scan (that is, how long the TV will pause at each
station) is five seconds.
You may vary the speed of the scan by pressing buttons 1 - 9 while
inVoca is scanning. The range is one channel command every three
seconds if you press button 1, one command every four seconds if you
press button 2, ranging up to one command every 12 seconds with
button 9. You can press [CH+] or [CH-] to switch directions.
The top line of the display will reflect the
device being controlled, and the bottom line
will show the scan direction, either up or down.
L inVoca cannot listen for voice commands at the same time it is
sending infrared commands. If you issue a voice command to stop
the scan while the LED is red, signifying inVoca is transmitting, it
will not be able to hear your command, and inVoca will keep
scanning. To avoid this it is recommended that you do not set the
scan rate at too fast a speed. Because some entertainment devices
require longer transmissions than others, the best rate will vary from
user to user. 7
L Please note: To avoid sending commands faster than the
television can receive them, inVoca will need one or two seconds to
send the entire string of volume up or down commands. Make sure
the inVoca is pointing toward the television when the inVoca LED
is red so that the television will receive all the commands. 7
inVoca User Guide - Page 27
TV
Scan Up
inVoca User Guide - Page 28
Punch Through
inVoca will try to reduce the number of buttons you have to press, in
order to make operating your entertainment system as easy as
possible. For example, VCRs and cable boxes rarely have volume
controls. With devices such as these, if inVoca can, it will send
volume control commands directly to the TV, even if you are in VCR
or Cable mode, eliminating the need to press the [TV/CD] button..
Availability of this feature will vary with the type and manufacturer
of the entertainment devices you are using.
Erasing inVoca's Programming (Reset inVoca)
inVoca uses a special non-volatile memory to remember voice
commands, macros, priority press and device setup. This ensures that
inVoca will retain its programming even when you are changing the
battery. From time to time you may wish to completely erase all
programming and start fresh. To clear non-volatile memory, press
[Æ] ÿ[REC] (inVoca will respond with a beep) followed by
[Æ] ÿ [REC] again. (The LED will turn orange, then after a brief
pause, inVoca will respond with the word "erased").
The LCD Display will indicate:
Initialize
inVoca
Caution: this will erase all set up
information, voice commands and macros. inVoca will be reset to
its default settings.
Microphone Sensitivity
A three-position microphone sensitivity control is located inside the
battery compartment (see page 61). The sensitivity as shipped should
be optimal for most users. However, you can make the microphone
either more or less sensitive. Making the microphone more sensitive
inVoca User Guide - Page 29
will make the inVoca more responsive to your commands, but also
more sensitive to background sounds such as the TV or other people
talking. Making the microphone less sensitive will make the inVoca
less sensitive to background noises but also less sensitive to your
voice, so you will need to speak louder.
Multi-String Macros
Multiple String macros take the flexibility and power of the inVoca
to another level by letting you program a single command to step
through a series of button sequences each time you speak the
command. For example, a multi-string macro can let you surf through
three favorite channels with just a single voice command or button
push. The following multi-string macro uses the TV tuner to step
through channels two, four, and seven, with a tuner that requires you
to enter all numbers as two-button sequences.
You Do This
inVoca Response
Press the [Train] button
inVoca will say, "Say a word."
When the inVoca is ready to listen,
the LED will light green.
Say a one or two-word
voice command. In this
example, "Favorite."
inVoca will ask you to repeat the
command.
Say the word Favorite
again
If the two words match, inVoca will
say "Press a button."
Press the first button that
you wish to associate with
the. In this example,
[TV/CD]
inVoca will say, "Button accepted.
Press another button."
Press the next button in the inVoca will say, "Button accepted.
sequence. In this example, Press another button."
[0]
inVoca User Guide - Page 30
You Do This
inVoca Response
Priority Press™
Press [2]
inVoca will say, "Button accepted.
Press another button."
Signify the end of the first
string by pressing
[Learn/M]
inVoca will say, "Button accepted.
Press another button."
Press [0]
inVoca will say, "Button accepted.
Press another button."
Press [4]
inVoca will say, "Button accepted.
Press another button."
Signify the end of the
second string by pressing
[Learn/M]
inVoca will say, "Button accepted.
Press another button."
L Once you have programmed Priority Press, you
may never need to press the [TV/CD], [CBL],
[VCR/DVD], or [Audio/Aux] buttons again! 7
Press [0]
inVoca will say, "Button accepted.
Press another button."
Press [7]
inVoca will say, "Button accepted.
Press another button."
For example, if both your cable box and TV can control volume, you
can have inVoca automatically select the TV whenever you press
volume up, volume down or mute, and have the inVoca automatically
select the cable box to change channels whenever you press channel
up, channel down, or any numeric key. (With traditional remote
controls you would need to remember to push the TV button to change
to the TV mode, then change the volume, then press the cable button
to switch back to the cable mode to continue changing the channels.)
Signify the end of the last inVoca will say, "Macro assigned."
string by pressing [Train]
Now, the first time you say "favorite," inVoca will take you to
channel two. When you repeat "favorite,", inVoca will take you to
channel four. As you repeat "favorite" inVoca will take you to
channel seven, then keep surfing through the three channels. Could
anything be easier for watching bowl games?
inVoca User Guide - Page 31
Priority Press is a new feature that makes using inVoca simpler than
any other remote control by eliminating the traditional need to push
the [TV/CD], [CBL], [VCR/DVD], or [Audio/Aux] button every time
you want to change what you are doing. Priority Press puts you in
complete control.
With Priority Press, you decide which
entertainment device you wish to use for common functions — which
you then perform with just one button press. Priority Press also
simplifies voice programming, by reducing the number of button
presses required to perform a function.
Priority Press classifies buttons of each common type together. The
classifications are: volume-related buttons, channel related buttons,
tape/DVD/Cassette control buttons, power-related buttons and Audio
related buttons. Once you assign any button to a device, all the
buttons of that type are automatically assigned. For example, if you
assign [C+] to the cable box, [C-], [Prev], and the numeric keys are
then all assigned to the cable box. Similarly, if you assign [V+]
volume up to the television, [V-] and [Mute] are also assigned to the
television.
inVoca User Guide - Page 32
To set up Priority Press:
1. [TV/CD],
[CBL/SAT],
[VCR/DVD], or
[Audio/Aux]
If you press Power
*
TV
Priority=Pwr
If you press a tape/DVD control group button
*
DVD
Priority=Ply
If you press display, surround, etc.
* Audio
Priority=Aud
Press the device button for
the device you wish to
program.
The LED will flash once.
2. [PROG]
Press the [PROG] button.
The LED will flash twice.
3.
[V+] [V-]or [Mute]
(Volume
Group)
[C+] [C-],
[0]... [9],
[Prev]
(Channel
Group)
[<<] [<] [Stop]
[>] or [>>]
(Tape/DVD
Control Group)
[Power]
(Power Group)
[Display]
[Surround] [Exit]
[Next] [Select]
After you have pressed
[PROG], press any button
in the desired group. The
LED will flash three times.
Any button in that group
will control the selected
device.
An asterisk (*) will be
displayed on the far left of
the top row of the LCD
display to indicate Priority
Press is on.
The asterisk will remain as long as Priority Press is enabled.
For example, to automatically select your cable box whenever you
wish to change channels,
Press [CBL] ÿ[PROG] ÿ[C+]
The display will show:
(Audio Group)
For example, to set up Priority Press to use the volume commands to
specifically control your TV:
Press [TV/CD] ÿ[PROG] ÿ[V+]
When Priority Press is active, the LCD will display an asterisk on the
left side of the top line, and the group associated with the button
pressed. Examples are:
If you press Vol+, Vol- or mute
inVoca User Guide - Page 33
*
TV
Priority=Vol
*
CBL
Priority=Ch
If you wish to override Priority Press (for example to record one
channel with your VCR while you are watching a different channel
with your TV), simply press a device button ([TV/CD], [CBL/SAT],
[VCR/DVD], or [Audio/Aux]). The LED will flash once. To turn
Priority Press back on, press [Auto]. The asterisk at the left of the
top row of the LCD will show when Priority Press is enabled.
The top line of the LCD display will always show the device you are
controlling. For example, if the display is showing TV, Priority Press
is programmed, and you press [Play], the display will change to
DVD if that is what you set up for the Tape/DVD group. It will
continue to display DVD until you press a button for a different
control group. (See also Punch Through, page 29.)
inVoca User Guide - Page 34
Auto-Mute
ADVANCED VOICE OPERATION FEATURES
When enabled, Auto-Mute sends a Mute command to the television,
thus making the room quiet so that inVoca will better understand
voice commands.
Personalities (keywords)
inVoca offers two alternative Auto-Mute modes. In the full AutoMute mode, any time inVoca wakes up through the user pressing the
[Wake_up] button, inVoca will send a mute signal. In the "Qualified
Auto-Mute" mode, inVoca sends a mute signal whenever it hears a
valid keyword. You may sequence through the Auto-Mute modes as
shown below. The LCD Display will indicate whether Auto-Mute is
on, and if so, which Auto-Mute mode is selected.
Press Then
Press
LED
Auto-Mute
flashes
Display
[¢] [Mute]
2
Full Auto-Mute
TV
AutoMute On
[¢] [Mute]
3
Qualified AutoMute
TV
AutoMute Key
L If only one person is to use the inVoca, personalities are not
required. 7
inVoca can learn independent voice commands for as many as four
people. Each family member can program inVoca for his or her
favorite channels. inVoca will only search for voice commands for
the currently active personality. This is important since a child's voice
is so much different than an adult's voice. The use of Personalities
is optional but it will increase the recognition accuracy for households
where more than one person will be using the inVoca remote control.
Setting up Personalities (optional)
"Personalities" are assigned through the use of "Keywords" to identify
individual users. To train the inVoca to recognize a user ("train a
keyword"):
1.
Be sure the room is reasonably quiet.
2.
Press and release the [¢] button then press the [Train]
button
3.
inVoca will prompt you by saying "Say a keyword"
4.
Wait for the LED to light up green before you speak.
5.
Say a one or two word voice command.
"Daddy."
VCR and Tape Recording
6.
The inVoca will ask you to repeat the command.
To prevent recording accidentally, inVoca requires that you press the
REC button twice to send your VCR or tape deck a record command.
7.
Say the same word again.
8.
If the two words match, inVoca will say "keyword assigned."
If voice commands were programmed prior to the first keyword,
then they will all be assigned to the first keyword.
[¢] [Mute]
1
Auto-Mute Off
TV
AutoMute Off
You may turn the volume back on by issuing a Mute command.
inVoca User Guide - Page 35
inVoca User Guide - Page 36
For example,
L You can add Personalities at any time, even if you have already
trained inVoca to operate without having assigned a Personality. If
you program a set of voice commands, and then record a keyword,
inVoca will associate all the existing commands to the first
Personality recorded. After that, you must identify yourself before
you record any new commands to insure that they are added to the
correct personality. If you have trained inVoca to recognize a large
number of commands, you may wish to erase them, then re-train
inVoca with the commands for each personality. 7
If personalities are programmed, inVoca will normally "wake up"
listening for the last personality used. That is, if "Daddy" was the last
personality used, inVoca will wake up assuming that it is still being
operated by "Daddy." To change users, press and release the [¢]
button then press the [Wake up] button. The LED will light orange
which means that it is listening for a keyword to identify the
personality. Once it recognizes a keyword the LED will light green
and inVoca will remember the new personality until you change it
again.
Switching to a Different Personality
If several family members typically take turns using inVoca, you may
change the operation so that, if personalities are programmed, inVoca
will always wake up listening for a new keyword. To do this, Press
and release the [¢] button then press the [TV/VCR] button. The LED
will flash twice.
In this mode of operation, the inVoca LED will turn orange when
inVoca has been awakened by pressing the [Wake_up] button.
inVoca then waits for you to identify the personality that you want to
use. Say the keyword (personality) that you programmed. If inVoca
recognizes the keyword, it will change the LED to green. inVoca will
listen for a keyword for 30 seconds. If it doesn't hear a valid keyword
in 30 seconds it will turn off the LED and go back to sleep.
If it does hear a keyword, inVoca will listen for voice commands for
inVoca User Guide - Page 37
the selected personality only for a period of 60 seconds. If it hears a
legitimate voice command, it will transmit the appropriate IR
command and reset its 60-second timer. The LED will be Green while
it is listening for voice commands and red while it is sending IR
commands.
You may change the operation back by pressing the [¢] button then
press the [TV/VCR] button again (the LED will flash once).
When you press [¢] ÿ [TV/CD]
If inVoca is set up to wake up listening for a
new keyword (personality), the display will
indicate:
TV
Wake to ID
If inVoca is set up to wake up remembering
the previous personality, the display will
indicate:
TV
Remember ID
To erase a keyword (“personality”):
1. Press and release the [Æ] button, then press [REW].
2. inVoca will respond with “Beep. Say a keyword.”
3. Say the keyword you wish to erase.
4. inVoca will respond with “keyword erased.” (Note: erasing a
personality also erases the commands associated with the personality.
inVoca Prompts
The inVoca Remote Control gives you a visual indication of its status
through its front panel LED and LCD Display, while friendly "voice
prompts" talk you through the process of setting up keys the way you
want. Following is a summary of the voice prompts inVoca will
provide:
inVoca User Guide - Page 38
inVoca will
respond with
this prompt
Say a word
When you
press this
button
[Train]
Comment
inVoca will
respond with
this prompt
When you
press this
button
Comment
You may now record a voice
command
Too Soft
You spoke too softly.
Speak louder
Press a button
You should now press a
button to associate with the
command just recorded
Too Soon
You began speaking before
the green light came on
Too Loud
Button accepted.
Press another
button
You should now press the
next button associated with
the command just recorded.
If the last button has been
pressed, press [train].
You spoke too loudly.
Speak softer
Choose a
different word
The Command or keyword
you used is too similar to
one previously recorded.
Too Long
Your command was too
long (more than 2 seconds)
Memory full
You have tried to record
either too many commands,
macros, or keywords. Up
to 50 commands, 50
macros, or 4 keywords may
be recorded
Button assigned
or Macro
assigned
[Train] (after inVoca is finished training a
entering a button button
or macro)
‘beep’ Say a
word
[Æ]ÿ[Train] You may now delete a voice
command.
inVoca has deleted a voice
command
Button Erased or
Macro Erased
Say a keyword
[¢]ÿ[Train] Record a personality
Keyword
Assigned
[¢]ÿ[Train] inVoca is finished training a
(after saying a
keyword (personality)
keyword)
'beep' Say a
keyword
[Æ]ÿ[REW]
Delete a personality (and its
commands)
Keyword Erased
inVoca has deleted a
personality (and all its
commands)
Repeat
inVoca needs to hear two
consecutive voice samples
that match
inVoca User Guide - Page 39
inVoca User Guide - Page 40
Front Panel LED
When Priority Press is active, an asterisk will appear on the far left
side of the top line.
The front panel LED will light in various colors to indicate the
status of the inVoca. Following is the meaning of the different
colors:
LED Color
*
TV
Front Panel (Visible) LED Interpretation
Off
inVoca is sleeping awaiting a button depression.
Red
inVoca is sending infrared commands to your TV,
other device, or flashing programming responses.
Orange
inVoca is listening for keywords
Green
inVoca is listening for remote commands
LCD Display
The symbols "<" or ">" will display on the right side of the top line
if the [¢] or [Æ] buttons have been pressed:
TV
>
When setting up inVoca for your entertainment system (see page 62),
the display will indicate the device code entered.
The LCD display provides a comprehensive view of inVoca's status
and operation. Most displayed words are self explanatory and
described elsewhere in this manual.
In general, the device selected (TV, VCR, etc.) will appear on the top
line:
131
TV
If you attempt to enter an invalid device code, the display will
indicate:
TV
TV
Not Found
The LCD display will always show the active device when inVoca is
transmitting signals. This is particularly useful when Priority Press
or Punch Through are responsible for commands to be sent different
device than the one you have selected. (See Priority Press, page 32,
and Punch Through, page 29)
inVoca User Guide - Page 41
inVoca User Guide - Page 42
ADVANCED FUNCTIONS
inVoca offers a number of advanced functions that bring out its full
power. These include:
Button Macros — In addition to invoking the macro by speaking the
appropriate command, you may play macros by first pressing the
appropriate macro button. In the set-up procedure described earlier,
every macro is assigned to a button as well as a voice command.
However, inVoca makes the decision as to which button it will assign
to each macro.
If you wish to control what button is assigned to each macro, you may
manually assign macros to specific buttons, then assign a voice
command to the specific macro, rather than have inVoca
automatically assign the button. This method of operation is called
Button Macros.
inVoca can store up to four Button Macros. The four macro buttons
are the [F1] - [F4] buttons.
Setting Up a Button Macro
•
Press the [Learn/M] (Learn Macro) button.
•
The LED will flash once.
•
Select one of the four macros by pressing your choice of [F1] [F4].
•
The LED will flash twice.
•
Press the button sequence that you want to program.
•
NOTE: The remote will transmit IR commands while you do
this so you can see the effect. The LED will light as it normally
does when you press buttons.
•
Since this macro has only one string, you can end it by pressing
the [PROG] key.
For example to program Macro F4 to go to channel 24 using your
cable box:
inVoca User Guide - Page 43
Press
LED flashes
Comment
[Learn/M]
1
Starts the sequence
[F4]
2
Selects Macro 4
[CBL]
1
Selects the cable box
[2]
1
[4]
1
Channel 24
[PROG]
3
End of Macro
When programming macros manually, you simply assign the
voice command to the specified macro key. For example, if
button [F4] has already been assigned to channel 24 (as above),
and you now wish to invoke this with the command "Home Box
Office," the voice training sequence is:
You Do This
Press the [Train]
button
inVoca Response
"Say a word." LED will light
green.
Say "Home Box Office" "repeat."
Say "Home Box Office" "Press a button."
Press [F4]
"Button accepted. Press another
button."
Press the [Train]
button.
"Macro assigned."
inVoca User Guide - Page 44
Following is an example of creating a multi-string button macro
to have button F1 cycle through favorite channels 2, 4, and 12:
Press
LED flashes
[Learn/M]
1
[F1]
2
[0]
1
[2]
1
[Learn/M]
2
[0]
1
[4]
1
[Learn/M]
2
[1]
1
[2]
1
Comment
Starts the sequence
end of first string
end of second string
[PROG]
3
end of macro
(Note: To reduce keystrokes you should not press [Learn/M] before
[PROG] at end of macro.)
When creating macros, rather than pressing device buttons twice, you
may find it easier to select a device using the [¢] or [Æ] buttons as
follows:
Button
Normal
Preceded by:
[¢]
[Æ]
[TV/CD]
TV/CD*
TV
CD
[CBL/SAT]
CBL/SAT*
CBL
SAT
[Audio/AUX] Audio/AUX*
Audio
AUX
[VCR/DVD]
VCR/DVD*
VCR
DVD
* Each press toggles the selection. For example, pressing TV/CD once
selects TV. Pressing again selects CD. Pressing once again selects TV.
inVoca User Guide - Page 45
SPECIAL COMMANDS
Delay
On rare occasions, you may find an entertainment device which
requires a pause between commands for a macro to operate properly.
To provide a pause of ½ second between two commands in a macro,
press [Æ] followed by [PAUSE].
Word Spotting
inVoca offers a powerful voice recognition technology called Word
Spotting, which allows it to recognize commands even in the middle
of a sentence. Word Spotting is useful if inVoca is responding to loud
background conversation in the room or if the TV is very loud, and
adjusting the microphone sensitivity does not help. The word spotting
function is initiated by the programmed keyword(s). Word Spotting,
however, could cause inVoca to respond to command words spoken
by other people in the background, or even conversation on the
television. To turn Word Spotting on or off, press [Æ] followed by
[AUTO]. The LED will flash once when Word Spotting is turned off,
and will flash twice when Word Spotting is turned on. The LCD will
indicate when you turn Word Spotting on or off:
TV
WordSpot On
To use Word Spotting, you should program inVoca for the keyword
that you want to use. For example if you set up your keyword to be
'remote' and enable Word Spotting, when you wake up inVoca, the
LED will light orange to let you know that it is listening for a
keyword. Once it recognizes the keyword the LED will turn
green indicating it is listening for a command. For example, if the
keyword is 'remote' even if inVoca is awake, it will ignore any
commands until it hears the word 'remote'.
inVoca User Guide - Page 46
Adjust Wake Time
To maximize battery life, the inVoca will "sleep" when not in use and
is awakened to listen for voice commands when you press the
[Wake_up] button. Normally, when you first wake up inVoca, it will
remain awake for 60 seconds. The Wake time may be lengthened as
follows:
1. Press [AUX]
The LED will flash red once.
2. Press [PROG]
The LED will flash red twice.
3. Press [5]
The LED will flash red once.
4. Press [PROG]
The LED will flash as follows:
1 flash = 1 minute
2 flashes = 5 minutes
3 flashes = 10 minutes
4 flashes = 30 minutes
5.
Repeat steps one through four to cycle
through the possible wake time
intervals.
L Note: The inVoca is "awake" and listening for commands only
when the LED is green. This is independent of the digital LCD
display, which will remain on for a brief interval after a button
press, and may be on even when the inVoca is not "awake" and
listening for commands. 7
inVoca User Guide - Page 47
SEARCH MODES
inVoca offers two search modes, "Auto Search" and "Manual
Search," to help you find the correct code for your entertainment
device. When searching for a code using Auto Search or Manual
Search you must first select the appropriate device type.
The [TV/CD] device button will search through TVs and TV/VCR
combos.
The [VCR/DVD] device button will search through VCRs, TV/VCR
combos and DVD players.
The [CBL/SAT] device button will search through cable boxes and
DSS receivers.
The [Audio/Aux] device button will search through all codes.
Auto Search for Your Device Code:
If you have trouble programming the device code for inVoca, or can't
find the correct code in the manual, inVoca can cycle through the
available codes automatically to help you locate a usable code. It is
recommended that this feature be used only when all other methods
have failed, as it may take from 7 to 18 minutes for the remote to
locate the correct code, depending on the device list that you are
searching. Note: Auto search will start searching from the currently
programmed device code then cycle through all the codes back to that
point.
1
Power On
Manually turn on the device that you want to
auto search (TV, VCR, etc)
2
[TV/CD],
[VCR/DVD],
[CBL], or
[Audio/Aux]
Press the device key for the device type for
which you are searching. For example, to
search for a TV code, press TV once (1
Flash).
inVoca User Guide - Page 48
3
[PROG]
4
Press the [PROG] button once
(2 Flashes).
Make sure that the remote is aimed directly
at the device you want to control.
Manual Search
You can manually cycle through the device codes to find a code that
works with your TV, VCR, Cable Box, DVD, or DSS.
1
Power On
inVoca will now search through the library for the target device code
in 3-second intervals. Every 3 seconds the remote will prompt you by
flashing the light, and the remote will test the new code by attempting
to turn the device power off.
2
[TV/CD],
Press the device key for the device type you
[VCR/DVD],
want to search for. For example, to search
[CBL/SAT], or for a TV code, press TV once (1 Flash).
[Audio/Aux]
The top line of the LCD display will show the
TV
device type and the second line will show the AutoSrch 123
device code number as inVoca Auto Searches.
(inVoca will skip device code numbers not associated with the
particular device type.)
3
[PROG]
Press the program button once
(2 Flashes).
4
[0], [0], [0]
Enter code 0,0,0.
(1 Flash for each number pressed). The LCD
display will indicate the code entered.
Test the remote, if it works, skip step 5.
[PROG]
Press the [PROG] button to change to the
next device code. (3 Flashes) Every time
[PROG] is pressed the
TV
remote will change to
the next device code. Device Saved
5
[Auto]
Press the Auto Search button (1 Flash).
When the target device turns off, immediately press [PROG] to save
the device code in memory.
6
[PROG]
Manually turn on the device that you want to
auto search (TV, VCR, cable box, DVD, or
DSS receiver).
5
When the target device turns off press the
[PROG] key and the code will be stored in
memory (3 Flashes). The LCD display will
show "Device Saved."
Test the remote with your entertainment
device by pressing a control button such as
[Power] for each code. When you press the
control button, the second line of the display
will change from
"Device Saved" to
TV
"Man Srch" and
Man
Srch
123
display the code
number.
After you have pressed [PROG], check the other buttons (such as CH+
and VOL+) to be sure they all work with the target device. If they do
not, repeat steps 1 through 6. When the auto search is re-started the
search for the target device will begin where it was last stopped.
To stop the "Auto Search" press any key except the Auto Search key.
6
inVoca User Guide - Page 49
[TV/CD],
[VCR/DVD],
[Audio/Aux],
or [CBL/SAT]
When you find a code that works with your
entertainment device, press the device key
again. This will lock in the code. The LCD
display will show "Device Saved."
inVoca User Guide - Page 50
Once you find a code that works you should read back that code using
the Read Back feature. Write down the device code to simplify setup
in the future.
all four device buttons, so it is possible to program up to eight of any
component, such as eight TV's, VCR's, etc.
Read Back Programmed Code
The inVoca can read back the codes you selected for TV, VCR, cable
box, DVD and DSS receiver, so you that can write them down for
future reference. To do this:
Display available Memory
You may check to see how many voice commands and macros you
have programmed, as well as the amount of memory space available
to program additional commands and macros.
1. Press the device key for which you want the code read back. For
example, if you want to know the code for your TV, press the
[TV/CD] key once. The LED will flash once.
To display the total number of voice commands and macros used for
all personalities,
2. Press [PROG]. The LED should flash twice.
1. Press the [TV/CD] key once. The LED will flash once.
3. Press [1], then [PROG]. The LCD display will show the three digit
code for the device.
2. Press [PROG]. The LED should flash twice.
TV
DeviceID
3. Press [4], then [PROG]. The LCD display will show:
T:Ix Cyy Mzz
Substitute Devices
inVoca does not limit you to just one of any type of entertainment
product. You can program two or more TVs, VCRs, etc. by
"substituting devices." Each of the four device buttons ([TV/CD],
[VCR/DVD], [CBL/SAT], or [Audio/Aux]) can be programmed to
control any component of your entertainment system. For example,
if you would like inVoca to control a second TV, selected by the
[Audio/Aux] device button:
1. Press [Audio/Aux] and then [PROG]. The LED will flash twice.
2. Enter the desired TV code. The light will flash once for each digit.
3. Press [PROG] and the LED will flash 3 times. Now the
[Audio/Aux] button will control your second TV. This works with
inVoca User Guide - Page 51
x is the number of keywords (Ids) used;
yy is the total number of voice commands programmed
(up to 50)
zz is the total number of macros programmed (up to 50)
To display the number of voice commands and macros used by a
specific personality (user ID),
1. Press the [CBL/SAT] key once. The LED will flash once.
2. Press [PROG]. The LED should flash twice.
3. Press [4], then [PROG]. The LCD display will show:
inVoca User Guide - Page 52
C:Ix Cyy Mzz
x is the ID number (1 through 4) of the personality (keyword)
selected
yy is the number of voice commands programmed (up to 50)
by the personality
zz is the number of macros programmed (up to 50) by the
personality
To display the total number of voice commands and macros
remaining:
1. Press the [VCR/DVD] key once. The LED will flash once.
2. Press [PROG]. The LED should flash twice.
3. Press [4], then [PROG]. The LCD display will show:
R:Ix Cyy Mzz
x is the number of keywords (Ids) available
yy is the number of voice commands available to be
programmed
zz is the number of macros available to be programmed
FREQUENTLY ASKED QUESTIONS
Q. The inVoca is having trouble recognizing a word that I have
programmed. What should I do?
A. The problem could be that there was a background noise when you
recorded the word or you picked a word that is difficult for inVoca to
recognize. See page 25 for hints on choosing words, and “Suggested
Vocabulary" (page 58) for good words to try. To see if there was
some background noise when you recorded the command, simply
erase the training by pressing [Æ] ÿ [Train], then re-training the
command. Try to have the television sound off when you train
inVoca. Otherwise, the noise from the television will become part of
the voice “template.”
You may also be speaking the command differently than when you
trained inVoca. This is common, particularly with new users who
speak especially carefully when first training inVoca. Again, the best
solution is to erase the command as described above, and re-train the
command speaking clearly and naturally. For example, if you train
"ABC" as A-pause B-pause C, you should then include the pauses
when actually using inVoca to operate your TV.
You should always try hold inVoca the same distance away while you
are training it as you will in actual operation, and train inVoca in the
same room as you will be using it in due to room to room variations
in acoustics.
If your television or sound system is very loud, you will have to speak
louder than usual to compensate.
Finally, make sure you are using words that inVoca can easily
understand. See "Choosing Voice Commands" (page 25) and
"Suggested Vocabulary (page 58). Sometimes, due to individual
speech patterns and accents, alternative words may work better for
you. See "Suggested Vocabulary (page 58).
Q. The inVoca said "too long" while I was training a command.
What happened?
inVoca User Guide - Page 53
inVoca User Guide - Page 54
A. A voice command may not be more than two seconds long. If you
talk more than two seconds, or if there was a long background noise
while you were training a command or inVoca was listening for a
command, it will say "too long."
Q. I have to keep repeating "louder" and "softer" to adjust volume the
amount I would like. What can I do to reduce the number of times I
need to repeat these words?
A. See Fast Volume, page 27. Fast Volume is a unique inVoca
feature designed to adjust your volume with just one command.
Q. inVoca appears to have difficulty hearing me unless I speak very
loudly.
A. If it is impractical to hold inVoca closer to your mouth, and
turning down the television volume does not help, you should try
adjusting the microphone sensitivity control, located inside the battery
compartment. See Page 29.
Q. inVoca keeps saying, "too soft," when I train it.
A. Adjust the microphone sensitivity switch, located inside the battery
compartment. See page 29
Q. inVoca keeps responding to words it hears on the television or in
background conversations.
A. If it is impractical to turn down the television volume, you should
try adjusting the microphone sensitivity control, located inside the
battery compartment. See Page 29. If this does not help, you should
turn on the Word Spotting feature described on page 46.
Alternatively, you may also try turning on Auto-Mute, described on
page 35.
Q. I pressed the [Wake_up] button, but inVoca does not respond to
voice commands.
A. inVoca will not respond to any voice commands until it has been
trained.
inVoca User Guide - Page 55
Q. Is there anyway to make the inVoca stop listening for commands
after I press the [Wake_up] button?
A. If you press the [Wake_up] button after inVoca is already awake,
it will put the inVoca back into the sleep mode.
Q. When I first received my inVoca, I trained it with a lot of trial
commands. Now I want to start over. Is there an easy way to erase
everything I did.
A. See "Erasing inVoca's Programming," page 29.
Q. When I try to use the inVoca remote, nothing happens, and the
LED does not flash.
A. Check to make sure that the batteries are good and have been
correctly installed. Refer to the Battery Installation section of the
manual.
Q. After I program the inVoca remote, it does not work with my
entertainment device.
A. You probably didn't select the correct device code. Refer to the
Detailed Programming section of the manual. If problems persist,
refer to the Auto Search feature.
Q. I tried all the methods, but I still couldn't program the remote
correctly, and I don't see my brand of entertainment device listed in
the code list.
A. Your entertainment device may not be supported by the inVoca
remote. Call the customer support number: 1 (800) 200-7700.
Q. The remote is acting erratically.
A. The batteries are probably too weak. Refer to the Battery
Installation section and replace them.
Q. My TV takes a long time to change channels after I tell it to go to
a specific channel.
inVoca User Guide - Page 56
A. Some TVs require a channel number to be followed by "Enter." If
yours is one of these, make sure you have entered the channel number
and then the "Enter" button when training macros.
Q. When using the SCAN function, sometimes I have trouble getting
the scanning to stop.
A. inVoca cannot respond to your voice while it is busy sending
channel commands to the TV etc. Wait until the LED is no longer red
to tell inVoca to stop the scanning action.
Q. The "Previous Channel" command on the inVoca does not work
with my TV. My original remote control does not have this function.
A. inVoca supports the most popular commands for today's
electronic equipment. However, a few remote control functions, such
as mute or previous channel, will not work if the actual TV etc. does
not support the feature. Similarly, because the space for buttons is
limit
Q. My VCR does not begin recording when I press the Record
button.
A. To prevent accidentally recording over recorded material, inVoca
requires that you press the Record button twice to send a record
command to your VCR or tape deck.
Q. When I inserted the batteries, the display lit, but my inVoca did
not operate and did not respond to any buttons that I pressed.
A. On rare occasions the inVoca may "freeze" (i.e. not respond to
button pushes) when you insert new batteries. If this occurs, just
remove the batteries, wait a few seconds, and reinsert the batteries.
Q. Where can I find more helpful hints about my inVoca?
A. Visit the inVoca Web site at www.invoca.com.
inVoca User Guide - Page 57
SUGGESTED VOCABULARY
The following words are recommended for best results:
Word
TV POWER
LOUDER
SOFTER
NEXT CHANNEL
CHANNEL BACK
STOP
PLAY TAPE
REWIND
FAST FORWARD
SILENT
SCAN
SURFING
CABLE
CABLE POWER
CD PLAYER
AUDIO
Comment
(Usually better than "Volume Up")
(Usually better than "Volume
Down")
(Usually better than "Channel Up"
You may also try "CHANNEL
FORWARD.")
(Usually better than "Channel
Down.")
(Better than "Mute." "MUTING"
is also satisfactory)
(Better than "Surf")
Try to use a mix of longer words and shorter words, but avoid very
short words like On, Off, or Mute. Don't hesitate to experiment —
everybody speaks differently!
inVoca User Guide - Page 58
MY PERSONAL VOCABULARY
Sometimes it is not easy to remember just what words you have
trained inVoca to recognize, particularly if you have been
experimenting with different words. You may find it useful to fill in
this chart to help your memory.
Button/
User 1
User 2
User 3
User 4
Macro
Keyword
CH+
CHVol +
Vol Mute
TV Power
VCR Power
Prev
Scan
inVoca User Guide - Page 59
inVoca User Guide - Page 60
BATTERY INSTALLATION
Your inVoca Voice Operated Remote Control requires four new AA
alkaline batteries. Installing the batteries involves three simple steps:
First, open the battery cover on the back of the inVoca by pushing
back on the tab and pulling out the cover.
Then, insert four new batteries in the direction indicated on the inside
of the battery compartment. Note: if you are replacing old batteries,
unlike conventional remote controls, inVoca will retain its set up
and programming indefinitely, even without batteries.
INDEX OF DEVICE CODES
Following is a list of device codes to be used when programming the
inVoca remote control. Note that the first codes listed for an
entertainment device brand are the latest models. You may have to try
some or all of the codes for each brand before you find the proper code
for your product. If you have problems, refer to the Frequently Asked
Questions section of the manual (page 54)
Set-Up Procedure (see page 10 for details)
1. [TV/CD],
[CBL/SAT], [VCR/DVD],
or [Audio/Aux]
Press the device button. The LED will
flash once. The LCD display will show
the device selected. Pressing the
device button twice will select the
alternative device.
2. [PROG]
Press the [PROG] button. The LED will
flash twice.
3. [1]ÿ [2]ÿ [3]
Type in the 3-digit code for your TV,
VCR, etc. The LED will flash for each
digit pressed. The number you have
entered will show on the second line of
the display.
4. [PROG]
After you have entered the correct code,
press [PROG]. The LED will flash three
times. The LCD display will show,
“Device Saved.”
5. [TV/CD],
[CBL/SAT], [VCR/DVD],
or [Audio/Aux]
Repeat steps one through four for each
device.
Finally, with the four new batteries properly installed, close the cover.
Note: Do not mix old and new batteries. If your inVoca is not to be
used for a long period of time, remove the old batteries to prevent
leakage and internal damage.
TV Device Codes
TV Manufacturer
Admiral
USE ALKALINE BATTERIES ONLY
inVoca User Guide - Page 61
Akai
Amark
Anam
Anam National
TV Device Code
025, 049, 078, 133, 142, 590, 594,
584
071
263
049, 047
138, 154
inVoca User Guide - Page 62
TV Manufacturer
AOC
Archer
Audiovox
Bell and Howell
Brooksonic
Candle
Capehart
Carver
Centurion
Citizen
Concerto
Contec / Cony
Coronado
Craig
Croslex
Crown
CTX
Curtis Mathes
CXC
Daewoo
Daytron
Emerson
Envision
Fisher
Fortress
Fujitsu
Funai
Futuretech
GE
GE Combo
Goldstar
TV Device Code
015, 014, 135, 146, 593
263
263
078, 590, 594, 614
338, 585, 593
014, 013, 023, 139
135
128
001
132, 014, 046, 013, 139, 048, 023
139
049, 163
130, 132
049, 154, 600, 601, 602, 603
592
132
111
132, 014, 046, 585, 603, 590
049
309, 308, 306, 132, 015, 048, 067,
612, 617, 611
132, 634
307, 010, 049, 132, 001, 025, 160,
163, 024, 171, 172, 338, 600, 601,
602, 634, 603, 595, 618
014
018, 153, 604
142
025
049, 025, 331
049
179, 133, 011, 012, 137, 134, 138,
038, 159, 001, 172, 584, 598, 632
179
015, 132, 139, 122, 083, 001, 597,
622, 626, 638, 593, 634, 608
inVoca User Guide - Page 63
TV Manufacturer
Goldstar TV/VCR Combo
Griswold
Hallmark
Hitachi
Infinity
JBL
J.C. Penney
JVC
Kenwood
Kloss
Kloss Novabeam
KMC
KTV
Linatech
Lodgenet
Logik
Luxman
LXI
LXI Combo
Magnatron
Magnavox
Marantz
Memorex
MGA
Mitsubishi
MTC
Multitech
NAD
NEC
Onwa
Optimus TV/VCR
TV Device Code
029
069, 169
001
016, 150, 132, 131, 139, 054, 158,
008, 176, 358, 636, 609
128
128
133, 132, 011, 124, 015, 014, 046,
145, 148, 608, 632, 585
273, 136, 157, 359, 606, 607
014
013
126
083
163, 132, 049, 171, 610, 637, 615,
634
069, 169
079
078
139
018, 081, 133, 128, 019, 596, 585
205
111
128, 014, 126, 125, 127, 143, 023,
164, 619, 623, 592, 605
014, 128
018, 078, 337
177, 149, 014, 015, 151, 001
149, 015, 001, 071, 151, 038, 002,
593, 635
015, 014, 046, 139, 067
168
081, 060
014, 015, 139, 021, 593
049
029, 018, 132, 020, 049, 130
inVoca User Guide - Page 64
TV Manufacturer
Optonica
Panasonic
Philco
Philips
Philips TV/VCR Combo
Pioneer
Portland
Proscan
Proton
Pulsar
Quasar
Radio Shack
Radio Shack TV/VCR
Combo
RCA
Realistic
Realistic TV/VCR
Combo
Sampo
Samsung
Samsung Combo
Sanyo
Scott
Sears
Sharp
Signature 2000
Sony
TV Device Code
142, 020
262, 209, 210, 211, 212, 259, 176,
207, 208, 206, 134, 138, 155, 128,
596, 597, 625, 598, 632
128, 015, 014, 125, 126, 127, 023,
164, 592
128, 038, 592
195
060, 131, 599, 613, 598
132, 015, 633
133, 145, 015, 124, 137, 131, 159,
169, 332
129, 132, 001, 135
079
262, 209, 210, 211, 212, 259, 176,
207, 208, 206, 134, 138, 624, 610
132, 020, 049, 130, 139, 584, 604,
635, 603
029
324, 326, 133, 145, 015, 124, 137,
131, 159, 169, 588, 589, 620, 621,
627, 587, 633, 632, 584
018
029
014, 135, 144
046, 130, 139, 015, 014, 132, 330,
605, 592
050, 330
018, 153, 147, 604
049, 025, 132, 010, 603, 592
128, 018, 147, 133, 139, 019, 148,
081, 153, 156, 001, 025
142, 020, 132, 017, 594, 595
078, 602, 606
038, 141, 123, 039, 170, 373, 584,
585, 586, 587
inVoca User Guide - Page 65
TV Manufacturer
Soundesign
Spectracon
SSS
Supre-Macy
Sylvania
Symphonic
Tandy
Tatung
Technics
Techwood
Teknika
Tera
Thomson
TMK
Toshiba
Tosonic
Totevision
Universal
Vector Research
Victor
Video Concepts
Vidtech
Viking
Montgomery Ward
Wards
Yamaha
York
Zenith
Zenith Combo
Zonda
TV Device Code
049, 001, 023
146
015, 049
013
128, 014, 126, 125, 127, 140, 023,
164, 360, 592
049, 025, 331, 615, 602, 616
213, 142
138
134
139
139, 132, 046, 078, 015, 013, 048,
149, 025, 049, 023
129
166, 167
139, 001
081, 018, 046, 148, 357, 616, 594
163
132
011, 012
014
136
071
015, 001, 609, 592
013
011, 012, 128, 078, 015, 125, 127,
137, 014, 143, 020, 159, 001, 164
025, 592, 595
015, 014
001
079, 078, 369, 371, 372, 591, 589
029
263, 029
inVoca User Guide - Page 66
VCR Device Codes
VCR Manufacturer
Admiral
Aiwa
Akai
Audio Dynamics
Bell and Howell
Brooksonic
Canon
Carver
Citizen
Consonic
Craig
Curtis Mathes
Daewoo
Daytron
DBX
Dynatech
Emerson
Fisher
Funai
GE
Go Video
Goldstar
Harman Kardon
Hitachi
Instant Replay
J.C. Penney
JCL
Jensen
JVC
Kenwood
Lloyd
VCR Device Code
189, 191, 080, 178, 179
315, 316, 226, 204, 333, 341, 343
072, 052, 051, 022, 073, 342
192
080
191, 189, 026, 340, 338
176, 187, 059
185
026
111
050, 035, 061
176
308, 199, 175, 002
175
192
204
278, 307, 191, 189, 009, 204, 057,
053, 029, 073, 183, 032, 026, 338
055, 035, 031, 028
204
317, 318, 320, 321, 322, 192, 176,
179, 181, 368
050, 197, 200
029, 174, 027
265, 027
176, 036, 075, 069, 204, 072, 181,
037, 201, 358
218, 176
036, 176, 050, 027, 033
176
072
072, 182, 193, 084, 194, 334, 359
034, 072, 182
204
inVoca User Guide - Page 67
VCR Manufacturer
Logik
LXI
LXI Combo
Magnavox
Marantz
Marta
MEI
Memorex
VCR Device Code
030
029
205
176, 185, 190, 188
176, 027, 185
029
176
176, 029, 178, 204, 080, 035, 055,
341
MGA
177, 176, 073
Minolta
069, 036
Mitsubishi
265, 266, 176, 177, 073
MTC
204, 050
Multitech
204, 030
NAD
058
NEC
267, 027, 033, 072, 182, 074
Optonica
178
Optimus TV/VCR Combo 029, 050, 178, 204, 176, 034, 035,
028, 055, 262
Panasonic
262, 209, 210, 211, 212, 206, 207,
208, 176, 187, 184, 367
Pentax
069, 036, 181
Philco
176
Philips
176, 185, 188
Philips TV/VCR Combo 195
Pilot
029
Pioneer
058, 182
Portland
175
Pulsar
080
Proscan
179
Quartz
034
Quasar
262, 209, 212, 207, 176, 187, 186
Radio Shack TV/VCR
029
Combo
RCA
179, 322, 323, 324, 206, 179, 181,
184, 176, 036, 069, 190, 192, 317,
318, 320
inVoca User Guide - Page 68
VCR Manufacturer
Realistic
Ricoh
Samsung
Sansui
Sanyo
Scott
Sears
Sharp
Shintom
Sony
STS
Sylvania
Symphonic
Tandy
Tashiko
Tatung
Teac
Technics
Teknika
TMK
Toshiba
Totevision
Unitech
Vector Research
Victor
Video Concepts
Videosonic
M. Ward
Yamaha
Zenith
VCR Device Code
029, 050, 178, 204, 176, 034, 035,
028, 055
042
050, 002, 051, 330
182, 072, 061, 074
034, 035, 055
189, 009, 002, 191
176, 270, 035, 034, 031, 029, 036,
028, 055, 069
258, 178
030
176, 041, 042, 040, 173, 043, 038,
375, 377, 379
036
176, 177
204, 331
204
026
072
072, 204
176
029, 176, 204, 056
053
002, 177, 028, 009
050, 029
050
033, 027
084, 182
033, 073
050
036, 176, 178, 204, 035, 030, 190,
009, 050
027, 072
080, 042, 041, 029
inVoca User Guide - Page 69
Cable Box Device Codes
Box Manufacturer
ABC
Antronix
Archer
Century
Citizen
Comtronics
Cox
Eagle Comtronics
Eastern
Electricord
Explorer 2000
GC Electronics
Gemini
General Instruments
Hamilton
Hamlin
Hitachi
Jasco
Jerrold
Kingston
Macom
Memorex
Movie Time
NSC
Oak
Panasonic
Paragon
Philips
Pioneer
Popular Mech.
Pulsar
RCA
Regal
Cable Box Device Code
091, 096, 088, 093
241
227, 271, 241, 111
111
111
106, 045
746
045
086
004
746
063
064, 068, 095, 116
091, 087, 094, 362
346, 347, 348
118, 119, 085, 090, 103, 311, 312
091
111
325, 305, 249, 251, 272, 094, 091,
087, 095, 100, 101, 104, 108, 350
111
003
076
004, 112, 113
112, 113
088, 097, 007
313, 099, 109
076
238, 239, 252, 253, 300, 106, 102
005, 070, 062, 344
400
076
099
120, 118, 085, 119, 346, 347, 348
inVoca User Guide - Page 70
Box Manufacturer
Regency
Rembrandt
Samsung
Scientific Atlanta
Signal
Signature
SL Marx
Sprucer
Standard Compnt
Starcom
Stargate
Sylvania
Tandy
Teknika
Telecaption
Texscan
Tocom
Toshiba
Unika
United Artists
Universal
Viewstar
West
Zenith
Cable Box Device Code
086
068
045, 005
089, 096, 120, 314
045
091
045
099, 121
065
095, 087, 104, 108
045, 095
082
117
006
115
082, 107
310, 093, 092, 105
076
227, 241, 111
088
241, 227, 271, 066, 004, 044, 111
106, 117, 110, 114
111
237, 076, 077
inVoca User Guide - Page 71
DVD Player Device Codes
DVD Manufacturer
Apex
California Audio
Denon
Fisher
GE
Goldstar
JVC
Kenwood
Magnavox
Mitsubishi
NAD
Optimus
Panasonic
Philips
Pioneer
Proscan
Quasar
RCA
Realistic
Samsung
Sanyo
Sharp
Sony
Teac
Technics
Theta-Digital
Thompson
Toshiba
Yamaha
Zenith
DVD Device Code
380
382
381, 387, 391
382
383, 384
395
354, 378
401
385, 399
356, 399
399
394
335, 382, 402, 403, 404, 405
385
355, 398, 408
383, 384, 339
382
339, 383, 384, 388
394
396
397
401
351, 386
389, 390
382, 404, 405
385
383, 384
336, 392, 398, 401
393, 400, 403
395
inVoca User Guide - Page 72
DSS Receiver Device Codes
DSS Manufacturer
DishNet
Hitachi
Hughes
Primestar
RCA
Sony
DSS Device Code
376
352
363
322
320, 327, 365, 364
321, 328
Working with DSS On-Screen Menus
Remote Key Name
REC
Pause
Play
Stop
Rew
FF
Screen Menu Function
Menu
Select
Menu +
Menu Menu L
Menu R
Audio Receiver Device Codes
Audio Manufacturer
Aiwa
Akai
Bose
Carver
Casio
Clarion
CurtisMathes
Denon
Fisher
Hitachi
Inkel
Audio Device Code
410, 437, 454, 462, 471, 472, 474, 476,
511, 514, 643
444
427, 454
459
430
412
430
501, 502, 503
418, 459, 519
411
468
inVoca User Guide - Page 73
Audio Manufacturer
JCPenny
JVC
Kenwood
Koss
LKI
Magnavox
MCS
Nakamichi
NEC
Onkyo
Optimus
Panasonic
Philips
Pioneer
RCA
Realistic
Sansui
Sanyo
Sears
Sharp
Sony
Taekwang
Teac
Technics
Toshiba
Wards
Yamaha
Zenith
Audio Device Code
430, 477
439, 451, 464, 484, 494, 495
412, 424, 446, 447, 459, 460, 461, 463,
465, 468, 469, 481, 492, 493
477
430
448, 520
430
438, 505
456
498, 509
412, 416, 444
413, 457, 467, 480, 510
512
408, 409, 414, 415, 417, 421, 426, 431,
440, 449, 452, 491
407, 419, 425, 441, 515, 516, 517, 518,
530
428, 429
419, 505, 506
418, 422
430
412, 435, 443, 460, 501, 517
408, 409, 410, 434, 436, 450, 479, 482,
485, 490, 643
444
508, 406, 420, 438, 475, 478, 504, 507
442, 456, 457, 458, 466, 470, 480, 487,
488, 496, 497, 510
423, 432
459
412, 425, 433, 453, 455, 473, 483, 486,
489, 499, 500
445
inVoca User Guide - Page 74
CD Player Device Codes
CD Manufacturer
Adcom
Aiwa
Akai
AMC
Audio Access
Audio Technica
BSR
Carrera
Carver
Crown
Daewoo
Denon
Emerson
Fisher
GE
Genexxa
Goldstar
Haitai
Harmon Kardon
Hitachi
Inkel
JCPenny
Jensen
JVC
Kardon
Kenwood
Koss
Krell
KTV
Kyocrea
Lotte
Luxman
LXI
Magnavox
Marantz
MCIntosh
MCS
CD Player Device Code
679
548, 549, 677, 680, 692, 693, 725, 730
690, 731, 732
739
703
667
663
675, 687
669, 706, 707, 709, 710, 722, 729, 733,
691
661
699
542
555, 556, 666, 700, 699
669, 729, 545
699
648, 700
687
696
668, 734
555, 727, 666, 645, 699
713, 714
650, 678, 695
717
629, 525, 526, 720, 527
553
528, 529, 647, 654, 673, 683, 684, 708,
712, 729
678
741
699
645
700
649, 658, 682, 685
557, 677
541, 699, 540
532, 657, 670, 685
735
650, 695
inVoca User Guide - Page 75
CD Manufacturer
Memorex
Mitsubishi
Mitsumi
NAD
Nakamichi
NEC
Nikko
Onkyo
Optimus
Panasonic
Parasound
Phillips
Pioneer
Portland
Procede
RCA
RCX
Realistic
Rotel
Samsung
Sansui
Sanyo
Scott
Sharp
Sherwood
Sony
Soundesign
Sylvania
Symphonic
Taekwang
Tandy
Teac
Technics
Techwood
Theta Digital
Toshiba
Vector Research
CD Player Device Code
648
699
716
646, 645, 681
697, 736, 737, 738, 532
679, 699, 650
667
535, 536, 659, 664, 665, 723, 724
676, 688, 689, 675, 696, 731, 648, 690,
669
547
740
540, 544
522, 531, 653, 656, 674, 728, 727, 648,
660
699
742
630, 522, 530, 550, 551, 711
729
666, 669, 670, 730, 681, 700, 712, 730
719
699
631, 641, 534, 704, 726, 532
545, 669
700
542, 546, 670, 646
554, 644, 652, 698, 701, 702, 721, 703,
670, 682
521
743
699
671
731, 690
648
641, 543, 545, 550, 660, 662, 671, 699,
705, 711, 670
547, 642, 523, 524
685
741
681, 715, 718, 646, 694
687
inVoca User Guide - Page 76
CD Manufacturer
Wards
Yamaha
CD Player Device Code
699, 729
537, 538, 539, 655, 672, 667
Tape & Cassette Player Device Codes
Drive Manufacturer
Aiwa
Denon
Fisher
JVC
Kenwood
Nakamichi
Onkyo
Panasonic
Phillips
Pioneer
RCA
Sansui
Sharp
Sony
Teac
Technics
Yamaha
Tape Drive Device Code
572, 578, 579
569
583
560, 561
564, 565
571
566, 567, 577
575
580
559, 576
581, 582
574, 571
569
558
570, 573
562, 563, 575
568
Miscellaneous
Miscellaneous Device
Panasonic Hard Disk
Replay TV
TIVO
X10
Device Code
745
745
744
366
inVoca User Guide - Page 77
inVoca User Guide - Page 78
SUMMARY OF BUTTON FUNCTIONS
The following table summarizes the function of each button, when
pressed by itself, and when preceded by either the [¢] or the [Æ]
button.
Button
[TV/CD]
[CBL/SAT]
[Audio/AUX]
[VCR/DVD]
[Wake up]
[Power]
[Mute]
[Prev]
[VOL+]
[VOL-]
[CH+]
[CH-]
[F1]
[F2]
[F3]
[F4]
[Learn/M]
[PROG]
[Train]
[Auto]
[Enter]
[TV/VCR]
[1]
[2]
[3]
[4]
[5]
[6]
Normal
TV/CD*
CBL/SAT*
Audio/AUX*
VCR/DVD*
Listen
Power
Mute
Recall
Vol+
VolCh+
Chplay button macro 1
play button macro 2
play button macro 3
play button macro 4
Learn Macro
PROG
New word
Enable Priority
Press & Autosearch
Enter
TV/VCR function
on VCR
1
2
3
4
5
6
Preceded by:
[¢]
[Æ]
TV
CBL
Audio
VCR
Switch personality
Power
Toggle Auto-Mute
Display
Fast Volume 4 +
Fast Volume 4 Up
Down
play button macro 1
play button macro 2
play button macro 3
play button macro 4
Learn Macro
Menu
New Keyword
Toggle WordSpotting
CD
SAT
AUX
DVD
Switch personality
Power
Toggle Auto-Mute
Adjust VR thresh **
Fast Volume 8 +
Fast Volume 8 Up
Down
play button macro 1
play button macro 2
play button macro 3
play button macro 4
Learn Macro
Menu
Delete word
Toggle WordSpotting
Select
Toggle get
personality on every
wake up
1
2
3
4
5
6
Select
Toggle get
personality on every
wake up
1
2
3
4
5
6
inVoca User Guide - Page 79
Button
Normal
Preceded by:
[¢]
[7]
[8]
[9]
[0]
[REC]
7
8
9
0
Record
(press twice to
record)
[Pause] Pause
[Rew]
Rewind
[Play]
Play
[FF]
Fast Forward
[Stop]
Stop
[Display] Display
[Menu]
Menu
[Surround] Surround
[Exit]
Exit
[Next]
Next
[Select] Select
7
8
9
0
Record
(press twice to
record)
Up
Left
Test Listen **
Right
Down
Display
Menu
Surround
Exit
Next
Select
[Æ]
7
8
9
0
erase memory
(see p20)
Delay
Delete Personality
Play
Fast Forward
Reset
Display
Menu
Surround
Exit
Next
Select
* Each press toggles the selection. For example, pressing TV/CD once selects
TV. Pressing again selects CD. Pressing once again selects TV. Alternatively,
pressing [¢] or [Æ] prior to a device selection button unambiguously selects
the desired choice.
** for technician use only.
inVoca User Guide - Page 80
INDEX
advanced functions . . . . . . 43
advanced operation . . . . . 36
Auto-Mute . . . . . . . . . . . . 35
auto-search . . . . . . . . . . . 48
battery installation . . . . . . 61
button macros . . . . . . . . . 43
button summary . . . . . . . . 79
cancel training . . . . . . . . . 26
changing voice command . 26
channel scan . . . . . . . . . . 28
choose different word . . . . 40
choosing commands . . . . . 25
delay . . . . . . . . . . . . . . . . 46
deleting voice command . . 26
device button . . . . . . . . . . . 7
device codes . . . . . . . . . . . 62
device substitution . . . . . . 51
display . . . . . . . . . . . . 41, 52
entertainment system . . . . 10
erasing . . . . . . . . . . . . . . . 29
FAQs . . . . . . . . . . . . . . . 54
Fast Volume . . . . . . . . . . 27
freeze up . . . . . . . . . . . . . 57
frequently asked questions
. . . . . . . . 54
IDs . . . . . . . . . . . . . . . . . 36
keywords . . . . . . . . . . . . . 36
LCD display . . . . . . . . . . 41
LED . . . . . . . . . . . . . . . . 41
macro . . . . . . . . . . 12, 30, 43
macros explained . . . . . . . . 2
manual search . . . . . . 48, 50
memory . . . . . . . . . . . . . . 52
memory full . . . . . . . . . . . 40
microphone sensitivity . . . 29
multi-string macro . . . . . . 30
personalities . . . . . . . . 36, 37
Priority Press . . . . . . . . . . 32
program codes . . . . . . . . . 62
programming, erasing . . . 29
prompts . . . . . . . . . . . . . . 38
punch through . . . . . . . . . 29
read-back . . . . . . . . . . . . . 51
recording . . . . . . . . . . . . . 35
reset inVoca . . . . . . . . . . . 29
responses . . . . . . . . . . . . . 38
scan . . . . . . . . . . . . . . . . . 28
search . . . . . . . . . . . . . . . 48
set-up . . . . . . . . . . . . . . . 10
setting wake timer . . . . . . 47
special features . . . . . . . . 27
substitute devices . . . . . . . 51
Tape recording . . . . . . . . . 35
teaching inVoca . . . . . . . . 12
too loud . . . . . . . . . . . . . . 40
too soft . . . . . . . . . . . . . . 40
too soon . . . . . . . . . . . . . . 40
training inVoca . . . . . . . . 12
training, cancelling . . . . . . 26
using voice commands . . . 24
VCR recording . . . . . . . . 35
vocabulary . . . . . . . . . . . . 58
voice command hints . . . . 25
voice commands . . . . . . . . 24
voice training . . . . . . . . . . 12
wake time, setting . . . . . . 47
wake up inVoca . . . . . . . . 24
warranty . . . . . . . . . . . . . 83
word spotting . . . . . . . . . . 46
inVoca User Guide - Page 81
inVoca User Guide - Page 82
WARRANTY, TECHNICAL SUPPORT, AND
COPYRIGHT INFORMATION
Kash N Gold Ltd.
Sole Distributors For TELEMANIA™ Products
For support and service, visit the inVoca
Web site at www.invoca.com or call
1 (800) 200-7700
Limited Warranty
Kash N Gold warrants to the original purchaser that this product is free
from defective materials and workmanship for a period of 1 year from date
of original purchase.
Should a failure occur in normal usage during the 1 year warranty period.
Kash N Gold will repair or, in its discretion, replace this product without
charge (except for a $10 charge to cover: handling, packing, and return
postage or freight). This warranty excludes (A) Damages due to misuse,
negligence abuse or accidents. (B) Repairs by persons not authorized by
Kash N Gold and (C) AC cords, or other accessories where applicable (D)
Installation, improper maintenance or commercial use (E) Cracked or
broken cabinets (F) Acts of GOD.
When returning this product (A) Enclose a copy of your sales slip to verify
warranty service. (B) Include explanation of defect problem (C) Enclose
check or money order for $10 payable to Kash N Gold Ltd. (D) Forward
prepaid and insured.
All products sent after the warranty period or without proof of date of sale
will be serviced on an out-of-warranty basis.
This warranty is valid only in the United States, and does not extend to
owners of the product subsequent to the original purchaser.
Requires 4 AA batteries (not included)
USE ALKALINE BATTERIES ONLY
Telemania Model:
inVoca Remote
This device complies with part 15 of the FCC rules.
Operation is subject to the following two conditions: (1)
This device may not cause harmful interference, and
(2) this device must accept any interference received,
including interference that may cause undesired
operation.
In the United States, this warranty gives you specific legal, rights, and your
rights may vary from state to state.
Kash N Gold Ltd.
1 Trade Zone Court, Ronkonkoma,
NY 11779,U.S.A.
1-800-354-8785
In accordance with “Moss Magnuson warranty act” of July 10,1975 this is
termed a “Limited” warranty, which in no way compromises Kash N Gold
high standards of quality and workmanship.
TELEMANIA™
inVoca
Remote
TESTED TO COMPLY
WITH FCC STANDARDS
FOR HOME OR OFFICE USE
inVoca is a trademark of Kash'N Gold Ltd.
© 2000 Innotech Systems Inc. All rights reserved. No part of this publication may be
reproduced, transmitted, transcribed, or stored in any retrieval system without the prior
written permission of Innotech Systems Inc.
Innotech Systems Inc. is a registered trademark of Innotech Systems Inc. Priority Press
and Fast Volume are trademarks of Innotech Systems Inc. All other marks are the
property of their respective owners.
inVoca User Guide - Page 83
October 31, 2000