1
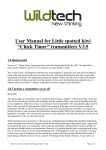
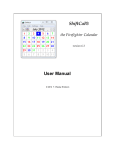
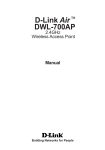
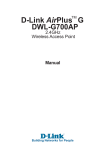
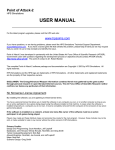
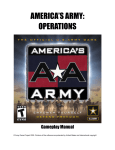
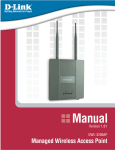
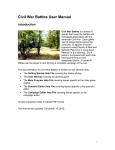
CLOSE COMBAT MARINES
Tactical Decision making Simulation
USER MANUAL
(This page intentionally left blank)
Table of Contents
Subject
Page
Main Screen
1
Command Screen
4
Battlegroup Screen
7
Deployment Screen
12
Battle Screen
15
Situational Awareness
16
Orders Menu
28
Command And Morale
45
Battle Map
47
Forces
52
Endex
54
Scenario Editor
57
Multi Player
68
(This page intentionally left blank)
Main Screen
Starting the
TDS
Double click the Close Combat Marines desktop icon or click the
START button followed by Programs and then Close Combat Marines
to launch the game.
Click through the preliminary logo and splash screens
Advance to the main screen.
Continued on next page
1
Main Screen, Continued
Main
Arrow 1
Boot Camp
Panel
Click the Boot Camp panel to open an interactive tutorial on playing
CCM.
Boot Camp includes:
•
•
•
•
•
Quick Tour; how to select troops, issue orders and
adjust existing orders.
Monitors and Toolbars; on how to review teams and
Marines before battle, monitor Marine status and call in
support missions during battle.
Viewing Terrain; scrolling the battle map and displaying
terrain details.
Infantry Tactics
Armor Tactics
Continued on next page
2
Main Screen, Continued
Arrow 2
Command
Panel
Click the Command panel to open the Command Screen to play a
CCM instructional or user-created engagement. See Command
Screen on page 4 for further information about using the Command
Screen.
Arrow 3
Editor Panel
Click the Editor panel to open the CCM Game Editor. The Editor is
where user-created engagements are produced. See Scenario Editor
page 58 for more information about using the CCM Game Editor.
Arrow 4
Options
Button
Click the Options button to open the CCM Game Options menus.
Arrow 5
Options and
Credit Button
Click the credit tab to view information on the developers of CCM.
Arrow 6
Exit Switch
Click the Exit switch to exit Close Combat Marine. Alternatively,
players can use the keyboard shortcut Alt+F4 to close CCM. CCM
can be minimized to Windows taskbar using the Alt+Tab or Windows
key shortcuts.
3
Command Screen
Screen
Arrow 1
Engagements
Click the switch to choose between the rosters of Instructional
Engagements, User-Created Engagements and Saved Replays.
There will be no User-Created Engagements available in the roster
window until the player creates them in the CCM Game Editor or
downloads engagements created by other CCM users and installs
them to the Close Combat Marines/Games/Battles folder.
Arrow 2
Engagement
selection
Click the name of the Instructional Engagement or User-Created
Engagement in the roster window to select the battle scenario to be
played. Double-clicking the name of the engagement is the same as
clicking the NEXT button and immediately advances the player to the
Battlegroup Screen.
Continued on next page
4
Command Screen, Continued
Arrow 3
View Map
After selecting an engagement the battle map to be played may be
previewed by clicking the VIEW MAP button.
Click the BACK button to return to the Command Screen.
Arrow 4
Marine and
OPFOR
Click the toggle button to switch between playing the Marine or Opfor
force.
Arrow 5
Multi
or Single
Player
Click the MULTIPLAYER button to play CCM online or on a LAN. See
the Multiplayer Connection FAQ for further instructions. Click the
SINGLE PLAYER button to play solo against the computer.
Continued on next page
5
Command Screen, Continued
Arrow 6
Exit Button
Click the EXIT button, or use the Alt+F4 shortcut to close CCM.
Arrow 7
Delete Toggle
Click the Delete toggle button to remove the engagement selected in
the roster window.
Arrow 8
Main Button
Click the MAIN button to return to the Main Screen.
Arrow 9
Next Button
Click the NEXT button to advance to the Battlegroup Screen.
6
Battlegroup Screen
Battlegroup
Arrow 1
Team Slot
Up to 15 teams may be assigned to each player’s Battle Group (BG).
Teams in a BG occupy one ‘slot’ on the Battlegroup Screen. The team
information in each BG slot consists of Team Type (Fire Team, Med
MG Tm etc), the number of soldiers on that team, indicated by the
green ‘health’ head icons, and the team’s optional identification (A11,
A41 etc). To display more information on about a team on the
Battlegroup Screen, click within its ‘slot’ area to select that team.
Arrow 2
Force Mix
CCM engagement scenarios are created with a Force Mix of additional
teams either locked and unavailable or unlocked and available in the
Battlegroup Screen. If the scenario was created with a locked Force
Mix option in the CCM Game Editor then the Force Mix window on the
left side of the screen will be empty. If the scenario’s Force Mix option
is ‘unlocked’ then two rosters of additional teams will be displayed in
the window and available for ‘requisition’ into the player’s BG. To add
a team type from the Force Mix to a BG, double-click on the team type
name in the Force Mix roster. To delete a team from the BG, doubleclick within its BG slot area.
Continued on next page
7
Battlegroup Screen, Continued
Arrow 3
Infantry
Armor
To switch between the Infantry and Armor/Vehicle Force Mix Rosters,
click the appropriate button to display that roster.
Arrow 4
Team
Information
The averages of the team’s experience and morale are displayed
when a team in a BG or Force Mix roster slot is selected by a left click
on its ‘slot’. These averages are color-coded in the background color
of a team’s Type name in its BG ‘slot’.
Arrow 5
Weapons
When teams are selected by clicking on their BG or Force Mix roster
slot, the weapons that team carries are displayed in the lower right
corner of the Battlegroup Screen. Clicking on these weapon icons in
the battlegroup or Soldier Detail Screens plays the sound of that
weapon being fired. Familiarity with the CCM weapon sounds will
improve player’s situational awareness during battle.
Continued on next page
8
Battlegroup Screen, Continued
Arrow 6
Rename
The RENAME button opens a pop-up window that allows the selected
team to be assigned a player-created identification (e.g. A11, A41 etc).
Type in a new team name then click OK. The new team ID is then
displayed throughout the TDS.
Arrow 7
View Map
The VIEW MAP button opens the MAP DETAIL Screen. A reduced
scale preview of the battle map shows the player’s deployment zone[s]
as non-shaded areas. The remainder of the battle map preview is
darkened. The locations of Enemy deployment zones are not
displayed.
Continued on next page
9
Battlegroup Screen, Continued
Arrow 8
Marine/Opfor
Click on the MARINE/OPFOR button to open the Soldier Details Screen.
Players only have a MARINE or OPFOR button, corresponding to their
assigned force.
1. The upper left area on the Soldier Details Screen displays the team
type icon, the team name or player-created identifier, the color-coded
average of the team’s experience and morale and the number of
Marines on the team.
2. Marines name, rank, weapon and function within the team. Click the
weapon icon to hear the sound of the weapon being firing.
3. Bar graphs indicating the Marine’s morale, leadership, intelligence,
strength and experience. All of these attributes affect performance.
4. Click the team icons, or use the scroll arrows, to view the Marine
Details Screens for the other teams in the player’s BG.
5. Click the BACK button to return to the Battlegroup Screen.
Arrow 9
Back
Click on the BACK button to return to the Command Screen.
Arrow 10
Next
Click the NEXT button to advance to the Briefing Screen.
10
5 Paragraph Order
SMEAC
1. The mission is detailed on the Briefing Screen. Players should pay
particular attention to the tactical tasks specified for their own
platoon BG. User-created scenarios may or may not include
Briefing Screen text although it is recommended that the scenario
author indicate the mission objectives for each force.
2. Use the scroll slider or scroll arrows to view the entire Briefing
Screen text.
3. Click the VIEW MAP button for a reduced scale preview of the
battle map. The player’s deployment zones are displayed as nonshaded areas on the battle map preview. The remainder of the
battle map preview is shaded. Allied player and Enemy player
deployment zones are not displayed on the battle map preview.
4. Click the PRINT OP ORDER button to open a standard printer
options window. It is recommended that player’s print the Briefing
Screen text for ready reference during battle.
5. Click the BACK button to return to the Battlegroup Screen.
6. Click the NEXT button to advance to the Deployment Screen.
11
Deployment Screen
Course of
Action
1. In the Deployment Screen the player sees the unit deployment
mode information window. Click anywhere on the Deployment
Screen to close this window.
2. The player’s deployment zone is indicated by the non-shaded
portions of the battle map.
3. Neutral territory and Enemy deployment zones are indicated by the
shaded portions of the battle map.
4. The player can reposition or issue pre-battle orders to his units on
the Deployment Screen.
• Left click and drag units anywhere in the deployment zone to reposition
them prior to battle. The ‘shadow’ of the team being repositioned
remains in place outlined in yellow while a single soldier or vehicle
shadow is being dragged under the cursor. When the cursor is in the
desired position, release the left mouse button to relocate the team.
• Movement, fire, dig in and mount orders can be issued to units on the
Deployment Screen. Units will execute the player’s commands when
the battle starts. The default status for units is ‘Ambush’ and remains so
until the player issues that team a different order
• In some scenarios the player may have a ‘lighted’ Artillery Barrage
Mission icon on the Deployment Screen. If so, the player can click the
icon and then click the map to pre-plan 1 mission.
Continued on next page
12
Deployment Screen, Continued
Course of
Action
(continued)
5. To switch to the Overview Map Screen click the magnifying glass
icon (-). In Deployment, the Overview Map displays the player’s
BG units as NATO style icons on the entire Battle map. Units can
be re-deployed and issued pre-battle commands on the Overview
Map in the same manner as the Deployment Screen. The
Overview Map also allows players to have the widest field of view
when dragging out fire lines to check LOS.
• Click the magnifying glass icon (-) on the Deployment and Battle screens
to open the Overview Map Screen (OVM). In deployment, the OVM
indicates the player’s deployment zones as non-shaded portions of the
map. The player’s units are depicted with NATO style icons. The
player’s units may be selected, re-deployed and issued commands on
the OVM in the same manner as on the Deployment and Battle Screens.
• During battle, the OVM also displays spotted Enemy units as NATO
icons. It is often useful to switch from the Deployment and Battle
Screens to the OVM to get the ‘big picture’ as well as useful information
on spotted enemy team types during battle
Continued on next page
13
Deployment Screen, Continued
Course of
Action
(continued)
6. The deployment timer starts running when the player clicks off the
unit deployment mode information window.
• The deployment timer will start at 10, 5, 0 minutes, or a random choice
of these 3 time periods, depending on the timer option chosen for the
scenario in the CCM Game Editor. When the deployment timer is set at
0 minutes, the battle begins immediately after all the player clicks off the
unit deployment mode information window
7. When the player finishes deployment he can either wait for the
deployment timer to expire or click the BEGIN button to start the
battle.
14
Battle Screen
Execute
Course of
Action
Battle begins when the BEGIN button is clicked or the Deployment
Timer expires. The pop-up message “Prepare For Battle” is briefly
displayed and three changes occur to the Deployment Screen when
battle begins and it becomes the Battle Screen:
1) The darkened map shading on the Deployment Screen indicating
neutral or enemy territory, disappears
2) The Deployment Timer becomes the Battle Timer if a time limit has
been established for the engagement in the CCM Game Editor. The
Battle Timer alternates being displayed with the Force Morale
indicator every two seconds during play.
3) The BEGIN Button on the Deployment Screen becomes the TRUCE
button on the Battle Screen.
15
Situational Awareness
Monitors
There are four monitors and a toolbar on the Deployment and battle
Screens.
Arrow 1
Map Monitor
The Map Monitor is displayed by clicking on the MAP button on the
Battle toolbar, using the F6 keyboard shortcut or by clicking the Map
Monitor checkbox under the Game Play tab on the Options Menu.
• The Map Monitor displays a reduced scale image of the entire battle
map. Friendly units are indicated by blue dots. Any friendly selected unit
is displayed on as a blue dot within a white outline. Enemy units are
indicated by red dots.
• The rectangular yellow box within the Map Monitor shows the area of the
battle map displayed on the Deployment or Battle Screens. Left click
anywhere within the Map Monitor to center the Battle Screen display on
that point of the battle map. If a friendly unit is beneath the Map Monitor,
left clicking within the Map Monitor may instead select that team
• Right click and drag to reposition [dock] the Map Monitor elsewhere on
the Battle Screen. If a friendly unit is beneath the Map Monitor, right
clicking may instead select that team and open its Orders Menu.
Continued on next page
16
Situational Awareness, Continued
Arrow 2
Marine
Monitor
The Marine Monitor is displayed when a team is selected and the
Marine Monitor has been enabled by using the F7 keyboard shortcut
or the Options Menu checkbox. The Marine Monitor displays
information about the Marines in the selected friendly unit. Each
soldier within the team has a ‘slot’ of data on the Marine Monitor.
• The top row of data includes the Marine’s name, function, and physical
status.
• The bottom row of Marine Monitor data displays the Marine’s
action/morale status, weapon icon, ammo type and amount of ammo
remaining. All of this data except for the Marine name is dynamic and is
constantly updated during battle.
• When the player selects an infantry team by left or right clicking on one
of its Marines, all of the selected team’s Marines are outlined in yellow
and the individual Marine sprite that was specifically selected is
highlighted with a yellow box.
Additionally, the selected Marine’s data ‘slot’ is outlined in yellow on the
Marine Monitor and his corresponding ‘health head’ is underlined in the team
status area on the Battle toolbar.
Continued on next page
17
Situational Awareness, Continued
Arrow 2
Marine
Monitor
(continued)
When the player selects a vehicle by left or right clicking on that unit, the
selected vehicle is highlighted by a yellow selection box. The interior yellow
box is centered over the vehicle leader’s position.
Continued on next page
18
Situational Awareness, Continued
Arrow 3
Team
Monitor
The Team Monitor is displayed by clicking on the TEAM button on the Battle
toolbar, clicking the scroll arrow to the immediate right of the Message
Monitor, using the F5 keyboard shortcut or selecting the appropriate
checkbox under the Game Play tab on the Options Menu. There are 15
‘slots’ on the Team Monitor available to display data on the maximum of 15
teams per player allowed in CCM. Unused team ‘slots’ are left blank.
The Team Monitor displays 5 items of information about each friendly team:
• team type icon
• team name [player-created or default]
• action/order status
• team cohesion
• color coding of action/order and cohesion
Color-coding in CCM is based on the following categories:
Green = Good
Yellow = Fair
Red = Poor
Black = None
Color coding of the action/order status text is:
• Green text indicates that the team is following the player’s last order.
• White text, as in the example above [DEFENDING], indicates that the
teams is in a default order status
• Red text indicates a team whose Marines are all KIA or incapacitated.
Continued on next page
19
Situational Awareness, Continued
Arrow 3
Team
Monitor
(continued)
The selected team’s ‘slot’ on the Team Monitor is outlined in yellow.
When a team is pointed to with the cursor, its Team Monitor ‘slot’ is
highlighted in white.
Clicking once on a Team Monitor ‘slot’ :
• selects that team
• outlines the team’s Marines in yellow
• places a yellow selection box on a vehicle
• shows the team name in blinking green and white text above the team
• displays the team’s data in the team status area on the battle toolbar
• displays the team’s Marine data in the Marine Monitor when it’s enabled
Double-clicking on a Team Monitor ‘slot’, or clicking a second time on a
previously selected ‘slot’ does all of the above and centers the Battle
Screen on that team as well.
Players may left or right click and double-click on Team Monitor slots to
select a team and center the battle map on that team.
Pointing the cursor to a team Monitor ‘slot’ outlines the corresponding
team’s soldier sprites in white, flashes the team name in alternating
green and white text above the team on the battle map and displays
that team’s data within the team status area on the battle toolbar. If the
team being pointed at on the Team Monitor is a vehicle it isn’t outlined
in white but its team name will flash in alternating green and white text
on the battle map.
Continued on next page
20
Situational Awareness, Continued
Arrow 4
Message
Monitor
The minimized Message Monitor on the battle toolbar displays text
information about actions taking place on the battle map. The last
message received is displayed on the bottom Message Monitor ‘slot’.
The Message Monitor can be expanded to show the preceding three
messages, along with the Team Monitor by either :
• clicking on the TEAM button on the Battle toolbar
• clicking the scroll arrow to the right of the Message Monitor
• using the F5 keyboard shortcut
• or selecting the “Display Team Data” checkbox under the Game Play tab
on the Options Menu
Left or right clicking on an individual message :
• selects the team referred to by the message
• highlights the team with yellow Marine outlines, or
• highlights a vehicle with a yellow selection box
• flashes the selected team’s name in alternating green and white text on
the battle map
• centers the Battle Screen on the selected team
Continued on next page
21
Situational Awareness, Continued
Arrow 5
Battle
Toolbar
The Battle toolbar is always available on the Deployment, Battle and
Overview Map Screens.
The different sections of the toolbar are explained from left to right :
The left side of the Battle toolbar has buttons to access the Overview Map
Screen, Options Menus, Team Monitor and Map Monitor.
If a support mission or missions for the player’s force has been chosen in the
CCM Game Editor, at set moments during battle the four support mission
buttons:
• Fixed Wing
• Rotary
• On-Call Artillery
• Battalion Mortar
The buttons will ‘light’ when that support becomes available to the player.
Continued on next page
22
Situational Awareness, Continued
Arrow 5
Battle
Toolbar
(continued)
To use a support mission, left click a ‘lighted’ support mission button then left
click on the map to target that mission. The targets of Fixed Wing and
Rotary support missions are indicated by yellow marker smoke on the map.
The targets of On-Call Artillery and Battalion Mortar missions are indicated
by white marker smoke.
When Support Missions become available the player is also informed of that
fact by a voice cue and Message Monitor text describing the available
mission. Support Missions need not be used immediately after becoming
available. In fact, it is often the winning player that retains them for use at
the most critical moments during battle.
When the support mission button is clicked the CCM cursor changes from
and arrow head to bomb and target reticule.
Left click on the map to target the mission with a marker round of yellow (Tac
Air) or white (Barrage) smoke.
Continued on next page
23
Situational Awareness, Continued
Arrow 5
Battle
Toolbar
(continued)
When a Fixed Wing or Rotary support mission is used, after a short
delay, a fighter-bomber or attack helicopter unloads its ordinance in
the vicinity of the yellow marker smoke.
When an On-Call Artillery or Battalion Mortar support mission is used,
after a short delay, the rounds from those indirect fire weapons will
begin to impact in the vicinity of the white marker smoke placed when
the mission was clicked on the map. The final salvo of an indirect fire
support mission is often indicated by a single round burst.
More than one of the same type of support mission may be allocated.
Up to 99 of each of the four types of support missions may be
allocated to an engagement in the CCM Game Editor. If another of
the same type of mission has been allocated, the next mission
becomes available almost immediately after employing the initial
mission. When it does so, the corresponding support mission button
will ‘light’ and the appropriate voice and messages heard and seen.
Continued on next page
24
Situational Awareness, Continued
Arrow 5
Battle
Toolbar
(continued)
On the left of the Team Status area of the Battle toolbar are displayed
the team type icon and the team leader’s rank.
The status area then splits into upper and lower display fields. The
team type name is displayed in a panel color coded using the standard
green/yellow/red/black code scheme, to represent team cohesion.
Below that are the ‘health heads’. These icons represent the colorcoded health or morale status of the Marines on the team. ‘Health
heads’ correspond left to right to the Marine data slots top to bottom
on the Marine Monitor. The selected Marine’s ‘health head’ is
underlined by white. ‘Health heads’ are color-coded as follows :
• Green = Healthy
• Yellow = Hurt
• Orange = Incapacitated
• Black = Panicked
• White = Surrendered
• Red = Dead
Continued on next page
25
Situational Awareness, Continued
Arrow 5
Battle
Toolbar
(continued)
The next area of the Team Status display states the team’s action
status (Ambushing, Moving, Firing etc). Below that is a description of
the team’s overall warfighting quality.
The team’s anti-personnel (AP) and anti-tank (AT) effectiveness is
displayed by a series of color-coded bar graphs. The team’s AP and
AT effectiveness is rated at six ranges (20m, 40m, 80m, 160m, 320m,
& 640m) using a modified green/yellow/red/none color scheme.
The icons on the right side of the Team Status area, shown enlarged,
signify whether the team possesses smoke (top) or explosive or
fragmentation grenades.
Continued on next page
26
Situational Awareness, Continued
Arrow 5
Battle
Toolbar
(continued)
Click the TRUCE button to offer your opponent a ceasefire. If the opposing
player also clicks his TRUCE button, the truce is accepted, the battle ends
immediately and the game advances to the Details Screen where victory and
defeat are assessed.
If the opponent refuses to accept a truce, battle continues. Players can
retract their truce offer by clicking the TRUCE button a second time before
their opponent accepts the truce.
During engagements where a time limit has been selected, the Battle Timer
alternates display every two ‘game’ seconds with the Force Morale indicator.
When the Battle Timer runs down to 00:00 the battle ends immediately.
The Force Morale indicators measure the effects of casualties and the stress
of battle on the Opfor (yellow and red icon) and US (green icon) force
cohesion. The indicators diminish and change color from green to yellow to
red as each force suffers the effects of battle on its cohesion.
Note: when the “Battle Ends When: Force Morale Gets Too Low” option has
been selected in the CCM Game Editor for use in an engagement, the battle
ends when one side’s Force Morale indicator goes into the red. When this is
the case there may be a Victory Location control penalty imposed on the side
that Force Morale failure caused the battle to end. The Victory Location
penalty depends on the proportion of the winning side’s remaining Force
Morale to the losing side’s.
27
Orders Menu
Issuing
Orders
Right clicking on a unit opens the pop-up Orders Menu which lists the
orders that can be issued to that team. The orders are:
Not all orders are available to all teams at all times. Orders
unavailable to a unit are shaded in gray.
Orders are issued by left clicking on one of the Orders Menu options.
Right clicking on an empty area of the map cancels an order that has
been selected but not issued. Left or Right clicking on an empty area
of the map closes the Orders Menu.
Continued on next page
28
Orders Menu, Continued
Issuing
Orders
(continued)
Orders can also be issued to a unit by selecting the team and using
one of the Orders menu keyboard shortcuts. These Order shortcuts
are as follows :
• MOVE……………………Z key
• MOVE FAST……………X key
• MOVE COVERT……….C key
• FIRE…………………….V key
• SMOKE…………………B key
• DEFEND……………….N key
• AMBUSH......................M key
• MOUNT/DISMOUNT….K key
• DIG IN………………….D key
Units can be selected using a number of methods :
• Left clicking on a soldier or vehicle
• Left clicking and dragging selects all teams within the marquee box
• Right clicking on a soldier or vehicle
• Left or right clicking on a team slot in the Teams Monitor
• Left or right clicking on a message slot in the Message Monitor
• Left or right clicking on a team’s Order ‘dot’
• Using a unit selection hot key
Units can be ‘bound’ to the 1 through 0 selection hot keys on the top
row of the keyboard by selecting the unit then pressing CTRL+#
(where # is one of the 1 through 0 keys) to bind that unit or group of
units to that particular selection hot key. Multiple units can be ‘bound’
to a selection hot key by group selecting them then using Ctrl+# to
bind them to a particular hot key.
When infantry units are given a group movement order, the resulting
movement dots are placed on the map in positions relative to the
starting positions of the teams within the group.
Continued on next page
29
Orders Menu, Continued
Group
Selection
Multiple units may be group selected in one of two ways :
1) Selecting a unit then holding the Shift key down while clicking on
additional units to select them.
2) Another way to select multiple units is to left click on the map and
drag out a selection marquee box. All friendly units entirely or
partially within the selection box are selected when the mouse key is
released. Orders may be issued to multiple units simultaneously by
group selecting them, right clicking on one of the selected units to
open the Orders Menu then issuing an available order to those units
in the normal manner. Alternatively, group select the units then use
an Orders hot key to issue the same order to the entire unit group.
Executing
Orders
Player actions when issuing orders differ depending on the order.
The MOVE order is represented by a blue line stretching from the
selected team being issued the order, to an invisible cursor. The white
numbers at the end of the Move line measure the distance in meters
from the team to that point on the map. Scroll the mouse and left click
to place a blue Move dot on the map location intended as the team’s
destination.
Continued on next page
30
Orders Menu, Continued
Move
When the Move dot is placed the team will advance toward that point
in a tactical manner. The team’s rate of movement is affected by the
terrain it crosses en route. Moving teams may initiate combat and
assault if the opportunity presents. Moving teams are much more
vulnerable to enemy fire than stationary teams or teams moving
covertly.
When a moving team reaches its destination, the Move dot disappears
and a voice cue and text message announce the completed
movement. After carrying out the Move order the team assumes
Defend status in the direction of its movement.
MOVE Orders can quickly be issued to teams by left clicking on the
team and dragging out a blue Move line to the intended destination
then left clicking on that map point.
Continued on next page
31
Orders Menu, Continued
Move Fast
The MOVE FAST order is represented by a purple line stretching from
the selected team being issued the order, to an invisible cursor. The
white numbers at the end of the Move Fast line measure the distance
in meters from the team to that point on the map. Scroll the mouse
and left click to place a purple Move Fast dot on the map location
intended as the team’s destination.
When the Move Fast dot is placed the team will advance toward that
point as rapidly as possible. The team’s rate of movement is affected
by the terrain it crosses en route. Moving teams may initiate combat
and assault if the opportunity presents. Teams moving fast are more
vulnerable to enemy fire than moving teams.
When a team moving fast reaches its destination, the Move Fast dot
disappears and a voice cue and text message announce the
completed movement. After carrying out the Move Fast order the
team assumes Defend status in the direction of its movement
Continued on next page
32
Orders Menu, Continued
Move Covert
The MOVE COVERT order is represented by a yellow line stretching
from the selected team being issued the order, to an invisible cursor.
The white numbers at the end of the Move Covert line measure the
distance in meters from the team to that point on the map. Scroll the
mouse and left click to place a yellow Move Covert dot on the map
location intended as the team’s destination.
When the Move Covert dot is placed the team will advance toward that
point as cautiously as possible. The team’s rate of movement, literally
a crawl, is affected by the terrain it crosses enroute. Teams moving
covertly do not initiate combat or assault if the opportunity presents.
Teams moving covertly are more vulnerable to enemy fire than
stationary teams.
When a team moving covertly reaches its destination, the Move Covert
dot disappears and a voice cue and text message announce the
completed movement. After carrying out the Move Covert order the
team assumes Ambush status in the direction of its movement.
Continued on next page
33
Orders Menu, Continued
Additional
Execution
Options
If the player changes his mind and decides not to issue a movement or
fire order, the order can be cancelled either by right clicking on the
map or pressing the Backspace key.
Once issued, movement orders are displayed as blue, purple or yellow
dots on the battle map. The player can adjust these orders by clicking
on the dot and dragging it to a new map location. When a dot is
clicked, the corresponding movement line is displayed between the
moving team and movement dot.
Vehicles
Vehicles obeying a movement order may take a circuitous path to their
destination. Players are advised to monitor and manage their vehicle
movements with increased attention.
Vehicles are not stealthy and may be spotted by the opposing force
outside of its LOS due to the vehicle’s inherent noise. Vehicles
moving covertly do so at maximum watchfulness and slowest speed.
A moving vehicle is slightly faster and somewhat less observant. A
vehicle moving fast turns to face its destination and moves at
maximum speed and with minimum tactical awareness.
Moving vehicles and vehicles moving covertly may attempt to maintain
their original facing. A vehicle facing the enemy can be ordered to
‘back up’ using the Move or Move Covert orders. It may sometimes be
necessary to use the Defend or Ambush arcs to face the vehicle in the
intended direction of travel before issuing a movement order.
Continued on next page
34
Orders Menu, Continued
Establishing
Waypoints
WAYPOINTS are multiple movement orders created by selecting the team,
issuing the team a movement order and holding down the Shift key while
clicking on the battle map to set intermediate checkpoints and a final
destination. The team then moves to its destination by way of the sequential
points. Once issued, any of the waypoint dots can be clicked and dragged to
adjust their positions and alter the moving team’s path. A maximum of 20
waypoints may be plotted when issuing a movement order.
Fire
Command
The FIRE order is represented by a green and/or red line stretching from the
selected team being issued the order to an invisible cursor. The colored
number at the end of the Fire line measures the distance in meters from the
team to that point on the map. A black distance number indicates the range
is either within the minimum safe range or beyond maximum weapon range.
A yellow distance number indicates the target is outside effective range and
the weapon performance of the firing team will be decreased. Scroll the
mouse and left click to place a red direct Fire dot on an enemy unit or orange
area Fire dot on a map location to make a unit or area of the map the firing
team’s target.
Continued on next page
35
Orders Menu, Continued
Fire
Command
(continued)
When the end of a Fire line is placed over an AP or AT target, the
invisible cursor becomes a color-coded target reticule. The color of
the reticule indicates the chance that a shot fired by the team would kill
the target.
These color-coded kill percentages are as follows:
• Green
100-60%
• Yellow
59-30%
• Red
29-10%
• Black
9-0%
Continued on next page
36
Orders Menu, Continued
Line
of
Sight
The color of the Fire line indicates whether the team has Line Of Sight
[LOS] to that target or point on the map. A bright green Fire line
signifies the team has a clear LOS and its fire won’t be affected.
A dark green Fire line signifies the team’s LOS is hindered by an
intervening obstruction and its fire will be adversely affected. A
hindered Fire/LOS line means that any fire by the team will be
calculated as area rather than direct fire.
A red Fire line indicates the team’s LOS is completely obstructed and
teams other than indirect fire mortar units will not be responding to a
Fire order where LOS is blocked. If this is the case then a white
distance number is displayed along the Fire line measuring the
distance from the team to the LOS obstruction.
Continued on next page
37
Orders Menu, Continued
Smoke
The SMOKE order creates a man-made LOS hindrance. Enemy units
observed through Smoke are harder to detect, and if detected,
impossible to target directly. Smoke has approximately the same
effect on spotting and firing that a partial obstruction by foliage causes
– direct fire at a target obscured by smoke is resolved as area fire
even when a red direct Fire dot has been placed on the enemy target.
The SMOKE order is represented by a standard green and or red
Fire/LOS line. Left clicking the Smoke order on the map places a gray
Smoke order dot at that location. Except for mortars, a unit must have
LOS to its target to fire Smoke. Mortar units are capable of indirect fire
and can place Smoke rounds anywhere on the battle map. Infantry
can throw Smoke grenades a maximum of 30 meters, 15 meters if the
soldiers throwing smoke are in the prone position.
Continued on next page
38
Orders Menu, Continued
Smoke
(continued)
Units on both the Opfor and USMC forces are equipped with smoke
firing capability. Many vehicles on both forces are equipped with
smoke dischargers and will often fire smoke on their own initiative for
self-protection when threatened by enemy fire. Units that don’t have a
Smoke order capability or have expended their supply of Smoke
ammo have the Smoke order option grayed out and displayed on the
Orders Menu reading as ‘Can’t Smoke’.
The tactical effects of Smoke last for approximately 2 minutes of game
time. Smoke effects can persist for a short time even after the smoke
plume graphic has disappeared. Smoke rounds are inaccurate,
particularly so in the case of mortars firing Smoke rounds. It may be
necessary to reposition the Smoke order dot to achieve the desired
smoke coverage on the battle map. Smoke has the same LOS and
Fire effects on enemy and friendly units, including the team placing the
smoke.
Continued on next page
39
Orders Menu, Continued
Defend
The DEFEND order is represented by a blue Defend arc. The Defend
order causes a unit to seek whatever cover it can locate in the
immediate area, face itself in the direction of the Defend arc and to fire
at high percentage enemy targets of opportunity. Defending units will
engage enemy units outside the Defend arc only when those targets
are closer.
Adjusting a team’s Defend arc is a useful method of repositioning that
unit to face another direction. This can be particularly helpful in the
Deployment Screen as the only way to force infantry and vehicles to
align themselves in the direction desired by the player.
To adjust a team’s Defend arc, left click on the blue arc and drag the
arc to one of the eight available directions [N, NE, E, SE, S, SW, W or
NW] within the Defend arc circle, then left click again to set the Defend
arc in its adjusted direction.
Defend is the default action status for vehicles.
Continued on next page
40
Orders Menu, Continued
Ambush
The AMBUSH order is represented by a green Ambush arc. The
Ambush order cause a unit to go prone, seek cover in the immediate
area, face itself in the direction of the Ambush arc and to engage
enemy targets when they approach within 30 meters.
Adjusting a team’s Ambush arc is another useful method of
repositioning that unit to face another direction. This can be
particularly helpful in the Deployment Screen as the only way to force
infantry and vehicles to align themselves in the direction desired by the
player.
To adjust a team’s Ambush arc, left click on the green arc and drag the
arc to one of the eight available directions [N, NE, E, SE, S, SW, W or
NW] within the Ambush arc circle, then left click again to set the
Ambush arc in its adjusted direction. Ambush is the default action
status for infantry.
Continued on next page
41
Orders Menu, Continued
Mounting
and
Dismounting
The MOUNT order is represented by a blue line and green dot.
Mount/Dismount involves two teams – a passenger infantry unit and its
mount vehicle. Only infantry teams may be issued Mount orders and only
mounted vehicles may be issued Dismount orders.
Left click to place a green Mount dot on an eligible vehicle. The infantry unit
then moves to mount the chosen vehicle. The vehicle will slightly adjust its
position in preparation for mounting. Do not cancel or change a Mount order
until it has been completed or the vehicle will lose its passenger carrying
capability.
When a vehicle is mounted, the letter ‘M’ blinks in white and orange above
the vehicle. When the vehicle is pointed at with the cursor, the vehicle team
name and the team names of all passenger infantry units are displayed in
white above the vehicle. When a vehicle is mounted it’s Soldier Monitor
‘slots’ are expanded to include the soldier data for all passengers.
Continued on next page
42
Orders Menu, Continued
Mounting and
Dismounting
(continued)
When a mounted vehicle is issued the Dismount order, its passenger
infantry units are immediately placed on the map approximately 12
meters from the dismounted vehicle. Dismount orders may be issued
to moving vehicles which will stop to unload all passenger infantry.
Multiple infantry teams may be issued concurrent Mount orders to the
same vehicle to the limit of its passenger capacity. The passenger
capacity for small vehicles is 4 soldiers/4 teams maximum. The
passenger capacity for larger vehicles is 8 soldiers/4 teams maximum.
The passenger capacity for 5 ton trucks is 20 soldiers/4 teams
maximum.
Passenger units are not capable of Fire while mounted – only the
mount vehicle’s organic weapons are used when a mounted vehicle is
issued a Fire order. Players should be careful when issuing Mount
orders where more than one vehicle is in proximity because the
infantry may get confused and mount the wrong vehicle, generally one
that is nearer than the intended mount vehicle.
Continued on next page
43
Orders Menu, Continued
Dig in
The DIG IN order causes infantry teams to dig entrenchments. It takes
about 5 game minutes from the time the Dig In order is issued until the
team finishes its fighting position. The Dig In order is only available to
infantry teams occupying suitable terrain such as grass, dirt etc. If a
unit’s Dig In order is interrupted for any reason, that unit must be
issued a new Dig In order and spend another 5 game minutes to
complete the order and finish digging it’s fighting position. The dug in
terrain feature will display itself as a ‘Newly Dug Trench’ when its
location is right-clicked on the battle map. Trenches offer more cover
and concealment than the surrounding open terrain to infantry teams
that occupy them. Teams digging in will quickly become fatigued.
44
Command and Morale
Command
Influence
Every unit has a leader who commands the subordinate Marines in his unit
during battle. Infantry team leaders are indicated by a color-coded
Command circle under their screen image. Certain units are designated as
Command teams. Command teams improve the effectiveness and morale of
all player units within a Command team’s radius of command influence.
The Command radius for all of the player’s units is displayed by pressing the
Space Bar on the keyboard. The color of a unit leader’s Command circle will
correspond to the color of his Command radius circle. The color of the
Command radius indicates the overall leadership quality and range of unit
commanders
Command influence is color-coded as follows :
•
•
•
•
Green
Yellow
Red
Black
High
Medium
Low
Very Low
Continued on next page
45
Command and Morale, Continued
Morale
Aside from effective command, players can improve Marine morale by
successfully ambushing the enemy. Infantry teams that destroy
enemy tanks also get a morale boost. Moving a team with reduced
morale out of enemy LOS and Fire also helps increase Marine’s
morale.
As the battle progresses, Marines may lose morale.
Receiving enemy fire, friendly leader and enlisted casualties or being
heavily outnumbered by enemies in close proximity reduce a Marines’
morale.
Eventually a Marine may panic, retreat from the battle or even
surrender to the enemy. Marines that become broken will rally after a
period of time. Broken Marines outside the Command influence radius
of a leader will take longer to rally.
Separation
Sometimes Marines get separated from their units during movement or
if they become broken. Separated Marines will use their own initiative
to rejoin their units. This process can be expedited by moving that
team closer to the separated Marine. The presence of effective
commanders assists in keeping Marines from becoming separated
from their units as well as in reuniting separated Marines with their
units.
46
Battle Map
KOCOA
The map scale is 10 pixels equal 2 meters. The battle map graphic is coded
as a certain type of terrain on an invisible 2x2 meter grid. Every 2x2m
[10x10 pixel] area of the map has a specific terrain type and elevation value.
Right click and drag the cursor on the map to display the terrain data
including type, elevation and the cover value it offers in the lower left corner
of the Battle Screen.
To scroll around the Battle Screen use the game cursor to ‘bump’ the edge of
the screen corresponding to the desired direction of view – e.g. to view an
unseen portion of the battle map to the right, ‘bump’ the right edge of the
screen.
Alternatively, the Battle Screen can be scrolled N, E, S & W by using the
directional arrow keys or N, NE, E, SE, S, SW, W & NW by using the number
pad on the keyboard. The easiest method to change the area of the map
viewed on the Battle Screen is to click within the Map Monitor to reposition
the screen.
Hills and other elevated areas of the map are indicated by darkened shading
on the Battle map graphic. Units on hills generally have a wider field of view
and can see over lower obstacles. Units moving uphill do so more slowly
than units moving downhill. Because of their height, hills block LOS from one
lower elevation, through the hill to another lower elevation. It is suggested
that players familiarize themselves with the terrain they will be fighting on by
making a right click and drag ‘reconnaissance’ of the CCM battle maps.
Continued on next page
47
Battle Map, Continued
KOCOA
(continued)
Trees offer a good deal of concealment and cover to infantry teams
that occupy forested locations although mortar fire into trees causes
airbursts which multiply the effectiveness of indirect fire. Tree trunks
will block Fire and LOS. The foliage surrounding trees will hinder Fire
and LOS. Treetop graphics can be removed from the map for better
Battle Screen visibility using the Ctrl+T shortcut, however doing so
does not eliminate the effects that trees have on Fire and LOS.
Removing the treetop graphics only allows the player to see units on
the map more easily.
Most water terrain on the battle maps is the shallow type that can be
traversed at reduced speeds by both infantry and vehicle teams.
However, wise players will right click and drag on water terrain to verify
its depth if they are unsure whether a water obstacle can be forded.
Deep Water cannot be crossed by any vehicle or infantry teams except
by doing so across a bridge.
Continued on next page
48
Battle Map, Continued
KOCOA
(continued)
Water offers no concealment or cover which makes it a good tactic to
cross water terrain only when sure your teams are out of enemy lines
of sight and fire. Smoke rounds are extinguished and ineffective when
they impact in water. Try to place smoke rounds on the banks of the
water terrain when it is necessary to make a water crossing under
enemy observation.
Building roofs provide cover from mortar fire and building walls provide
concealment and cover from other types of enemy fire. Multi-story
buildings are indicated as such by a white numeral on their roof or
interior which specifies the number of 4 meter levels in that building.
Only infantry teams may enter buildings. When a friendly team enters
a building the roof graphic is replaced by an interior graphic.
Opposing players only see the building roof graphic while a team
remains unspotted in that building. If the team is spotted that team is
displayed to opponents as being on top of the building’s rooftop
graphic.
An infantry team in a building is assumed to occupy the highest level
of that building. Teams in multi-level buildings will have wider fields of
LOS and Fire but so too will enemy teams trying to spot or shoot at the
team in a taller building.
Stone buildings offer better cover than wood buildings. On a few CCM
maps there are bunkers built with reinforced concrete that offer more
protection than stone buildings.
Continued on next page
49
Battle Map, Continued
KOCOA
(continued)
Rubble and Debris offer good concealment and cover but teams move
through this type of terrain more slowly. Portions of multi-story
building that become rubble during battle collapse to ground level.
Teams that occupy rubble in a multi-story building are also considered
to be at ground level. Rubble portions of buildings have no roof and
are more exposed to mortar fire. Rubble, debris and vehicle wrecks
are randomly placed on the battle map prior to play. The location of
this randomly placed terrain will be different each time that map is
used.
Roads offer a trade-off in battle. Moving on a road is faster than
moving cross-country but roads, being flat and open, offer little in the
way of concealment or cover to teams using them. Roads may be
either paved or dirt.
Continued on next page
50
Battle Map, Continued
KOCOA
(continued)
Several CCM battle maps feature snow terrain. Snow offers little
concealment or cover and slows units that move across it. Vehicles in
particular tend to become bogged down. Infantry teams become
fatigued more easily in snow than they would if the same terrain were
without snow. Infantry teams that occupy snow terrain can be issued
Dig In orders.
Flammable is a type of terrain that is explosive when weapons fire,
especially high explosives, impacts in close proximity. Flammable
terrain can only be detected by right clicking on the battle map.
Units should avoid occupying locations near this type of terrain.
Enemy units in or around flammable terrain can be effectively
damaged by firing at that terrain. Flammable terrain can be
neutralized by detonating it with weapon fire prior to locating friendly
units nearby.
51
Forces
Vehicles
Vehicles are sometimes difficult to maneuver. Wheeled vehicles may
not be able to navigate the same terrain as tracked vehicles. Players
employing vehicles within their force should pay close attention to
vehicle performance and may need to adjust a vehicle’s action and
order status frequently to achieve that team’s objectives.
Vehicles are often vital to overall force cohesion. Soft-skinned or light
vehicles should be protected from enemy fire accordingly during battle.
Keep in mind that vehicles have a hard time spotting enemy infantry,
especially in close terrain. Also, that moving vehicles may be spotted
by the assumed noise they make, even when the enemy doesn’t have
LOS to the vehicle.
Surviving vehicle crew will abandon badly damaged or destroyed
vehicles. The bailed-out crew will hide in the best available cover in
the vicinity of its damaged vehicle. The crew will assume Ambush
posture and engage approaching enemy units. Players can issue
orders only to surviving command vehicle crews. Other crews act only
on their own initiative.
Marines
As in real life, Marines are the heart and soul of CCM. The Close
Combat game system uses a ground-breaking model that tracks
individual Marine psychology, intellect, experience, leadership and
physical status throughout the battle.
CCM Marines will not always instantly and robotically follow a player’s
every order. The Marines will often react to game events in a manner
similar to the way real Marines react in combat.
Take care of your CCM Marines so they can attain of the mission
objectives. Winning victory but losing 3 KIA and having 5 good men
incapacitated is not often the best result possible.
Continued on next page
52
Forces, Continued
Marines
(continued)
The Marine Monitor provides the most detailed information about the
Marines in CCM. The pre- and post-battle Details Screens are also an
excellent source of information about your troops. Note that some
Marines carry secondary weapons, grenades and even knives.
Marines will use these weapons on their own initiative when events
warrant.
The Marine health/morale states on the Marine Monitor are as follows :
• HEALTHY - the Marine has normal health and morale
• INJURED - the Marine is hurt and acting at reduced effectiveness
• INCAPACITATED – the Marine is badly wounded and ineffective
• DEAD - the Marine has been killed
• WINDED - Marine is tired, acting at reduced effectiveness and needs
rest
• FATIGUED – Marine is exhausted, cant function and needs rest
immediately
• PANICKED - Marine is scared and acting with much diminished
efficiency
• BROKEN - Marine refuses orders and prepares to retreat from battle
• ROUTED - the Marine is deserting in the face of the enemy
• SUPPRESSED - the Marine is taking cover but returning fire
• PINNED - Marine is taking cover under heavy fire and firing
intermittently
• COWERING - Marine is frozen and hiding and fires only occasionally
• STUNNED – Marine is momentarily dazed by an explosion and
ineffective
53
Endex
Causes
Battles can end in one of four ways:
• TRUCE - when one side clicks the Truce button then the other side
clicks theirs
• TIMER - when the battle clock reaches 00:00 if a time limit was set for
the battle
• FORCE MORALE - when a side’s Force Morale indicator goes red, if
set for a battle
• ELIMINATION – when one side’s entire force has been KIA or
Incapacitated
Debrief
Screen
When the battle ends the Battle Screen advances to the Debrief
Screen. The Debrief Screen describes, displays and assesses the
outcome of the battle. Here it is determined whether the player
achieved victory, draw or defeat.
Continued on next page
54
Endex, Continued
Debrief
Screen
(continued)
Arrow 1
Battle
Results
The battle result is assessed in the upper left panel on the Debrief Screen.
The results include Total, Major or Minor Victories, Draw, and Total, Major or
Minor Defeat.
Arrow 2
Victory
Locations
An overview map of the battlefield depicts which hidden victory locations are
controlled by which force. Green and white star icons represent victory
locations controlled by the USMC. Red and yellow icons represent victory
locations controlled by the Opfor. Split US/Opfor icons represent victory
locations controlled by neither force.
Arrow 3
Results
The results of the battle are described in the area of the Debrief Screen
beneath the Victory and overview map panels.
Arrow 4
Save
Replay
Allows the player to save a copy of the battle.
Note: Replay does not always record a battle exactly the way it happened.
Continued on next page
55
Endex, Continued
Arrow 5
Play
Replay
Starts the Replay recording of the battle. The viewer may scroll the battle
map, change game options, select teams and view team and soldier
information in the game monitors. The viewer cannot issue orders or
influence the progress of the replayed battle in any way.
Arrow 6
Details
The DETAILS button replaces the battle results description with a chart of the
casualties suffered by each force. In many cases, the number of casualties
inflicted and incurred will be the truest measure of victory or defeat.
Arrow 7
Forces
Arrow 8
Next
The MARINES button, or OPFOR button if the player controlled the bad
guys, advances the Debrief Screen to the Soldier Details Screen. The postbattle Soldier Details Screen is similar to the pre-battle Soldier Details
Screen except it displays battle results including the physical and
psychological effects of battle on soldiers; infantry, gun and vehicle ‘kills’ on a
per team basis and medals awarded.
The NEXT button returns the player to the Command Screen.
56
Scenario Editor
Main Screen
Clicking the Editor panel on the Main Screen opens the first of three screens
in the CCM Game Editor. The Editor is where the player can make or modify
User-Created Engagements. These engagements then become available for
selection on the Command Screen and battle.
Map Selection
Continued on next page
57
Scenario Editor, Continued
Map
Selection
(continued)
Arrow 1
Map
Selection
The window on the right side of the Map Selection Screen displays a roster
of the available CCM maps. Click the scroll slider or scroll arrows to see the
entire list. Click on a map name to select that map on which to edit a battle.
Arrow 2
Map
The window on the left side of the Map Selection Screen displays a preview
of the selected battle map.
Arrow 3
Load
Engagement
The LOAD ENGAGEMENT button opens a pop-up Load Scenarios window
containing a roster of existing User-Created Engagements residing in the
CCM/Games/Battles folder. The Load Scenarios window won’t display if that
folder doesn’t contain any engagements. The player can copy the
Instructional Engagement files in the CCM/Data/Battles folder to the
CCM/Games/Battles folder to edit those existing engagements.
Continued on next page
58
Scenario Editor, Continued
Arrow 4
Fog
of
War
There are three FOG OF WAR option buttons:
• SEE ENEMY ALWAYS
¾ allows both forces to always see opposing units on
the battle map regardless of LOS.
• SEE ENEMY IN YOUR LOS
¾ has a flaw and functions the same as…
• SEE ENEMY IN ALLIED LOS
¾ allows players to see enemy units spotted by allied
player units as well as enemy units spotted by the
player’s own teams.
Arrow 5
Pre-Battle
Time
The Pre-Battle Setup Time option allows a choice of Deployment Screen
timer values ranging from None to Random. The Random Deployment timer
option causes a different random time limit of 0, 5 or 10 minutes to be used
each time the engagement is played. The battle begins automatically when
the Deployment timer expires at 00:00.
Continued on next page
59
Scenario Editor, Continued
Arrow 6
Force
Morale
The ‘Battle Ends When: Force Morale Gets Too Low’ option causes
the engagement to end when one side’s Force Morale indicator gets
low and goes into the red.
Arrow 7
Battle
Ends
The ‘Battle Ends When: Time Expires In’ option allows a time limit to
be established for the engagement being edited. The available battle
timer values are: No Limit, 10, 20, 30 and 40 minutes.
Arrow 8
Main
The MAIN button returns the player to the Main Screen.
Arrow 9
Next
The NEXT button advances the Map Selection Screen to the Map Info
Screen.
Continued on next page
60
Scenario Editor, Continued
Map Info
Arrow 1
Click the selector button to choose between specifying various
locations on the battle map.
Except for Neutral Deployment, each type of location that can be
specified on the battle map is represented by a different symbol
When the Victory Location option is selected, those locations are
clicked one at a time onto the map. When a Victory Location has been
specified it appears as an empty red outline around a single square on
the map grid.
When the Marine Deployment option is selected, the USMC
deployment zones are specified by either clicking a single square on
the map grid or clicking and dragging to specify multiple deployments
zones.
Continued on next page
61
Scenario Editor, Continued
Arrow 1
(continued)
When the Marine Deployment zones have been specified on the map
they are represented by a blue square with a white numeral on a black
background. The numeral indicates which of the 3 possible USMC
platoons can occupy those zones on the Deployment Screen. The
specification of the 3 possible deployment zones is switched between
the USMC platoons by clicking the checkboxes indicated by arrow #4.
An engagement MUST specify deployment zones for all 3 USMC and
all 3 Opfor platoons.
When the Neutral Deployment option is selected, click or click and
drag on the map grid to change previously placed deployment zones
back to neutral territory.
When the Opfor Deployment option is selected, the Opfor deployment
zones are specified by either clicking a single square on the map grid
or clicking and dragging to specify multiple deployments zones.
When the Opfor Deployment zones have been specified on the map
they are represented by a red square with a white numeral on a black
background. The numeral indicates which of the 3 possible Opfor
platoons can occupy those zones on the Deployment Screen. The
specification of the 3 possible deployment zones is switched between
the Opfor platoons by clicking the checkboxes indicated by arrow #4.
Continued on next page
62
Scenario Editor, Continued
Arrow 1
(continued)
When the Map Labels option is selected, click on the map grid to
open the Add Map Label window.
Type the place name to be displayed at that location on the map in
the Enter Label field and click OK. The chosen place name is then
displayed on the battle map when the edited engagement is played.
When Map Labels have been specified on the map grid they are
represented by solid red squares containing the letter ‘L’.
Continued on next page
63
Scenario Editor, Continued
Arrow 2
Map
The window on the left side of the Map Info Screen displays a reduced
scale image of the battle map with a 40x40 grid dividing the map into
24 meter increments. Victory Locations, Deployment Zones and Map
Labels are specified by clicking on this map grid.
Arrow 3
Clear
Clicking the CLEAR button removes previously specified map data.
Arrow 4
Platoon
The Platoon checkboxes are clicked to change the USMC and Opfor
deployment specification between the 3 available platoons on each
force. For example - when the Marine Deployment option is selected
and the ‘2’ platoon checkbox is clicked, click or click and drag on the
map grid to specify the deployment location zones for the 2nd USMC
platoon.
Continued on next page
64
Scenario Editor, Continued
Arrow 5
Force
Toggle
The MARINE/OPFOR toggle button is clicked to change which force’s OnCall Support missions are specified by the support mission dial controls
described below.
Arrow 6
Support
The Available On-Call Support mission dials determine how many of each
support mission type - Fixed Wing, Rotary, On-Call Artillery or Battalion
Mortars – each force will receive during battle. A maximum of 99 missions
for each type of support may be allocated to each force.
Arrow 7
Support
Availability
The Start dials determine how many minutes into battle each type of support
mission will become available. 0 means that mission type is available within
the first minute of battle. 10 would mean that mission type doesn’t become
available until 10 minutes into battle.
Arrow 8
Pre-Planned
Fire Support
The PRE-PLANNED ARTILLERY button makes one On-Call Artillery support
mission available to that force in the Deployment Screen. When this option
is selected the On-Call Artillery button on the Battle toolbar is lighted and
available to be targeted on the map during deployment.
Continued on next page
65
Scenario Editor, Continued
Arrow 9
Edit
SMEAC
The EDIT OP ORDER button opens a window where the operation
order for the engagement being edited is written. The Op Order is
displayed on the Briefing Screen during play. Good engagements
require a well-written, detailed Op Order.
Arrow 10
Clicking the BACK button returns the player to the Main Screen.
Arrow 11
Clicking the NEXT button advances the Map Info Screen to the Force
Mix Screen.
Continued on next page
66
Scenario Editor, Continued
Force Mix
The Force Mix Screen is almost identical to the Battlegroup Screen C
except there are three additional functions on the Force Mix Screen:
1. The LOCK FORCE MIX checkbox determines whether players can
customize their battlegroup TO&E or whether the engagement
must be played only with the units specified in the CCM Game
Editor when the engagement was created.
2. The MARINES PLATOON 1 2 3 checkboxes determine which
teams are added to which US platoon battlegroups. For example,
when box 3 is checked, the Force Mix Screen displays the roster
of 15 available battlegroup ‘slots’ for the USMC 3rd platoon.
3. The OPFOR PLATOON 1 2 3 checkboxes determine which teams
are added to which US platoon battlegroups. For example, when
box 2 is checked, the Force Mix Screen displays the roster of 15
available battlegroup ‘slots’ for the Opfor 2nd platoon.
4. Clicking the NEXT button on the Force Mix screen opens the Save
Scenario window. Type a name and description for the edited
engagement and click OK to save it. The new engagement is then
available for play in the roster of User-Created Engagements.
67
Multi-Player
Connection
Connect to the Internet or LAN per SOP.
Coordination
For Internet connections use Instant Messaging, Email, Websites, Fax
or Telephone to arrange online multiplayer CCM sessions. 2-6 players
can connect over the internet, or by LAN, to play CCM. One player
must act as HOST and communicate his IP address to the JOINER
players. It is recommended that the player with the fastest upload
connection speed act as HOST. In general, cable modem internet
service has faster upload speed than DSL which is faster than dial-up
internet connections.
IP Address
The HOST player can determine his external IP address by several
methods. Windows 2000/XP users can click the START button, click
RUN, type -- cmd – in the RUN window and click OK. Then in the
command line [DOS] window type – ipconfig – and press the Enter
key. Windows 98/ME users click Start, type – winipcfg – in the Run
window, and then click OK.
• There are web sites such as whatismyip.com and checkip.org that will
display the user’s current external IP address. Additionally, there are
freeware applications such as Get My IP Address and IP Address
Monster that will display the user’s external IP address.
• One of the easiest ways for the HOST player to determine his current
external IP address is to start CCM, click the Multiplayer button on the
Command Screen, then click the HOST button on the Multiplayer
Screen. The Host’s IP address will then be displayed in the lower left
of the screen, to the right of the Search button.
• It is important for a HOST player who accesses the Internet via a LAN,
from behind a router or through a proxy server, to provide the JOINER
players with his external gateway IP address. In such cases, when the
HOST uses the CCM Multiplayer Screen to determine his IP address
there will often be two IP addresses shown, the local IP address
followed by the external or gateway IP address. It is the HOST
external gateway IP address that must be provided to JOINER players.
Continued on next page
68
Multi-Player, Continued
Firewalls
Firewalls, Routers, Proxy Servers and Virtual Private Networks can
interfere with multiplayer CCM internet connections. Refer to the
corresponding user manuals for these types of hardware and software
if you are experiencing difficulty establishing multiplayer CCM internet
connections. Websites such as HomeNetHelp.com offer further
guidance in understanding and configuring Firewalls, Routers, Proxy
Servers, Virtual Private Networks as well as solutions such as port
forwarding and DMZ that may be required to enable multiplayer CCM
internet connections.
CCM uses the following ports in addition to DirectPlay ports:
• 47624 TCP; 2300-2400 TCP and UDP
Start
All players start Close Combat Marines
Options
At the Main Screen, use the F8 function key to open the Close Combat
Marines Options display. Use the Options menu to set Opfor
language preference [Russian or English], scroll speed [Fast, Medium
or Slow] and screen resolution [changes to which require CCM be
restarted].
It is recommended that one of the Team Icon and Soldier Outline
options be chosen. Using Team Icons and Soldier Outlines assists in
identifying which infantry and vehicle teams are yours since players
see only their own Team Icons and Soldier Outlines.
It is suggested that players select the ‘Show Cover’ Icons and Outlines
for use on the Deployment Screen, then use the F8 key or Options
button on the Battle Toolbar to switch the Icons and Outlines option to
‘Show Suppression’ before beginning the battle.
Click OK to close the Close Combat Marines Options menu.
Continue
Click the COMMAND panel on the main CCM screen to enter the
Command Screen.
Continued on next page
69
Multi-Player, Continued
Command
1. The HOST player clicks on the knob to select between the rosters
of Instructional or User-Created Engagements shown in the top
center window.
2. The HOST then clicks on one of the Instructional or User-Created
Engagements to select it for use in the multiplayer CCM battle.
3. All players click on the MULTI-PLAYER button.
4. The MARINE/OPFOR toggle switch determines which force the
HOST will initially be assigned to. The HOST force assignment
can also be changed on the Multiplayer Screen.
5. After selecting an Engagement the HOST can preview the battle
map for that scenario by clicking on the VIEW MAP button.
6. All players individually click the NEXT button to advance to the
Multiplayer Screen.
Continued on next page
70
Multi-Player, Continued
Host
1. After entering the Multiplayer Screen the HOST waits for the Subnet auto-search - ‘Searching for available games…’ - to run. Autosearch for a LAN game occurs every time a player enters the
Multiplayer Screen. When the auto-search has completed, the
Host player clicks the HOST button. The HOST button then
changes color from gray to red and the voice cue ‘Waiting For
Connection’ will be heard.
2. The selected engagement name is displayed.
3. The HOST player’s screen name is displayed at in red the top of
the player roster.
4. The HOST player’s IP address is displayed. Two IP addresses are
displayed when the HOST player’s computer is behind a router.
The first IP is the HOST computer’s local IP address. The second
IP is the external address JOINER players SEARCH for to
establish a multiplayer CCM internet connection
Continued on next page
71
Multi-Player, Continued
Joiner
1. After entering the Multiplayer Screen the Joiner Player(s) wait for the
LAN auto-search (‘Searching for available games…’) to run. Again, autosearch for a LAN game occurs every time the player enters the
Multiplayer Screen. When the auto-search has completed, the JOINER
player clicks the SEARCH button.
2. The Search window will pop-up and the JOINER player(s) will type in the
HOST player’s IP address. In example above the JOINER player(s)
would type – 151.201.137.188 – HOST IP addresses can also be pasted
in using ‘Paste’ from the right-click context menu or the standard
CTRL+V keyboard shortcut to ‘Paste’.
• It is recommended that JOINER players make written note of
the HOST IP address to avoid mistake or lapse of memory
• The last IP address entered into the Search window is saved
and ‘remembered’ in the Search window as long as CCM is
running, either maximized in its full window or minimized to the
taskbar. This avoids the necessity of typing in the same HOST
IP address in the event the HOST isn’t found by Search, an
established connection is broken or when another engagement
is to be played
If you are using a LAN connection do not type in an address, just click
OK.
3. After typing in the HOST IP address the JOINER player[s] click OK. The
Search function will then seek for the HOST player’s offered engagement
displaying the message ‘Searching for available games’ for
approximately 5 seconds as it does so.
Continued on next page
72
Multi-Player, Continued
Trouble
Shooting
Internet
Connection
If the HOST isn’t found by the Search function, repeat steps 1-3
above, with the exception that the HOST IP will be saved in the
Search window, so it isn’t necessary to re-type the IP address. If
repeated Search attempts fail to display the HOST selected
engagement in the first ‘slot’ of the game roster window (#/#, Host
Handle, Scenario Name) the JOINER player(s) should attempt to
contact the HOST to see if he is experiencing any problems. If
repeated attempts to establish a multiplayer CCM internet connection
should fail then the players should re-examine their firewall, router or
proxy server settings.
Instant messaging [IM] programs such as MSN Messenger, ICQ and
AIM facilitate communication and coordination between players. It is
usually necessary that all players use the same IM program
In addition to online networking resources such as those linked above,
players experiencing difficulty establishing multiplayer CCM
connections can use the Windows ‘ping’ and ‘tracert’ command line
utilities to verify the communication status of the internet connection.
A large number of hops, packet loss, millisecond (ms) values above
750, and ‘Request Timed Out’ responses indicate internet connection
problems with the intermediate internet servers and routers between
HOST and JOINERS.
Continued on next page
73
Multi-Player, Continued
Joiner
Screen
1. When the JOINER search finds the HOST engagement scenario it is
displayed in the top slot of the games roster. The #/# column indicates
how many players have already connected (e.g. 2/6 would indicate the
HOST and one other JOINER were already connected).
• The ‘Host Handle’ column displays the Host’s chosen
nickname. The ‘Scenario Name’ column shows the name of
the engagement scenario the HOST has selected.
2. To connect to the HOST the JOINER clicks the JOIN button. When the
JOINER does so his button turns red and both the HOST and JOINER
hear the voice cue “Connection Established”. At the same time.
3. The scenario name is displayed again on the JOINER screen.
4. The JOINER default handle is displayed in red on the player roster.
5. The JOINER IP address is displayed on the lower left of his Multiplayer
screen.
6. And the CHAT button appears in the lower left corner on both the HOST
and JOINER player’s screens.
Continued on next page
74
Multi-Player, Continued
Changing
Net
Names
1. When the NAME button on the Multiplayer Screen ‘lights’ to
become available, click it to open the CCM Net Name popup
window. The HOST player’s NAME button becomes available
after he clicks the HOST button on the Multiplayer Screen.
JOINER player’s NAME buttons become available after they
establish a multiplayer connection to the HOST.
2. Type a new player name.
3. Click OK.
4. The new player name will appear in red on the player roster.
Continued on next page
75
Multi-Player, Continued
Chat
Feature
When the first multiplayer CCM connection is established, the HOST and
JOINER CHAT button will appear in the lower left corner of the Multiplayer
Screen. As each subsequent JOINER establishes a connection to the
HOST, their CHAT buttons will also appear. CHAT allows players to
communicate by typing and sending text messages while they are connected
in multiplayer CCM.
1. To open the CHAT message window in the Multiplayer, Battlegroup,
Soldier Details, Briefing, and Map Details screens either click the CHAT
button or press the Enter key. Use the keyboard to type a message,
which will appear in bright green in lower part of the CHAT window.
2. Press the Enter key on the keyboard to send the message to all other
connected players. The message is displayed beside your player name
at the bottom of a running log of player CHAT messages.
¾ The CHAT window also displays player activity in the pre-battle
screens (e.g. ‘Devil Dog has entered the Briefing screen’)
3. Use the scroll slider or scroll arrows to view previous CHAT messages in
the log, and then return to the current messages.
4. The most current CHAT message will always be displayed beside the
sender’s player name in the mini-CHAT window at the bottom of the
Multiplayer, Battlegroup, Soldier Details, Briefing, and Map Details
screens.
¾ To close an open CHAT window, press the Enter key when
there is no green message text to be sent.
Continued on next page
76
Multi-Player, Continued
Chat
Feature
(continued)
CHAT functions differently on the Deployment, Battle and Overview
Map screens. To type and send a CHAT message, press the Enter
key to open a small black text input window immediately above the
Toolbar…
…or Team Monitor…
Use the keyboard to type a message. Bright green typed message text
will be displayed in the mini-CHAT window. Press the Enter key again
to send the message to all players. The mini-CHAT window closes
after a message is sent. CHAT messages sent in the Deployment,
Battle and Overview Map screens are displayed along the left edge of
the screen for approximately 7 seconds…
After clicking the BEGIN button, players may not be able to use CHAT until
all players advance to the Battle Screen. It is recommended that players use
CHAT to notify the group of their intention to BEGIN before clicking the
BEGIN button.
Continued on next page
77
Multi-Player, Continued
Disconnect
1. Clicking the BACK button displays a popup window that allows any
player to break the multiplayer CCM internet connection. Clicking OK in
this confirmation window breaks the connection and returns all players to
the default Multiplayer Screen. Clicking the Cancel button closes the
window without breaking the connection.
2. Clicking the Disconnect button also displays a popup window that allows
any player to break the multiplayer CCM internet connection. Clicking
OK in this confirmation window breaks the connection and returns all
players to the default Multiplayer Screen. Clicking the Cancel button
closes the window without breaking the connection.
3. If the multiplayer CCM internet connection is broken for any reason, the
players who didn’t break the connection will hear the voice cue
“Connection aborted” and see a warning message in a pop-up window
informing them that the connection was broken. Clicking OK on this
message window will return those players to the default Multiplayer
screen.
Connections can be broken by circumstances beyond player control. In the
event of a broken connection it is suggested that players have an established
plan to either reconnect or regroup using Instant Messaging.
Continued on next page
78
Multi-Player, Continued
Host
Assigns
Positions
1. The HOST player only assigns JOINER players to the USMC or
Opfor forces. Player assignments can be pre-arranged or, after
connecting, decided by the players using CHAT. One player on
each force must be chosen as the CMDR (commander). The
HOST player must be one of the two player CMDRs. To change
his initial force assignment the HOST must click off his CMDR
‘check’, click off the force icon, click in the opposing force icon
then click the CMDR check back on. Changes to JOINER player
force assignments are made similarly – a JOINER player’s force
icon and CMDR ‘check’ must be clicked off before changes to
those can be made.
2. When the agreed upon player force assignments have been
made, players click the READY button.
3. A player’s ready status is indicated by the change in the color of
his player name from red to green.
4. When all players are ready, indicated by green player names, the
HOST player’s NEXT button will ‘light’. When the HOST clicks
NEXT the CCM multiplayer group advances to the Battlegroup
screen. JOINERS see the progress bar “Receiving Game Data”.
Continued on next page
79
Multi-Player, Continued
Host
Assigns
Positions
(continued)
NOTE: Platoons 1, 2 and 3 on the USMC and Opfor forces are
assigned to players in the order in which they connected and their
player names appear on the player roster. The HOST will always be
assigned to the 1st Platoon in the USMC or Opfor force. If the first
JOINER is on the force the HOST, that JOINER will be automatically
assigned to the 1st Platoon in that force. If the first player to join is on
the same force as the HOST he will be automatically assigned to the
2nd Platoon on that force.
Example:
PLAYER
FORCE
CMDR
PLT
HOST……….USMC…..CMDR…1PLT
JOINER#1...USMC………………2PLT
JOINER#2...OPFOR…………….1PLT
JOINER#3...OPFOR…………….2PLT
JOINER#4...USMC………………3PLT
JOINER#5...OPFOR…CMDR….3PLT
If it is intended that certain players be assigned to certain forces and/or
platoons then arrangements should be made before connecting for
players to use the #/# indicator in the top left of the Games Roster on
the Multiplayer Screen to determine when each player should click
their JOIN button to connect. Multiple player/force combinations are
possible: 1, 2 or 3 US players versus 1, 2 or 3 Opfor players –
e.g. 1 vs 3; 3 vs 2; 2 vs 1 etc.
Only the CMDR players control the Support Missions (Tac Air and
Attack Helo, Artillery and Mortar Barrage). If the Force Morale scenario
option was checked in the Scenario Editor and the CMDR player’s
Force Morale (FM) drops below the cohesion threshold, the CMDR
player goes into Observer Status, indicated as such at the top of his
Battle Screen, and can no longer issue commands, only reposition fire
and movement ‘dots’ and place Support Missions.
80
(This page intentionally left blank)
81