1
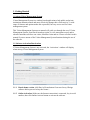
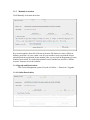
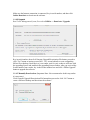
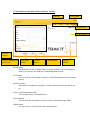
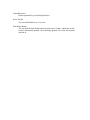
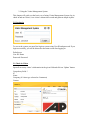
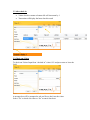
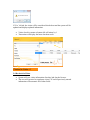
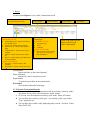
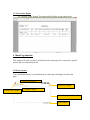
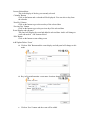
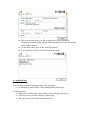
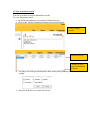
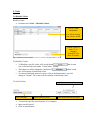
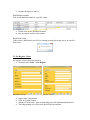
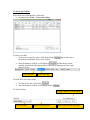
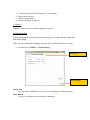
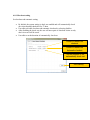
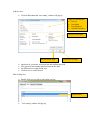
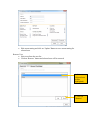
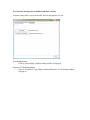
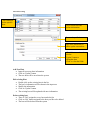
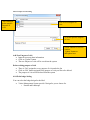
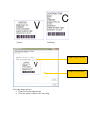
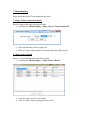
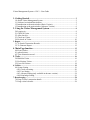
Visitor Management System v 12.0.3 - User Guide
1. Getting Started ......................................................................................................... 2
1.0 About Visitor Management System.......................................................................... 2
1.1 Software Activation/Deactivation............................................................................. 2
1.2 Introduction to the main window (Basic Version).................................................... 5
1.3 Introduction to the main window (Advance Version) .............................................. 6
2. Using the Visitor Management System ........................................................... 8
2.0 Logging in................................................................................................................. 8
2.1 Check in Visitor ........................................................................................................ 8
2.2 After check in............................................................................................................ 9
2.3 Check out Visitor ...................................................................................................... 9
2.4 Re-check in Visitor ................................................................................................. 10
3. Report........................................................................................................................... 11
3.1 To Search Transaction Records .............................................................................. 11
3.2 To Generate Report................................................................................................. 12
4. Main Page function ............................................................................................... 12
4.0 Event Tracker.......................................................................................................... 12
4.1 upload picture.......................................................................................................... 14
4.2 View transaction record .......................................................................................... 15
5. Tools ........................................................................................................................... 16
5.0 Blacklist Visitor ...................................................................................................... 16
5.1 Pre-Register Visitor ................................................................................................ 17
5.2 Force-out Visitors ................................................................................................... 18
6. Utilities ......................................................................................................................... 19
6.0 System Setting ........................................................................................................ 19
6.0.1 Check out setting.............................................................................................. 20
6.0.2 User Setting...................................................................................................... 21
6.0.3 Advance Setting (only available in advance version)...................................... 24
6.0.4 Print badge Setting........................................................................................... 26
7. Housekeeping............................................................................................................... 28
7.0 Purge Visitor’s transaction details .......................................................................... 28
7.1 Purge visitor’s details.............................................................................................. 28
1. Getting Started
1.0 About Visitor Management System
Visitor Management System is a window-based application to help public and private
institutions maintain control and more effectively manage their visitor activity. A wide
range of features and options makes this a powerful, but easy-to-use tool for visitor
management system.
This Visitor Management System user manual will guide you through the use of Visitor
Management System, from check-in and out visitor, to view transaction record, and to
advance functions such force out visitor, blacklist visitor and etc. Please refer back to this
manual if you are unsure of the Visitor Management System functions during the use of
the software.
1.1 Software Activation/Deactivation
If Visitor Management System is not activated, the “Activation “ window will display
when start up Visitor Management System.
1.1.1
Run in demo version, click Run As Demo button if user need to try iDesign
software before proceed to buy the license \
1.1.2
Online Activation: Make sure the Internet connection is connected, key in serial
number, then click Online Activate button to activate the software.
1.1.3
Manually Activation
Click Manually Activation check box.
Key in serial number, then click Generate Activation File button to create a SM.txt at
desktop, email/fax it to your vendor, wait for your vendor to work out with the license
and send back the registration license number, after you received the Registration License
Number from vendor, key in the Registration License Number here and click “Offline
Activate” button to active the software.
1.1.4 Upgrade and Deactivation:
Run Visitor Management system, Proceed to Utilities –> Deactivate / Upgrade
1.1.4.1 Online Deactivation:
Make sure the Internet connection is connected, key in serial number, and then click
Online Deactivate to deactivate the software.
1.1.4.2 Upgrade
Run Visitor Management System, Proceed to Utilities –> Deactivate / Upgrade
Key in serial number, then click Generate Upgrade/Deactivation File button, proceed to
click “Yes” button on option screen (Ref 1.1.4.3 screen behind) to create a upgrading
SM.txt file at desktop, email/fax it to your vendor, wait for your vendor to work out with
the upgrading license and send back the upgrading license number, after you received the
license number from vendor, key in the license number here and click “Offline Upgrade”
button to upgrade the software
1.1.4.3 Manually Deactivation: (Important Note: Not recommend to do this step unless
it is necessary.)
Click Generate Upgrade/Deactivation File button then proceed to click “No” button to
create a SM.txt at desktop and deactivate the software.
1.2 Introduction to the main window (Basic Version)
The Visitor Management System user interface, with its functions and commands,
follows similarly to the interfaces you work in for other windows based software. The
following will illustrate and name each part of the Visitor Management System main
window, and explains how each part works.
Menu bar
Close Button
Current Time
Event Tracker
Check in
counter
Visitor’s information
input fields
Clear all
button
Update button
Upload
Picture
1.3 Introduction to the main window (Advance Version)
Menu bar
Close Button
Current Time
Event Tracker
Check in
counter
Visitor’s information
input fields
Print badge
Button
Clear all
button
Update button
Upload
Picture
The Menu bar
The Menu bar lists the available menus. A menu contains a list of commands, or
actions, you can carry out with the Visitor Management System.
Close button
You can click the Close button to end your Visitor Management System working
session.
Check in counter
The counter is to display the number of visitors checked in whose not check out
yet.
Visitor’s information input fields
You can input visitor’s information here
Clear all button
You can click the clear button to clear all visitor’s information input fields
Update button
You can check in visitor by click on the update button
Uploaded picture
Picture uploaded by you will displayed here
Event Tracker
You can add/edit/delete or view event
Print badge Button
You can click the Print badge button to print visitor’s badge, which base on the
visitor’s information inputted. Once the badge printed , the visitor will consider
checked in.
2. Using the Visitor Management System
This chapter will guide you the basic way of using Visitor Management System, log in,
check in and out visitor, view visitor’s transaction records and generate simple reports.
2.0 Logging in
To access the system you must first login to system using User ID and password. If you
login successfully, you will be directed to the main screen after logging in.
Default user
User ID: Demo
Password: Password
2.1 Check in Visitor
Input all necessary visitor’s information in the given field and click on ‘Update’ button.
Compulsory fields *
IC
Name
Company (if visitor type selected as Contractor)
Contact
2.2 After check in
•
•
Visitor check in counter at bottom left will increment by 1
Transaction will display the latest check-in result
2.3 Check out Visitor
To check out Visitor: Input/Scan “checked in” visitor’s IC and press enter or leave the
field.
A message box will be prompted to ask you like to check out the visitor.
Select ‘Yes’ to check out visitor or ‘No’ to cancel check out.
If ‘Yes’ clicked, the visitor will be considered checked out and the system will be
updated and displays updated information.
•
•
Visitor check in counter at bottom left will minus by 1
Transaction will display the latest checkout result
2.4 Re-check in Visitor
•
•
System will save visitor information after they had checked in once.
The user will just need to scan/input visitor’s IC and all previously entered
information will automatic fill in other fields.
3. Report
On menu select Report to view visitor’s transaction record.
Check ‘Today Only’ to filter the
records that checked in today
User can search by:
Demo & Basic Version
• All Pending Logout - shown visitor that is
not checked out yet
• IC (Visitor) –Search visitor by their IC
• Name (Visitor) – Search visitor by their
name
• Company Name – Search visitor by their
company
• Vehicle – Search visitor by their vehicle
no.
• Date-in – Search visitor by checked in date
in certain duration
Advance version include
• Host name – Search visitor by their
hostname
• Host address – Search visitor by their host
dd
‘Search’ button
‘Show all’ button
User can filter the search by
visitor type:
Demo & Basic Version
• All Visitor Type
• Visitor
• Contractor
Advance version include
• Able to create visitor type and
filter by the visitor type you
had created (Ref : )
‘Report’ button
Result of the search will be
display in the list with
visitor’s information
Search button
Start search base on the critical inputted
Show All button
Display all visitors’ transaction record
Report button
To generate report base on the search results
Exit button
Close module and back to main page
3.1 To Search Transaction Records
• You can search for specific transaction records by selecting ‘search by’ under
drop down list, key in the critical and click ‘search’ button.
• Or you can view all transaction records by click on the ‘Show All’ button
•
•
‘Exit’ button
You can filter the records by visitor type - by selecting visitor’s type under
‘Type’ drop down list
You can filter the records by only displaying today records – check on ‘Today
Only (DATE IN)’
3.2 To Generate Report
•
Click on ‘report’ button. The report detail will base on the search result.
4. Main Page function
This chapter will guide you the to use function in the main page like event tracker, upload
picture and view transaction record.
4.0 Event Tracker
You can add/edit/remove event information on certain day and display it on the main
page.
Current selected date
‘Next Day’ Button
‘Pervious Day’ Button
‘Calendar’ button
Event Display and edit panel
‘Edit’ Button
Current Selected date
This is the display of the day you currently selected
‘Calendar’ Button
Click on the button and a calendar will be displayed. You can select a day from
the calendar
‘Next Day’ Button
Click on the button to go to the next day of the selected date
‘Pervious Day’ Button
Click on the button to go to the pervious day of the selected date
Event Display and edit panel
The panel will display the event had added in selected date. And it will change to
event edit mode if ‘edit’ button clicked
‘Edit’ Button
Click on the button to start editing event
Add/Update/Delete ‘Event’
•
Click on ‘Edit’ Button and the event display and edit panel will change to edit
mode
•
Key in Event information- event name, location, duration and remarks
•
Click on ‘Save’ button and the event will be added
•
•
•
Once you saved an event, you able to update the event by editing the
information and click on the ‘Update’ button and delete the Event by clicking
on the ‘Delete’ button.
To end ‘Edit’ mode, click on the “End Edit’ Button
You will able to view the saved Event under the panel.
4.1 upload picture
You can attach picture on the bottom right of the main page
• By default the picture will be Visitor Management System Logo
To upload picture
• Double click on the picture and a window browser dialog will pop out.
• Select the picture you like to display on main page
• The new picture will be uploaded and displayed
4.2 View transaction record
You can view check in and out information of today
To view Transaction record
• By default the transaction record panel is hidden from user
• Click on the ‘Display Transaction’ and the record will be shown
Click to display
records
Record displayed
‘Setting’ to select
type of information
to shown
•
You able to set what type information to show on the panel by clicking on
“setting”.
•
Select the field like to view and click on save
5. Tools
5.0 Blacklist Visitor
Blacklist visitor
• On menu select Tools -> Blacklist Visitors
List of Visitor
information
List will be change
base on user search
Search Visitor by
name, IC or
company
‘Search all’ is to
show all visitors
Fig #.# Blacklist Visitors Window
To Blacklist Visitors
•
To Blacklist a specific visitor, click on the button
row as the selected visitor under ‘Visitor Status’ column.
•
The button text will be changed to ‘blacklisted’
and the visitor
now will consider as blacklisted visitor.
To remove blacklisted status of a visitor, click on the button and it’s text will
change to ‘Normal’. The visitor will not consider as blacklisted visitor
•
To Search Visitor
Select search by
•
•
•
that is same
Display number of records found
Input search keyword
To search for specific visitor by name, IC or company.
Input search keyword
Click on search button
Start search base on user input
•
Result will display in the list
Edit Blacklist remarks
Able to edit blacklist remark of a specific visitor
•
•
Double click on the Blacklist Remarks
Key in remarks and leave the textbox
Blacklisted Visitor
If the visitor is blacklisted, you will see warning message box when you try to check in
that visitor
5.1 Pre-Register Visitor
Pre register visitor before they check in
• On menu select Tools -> Pre-Register
Demo/Basic Version
•
•
•
•
Advance Version
Input visitor’s information
Click on ‘Update’ button
Advance Version only – Able to print badge once the information had entered.
The badge printed out will no have checked in time and date.
5.2 Force-out Visitors
Force check out visitor that have checked in
• On menu select Tools -> Force Out Visitor
To force out visitor
• To Force out a specific visitor, click on the button
the chosen visitor under ‘Force Out’ column.
•
that is same row as
Once the button is clicked, it will change to
and the chosen visitor
consider checked out. The status of the visitor will be updated (ref below) and
show in the list.
Force out date
Force Out Time
To Redo force out visitor action
•
•
To redo a Force out, click on the
Once the button is clicked, it will change back to
To Search Visitor
Select search by
Display number of records found
Input search keyword
Start search base on user input
•
•
•
•
To search for specific visitor by name, IC or company.
Input search keyword
Click on search button
Result will display in the list
6. Utilities
Utilities is allow you to set specific setting in the system
6.0 System Setting
System Setting allow user to set the check out setting, user setting, advance setting and
print badge setting
(Note: advance setting and print badge setting is only available for advance version)
•
On menu select Utilities -> System Setting
Setting Tab
Close Button
Setting Tab
You can click on different tab to set or view the setting of each tab represent
Close Button
Click on close button to exit and back to main page
6.0.1 Check out setting
Set checkout and automatic setting
•
•
•
•
By default, the system setting is check out enabled and will automatically check
out visitor that had checked in for 72 hour
User able to disable checkout and automatic checkout by selecting disables.
After disabling the check out, the user will not require to checkout visitor as only
check in record will be saved
User able to set the duration of automatically check out
Enable or disable the
checkout
Enable or disable the
Automatic checkout
Set the duration of the
automatically check out
Save setting
6.0.2 User Setting
User Setting allow you to create user with specific access right to different module
List of user
Add button
List of users
The list will display the user that is saved in the system
Add button
Click on add button to add new user
Remove button
Click on remove button to remove certain user
Remove button
Add new user
•
Click on add button and ‘user setting’ window will pop up
Input user information:
• User id
• User Name
• User Password
• Confirm Password
Set user access right
Set user access right
•
•
•
•
Set user access right
Input user id, user name, user password and confirm password
User password and confirm password must be the same
Set different access right for the user
Click on save to create the user
Edit existing user
•
Double click user you like to edit on the user list
Double click
•
‘User setting’ window will pop up
•
Edit current setting and click on ‘Update’ Button to save current setting for
selected user
Remove User
• Select user from the user list
• Click on ‘Remove’ button and selected user will be removed
1. Select user
(Selected user
will be
highlighted)
2. Click on
‘Remove’
6.0.3 Advance Setting (only available in advance version)
Advance setting allows you to set/modify the host and purpose of visit.
Host Setting button
Click on ‘Host Setting’ and host setting window will pop up
Purpose of Visit Setting button
Click on ‘Purpose of Visit Setting’ button and Purpose of Visit Setting window
will pop up
6.0.3.0 Host setting
‘Del’ Button to
delete specific
host
List of saved Host and
his/her information
To search specific host
Input host information to
add or update current host
‘Close’ Button to close the
window
‘Update’ button to
add/update host
‘Clear’ to clear the fields
Add New Host
• Input all necessary host information
• Click on ‘Update’ button
• The new host will be saved into the system
Edit existing Host
• Double click on the existing host in the list
• The host’s information will be shown in the input area
• Modify the information
• Click on ‘Update’ button
• The existing host will be updated with new information
Delete existing host
• There is ‘Del’ assigned to every host under the list
• Click on ‘Del’ button assigned to the host you like to be deleted
• The host will be deleted from the system
6.0.3.1 Purpose of visit setting
‘Del’ Button to
delete specific
Purpose of
visit
List of saved Purpose of
visit
To search specific Purpose
of visit
Add New Purpose of visit
• Input all necessary host information
• Click on ‘Update’ button
• The new Purpose of visit will be saved into the system
‘Close’ Button to close the
window
‘Update’ button to
add/update host
Delete existing purpose of visit
• There is ‘Del’ assigned to every purpose of visit under the list
• Click on ‘Del’ button assigned to the purpose of visit you like to be deleted
• The purpose of visit will be deleted from the system
6.0.4 Print badge Setting
You can select the badge design for the label
• Visitor Management System provide 2 design for you to choose for
o Portrait and Landscape
Portrait
Landscape
Badge design selection
Badge Design Sample
Set badge design and save
• Choose one of the badge design
• Click the ‘update’ button to save the setting
7. Housekeeping
Purge stored data in the Visitor Management System
7.0 Purge Visitor’s transaction details
Remove transaction record till on specific date
• On menu select Housekeeping -> Purge Visitor’s Transaction Detail
•
•
Select the date that you like to purge till
Click on ‘Purge’ button and the record before that day will be purged
7.1 Purge visitor’s details
Remove visitor detail that had stored in the system
• On menu select Housekeeping -> Purge Visitor’s Details
•
•
Select the visitor you like to be purged
Click on ‘Delete’ button to purge selected visitor