1
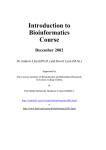
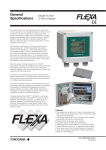
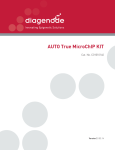
Bioruptor
®
Sonication System
USER MANUAL
VERSION 2.1
User Manual for the Bioruptor Family
of Sonication Systems and Accessories
UCD-200 — Bioruptor Standard
UCD-300 — Bioruptor Plus
UCD-400 — Bioruptor Twin
UCD-500 — Bioruptor XL
Guarantee
Limited one year global warranty
Diagenode guarantees all products from any manufacturing defects as we rigorously test all
products to meet strict quality standards. Diagenode warrants that all standard components of
its instruments will be free of defects in materials and workmanship for a period of one (1) year
from the date that the warranty period begins, unless the original quotation or accompanying
documentation states a different warranty period. All warranty periods begin on the date of delivery
and apply only to the first purchaser of the product. If a manufacturing defect arises and a valid
claim is received within the warranty period, Diagenode, at its discretion, will repair or replace the
product in accordance with the warranty terms and conditions stated herein. In case of repair or
replacement of a product under warranty, Diagenode will cover the expenses to return the repaired
or replacement product.
This warranty covers only manufacturing defects and does not cover any damage caused by misuse,
lack of compliance to recommendations stated in the manual, neglect, accidents, abrasion, or
exposure to extreme temperatures, chemical solvents, or acids. We strongly recommend that
maintenance or repairs of Diagenode’s products are performed by our approved Diagenode service
center. Improper or incorrectly performed maintenance or repairs will void the warranty.
Technical Assistance
Phone: +32 (0) 4 364 20 69
Ordering Information
Diagenode s.a.
Europe, Asia & Australia
Diagenode Inc.
North America
CHU, Tour GIGA B34, 3rd Floor
400 Morris Avenue, Suite 101
Diagenode
Avenue de l’Hôpital, n°1
Denville, NJ 07834 USA
CHU B34
4000 Sart-Tilman, Liège
Fax: +32 (0) 4 364 20 51
[email protected]
Tour GIGA 3ème étage
Avenue de l’hôpital, 1
4000 Liège
Belgium
BELGIUM
Phone: +32 (0) 4 364 20 50
Fax: +32 (0) 4 364 20 51
Email: [email protected]
Phone : +1 862 209-4680
Fax: +1 862 209-4681
Email: [email protected]
DIAGENODE BIORUPTOR® USER MANUAL
PAGE 3
Contents
Warnings. . . . . . . . . . . . . . . . . . . . . . . . . . . . . . . . . . . . . . . . . . . . . . . . . . . . . . . . . . . . . . . . . . . . . . . . . . . 4
Introduction. . . . . . . . . . . . . . . . . . . . . . . . . . . . . . . . . . . . . . . . . . . . . . . . . . . . . . . . . . . . . . . . . . . . . . . . . 5
Bioruptor Technical Specifications . . . . . . . . . . . . . . . . . . . . . . . . . . . . . . . . . . . . . . . . . . . . . . . . . . . . . 5
Getting to Know Your Bioruptor. . . . . . . . . . . . . . . . . . . . . . . . . . . . . . . . . . . . . . . . . . . . . . . . . . . . . . . . 6
Bioruptor Components . . . . . . . . . . . . . . . . . . . . . . . . . . . . . . . . . . . . . . . . . . . . . . . . . . . . . . . . . . . . . . . 6
Waterbath. . . . . . . . . . . . . . . . . . . . . . . . . . . . . . . . . . . . . . . . . . . . . . . . . . . . . . . . . . . . . . . . 6
Motorized lid. . . . . . . . . . . . . . . . . . . . . . . . . . . . . . . . . . . . . . . . . . . . . . . . . . . . . . . . . . . . . . 7
Tube holders. . . . . . . . . . . . . . . . . . . . . . . . . . . . . . . . . . . . . . . . . . . . . . . . . . . . . . . . . . . . . . 7
Sound-Proof Box . . . . . . . . . . . . . . . . . . . . . . . . . . . . . . . . . . . . . . . . . . . . . . . . . . . . . . . . . . 7
Power Supply Adapter. . . . . . . . . . . . . . . . . . . . . . . . . . . . . . . . . . . . . . . . . . . . . . . . . . . . . . 7
Equipment Installation . . . . . . . . . . . . . . . . . . . . . . . . . . . . . . . . . . . . . . . . . . . . . . . . . . . . . . . . . . . . . . . 8
Installing the Bioruptor UCD-200. . . . . . . . . . . . . . . . . . . . . . . . . . . . . . . . . . . . . . . . . . . . . 9
Installing the Bioruptor UCD-300 and UCD-400. . . . . . . . . . . . . . . . . . . . . . . . . . . . . . . . 10
Installing the Bioruptor XL . . . . . . . . . . . . . . . . . . . . . . . . . . . . . . . . . . . . . . . . . . . . . . . . . 11
Control Units. . . . . . . . . . . . . . . . . . . . . . . . . . . . . . . . . . . . . . . . . . . . . . . . . . . . . . . . . . . . . . . . . . . . . . . 13
UCD-200. . . . . . . . . . . . . . . . . . . . . . . . . . . . . . . . . . . . . . . . . . . . . . . . . . . . . . . . . . . . . . . . 13
UCD-300 and UCD-400 . . . . . . . . . . . . . . . . . . . . . . . . . . . . . . . . . . . . . . . . . . . . . . . . . . . . 13
Controlling the Sonication. . . . . . . . . . . . . . . . . . . . . . . . . . . . . . . . . . . . . . . . . . . . . . 13
UCD-300 Digital Timer. . . . . . . . . . . . . . . . . . . . . . . . . . . . . . . . . . . . . . . . . . . . . . . . . 13
UCD-400 Digital Timer. . . . . . . . . . . . . . . . . . . . . . . . . . . . . . . . . . . . . . . . . . . . . . . . . 14
Overheat Shutdown for UCD-300 and UCD-400 . . . . . . . . . . . . . . . . . . . . . . . . . . . . . . . . 14
Bioruptor XL. . . . . . . . . . . . . . . . . . . . . . . . . . . . . . . . . . . . . . . . . . . . . . . . . . . . . . . . . . . . . 15
Controlling the Sonication. . . . . . . . . . . . . . . . . . . . . . . . . . . . . . . . . . . . . . . . . . . . . . 15
Using Adaptors and Holding Plates. . . . . . . . . . . . . . . . . . . . . . . . . . . . . . . . . . . . . . . . . . . . . . . . . . . . 16
Adaptor Tube Units. . . . . . . . . . . . . . . . . . . . . . . . . . . . . . . . . . . . . . . . . . . . . . . . . . . . . . . . 16
Holding Plates . . . . . . . . . . . . . . . . . . . . . . . . . . . . . . . . . . . . . . . . . . . . . . . . . . . . . . . . . . . 17
Sonication Protocols . . . . . . . . . . . . . . . . . . . . . . . . . . . . . . . . . . . . . . . . . . . . . . . . . . . . . . . . . . . . . . . . 17
Sample Protocol for DNA Shearing . . . . . . . . . . . . . . . . . . . . . . . . . . . . . . . . . . . . . . . . . . 17
Bioruptor Sample Protocols. . . . . . . . . . . . . . . . . . . . . . . . . . . . . . . . . . . . . . . . . . . . . . . . 18
Optimal Sonication Parameters. . . . . . . . . . . . . . . . . . . . . . . . . . . . . . . . . . . . . . . . . . . . . . . . . . . . . . . 19
Bioruptor: Chromatin Shearing Example. . . . . . . . . . . . . . . . . . . . . . . . . . . . . . . . . . . . . . 20
Quick Overview: Tips for Starting a Successful Sonication. . . . . . . . . . . . . . . . . . . . . . . . 20
Troubleshooting. . . . . . . . . . . . . . . . . . . . . . . . . . . . . . . . . . . . . . . . . . . . . . . . . . . . . . . . . . . . . . . . . . . . 21
Bioruptor: Chromatin Shearing FAQs. . . . . . . . . . . . . . . . . . . . . . . . . . . . . . . . . . . . . . . . . . . . . . . . . . 21
Bioruptor Packing Instructions . . . . . . . . . . . . . . . . . . . . . . . . . . . . . . . . . . . . . . . . . . . . . . . . . . . . . . . 22
Related Products. . . . . . . . . . . . . . . . . . . . . . . . . . . . . . . . . . . . . . . . . . . . . . . . . . . . . . . . . . . . . . . . . . . 23
Antibodies. . . . . . . . . . . . . . . . . . . . . . . . . . . . . . . . . . . . . . . . . . . . . . . . . . . . . . . . . . . . . . . 23
ChIP Kits. . . . . . . . . . . . . . . . . . . . . . . . . . . . . . . . . . . . . . . . . . . . . . . . . . . . . . . . . . . . . . . . 23
DNA Methylation Kits. . . . . . . . . . . . . . . . . . . . . . . . . . . . . . . . . . . . . . . . . . . . . . . . . . . . . . 23
Ordering Information. . . . . . . . . . . . . . . . . . . . . . . . . . . . . . . . . . . . . . . . . . . . . . . . . . . . . . . . Back Cover
Diagenode Inc. North America / Phone: +1 862 209-4680 // Fax: +1 862 209-4681 // Mail: [email protected]
PAGE 4
DIAGENODE BIORUPTOR USER MANUAL
Warnings
These instructions do not necessarily cover all the details of possible equipment variation, installation, or operation.
Trouble-free and safe operation of the instrument is dependent on proper transport and installation by qualified
personnel. READ ALL THE FOLLOWING PRECAUTIONS BEFORE INSTALLING AND USING THE INSTRUMENT.
General warnings
• Never use the instrument near flammable gases to avoid risk of fire.
• Never use the instrument in an environment of extreme dust.
Bio
rup
tor
• Do not place instrument in direct sunlight.
• Handle the waterbath component of the instrument with extreme caution. The waterbath unit contains the ultrasound
emitter which is composed of fragile mechanisms. To empty the water tank, use the plastic pump provided with the
instrument. Do not move the unit to pour out the water.
• The water in the waterbath must be kept at 4°C (40°F). Sonication transfers energy to the waterbath which leads to a
temperature increase. To retain the integrity of biological samples and to prevent the Bioruptor from damage, change
the water in the waterbath as frequently as possible OR purchase our optional water cooler cooling system (Cat. No.
BioAcc-cool).
• Do not turn on the instrument without water. This will damage the instrument.
• Do not leave the instrument unattended for more than 20 minutes at a time.
• Make sure water level is always at the level indicated within the waterbath. Deviation may cause damage.
• Use the 15 ml adaptor with the aluminium O-ring or scratches will occur on the tank bottom.
Use of Bioruptor by pregnant women
Exposure to 20kHz sound waves has not been shown to be harmful to human health. However, we would recommend
avoiding unnecessary exposure. Diagenode recommends that pregnant women should not be exposed to 20kHz wave
lengths for a long period of time.
Noise level measurements & precautions
CEE noise data is not applicable to the Bioruptor’s ultrasound emitter as no tests have been conducted on similar devices
to date. See listed noise levels (as measured in the Accredited Acoustics Laboratory) and precautions for the Bioruptor:
Leq = noise level in dBA = 78.4 dB
Lmax = dB Peak = 87.6 dB
1. Exposure limit value
The exposure limit value is the maximum amount of noise an employee may be exposed to on any single day (8 hours).
Exposure beyond this limit presents a high risk to the user.
LEXPOSURE, 8h = 87 dB(A)
PPEAK = 200 Pa (140 dB(C) referring to 20 µPa)
2. Upper exposure Action value
The exposure action value is the upper daily limit of noise exposure. Exposure beyond this value requires employers to
take action to limit user exposure.
LEXPOSURE, 8h = 85 dB(A)
PPEAK = 140 Pa (137 dB(C) referring to 20 µPa)
3. Lower exposure action value
LEXPOSURE, 8h = 80 dB(A)
PPEAK = 112 Pa (135 dB(C) referring to 20 µPa)
Europe Diagenode sa / CHU - Tour GIGA - B34 - 3e étage // Avenue de l’Hôpital, 1 // 4000 Liège (Sart Tilman) // Belgium // Phone: (+32) 4 364 20 50 // Mail: [email protected]
DIAGENODE BIORUPTOR® USER MANUAL
PAGE 5
Introduction
The Diagenode Bioruptor uses a gentle method of sonication to retain the integrity of DNA and/or biological complexes,
including chromatin, protein-protein binding, protein-DNA complexes, and other biochemical and biological assay systems.
The Bioruptor Sonication System uses a waterbath to generate these indirect sonication waves, which emanate from an
ultrasound element below the water tank. Because the system is gentler than other sonicators, many customers report better
and more consistent results with the Bioruptor than with harsher sonication methods. Multiple closed tubes can be sonicated
together and the continuous rotation of tubes allows even distribution of the energy for efficient sonication. The Bioruptor
enables automation of sonication, guaranteeing higher reproducibility of results.
What is the effect of ultrasound on biological samples?
The Bioruptor sonication system uses ultrasound to create focused mechanical stress to lyse cells or shear DNA or
chromatin. The ultrasound waves pass through the sample, expanding and contracting liquid. During expansion, negative
pressures pull the molecules away from one another and form a cavity or bubble in a process called cavitation. The
bubble continues to absorb energy until it can no longer sustain itself and then implodes, producing intense focused
shearing forces, which disperses or breaks biomolecules. Also, the fragmentation of DNA takes place as a consequence
of this mechanical stress or shear from the bubbles.
With the Bioruptor, the entire volume of water present in the waterbath is exposed to
ultrasound, allowing the samples in the tubes to be efficiently sonicated. For larger
tubes (15 ml or 50 ml), the transfer of the ultrasound to the tubes is facilitated by a
metallic bar in contact with the sample. This metallic bar is not a probe (no corrosion
problems) but “reflects” the ultrasound originated from the waterbath and improves
the sample sonication efficiency by a patented resonance system (See Figure 1).
Bioruptor Technical Specifications
Fig 1. Propagation in 15ml /50ml tubes
Bioruptor UCD-200
Bioruptor UCD-300
Bioruptor UCD-400
Bioruptor UCD-500
20kHz
20kHz
20kHz
20kHz
160, 200, 320W
160, 320W
160, 200, 320W
130, 200, 250, 300W
100V, 50/60Hz, 4.2A
100V, 50/60Hz, 4.2A
230V, 50/60Hz, 2.1A
240V, 50/60Hz, 3.2A
Control Unit Dimensions
150w x 300d x 195h mm
150w x 300d x 195h mm
150w x 300d x 195h mm
400w x 260d x 160h mm
Sonication Unit Dimensions
117w x 190d x 300h mm
350w x 260d x 150h mm
350w x 260d x 150h mm
320w x 180d x 280h mm
Noise Reduction Box Dimensions
200w x 260d x 360h mm
200w x 260d x 360h mm
200w x 260d x 360h mm
400w x 300d x 520h mm
Ultrasonic Wave Frequency
Ultrasonic Wave Output Power
(switchable)
Power Supply
Waterbath Volume
800cc
800cc
800cc
1800cc
12 x 0.5 ml, 6 x 1.5 ml,
6 x 10 ml, 6 x 15 ml,
3 x 50 ml
12 x 0.5 ml, 6 x1.5 ml,
6 x 10 ml, 6 x 15 ml,
3 x 50 ml
24 x 0.5 ml, 12 x 1.5 ml,
12 x 10 ml, 12 x 15 ml,
6 x 50 ml
48 x 0.5 ml, 24 x1.5 ml,
24 x 10 ml, 24 x 15 ml,
12 x 50 ml
Available for 0.5–1.5, 10,
15 & 50 ml tubes
Available for 0.5–1.5, 10,
15 & 50 ml tubes
Available for 0.5–1.5, 10,
15 & 50 ml tubes
Available for 0.5–1.5, 10,
15 & 50 ml tubes
26 x16 x 18
outside the U.S.
26 x 16 x 18
outside the U.S.
26 x 16 x 18
outside the U.S.
26 x 16 x 18
outside the U.S.
170w x 130d x 140h mm
Internal
Internal
Internal
0-60 sec. or min.
(on/off cycles)
0-60 sec. or min.
(on/off cycles)
0-60 sec. or min.
(on/off cycles)
0-99 sec. or min.
(on/off cycles)
Total Timer
Max 15 min. (analog)
Max 15 min. (digital)
Max 15 min. (digital)
Max 15 min. (digital)
Total Weight
22.6Kg
20Kg
30Kg
32.5Kg
Number of Samples Processed
Simultaneously
Attachment Unit
Power Supply Adapter
Transformer 220/100V Dimensions
Interval Timer
Diagenode Inc. North America / Phone: +1 862 209-4680 // Fax: +1 862 209-4681 // Mail: [email protected]
PAGE 6
DIAGENODE BIORUPTOR USER MANUAL
Getting to Know Your Bioruptor
Bioruptor Components
Control Unit
Waterbath
Motor Lid
Sound-Proof Box
Power Cable
Control Unit Cable
Accessory Example
Power Supply Adaptor
(only outside the U.S.)
Waterbath
The waterbath is a critical component of the instrument. The generators below the tank produce ultrasonic waves which
are then transferred through water. The waterbath requires special handling and care as described below.
Handling
The waterbath must remain upright at all times, especially when moved. Tilting the waterbath
or handling roughly may damage the fragile ultrasound emitter component, resulting in a
substantial drop in sonication efficiency. If transportation of the apparatus is required after
initial set-up, it is imperative to keep the tank at a right angle to the ground during the transport
at all times.
Water level and quality
The level of the water has been optimized and should always reach the blue line (sticker on the
wall of the tank). Tap water or distilled water can be used to fill the tank.
Water temperature
Waterbath
The water in the waterbath must be kept at 4°C (40°F). Ultrasonic waves produced by the Bioruptor generate heat. To
ensure preservation of the samples and to prevent damage to the instrument, it is necessary to start the sonication
process with cold water. Diagenode suggests maintaining the waterbath temperature during sonication by either adding
ice throughout the run (manual temperature control) or by connecting the system to a circulating water cooling system
(Cat. No. BioAcc-cool) for automatic temperature control.
Europe Diagenode sa / CHU - Tour GIGA - B34 - 3e étage // Avenue de l’Hôpital, 1 // 4000 Liège (Sart Tilman) // Belgium // Phone: (+32) 4 364 20 50 // Mail: [email protected]
DIAGENODE BIORUPTOR® USER MANUAL
PAGE 7
Manual temperature control
A “pre-cooling” of the Bioruptor’s tank 15 minutes before starting the first round of sonication is advised. This prevents
the water from heating too quickly due to thermal inertia (i.e. when the tank and the ultrasound generating elements are
stored at room temperature). To pre-cool, simply add crushed ice and then fill with cold water up to the indicated level
(blue line or sticker). The crushed ice floating in the water should not exceed 0.5cm and the total water level (water and
ice) should be exactly at the indicated water level. We advise keeping a 4°C stock of water for the process. At the end of a
typical sonication time (10 minutes, cycles of 30 seconds “ON” and 30 seconds “OFF”), the temperature in the waterbath
should be below 10°C.
Note: You may permanently install the Bioruptor in a cold room, though this is not sufficient to avoid the temperature increases during sonication. The cold
room would only eliminate the need for the “pre-cooling” step described above.
Automatic temperature control
A refrigerated circulation bath can be used to guarantee the automatic temperature control of the waterbath during the
entire sonication process. The optional Diagenode Water Cooler circulation bath (Cat. No. BioAcc-cool) features two
pumps (“IN” and “OUT”) and produces a regular water flow to maintain a constant water level in the tank. An additional
regulating valve (the “Connectors Kit for Water Cooler”) should be installed into the water circuit (from the refrigerating
unit to the Bioruptor) to ensure that the water flows at an optimal level. The water flow must not exceed 500 ml/min to
allow optimal resonance. The Water Cooler can be ordered directly through Diagenode with all the required tubing (see
price list). The Water Cooler is not available to North American customers.
Motorized Lid
Sound-Proof Box
The motorized lid, along
with the blue gear plate
accessory, keeps the sample
tubes in constant rotation
and
ensures
optimal
position in the waterbath
Motorized Lid
during sonication. When in
motion, do not hamper the rotation of the blue gear plate.
Avoid the immersion of the motor into the water.
A plastic sound-proof box is
available for the UCD-200. The
metal sound-proof box for the
UCD-300, UCD-400, and Bioruptor
XL is very efficient in absorbing the
noise generated by the ultrasonic
waterbath, which is placed inside
this box.
Power Supply Adapter
Tube Holders
Several sizes of tubes can be used with the Bioruptor.
The maximum and minimum sample volume to be used
with each container is given in the table below. The 0.5 ml
and 1.5 ml tubes can be simply closed and installed in the
rotor. For the sonication of larger volumes (10 ml, 15 ml,
and 50 ml tubes), a stopper with a metallic bar has to be
used to reflect sound waves to produce a better resonance
efficiency.
0.5 ml
Tube Holders
Sound-Proof Box
A power supply adapter is needed when operating the
Bioruptor outside the U.S. with a voltage other than 110V. This unit provides the instrument with several signals
used at the different stages during operation. The power
supply adapter is the heaviest part of the apparatus and
needs particular handling caution.
The power supply adapter for the UCD-300, UCD-400 and
Bioruptor XL is switched on with the power button
located on the back. The UCD-200
does not need to be switched on.
1.5 ml
15 ml
50 ml
Power Supply Adapter
Diagenode Inc. North America / Phone: +1 862 209-4680 // Fax: +1 862 209-4681 // Mail: [email protected]
PAGE 8
DIAGENODE BIORUPTOR USER MANUAL
Equipment Installation
The following pages contain information on installing your particular Bioruptor model. In the interest of safety, this
equipment must only be installed by competent personnel after reading this section. Consider all hazards even though
no particular hazards have been identified during installation. Before starting installation work, turn the main switch off
(beyond power connection) and secure the unit against being re-energized. No special tools are required. Three (3) square
meters are needed to set-up the Bioruptor.
Devices are designed to be safe under the following conditions:
• Indoor use
•P
ower plug must be grounded
• Altitude up to 2, 000 meters
•P
OLLUTION DEGREE 2 (Normally only non-conductive
pollution occurs. However, occasionally a temporary
conductivity caused by condensation is expected.)
• Operating external temperature 0°C to 25°C
• Maximum relative humidity 80%
• Transient overvoltage typically present on the
MAINS supply
• Degree of protection: IP20
•N
ever install this equipment in a place where
environmental conditions and warnings mentioned
above are infringed.
Power Supply Adapter
The power supply adapter must be plugged into the power grid. An IEC lead is provided.
IMPORTANT WARNING: Ensure that your power inlet (behind the power supply adapter) shows the right voltage
corresponding to your area. Otherwise, switch it using a narrow blade screwdriver.
Attaching Cables
When connecting cables, always be sure pins are
properly aligned. Note the indexing pins on the control
unit cables for precise mating alignment.
Keep dot facing up. Once plugged in, secure.
by turning 90° clockwise
until a click is heard.
Europe Diagenode sa / CHU - Tour GIGA - B34 - 3e étage // Avenue de l’Hôpital, 1 // 4000 Liège (Sart Tilman) // Belgium // Phone: (+32) 4 364 20 50 // Mail: [email protected]
DIAGENODE BIORUPTOR® USER MANUAL
PAGE 9
Installing the Bioruptor UCD-200
Note: Control unit connector has two different plugs; one is for the control unit and the other is for the waterbath. Turn
the connector 90° to secure the connection.
1. Connect the power supply adapter to the .
control unit with the power cable.
(Power supply adapter is only needed outside the U.S.)
2. Connect the waterbath and control unit .
using the control unit cable.
3. Connect the rotor. Rotate the black cap .
to secure the connection.
4. Place the waterbath into the sound-proof box.
and add the accessory.
You are ready to work.
0.5 ml, 1.5 ml
microtube adaptor
Top case
10 ml, 15 ml
tube adaptor
Cold Water
Circulation System
50 ml
tube adaptor
Sample tube holding plate
Small sized motor
Soundproof box
Multitimer
Level meter
Output
selector
swich
L
Water
M H
Power cord
Oscilation
unit
Mechanical
reset timer
Disruption unit
Drain hose
Diagenode Inc. North America / Phone: +1 862 209-4680 // Fax: +1 862 209-4681 // Mail: [email protected]
PAGE 10
DIAGENODE BIORUPTOR USER MANUAL
Installing the Bioruptor UCD-300 and UCD-400
1. Connect the power supply adapter to the .
control unit with the power cable. .
(Power supply adapter is only needed outside the U.S.)
2. Connect the controller to the waterbath .
through the sound-proof box. 3. Remove the rubber cap from the back of the .
sound-proof box and feed the instrument cable through
the upper left hole marked instrument cable.
4. The fitting will secure the cable to the sound-proof
box. Turn the front section counterclockwise to seal. .
Be sure there is enough slack in the cable.
red
5. Connect the instrument cable to the waterbath.
and place into the sound-proof box.
Bioruptor UCD-300
green
NOTE: The UCD-400 has dedicated connectors that are
colored red and green with corresponding receptacles.
Bioruptor UCD-400 Twin
Europe Diagenode sa / CHU - Tour GIGA - B34 - 3e étage // Avenue de l’Hôpital, 1 // 4000 Liège (Sart Tilman) // Belgium // Phone: (+32) 4 364 20 50 // Mail: [email protected]
DIAGENODE BIORUPTOR® USER MANUAL
PAGE 11
Bioruptor UCD-300
0.5 ml, 1.5 ml
microtube adaptor
10 ml, 15 ml
tube adaptor
Cold Water
Circulation System
50 ml
tube adaptor
Sample tube holding plate
Small sized motor
Soundproof box
Water
Multitimer
Level meter
Power cord
Stop button
Intensity setting button
Start button
Disruption unit
Drain hose
Bioruptor UCD-400 Twin
0.5 ml, 1.5 ml
microtube adaptor
10 ml, 15 ml
tube adaptor
Cold Water
Circulation System
50 ml
tube adaptor
Sample tube holding plate
Small sized motor
Soundproof box
Water
Multitimer
Level meter
Power cord
Stop button
Intensity setting button
Start button
Disruption unit
Drain hose
Diagenode Inc. North America / Phone: +1 862 209-4680 // Fax: +1 862 209-4681 // Mail: [email protected]
PAGE 12
DIAGENODE BIORUPTOR USER MANUAL
Installing the Bioruptor XL
Note: Control unit connector has two different plugs; one is for the control unit and the other is for the waterbath. Turn
the connector 90° to secure the connection.
1. Connect the power supply adapter to the.
control unit with the power cable.
(Power Supply Adapter is only needed outside the U.S.)
2. Connect the waterbath and rotor. .
Rotate the black cap to secure the connection.
3. Add the accessory and place the waterbath.
into the sound-proof box. 4. Connect the waterbath and control unit. You are ready to work.
0.5 ml, 1.5 ml
microtube adaptor
Top case
10 ml, 15 ml
tube adaptor
50 ml
Cold Water
tube adaptor
Circulation System
Sample tube holding plate
Small sized motor
Soundproof box
Water
Start button
Level meter
Digital timer
Power cord
Power button
Output selector switch
Disruption unit
Drain hose
Stop button
Europe Diagenode sa / CHU - Tour GIGA - B34 - 3e étage // Avenue de l’Hôpital, 1 // 4000 Liège (Sart Tilman) // Belgium // Phone: (+32) 4 364 20 50 // Mail: [email protected]
DIAGENODE BIORUPTOR® USER MANUAL
PAGE 13
Control Units
Bioruptor UCD-200
Intensity
Meter
Level
MultiTimer
Multi-timer: Produces automatic “ON” and “OFF” cycles to preserve samples from
overheating from ultrasound energy. The green needle shows the “OFF” time and can
be set by turning the external surface of the dial. The red needle shows the “ON” time
and can be set by turning the internal knob of the dial. The time units (min 0 sec) can be
modified by using a screw driver on the screws directly above the “ON” and “OFF”.
Intensity
Setting
Dial
Total
Timer
Total (analog) timer: The Bioruptor is activated by the clockwise rotation of this dial.
The maximum time is 15 minutes. The time set will equal the sum of the “ON” and
“OFF”cycles. Alternatively, turning the timer knob counterclockwise will set the Bioruptor on a permanent position (always
cycles “ON” and “OFF”). To stop this process, manually set the timer knob on to the vertical position.
Intensity setting dial: 3 power settings are available for the sonication: L (Low, 160W), M (Medium, 200W) and H (High,
320W).
Intensity level meter: Allows visualization of sonication intensity.
Bioruptor UCD-300 and UCD-400
Controlling the Sonication
CYCLE NUMBER, TIME ON and TIME OFF are the parameters controlling the sonication. First press UP or DOWN
depending on the value to be modified. The four flashing black squares move up or down. Once the selected values are
chosen to be modified, press OK. The four flashing black squares disappear and 2 digits start flashing. The digits can be
changed by pressing UP or DOWN. To select and save the correct number, press OK to confirm or ESC to escape without
saving the change.
Digital Timer:
Allows the user to easily program
the sonication of samples (ON/OFF
pulse time & total time). See use of
digital timer in next section below.
Stop Button:
Ends sonication
Intensity Setting Button:
Adjusts intensity of the
ultrasonic waves generated
Intensity Level Meter:
Indicates the sonication
intensity
Start Button:
Begins sonication
Power Switch: Turns
Bioruptor on and off
Once all parameters are selected and confirmed, press START.
Once the run is started, “BIORUPTOR RUNNING” is displayed on the control screen.
UCD-300 Digital Timer
After the introductory message, the control screen shows the main sonication parameters in the first three lines (CYCLE
Number, Time ON, Time OFF) and summary of actions in the last line (see example below).
CYCLE Num :
10
Time ON :
30sec
Time OFF :
30sec
Press OK = Modify
BIORUPTOR RUNNING
*****************
CYCLE Num :
04/10
ON
Bath 1
OFF
TIME
ON
TIME
OFF
CYCLE
Cycle number reached
(4 cycles in this example)
START
The display shows cycle 4 of 10.
Waterbath will sonicate as shown.
Diagenode Inc. North America / Phone: +1 862 209-4680 // Fax: +1 862 209-4681 // Mail: [email protected]
PAGE 14
DIAGENODE BIORUPTOR USER MANUAL
Digital Timer (UCD-400)
After the introductory message, the control screen shows the main sonication parameters in the first two lines (CYCLE
Number, Time) and summary of actions in the last line (see example below).
CYCLE Num :
Time :
Press OK =
10
30
Modify
BIORUPTOR RUNNING
*****************
CYCLE Num :
ON
Bath 2
04/10
ON
Bath 1
The display shows cycle 4 of 10.
OFF
OFF
TIME
ON
TIME
OFF
CYCLE
START
Overheat Shutdown for UCD-300 and UCD-400
Cycle number reached
(4 cycles in this example)
Waterbath will sonicate as shown.
The ultrasound source is sensitive to high temperatures which means that increases in temperature diminish the
sonication efficiency and can damage the device. The production of ultrasound generates heat which is transferred
into the waterbath. To avoid excessive overheating of the ultrasound source, the Bioruptor Plus (UCD-300) and Twin
(UCD-400) contains a temperature sensor. We recommend that the water in the waterbath remain between 4˚C–10˚C
(39°F—50°F) for optimum sonication.
Note: The sensor does not measure the water temperature inside the ultrasound bath where the samples are submerged.
Once a critical limit is reached a warning is displayed on the control screen. Depending on the situation, different screens
pop up as described below:
1. If START is pressed and the instrument stops after a couple of seconds showing the following screen blinking, the
instrument could not start a new run due to the ultrasound source’s temperature.
Machine too hot
to start a new run
See Manual
Causes:
• Instrument has been used several times in a row recently without breaks
• Instrument is stored in a place exposed to direct sun
• Room temperature is too hot
What to do:
• Store the instrument in another place if the current one does not meet the installation
specific requirements
• Allow for longer breaks between uses
• Place crushed ice in waterbath to help the cool ultrasound source
2. During a run, if the instrument stops and the following screen pops up, the critical temperature has been reached. To protect the ultrasound source from damage, the instrument has stopped and is standing by to be restarted
after the ultrasound source has cooled.
RISK OF DAMAGE
Machine stoped at
Cycls XX/XX
See Manual
Causes:
• Instrument has been running too long without breaks
What to do:
• Store the instrument in another place if the current one does not meet the installation
specific requirements
• Allow for longer breaks between uses
• Place crushed ice in waterbath to help the cool ultrasound source
3. If the warning message appears at the bottom of the BIORUPTOR RUNNING screen (see below), it means that the
critical temperature is about to be reached.
BIORUPTOR RUNNING
*****************
CYCLE Num : xx/xx
WARNING gets hot
Causes:
• Instrument has been running too long without breaks
What to do:
• Reduce the number of consecutive cycles or split protocols into two runs
separated by a break
• Keep cold water in the sonication bath while running to help keep the ultrasound
source at low temperature
Europe Diagenode sa / CHU - Tour GIGA - B34 - 3e étage // Avenue de l’Hôpital, 1 // 4000 Liège (Sart Tilman) // Belgium // Phone: (+32) 4 364 20 50 // Mail: [email protected]
DIAGENODE BIORUPTOR® USER MANUAL
PAGE 15
Bioruptor XL
Intensity Level Meter
Digital Timer
Start/Stop Button
Power Switch
Power Settings
Controlling the Sonication
First switch on the Bioruptor with the POWER button. Next set the intensity level ( L=130W, M1=200W, M2=250W, and
H1=300W). Next, use the digital timer as described in the following steps: note, the parameters CYCLE NUMBER, TIME
ON and TIME OFF control the sonication.
1. If START is pressed and the instrument stops after a couple of seconds showing the following screen blinking, .
the instrument could not start a new run due to the ultrasound source’s temperature.
ON
Bath 1
OFF
TIME
ON
TIME
OFF
CYCLE
Cycle number reached
(4 cycles in this example)
START
2. To enter Time Settings, go down to PARAMETER
and Press OK. Please disregard the manufacturer
settings (Password, Stop Run, Info)
Attention! Do not change the password!
3. After you get into PARAMETER, select T1. Select
I1, go left and go up and down to choose the total
sonication time (in minutes and seconds). And then
push OK. Do not change the I2. I2 must be +0.
4. ON and OFF Cycles
The control unit allows the automatic production of “ON” & “OFF” cycles to preserve the samples from rapid heating
due to ultrasonic waves. ON cycle Select T2. Repeat as for T1. Diagenode Inc. North America / Phone: +1 862 209-4680 // Fax: +1 862 209-4681 // Mail: [email protected]
PAGE 16
DIAGENODE BIORUPTOR USER MANUAL
Using Adaptors & Holding Plates
Adaptor Tube Units—Available in 0.5 ml, 1.5 ml, 10 ml, 15 ml, and 50 ml
To use adaptor tube unit, remove the lower part of the microtube holder by turning counterclockwise. Then place
microtubes in the unit. Attach the lower part to the upper part of the adaptor. To guarantee homogeneity of chromatin
shearing, the tube holders should always be completely filled with tubes. To ensure reproducibility, always use the same
brand of tubes.
• The 2 ml polypropylene tubes (thin-walled) should not be used with the Bioruptor. 1.5 ml tubes in TPX plastic that
provide better ultrasound transfer rates and more efficient sonication are available from Diagenode (see price list).
These tubes should be used for chromatin shearing, not DNA shearing.
• Any 0.5 ml or 1.5ml tube can be used although shearing efficiency is increased by using the hard plastic tubes
(TPX hard plastic) available from Diagenode. See catalog numbers on price list.
• The complete adaptor (including O-ring) can be sterilized in the autoclave. After more than 20 autoclave sterilizations,
the O-ring might need to be replaced (see price list for spare parts).
0.5 ml tube adaptor unit
(Cat. No. UCD-pack 0.5)
1.5 ml tube adaptor unit
(Cat. No. UCD-pack 1.5)
10 ml tube adaptor unit
(Cat. No. UCD-pack 10)
15 ml tube adaptor unit (Cat. No. UCD-pack 15)
The adaptors for 15 ml tubes are available in blue (Falcon tubes) and orange (Corning tubes).
If you use another brand of tubes, use the one which fits in the holder the best. When using
the 15 ml tubes, do not forget to insert the aluminium ring to ensure an optimal position of
the tube during sonication.
50 ml tube adaptor unit (Cat. No. UCD-pack 50)
Three different models of adaptors for 50 ml tubes are available—one for Nalgene and two
for Falcon.
Nalgene: These tubes offer the best efficiency in terms of transfer of the ultrasound energy
and can be ordered directly from Diagenode (Cat. No. 3015-0050).
Falcon or Corning: The adaptors for 50 ml tubes are available in blue (Falcon tubes) and
orange (Corning tubes). If you use another brand of tubes, use the one which fits in the
holder the best.
Note: The quality of the 50 ml Corning tube: “hard” plastic (polyethylene-ref Corning 430304) can be used as well as “soft”
plastic (Polypropylene, ref. Corning 430290 ) but you should stick to one kind as transfer of ultrasonic waves is different
for the different tube types (hard plastic is more efficient). For Falcon tubes, only polypropylene tubes are available.
Europe Diagenode sa / CHU - Tour GIGA - B34 - 3e étage // Avenue de l’Hôpital, 1 // 4000 Liège (Sart Tilman) // Belgium // Phone: (+32) 4 364 20 50 // Mail: [email protected]
DIAGENODE BIORUPTOR® USER MANUAL
PAGE 17
Holding Plates
Gear Plates (included with tube adaptor kits)
O rings (for 10ml, 15ml, 50ml tube adaptor units)
The gear plates (holding plates) for 10 ml and 15 ml tubes
can accommodate up to 6 tubes for the UCD-200, UCD-300,
AND UCD-400 and up to 12 tubes for the Bioruptor XL. For
50 ml tubes, the sample holding plate is the NG-50-3 which
can accommodate up to 3 tubes. The holding plates should
always be completely filled to guarantee homogeneity of
shearing.
Removing the black knob, it is possible to replace the
O-ring. The complete resonance chip (including O-ring) can
be sterilized in the autoclave. After more than 20 autoclave
sterilizations the O-ring might need to be replaced (see
price list for spare parts).
Sonication Protocols
Sample Protocol for DNA Shearing (Next Generation Sequencing
Applications)
The following describes our in-house protocol for DNA shearing for sequencing library preparation.
Samples
Prior to sonication, human DNA samples were
dissolved in a sonication buffer of TE (10 mM Tris,
1mM EDTA), pH 8 with a DNA concentration of
0.01 μg/μl and a final volume of 100 μl.
Costar 0.65 ml Low Binding Microcentrifuge
Tube (Cat. No. COR-3206) and Tube holder for
12 x 0.5 ml tubes (Diagenode, Cat. No. UCD-pack
0.5). All samples were vortexed and centrifuged
before shearing in the Bioruptor sonication
system.
Roche Genome
Sequencer-FLX
Illumina
Genome Analyzer
Life Technologies
SOLiD™
Required fragment
size post sonication
100–800 bp
100–500 bp
100–300 bp
Small genomes
(e.g. Bacteria)
5–10 cycles
20–30 cycles
60–80 cycles
Large genomes
(e.g. Human)
5–10 cycles
30–40 cycles
80–100 cycles
Sonication Parameters
As shown in the table, sequencing libraries were prepared by sonicating genomic DNA to obtain optimal fragment size
distributions to fit those recommended by the manufacturers of each of the commercial sequencing platforms (Solexa,
SOLID and 454 platforms). We established a set of sonication conditions that could be used to generate each of the
required size distributions, by varying only the duration of sonication (ie, the number of cycles), and leaving the buffer
concentrations, power, and other parameters identical between runs.
These conditions were:
• Low power, 1 min sonication cycles (30 sec “ON”, 30 sec “OFF”), and number of cycles based on desired DNA size. The
temperature was kept at 4°C (using the Diagenode Water cooler, Cat. No. BioAcc-Cool) for optimal shearing results.
• For the larger fragments (1.5 kb and higher), the Bioruptor was set on 50% of the Low power setting and samples were
kept at room temperature.
Diagenode Inc. North America / Phone: +1 862 209-4680 // Fax: +1 862 209-4681 // Mail: [email protected]
PAGE 18
DIAGENODE BIORUPTOR USER MANUAL
Bioruptor Sample Protocols: Chromatin Shearing for ChIP Assays
from Eukaryotic cells (adherent or suspension cell lines) with
ionic detergent buffers
Low Eukaryotic Cell Number: Protocol to
obtain 300-500 bp chromatin fragments
High Eukaryotic Cell Number: Protocol to
obtain 300-500 bp chromatin fragments
1. Starting material
1. Starting material
• 100,000 to 1,000,000 fixed cells
• Nucleus from 1,000,000 to 10,000,000 fixed cells
• Use preferably 1.5 ml TPX tubes (Cat. No. M-50050) or
0.5 ml tube but can be optimized with all kind of tubes.
• Shearing Buffer B from the Diagenode’s ChIP kits (for
the complete list of ChIP kits containing Buffer B, please
refer to the list provided at the end of this protocol). As an
alternative, the reagents and protocols provided with the
Shearing Optimization kit (ref. kch-shchro-040) or with
the Shearing ChIP kit (kch-redmod-100 / kch-redmod400) can also be used.
• Use preferably 1.5 ml TPX tubes (Cat. No. M-50050) but
can be optimized with all kind of tubes.
• Shearing Buffer B from the Diagenode’s ChIP kits (for
the complete list of ChIP kits containing Buffer B, please
refer to the list provided at the end of this protocol). As an
alternative, the reagents and protocols provided with the
Shearing Optimization kit (ref. kch-shchro-040) or with
the Shearing ChIP kit (kch-redmod-100/kch-redmod400) can also be used.
2. Sonication parameters
2. Sonication parameters
a. Set Bioruptor on “High” Power setting (H).
a. Set Bioruptor on “High” Power setting (H).
b. Add 200 μl of complete Shearing Buffer S1 (RT) to the
cells. Vortex until resuspension. Incubate for 10 minutes
on ice.
b. Add 130 μl of complete Buffer B (RT) to the cells. Vortex
until resuspension. Incubate for 5 minutes on ice.
• Use preferably the cooling system but if not; fill the
tank with cold water (4°C) and supplement with 0.5 cm
crushed ice.
• Submit the samples to sonication to shear the
chromatin using the Bioruptor for 12 cycles of: [30
seconds “ON”, 30 seconds “OFF”] each.
c. Reverse cross-links and analyze on gel.
3. Notes
• Protocol for quick analysis of shearing is given in the
“additional protocol” section of the kit manual.
• Use preferably the cooling system but if not; fill the
tank with cold water (4°C) and supplement with 0.5 cm
crushed ice.
• Submit the samples to sonication to shear the
chromatin using the Bioruptor for two run of 10 cycles:
[30 seconds “ON”, 30 seconds “OFF”] each.
• Spin and vortex between each run
c. Reverse cross-links and analyze on gel.
3. Notes
This protocol is a starting point and the total time of
sonication and/or “ON”/“OFF” cycling parameters should
be modified. The susceptibility of each chromatin can vary
depending on the cell type or cell number. So we suggest
conducting a time course (e.g. 10-15 cycles of [30 seconds
“ON”, 30 seconds “OFF”] for Low cell number) to determine
optimal shearing time for your cell line or cell mass.
ChIP kit references including Buffer B:
• AUTO ChIP KIT (AB-Auto01-0016; AB-Auto01-0100)
• LowCell# ChIP Kit™ (kch-maglow-A16; kch-maglow-G16; kch-maglow-A48; kch-maglow-G48)
• HighCell# ChIP kit (kch-mahigh-A16 ; kch-mahigh-G16)
• Transcription Factor ChIP kit (old description: Red ChIP kit) (kch-redTBP-012)
• Histone ChIP Kit (old description: Orange ChIP kit) (kch-orgHIS-012
• OneDay ChIP Kit (kch-oneDIP-060; kch-oneDIP-180)
Europe Diagenode sa / CHU - Tour GIGA - B34 - 3e étage // Avenue de l’Hôpital, 1 // 4000 Liège (Sart Tilman) // Belgium // Phone: (+32) 4 364 20 50 // Mail: [email protected]
DIAGENODE BIORUPTOR® USER MANUAL
PAGE 19
Optimal Sonication Parameters
The Bioruptor brings flexibility and walk-away parallel processing to sonication. Different sonication parameters and
protocols can be customized to your specific application, sample type, volume, and desired size range. Before starting
a new application or using a new tissue sample type, it is a good idea to carry out one or more preliminary test runs in
order to empirically optimize the best instrument parameters for your particular research goals. Consider varying the
type of sample, sample concentration, volume, instrument power, and duration of sonication, in order to identify the best
parameters for your experiments. Once run conditions are optimized, the Bioruptor provides unparalleled reproducibility
from sample to sample and run to run.
Critical Points
Use these starting points as the sonication parameters to yield the best results for a number of applications.
• Water level in the tank: Fill precisely to the blue line
• Temperature: Use the Diagenode Water Cooler (Cat. No. BioAcc-cool) for automated temperature control
• Power: For chromatin shearing set the output selector switch on High (H). For DNA shearing, (e.g. Next Gen Sequencing
applications) set the output selector on Low(L) for small to medium size fragments (100 to 800bp) or on Extra Low (HL)
for large size fragments (1000 to 5000bp)*
• Cycling parameters: 30 seconds “ON” & 30 seconds “OFF”
• Tube adaptors and holders: See “Using Adaptors and Holding Plates” on page 16 for optimal tube recommendations.
Make sure holding plates are completely full for best results.
•T
ube preparation: All samples should be vortexed and centrifuged briefly (e.g. 10-20 seconds) before shearing in the
Bioruptor sonication system.
Optimization Test (Chromatin Shearing)
Optimization is required to obtain reproducible sonication results. Various factors influence the outcome such as:
• Complexity of the mixture. Cell lysis extracts, DNA solutions, or liposome suspensions are complex mixtures of molecules.
The ability to disrupt biological materials by sonication depends on the individual molecule concentration and on the
presence of contaminants.
The aliquot volume in each tube should be fixed
• The viscosity of the solution is another factor that can affect
and correspond to the chosen tube.
the sonication efficiency, as the cavitation process is dependent
Tube Size
Maximum volume Minimum volume
on the viscosity coefficient of the solution.
• The fixation step (percentage of formaldehyde, duration, and
temperature) for ChIP assay users is a key factor that can
affect the chromatin shearing efficiency.
0.5 ml
100 µl
10 µl
1.5 ml
300 µl
100 µl
15 ml
2 ml
500 µl
20 ml
3 ml
50 ml
The best way to start optimization tests with the Bioruptor is to
collect a large quantity of the biological material to be sonicated.
8 ml
1 ml
50 ml
This material should be well-characterized, easily attainable,
and available in sufficient quantities for repeat optimization tests. For example, a nuclear extract should be always produced
with the same protocol and generated with a fixed number of cells. Since the sample concentration is a key factor to calibrate
sonication efficiency, a serial dilution should be performed with the starting material. For example 6 aliquots of the starting
material could be diluted as follows: 1X, 5X, 10X, 20X, 50X and 100X.
Sonicate the 6 tubes together using the sonication parameters of 30 seconds “ON” & 30 seconds “OFF.” If insufficient
disruption occurs, either perform a further serial dilution of the samples or increase the total time of sonication. If excessive
disruption occurs, either concentrate samples or reduce the total time of sonication. A fine tuning of the “ON” & “OFF”
cycles and of the other sonication parameters can be done once a satisfactory result has been obtained on a specific
sample concentration.
The optimal conditions should give excellent sonication reproducibility (i.e. fragment size) and preservation of the
sonicated material without overheating.
Diagenode Inc. North America / Phone: +1 862 209-4680 // Fax: +1 862 209-4681 // Mail: [email protected]
PAGE 20
DIAGENODE BIORUPTOR USER MANUAL
Important note when testing different sonication vessels:
15 ml and 50 ml tubes are sonicated in the Bioruptor with a metal bar which triggers the resonance effect and improves
the sonication efficiency. In other words, if you optimized your sonication parameters in 15 ml tubes, the same sample
concentration will not necessary be applicable to sonication in tubes. Greater sample dilutions for the tubes should thus
be tested.
Bioruptor: Chromatin Shearing Example
U2OS cells are fixed with 1% formaldehyde (10 minutes at RT).
One million cells are resuspended per 30 µl of lysis buffer prior to
chromatin shearing. Each sample consists on 5x 10e6 cells per 1.5
ml tube. Samples are sonicated for 15 cycles of: [30 seconds “ON”
/ 30 seconds “OFF”] with the Bioruptor from Diagenode (Cat. No.
UCD-200). Samples 1 and 2 are duplicates. The sheared chromatin is
submitted to a cross-linking reversion, DNA purification and RNase
treatment. Then the samples are analyzed on a 1% agarose gel. Two
amounts of sheared chromatin are analyzed (1.5 µl and 3 µl). The 100
bp DNA molecular weight marker is on lanes 1 and 4.
Analysis on an agarose gel of the sheared chromatin
1
2
3
4
5
6
Quick Overview: Tips for Starting a Successful Sonication
Critical Steps
Water level in the tank
Water temperature .
in the tank
Minimum sample .
volume per tube for .
each sonication trial
Maximum sample
volume per tube for .
each sonication trial
Quality of the 15 ml
tube
Sonicating in .
15 ml tubes
Sonication process
Optimization of
sonication cycling time
Solutions
Water level up to
the blue line
Keep cool
Comments
- Do not add too much water or too little
- Never start the sonication without water in the tank
It is best to pre-cool the tank before starting the first round of sonication in
order to reduce the water heating due to thermal inertia if the tank is stored at
room temperature. Use the automated cooling system as described on page 7.
Alternatively, manual temperature control protocols may also be used.
10 µl
In 0.5 ml tubes
100 µl
In 1.5 ml tubes
500 µl
In 15 ml tubes
3 ml
In 50 ml
1 ml
In 50 ml
100 µl
In 0.5 ml tubes
300 µl
In 1.5 ml tubes
2 ml
In 15 ml tubes
20 ml
In 50 ml
8 ml
In 50 ml
Falcon or Corning
Do not forget to insert
the aluminum ring
Sonicate by cycles
Cycles dependent on
the sample volumes
and type of tubes
Polystyrene or polyethylene (clear tube in “hard” plastic) is much more efficient for
the transfer of ultrasonic waves for chromatin shearing. Do not use TPX tubes for
DNA shearing as prolonged shearing times may damage the DNA.
The ring is essential to ensure an optimal position of the tube during sonication
Cycles of 30 seconds “ON” & 30 seconds “OFF” are advised for chromatin
shearing and DNA shearing
Cycles depend on the application (chromatin shearing, DNA shearing, RNA
shearing, obtention of bacteria lysates or tissue lysates
For 0.5 and 1.5 ml tubes, we have optimized with Sarstedt, Costar, Eppendorf, Fisher Bioblock Scientific, and Diagenode tubes.
Europe Diagenode sa / CHU - Tour GIGA - B34 - 3e étage // Avenue de l’Hôpital, 1 // 4000 Liège (Sart Tilman) // Belgium // Phone: (+32) 4 364 20 50 // Mail: [email protected]
DIAGENODE BIORUPTOR® USER MANUAL
PAGE 21
Troubleshooting
Bioruptor: Chromatin Shearing FAQs
Critical Steps
Fixation
Questions
Answers
Comments
What is the formaldehyde
final concentration
1%
Correct formaldehyde concentration
in fixation is critical.
How long is the fixation
step?
Fix for 10 minutes (with a time
course when needed)
It is possible to fix for as little as 5
minutes (depending on your protein of
interest for subsequent ChIP assays).
What is the temperature to
use for fixation?
Fix at room temperature
Fixation can be performed at 4°C, RT,
and 37°C. Make sure you perform the
fixation step at the right temperature.
Are the washes after
fixation important?
Wash the fixed cells properly.
Make sure you get rid of ALL the
formaldehyde. Use glycine to stop
the fixation.
Cell lysis
How can I achieve
complete cell disruption?
Do not use too many cells in the
cell lysis buffer. Lyse about 5x 10e6
cells/1 ml
The HighCell # ChIP kit is compatible
with cell numbers up to 10 million
cells in small volumes.
Number of cells/
shearing buffer
volume
What is the amount of
cells per shearing trial to
use?
1x 10e6–10x 10e6cells/ 300 µl
3x 10⁶–30x 106 cells/ 1 ml
Do not use a too high cell
concentration.
Shearing buffer
What is the key buffer
component?
Include detergent in buffer
Quality and quantity of detergent is
important.
Shearing step
How long is the shearing?
Perform a time course for chromatin
shearing
It is possible to shear from 5-30
minutes. If 30’, interrupt sonication
after 15 minutes and centrifuge tubes
briefly before proceeding with the
remaining 15’.
What is the optimal cycle?
30 seconds “ON” + 30 seconds “OFF”
What is the best
temperature for shearing?
4°C
Make sure waterbath is kept
cool. Once optimal conditions are
reached, use for all assays to assure
reproducibility.
What is the best volume/
tube for shearing?
1.5 ml per 15 ml tube
200 µl per 1.5 ml tube
Do not use a too big sample volume
What kind of gel should
I use to determine size
accuracy?
Check disrupted material on a 1%
agarose gel (10 µl/lane). Run the gel
slowly
Reverse cross-links from DNA
afterphenol/chloroform extraction
before loading on gel.
What do smears indicate?
Gel electrophoresis of cross-linked
samples often gives smears on gel.
Also take several pictures of the gel
to assure image quality.
To obtain clearer image with accurate
fragment size, reversion of the
crosslinking is advised.
How much DNA should
I load and is RNAse
treatment necessary?
The migration of large quantities of
DNA on agarose gel can lead to poor
quality pictures which do not reflect
the real DNA fragmentation.
Do not load too much on a gel. Do not
load more than 5 µg/lane.
Also treat the sample with RNAse.
What should my running
buffer concentration be?
1X TAE or TBE is preferred to 0.5X
TAE which can lead to smears on gel.
Will using an old gel cause
problems?
Use a freshly prepared gel and fresh
buffer.
Checking for .
high-quality shearing .
on an agarose gel
Do not reuse an old gel.
Diagenode Inc. North America / Phone: +1 862 209-4680 // Fax: +1 862 209-4681 // Mail: [email protected]
PAGE 22
DIAGENODE BIORUPTOR USER MANUAL
Bioruptor Packing Instructions
If you need to ship your Bioruptor for any reason, it is important to follow these specific packing instructions as the
Bioruptor is extremely fragile. Please use our pre-molded container and components for packing.
The box is composed of a double wall corrugated carton, a foam base, and a foam lid made of ultra shock-absorbent
foam. Each part of Bioruptor has a designated area in the box (as shown).
1. Tank unit preparation
A) P
lace a scrap piece of corrugated cardboard over the top of the tank (as shown).
B) T
ie packaging strap around the tank and cardboard.
C) T
ighten the strap as securely as possible (due to extreme fragility of tank unit which is
prone to damage during transit).
2. Placement of components
A) T
he controller unit should be placed in the largest rectangular recessed area in the
molded foam box with the fan toward the outer side of the box.
B) T
he tank unit should be placed in the square recessed area in the molded foam box towards the inside of the box (as
shown). Wedge a piece of cardboard in the space between the housing and the foam to keep the tank in place.
C) T
he motor plate should be placed in the slotted area in the molded foam with the motor towards the inside of the box
(as shown). Tuck the cable into the foam in the middle of the circle of the motor plate to block its movement.
D) R
oll the grey cable up and place it in the circular recessed area in the molded foam box. Place the other accessories
in the same circular area.
E) F
or UCD-200: The transformer (220V-100V) unit should be placed in the remaining rectangular recessed area in the
molded foam box with the cable between the foam and housing. Note: The transformer is not used in every area of
the world.
3. Placement of foam lid and seal box
A) F
or UCD-200: Place foam lid on the top so that the
protrusion in the lid is over the transformer’s area.
(The protrusion helps to keep things in place during
transit.)
B) T
he carton box should be easy to close; otherwise
you might have to shift the Bioruptor parts and wires
slightly.
C) C
lose the box and seal securely with wide tape.
Europe Diagenode sa / CHU - Tour GIGA - B34 - 3e étage // Avenue de l’Hôpital, 1 // 4000 Liège (Sart Tilman) // Belgium // Phone: (+32) 4 364 20 50 // Mail: [email protected]
Related Products
Diagenode offers a number of kits for chromatin immunoprecipitation and methylated DNA immunoprecipitation as shown
below. The Bioruptor, with its powerful yet gentle ultrasound technology, allows for consistent shearing, a narrow size
range of sheared DNA, and sample preservation, necessary for successful ChIP and DNA methylation experiments.
Antibodies
Diagenode offers a large selection of optimized ChIP-grade, MeDIP-grade, ChIP-seq grade, and MeDIP-seq grade antibodies
that we have developed and characterized in-house. See our price list for more details.
ChIP Kits—Suitable for ChIP-seq and ChIP-on-chip
Features
Optimized for
Amount of cells/IP
Time from cell
collection to PCR
Buffers & Reagents
Control Antibodies
& Control Primers
# IP per kit
LowCell #
ChIP Kit*
HighCell #
ChIP Kit*
OneDay
ChIP Kit
Transcription
ChIP Kit
Histone
ChIP Kit
Automated
ChIP Kit
Low cell numbers,
improved handling
(magnetic beads),
fast, increased
DNA yield
Standard cell
numbers, improved
handling (magnetic
beads), fast,
increased DNA yield
Ready-to-use on
large quantities
of sheared
chromatin, fast
Standard protocol
(3 days) optimized for
transcription factors
Standard protocol
(3 days) optimized
for Histones and
their modifications
Use from 1.000–5 million
cells per IP, validated on
SX-8G IP-Star Automated
System which ensures
maximum reproducibility
and time savings
All DNA-protein
interaction
All DNA-protein
interaction
All DNA-protein
interaction
Transcription factors
and co-factors studies
Histones &
modified histones
All DNA-protein interaction
10e3–10e5
10e6–10e7
1.5–2 X 10e6
10e6
10e5
1.000–5 million
1 day
1 day
1 day
3 days
3 days
1 day
Cell fixation,
collection, lysis / IP
/ DNA purification
Cell fixation,
collection, lysis / IP /
DNA purification
IP / DNA
purification
Cell fixation,
collection, lysis /
Shearing / IP / DNA
purification
Cell fixation,
collection, lysis /
Shearing / IP / DNA
purification
IP / DNA purification
Included
Included
Included
Included
Included
Included
16
16 or 48
60 or 180
18
18
16 or 48
* Validated on SX-8G IP-Star (Automated System for ChIP & MeDIP)
DNA Methylation Kits
MagMeDIP kit*
MeDIP kit
MethylEasy Xceed Kit
MethylEasy Kit
MBD
Quality control using internal
controls, improved handling
(magnetic beads), high
specificity (monoclonal
5-mec Ab), fast
Quality control using
internal controls, high
specificity (monoclonal
5-mec Ab), fast
Gives precise information
on methylation status of
single cytosines
Gives precise information
on methylation status of
single cytosines
Fast method for transient
and cyclical methylation
study
qPCR, linear amplification
and genome-wide analysis
(microarray, sequencing)
qPCR, linear amplification
and genome-wide analysis
(microarray, sequencing)
Sequencing
Sequencing
Linear amplification and
genome-wide analysis
(microarray, sequencing)
Amount of DNA/rxn
1 µg
1 µg
Min 50 pg
Min 100 pg
5 µg
Total Time of Assay
Manual MeDIP: 3 days
Automated MeDIP (Robotic
System: IP-Auto): 20h
3 days
90min (without primer
design and sequencing)
6h–18h (without primer
design and sequencing)
5h (incubation time 1h) or 4
h + overnight incubation
Controls
Methylated and
unmethylated BAC clones
Methylated and
unmethylated BAC clones
Untreated DNA and
bisulphite treated DNA
Untreated DNA and
bisulphite treated DNA
GST-protein (optional)
16 or 48
10
40
25 or 96
50
Features
Applications
# rxns per kit
* Validated on SX-8G IP-Star (Automated System for ChIP & MeDIP)
Ordering information
Description
Reference
Bioruptor Models
Bioruptor® Standard
UCD-200 TM (1.5 ml)
UCD-200 TO (1.5 ml & 15 ml)
UCD-200 TS (0.5/0.65 ml)
Bioruptor® Plus
UCD-300 TM (1.5 ml)
UCD-300 TO (1.5 ml & 15 ml)
UCD-300 TS (0.5/0.65 ml)
Diagenode s.a. BELGIUM | EUROPE
Avenue de l’hôpital, 1
Tour GIGA, 3rd Floor
Bioruptor® Twin
UCD-400 TM (1.5 ml)
UCD-400 TO (1.5 ml & 15 ml)
4000 Liège, Belgium
Bioruptor® XL
XL TM (1.5 ml)
XL TO (1.5 ml & 15 ml)
Fax: +32 4 364 20 51
Sample Tube Adaptor Kits
Tel: +32 4 364 20 50
[email protected]
0.5/0.65 ml tube holder for Bioruptor Standard,
UCD-pack 0.5
Bioruptor® Plus
®
1.5 ml tube holder for Bioruptor® Standard
& Bioruptor® Plus
[email protected]
Diagenode Inc. USA | NORTH AMERICA
UCD-pack 1.5
400 Morris Avenue, Suite 101
Denville, NJ 07834 USA
10 ml tube holder for Bioruptor® Standard
& Bioruptor® Plus
UCD-pack 10
Tel: +1 862 209-4680
15 ml tube holder for Bioruptor® Standard
& Bioruptor® Plus
UCD-pack 15
[email protected]
50 ml tube holder for Bioruptor® Standard
& Bioruptor® Plus
UCD-pack 50
Fax: +1 862 209-4681
[email protected]
Cooling System
Bioruptor® Water Cooler - including standard
connectors for Bioruptor®
BioAcc-cool
Connectors Kit for Water Cooler
CONN-7D1
Peristaltic Pump (Including Connectors Kit)
TWI-pump
For a complete listing of Diagenode’s.
international distributors visit:.
http://www.diagenode.com/pages/distributors.html.
For rest of the world, please contact Diagenode s.a.
Valve Kits
Connector kit for Water Cooler (Bioruptor® Plus)
VB-100-0001
Valve Kit for UCD-300
VB-101-000
Tubes
1.5 ml TPX Tubes
M-50050
1.5 ml TPX Tubes
M-50001
10 ml Tubes
AS-100
10 ml Tubes
AS-500
15 ml TPX Tubes
M-UN-15
50 ml Nalgene Tubes
3105-0050
© 2010 Diagenode, Inc. All rights reserved. The content
of this document cannot be reproduced without prior
permission of the authors. Bioruptor and IP-Star are
registered trademarks of Diagenode, Inc.
Bioanalyzer is a registered trademark of Agilent.