1
1. Contents of the set
Polar Equine
RS300X G31
2. How to use the RS300X receiver
A. A RS300X receiver: receives and displays all the data measured by the T54H
transmitter and the G1 sensor.
The RS300X receiver has 5 navigation buttons.
• Use UP and DOWN to scroll through
the different menus and adjust values (a
bit like + and - buttons).
B. A G1 GPS sensor with its battery:
measures speed and distance in real time.
C. A T54H transmitter: measures
horse’s heart rate in real time.
B.
the
• Use OK to enter a menu, to validate a
value and to start the stopwatch.
• Use STOP to exit a menu, to return to
the previous display (when you made a
mistake while adjusting a value) and to
stop the stopwatch.
- Getting started guide -
• Press LIGHT once and the backlight is
activated for 5 seconds when you press
any other button. You can also lock the
buttons by pressing and holding the
LIGHT button for 2 seconds.
C.
A.
3. Starting the RS300CX
By default, the RS300X receiver is
switched off to save the battery.
Press OK twice to activate it.
Press UP or DOWN to select english
as the language to be used.
Press OK to validate.
The following settings must be done,
even though they don’t concern the
horse.
Use the UP and DOWN buttons to customize the following basic settings.
Press OK to validate your settings.
•
Time display (24h/12h)
•
Time
•
Date (day/month/year or
month/day/year)
•
Units (kg/cm/km or lb/ft/mi)
•
Weight (of the rider)
•
Height (of the rider)
•
Birthday (day/month/year or
month/day/year) of the rider
•
Sex (of the rider)
If you don’t do these basic settings,
the RS300X will remind you again before every exercise.
If you made a mistake somewhere,
press STOP to return to the previous
setting.
The buckle located in the back of the G1
allows you either to wear the G1 on your
arm using the strap provided or to fix it
on a belt or loop.
Open the G1 buckle and pass the strap
through the loop (Velcro on the inside).
If your settings are good, select Yes.
Press OK to validate.
Once the settings are done, the RS300X
returns automatically to the time display.
It is now ready for use!
4. Starting the G1 GPS Sensor
The G1 sensor uses GPS (Global Positioning System) technology to measure speed
and distance in real time. In ideal conditions of use, its precision can reach one meter.
The battery of the G1 has an average of 10h of use. The G1 is waterproof and its solid
design makes it resistant to most shocks and scratches.
Use a coin to unscrew and open the metal battery cover. Place the LR6 battery as indicated and screw the metal cover back into place.
Pull in enough strap so your arm can fit
through it.
To ensure good detection of the GPS signals, the G1 shouldn’t be covered and
should be placed with the Polar logo in an
upright position. We also recommend wearing it on the same arm as the RS300X receiver.
Press the button 2 seconds to start (or stop)
the G1. A green light indicating battery status
(B) flashes for a few seconds. Following this,
a red light indicating detection status (A) appears and shows that the G1 is searching for
GPS signals.
Don’t move. Once the GPS signals have
been found (after 1 minute in average), this
light (A) turns green.
To ensure a good detection of the GPS
signals, the G1 should not be covered or
worn under clothes.
Then adjust the size of the strap so the G1
can’t move once placed on your arm.
Your G1 is now ready for use!
Note: The light indicating battery status (B)
turns red when the battery is flat .
5. Activate the G1 GPS in the RS300X
The GPS sensor has to be activated from the
training computer before it can be used:
UP/DOWN > Settings > Features > S sensor >
GPS.
6. Set the RS300X
speed or pace
to
display 7. How to attach the
transmitter on the horse
The RS300X receiver can display either speed or pace:
UP/DOWN > Settings > Features > Speed view >
choose option
T54H
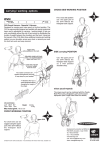
First of all, identify the 2 electrode pads on each
side of the transmitter. The electrode with velcro on
the back is the positive electrode and logically the
other electrode is the negative electrode. In the
middle, you’ll find the WearLink transmitter pocket.
Place the positive electrode under the saddlepad,on the
left or right side of the withers. Ensure that the electrode
is flat against the horse’s skin. The rider’s weight will keep
the electrode in place
Attach the WearLink transmitter into the transmiter
pocket and close it. This pocket protects your transmitter from shocks and scratches and prevents it from falling off the transmitter.
The
transmitter picks up very small electrical
impulses emitted by the heart and for the transmitter
to read the heart rate properly, we need to insure a
good contact to the horse’s skin. Make sure you wet
the electrodes properly, the integrated sponge will
keep up some moisture, but you still need to wet to
horse’s coat, especially as your horse is not yet
sweating. If your horse has a thick winter coat, you
can shave the spot where you will place the
electrodes, this will greatly improve the heart rate
signal quality.
Fasten the transmitter to the saddle with one of the
rubber straps
Attach the negative electrode to the girth using a rubber strap and tighten the girth. If you are riding with a
loose girth, you can place a sponge behind the negative electrode to insure contact with the skin.
Electrode under the saddle pad on the off-side
8. Caring of your product
Transmitter attached to the saddle
Like any electronic device, the Polar training computer
should be treated with care. The suggestions below will
help you fulfill guarantee obligations and enjoy this
product for many years to come.
Detach the transmitter connector from the strap and
rinse the strap under running water after every use.
Dry the connector with a soft towel. Never use alcohol or
any abrasive material (steel wool or cleaning chemicals).
Electrode attached to girth
Wash the strap regularly in a washing machine at
40ºC/104ºF or at least after every fifth use. This
ensures reliable measurement and maximizes the life
span of the transmitter. Use a washing pouch. Do not
soak, spin-dry, iron, dry clean or bleach the strap. Do
not use detergent with bleach or fabric softener. Never
put the transmitter connector in the washing machine
or drier!
Dry and store the strap and the transmitter
connector separately. Wash the strap in a
washing machine before long-term storage and
always after use in pool water with high chlorine
content. Keep your training computer and transmitter in a cool and dry place. Do not keep them
in a damp environment, in non-breathable material (a plastic bag or a sports bag) nor with conductive material (a wet towel). Do not expose to direct
sunlight
for
extended
periods.
Operating temperatures are -10°C to +50°C /
+14°F to +122°F.
9. Starting training
You are now ready to start. Starting from the
time display, press OK twice.
Each display shows 3 rows of data and is named
after the bottom row.
You can also zoom on a data to make it larger on
the display.
To stop the exercise, press STOP twice. The
RS300X returns to time display.
For more detailed information on how the Equine
RS300X G1 works, please check the user manual
included in the box.
For more tips, training advices and more information on Polar products, visit www.polar.fi
Enjoy your ride!
The stopwatch starts, a heart symbol blinks and
the horse’s heart rate is displayed in the bottom
of the screen.
To check the data you are most interested in,
change display by pressing UP or DOWN. (5 different displays are available : Heart Rate, Distance, Speed, Lap Time, Stopwatch)
Press and hold UP for 2 seconds to zoom in the
data of the top row, or DOWN for 2 seconds to
zoom in the data of the bottom row. Press and
hold the same button for 2 seconds to zoom out.
All the data has been recorded and can be retrieved in the file. To access the file, press UP
once from time display and then validate by
pressing OK.