1
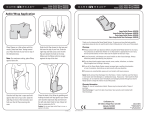
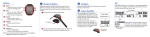
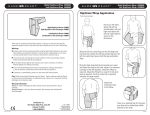
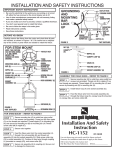
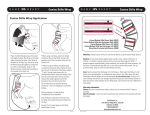
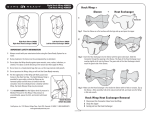
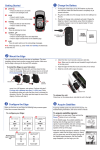
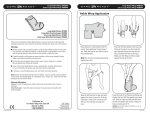
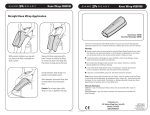
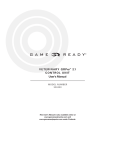
Back Wrap #580500
Back Wrap #580500
Back Wrap = Sleeve + 2 Heat Exchangers + Y Connector
Your Equine Back Wrap has been packaged with each of the two removable Heat Exchangers
already inserted into the Sleeve. Before you remove the Heat Exchangers for cleaning, take care
to note their assembly in the Sleeve. The Y-Connector is bagged separately.
Fig. 1 Back Wrap Heat Exchanger Removal
1. Disconnect the Y Connector
from the Heat Exchangers.
2. Place the Sleeve on a flat
surface with the logo side
down. Fold back the flaps
along the center of each side
of the sleeve to open the zippers.
Gently pull out each Heat
Exchanger from each side of
the Wrap.
Back Sleeve: 540500
Right Back Heat Exchanger: 560502
Left Back Heat Exchanger: 560504
Y-Connector: 570316
Sleeve (bottom view)
2 Heat Exchangers
Breastplate Strap
Back Girth Strap
Fig. 2 Back Wrap Heat Exchanger Insertion
1. Place the Sleeve on a flat surface with the
logo side down. Fold back the flaps along the
center of each side of the sleeve to open the zippers.
Insert each of the two Heat Exchangers into the
corresponding side of the Wrap with the black
side facing down.
2. Slide each Heat Exchanger Connector though
the corresponding opening in the Sleeve.
Connector
The part of the Sleeve which you have folded
over to open the zipper should be pulled over
the top of the Heat Exchanger to close the zipper.
Bottom view of Back Wrap
The green side of the Heat Exchanger should touch
the green side of the Sleeve.
Front Girth Strap
IMPORTANT SAFETY INFORMATION
1 Always consult with your veterinarian before using the Game Ready Equine System for
an injury.
2 During treatment, the horse must be accompanied by an attendant.
3 Do not place the Wrap directly against open wounds, sores, rashes, infections, or
stitches. First place a sterile dressing on the wound and then apply the Wrap.
4 Do not store in a closed plastic bag after use, as this may promote mold growth.
5 Do not puncture the Wrap; doing so will void the Game Ready Equine warranty.
6 Initial applications of the Back Wrap may cause some horses mild concern at the new
sensation. Carefully monitor your horse’s reactions throughout each step of the process
and proceed only when your horse appears calm and relaxed.
Important: Make sure the Heat Exchanger is flat inside the Sleeve with no folds or creases.
After assembly, fold at the natural horizontal fold, and make sure the Wrap is flat
and smooth.
7 It is recommended that the highest level of pressure is Medium Pressure (
for this Wrap. If the pressure appears uncomfortable, pause the Unit, and restart
with no pressure.
)
CoolSystems, Inc. 1201 Marina Village Pkwy, Suite 200 Alameda, CA 94501 1-888-GAMEREADY
www.gamereadyequine.com
702073 REV-C
Game Ready 2008
Back Wrap #580500
Back Wrap #580500
Back Wrap Application
“Y” Connector
Strap
Note: For maximum cooling,
place the Wrap against the
horse’s bare back, unless there
is a wound. In the case of a
wound, cover with a bandage
before applying the Wrap.
Do not allow the Hose to bend
the Wrap at the connection.
This can restrict water flow and
affect cooling.
After treatment, disconnect the
Hose from the Wrap first,
before removal of the Wrap
from the horse.
Step 1: Place the Wrap on the horse’s back, aligning the hose connection on top of the horse’s
withers, similar to the positioning of a pommel or saddle horn. Draw the front strap from the far
side of the horse, under his belly, clipping to the nearside front buckle.
Step 2: Adjust the tautness by shortening the nylon strap through the sliding buckles on both near
and far sides. Strap should be snug to the horse’s belly, but not as tight as a girth. Follow the
same protocol for the rear strap, carefully monitoring your horse’s reaction. Do not proceed further
until your horse appears calm and relaxed.
Step 3: Clip the upper Breastplate Straps into either side of the Back Wrap at the horse’s
shoulders. Pass the bottom Breastplate Strap through the horse’s front legs and clip to the Front
Girth Strap. Adjust the tautness by shortening the nylon straps at all points.
Step 4: Use the lacing along the spine of the Back Wrap to customize its shape for optimal fit and
contact. For best contact, adjust each side of the Back Wrap to cover the horse’s spine. The right
and left sides of the Wrap may overlap slightly, but should not be folded over onto themselves.
Step 5: Clip the split end of the Y Connector to each of the two Heat Exchanger Connectors. Clip
the single end of the Y Connector to the Single Hose Connector. Clip the Single Hose Connector to
the Control Unit.
Begin initial treatment with no pressure in order to acclimate the horse to the sensation of the
Back Wrap. If after several minutes there are no signs of aversion from the horse, begin
administering cold therapy at low pressure. Advance to medium pressure only when your horse
appears comfortable and relaxed. [Medium pressure should be the highest setting used for
the Back Wrap, as the product performs optimally at this setting.]
Caution: First application of this Wrap may cause horses to startle preliminarily at the new
sensation. Proceed with administering therapy with caution. Do not open the zipper on the Wrap
while the Wrap is in use, or while being applied to the horse.
Protocol: 30-40 minute application on low, medium, or no pressure. Always consult your
veterinarian before using the Game Ready Equine System on any injury.
Note:
Run the Connector Hose
through the Strap to fix the
Connector in place.
Connector Hose
Control Unit
Care: Gently remove the Heat Exchangers from the Sleeve. Hand wash the Sleeve in cold
water and mild detergent, or antibacterial soap. Hang to dry. Hand wash the Heat
Exchanger, do not machine wash; doing so will void the warranty. Periodically run hydrogen
peroxide through your Game Ready Equine System to keep the interior water chamber of
your Wrap clean. See Control Unit User's Manual for more detail. Cold sterilization only.
Storage: Store the Back Wrap laying flat with green sides out or hang. Do not bend
lengthwise.
Warranty Information:
Sleeve: In case of manufacturer defect: Sleeve may be returned within 7 days of purchase.
Heat Exchanger & Y-Connector: : 1 year from date of purchase. See warranty card
included .