1
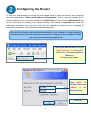
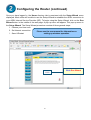
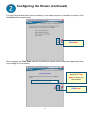
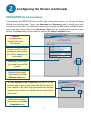
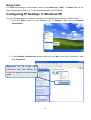
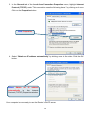
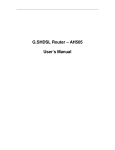
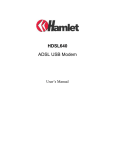
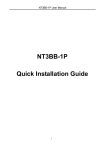
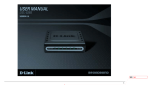
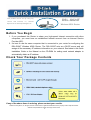
This product can be set up using any
current
web
browser,
i.e.,
DSL-G624T
Internet
Wireless ADSL Router
Explorer 6x or Netscape Navigator 7x.
Before You Begin
1. If you purchased this Router to share your high-speed Internet connection with other
computers, you must have an established Internet account from an Internet Service
Provider (ISP).
2. It’s best to use the same computer that is connected to your router for configuring the
DSL-G624T Wireless ADSL Router. The DSL-G624T acts as a DHCP server and will
assign all the necessary IP address information on your network. See below in this Quick
Installation Guide or the Manual on the CD-ROM for setting each network adapter to
automatically obtain an IP address.
Check Your Package Contents
If any of the above items is missing, please contact your reseller.
©2005 D-Link Systems, Inc. All rights reserved. Trademarks or registered trademarks are the property of their respective holders.
Software and specifications subject to change without notice.
1
Connecting the Router to Your Computer
Antenna
For good wireless reception
Reset Button
Push to return to default settings
ADSL Port
Power Input
Connect ADSL line here
Connect to AC power adapter
LAN Ports
Connects to your PC on the Ethernet LAN
A. First, connect the power adapter to the power input at the back panel of the DSL-G624T, then plug the other
end of the power adapter to a wall outlet or power strip. On the front of the device, the Power LED will turn
ON to indicate proper operation.
B. Insert one end of the Ethernet cable into an Ethernet (LAN) port on the back panel of the DSL-G624T and
the other end of the cable to an Ethernet Adapter or available Ethernet port on your computer.
C. Insert the ADSL (telephone) cable included with the Router into the ADSL port, then connect the cable to
your telephone line.
2
Configuring the Router
To use your Web browser to access the web pages used to setup the Router, your computer
must be configured to “Obtain an IP address automatically”, that is, you must change the IP
network settings of your computer so that it is a DHCP Client. If you are using Windows XP and
do not know how to change your network settings, skip ahead to Appendix and read the
instructions provided. You may also read the User Manual for instructions on changing IP
settings for computers running Windows operating systems.
To connect to the network, make sure the network adapter in your computer is configured properly.
Read the Appendix at the end of this guide to read how to configure the network adapter to obtain
an IP address automatically using Windows XP.
Open your Web browser and type
“http://192.168.1.1” into the URL
address box. Then press the Enter or
Return key.
The login prompt appears.
Type “admin” for
the User Name and
“admin” in the
Password field.
Click OK
3
Configuring the Router (continued)
Once you have logged in, the Home directory tab is prominent with the Setup Wizard menu
displayed. Most users will be able to use the Setup Wizard to establish the ADSL connection to
your ADSL Internet Service Provider (ISP). To begin using the Setup Wizard, click on the Run
Wizard button in the middle of the web page. A pop-up menu will appear. This pop-up menu is
the Setup Wizard. The Setup Wizard procedure consists of three general steps:
1. Choose your time zone
2. Set Internet connection
Please see the user manual for information on
3. Save & Restart
setting up wireless operation.
Click Run Wizard
4
Configuring the Router (continued)
The first Setup Wizard menu lists a summary of the steps required to complete the setup. Click
the Next button to begin setup.
Click Next
Now configure the Time Zone used for the Router’s system clock. Select the appropriate time
zone setting for your location.
Select the Time
Zone in which you
are located.
Click Next
5
Configuring the Router (continued)
Next you will Select the Internet Connection Type for the WAN interface. Your ISP has given
this information to you. If you do not know what type of connection to use, exit the Setup Wizard
and contact your ISP for the information. The Setup wizard menu that appears when you click
the Next button depends on what connection type you select. The connection types available in
the Setup Wizard menu are PPPoE/PPPoA, Dynamic IP Address, Static IP Address and Bridge
Mode. Follow the instructions below for the type of connection you are using.
Select the
Connection Type
used for your
ADSL service.
Click Next
6
Configuring the Router (continued)
PPPoE/PPPoA Connections
If you selected the PPPoE/PPPoA connection type in the previous menu, you will see the Setup
Wizard menu pictured here. Type in the Username and Password used to identify and verify
your account to the ISP. If you have been instructed to change the VPI number and VCI number,
type in the new values. Select the Connection Type used for encapsulation specific to your
service. Click Next when you are ready to continue the Setup Completed menu.
Type the
Username and
Password for your
ISP account.
Change the VPI and VCI
numbers as instructed by
your ISP by Typing in the
new values.
Select the Connection
Type used for your ADSL
service.
Click the Next button.
Skip ahead to the Set
Wireless LAN menu.
The Set Wireless LAN Connection window is for the
wireless side of your router. Enter the WLAN name for
your network in the SSID field and choose the wireless
channel to be used for your WLAN from the Channel pull
down menu.
Click the Next button.
Skip ahead to the Setup
Completed menu.
7
Configuring the Router (continued)
Dynamic IP Address Connections
If you selected the Dynamic IP Address connection type, select the Connection Type used for
encapsulation. If you have been instructed to change the VPI number and VCI number, type in
the new values. Click Next when you are ready to continue the Setup Completed menu.
Change the VPI and VCI
numbers as instructed by
your ISP by Typing in the
new values.
Select the Connection
Type used for your ADSL
service.
The “Clone MAC
Address” button will
automatically copy the
MAC address of the
network adapter in your
computer. You can also
manually type in the MAC
address.
What is a MAC address? Each network adapter
has a discrete Media Access Control (MAC)
address. Note that some computers and
peripherals may already include built-in network
adapters.
Click the Next button.
Skip ahead to the Setup
Completed menu.
Some ISP’s store the MAC address of your computer’s Ethernet address on their DHCP
server. This can cause problems for the Router and other computers connecting
through the Router. To use the MAC address from your computer, type the MAC address
of your computer’s Ethernet adapter in the Cloned MAC Address entry field and click the
Clone MAC Address button to save to transfer it to the Router.
8
Configuring the Router (continued)
Static IP Address Connections
If you selected the Static IP Address connection type, change the WAN IP Address, Subnet
Mask, ISP Gateway Address and (if available) Secondary DNS Server IP address as
instructed by your ISP. Select the Connection Type used for encapsulation. If you have been
instructed to change the VPI number and VCI number, type in the new values. Click Next when
you are ready to continue the Setup Completed menu.
Change the VPI and VCI
numbers as instructed by
your ISP by Typing in the
new values.
Type the IP addresses for
the WAN IP Address,
WAN Subnet Mask, ISP
Gateway Address and
Primary/Secondary DNS
Server.
Select the Connection
Type as instructed by your
ISP.
Click the Next button.
Skip ahead to the Setup
Completed menu.
For some IPoA Static IP Address Connection Types, it may be necessary to enter an
IP address for an ARP server. Use the ARP Server Address entry field for IPoA
connections if necessary.
9
Configuring the Router (continued)
Bridge Connections
If you selected the Bridge connection type, select the Connection Type used for encapsulation.
If you have been instructed to change the VPI number and VCI number, type in the new values.
Click Next when you are ready to continue the Setup Completed menu.
Change the VPI and VCI
numbers as instructed by
your ISP by Typing in the
new values.
Select the Connection
Type as instructed by your
ISP.
Click the Next button.
Skip ahead to the Setup
Completed menu.
10
Configuring the Router (continued)
Setup Completed
All the settings for the ADSL connection are now completed. Click the Restart button to save the
new settings and restart the Router. It will take about two minutes to restart the Router.
Click Restart
While the Router is restarting, DO NOT TURN OFF THE ROUTER. Click the Exit button when
the message appears informing you that the “device has rebooted successfully”. You can now
launch your web browser to access the Internet.
11
Appendix
For additional settings or information, refer to the Advanced, Tools, or Status tabs on the
web-management interface; or to the manual located on the CD-ROM.
Configuring IP Settings in Windows XP
Use the following steps to configure a computer running Windows XP to be a DHCP client.
1. From the Start menu on your desktop, go to Settings, then click on Network
Connections.
2. In the Network Connections window, right-click on LAN (Local Area Connection), then
click Properties.
Right-click on the Local Area
Connection icon and Select the
Properties option from the pull-down
menu.
12
3. In the General tab of the Local Area Connection Properties menu, highlight Internet
Protocol (TCP/IP) under “This connection uses the following items:” by clicking on it once.
Click on the Properties button.
Click Properties
4. Select “Obtain an IP address automatically” by clicking once in the circle. Click the OK
button.
Select Obtain an IP address
automatically
in
the
Internet
Protocol (TCP/IP) Properties window
Your computer is now ready to use the Router’s DHCP server.
13
Technical Support
You can find software updates and user documentation on the D-Link websites.
D-Link provides free technical support for customers within Canada,
the United Kingdom, and Ireland.
Customers can contact D-Link technical support through our websites,
or by phone.
For Customers within
The United Kingdom & Ireland:
D-Link UK & Ireland Technical Support over the Telephone:
08456 12 0003 (United Kingdom)
+44 8456 12 0003 (Ireland)
Monday to Friday 8:00 am to 10:00 pm GMT
Sat & Sun 10.00 am to 7.00 pm GMT
D-Link UK & Ireland Technical Support over the Internet:
http://www.dlink.co.uk
ftp://ftp.dlink.co.uk
For Customers within Canada:
D-Link Canada Technical Support over the Telephone:
14