1
GB
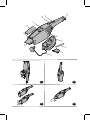
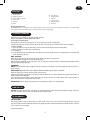
FEATURES
A. On/off Switch
B. Charging Indicator
C. Dust Cup Release Button
D. Crevice Tool
E. Dust Cup
f. Nozzle
g.
h.
I.
J.
K.
L.
Storage Hook
Charging Base*
Adaptor*
Squeegee Tool
Charging Socket
Measure*
Electrical requirements.
This HOOVER appliance is supplied with a double insulated battery charger which is only suitable for insertion in a 230V (UK 240V)
socket outlet. Ensure that the Charging rating label matches your voltage supply.
STORAGE/CHARGING
MOUNT Charging BASE* (* only for certain models)
TOOLS REQUIRED: SCREWDRIVER AND DRILL
CHARGING/STORAGE BASE
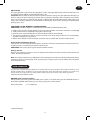
Designed to sit in the charging base on a flat surface or mount vertically. [1]
For tidy storage wrap excess cord on the back of the charging base and exit either side or bottom.
TO WALL MOUNT
1. Place the Measure* on the mounting surface vertically. Mark the centres of the holes.
2. Move the Measure* then drill 4.8mm holes.
3. Fit wall plug.
4. insert the Rawlplugs into the holes, and adjust the screws height to ensure Charging Base* is fixed firmly
to the mounting surface.
UNIT STORAGE
Hold the unit by the handle and push firmly down onto the Charging base*.
Be sure that the red light is on to indicate charging.
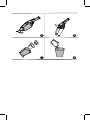
Other storage methods are hanging the unit up using the storage hook, or adjusting Nozzle [3] to allow
the unit to stand upright. [2]
CHARGING
NOTE: Use only the charger supplied with your cleaner to recharge, leave the appliance to charge for at
least 16 hours
IMPORTANT: BEFORE FIRST USE, CHARGE YOUR CLEANER FOR AT LEAST 24 HOURS.
When charging the Cleaner power switch must be Off.
Keep the charger plugged into a Charging Socket at all times. It is normal for the charger to become warm
to the touch when charging.
If the operating time reduces after repeated use, let the cleaner run until it stops, then recharge for 24
hours and repeat this monthly for best results.
Important: Never charge the batteries in temperatures above 37°C or below 0°C.
HOW TO USE
TO USE: Remove cleaner from storage base, slide the power switch to the ON position. Empty and clean
the unit and filter after each use or when the unit becomes full.
ATTACHMENTS
CREVICE TOOL
The crevice tool is used to clean corners and hard to reach areas and is stored on board the dust cup. To
use, remove the crevice tool from the dust cup [3] then fit the crevice tool onto the nozzle to clean corners
and hard to reach areas. [4]
*certain models only
3