1
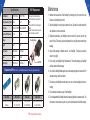
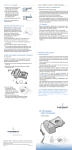
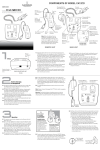
NEW GEN
OWNER’S MANUAL
For Models: LT-ELP223Q
LT-ELP116Q
1
!
CAUTION!
If you need to mount the flashlight onto a firearm, make sure firearm is not loaded before
installation. Remove magazine and examine chamber. Use safe handling procedures
at all times.
UTG flashlights produce substantial heat during operation. Do not leave activated
flashlight unattended. Do not set activated flashlight face down. Do not place activated
flashlight against combustible material or material that could be damaged by heat. Do
not hold bezel or lens of activated flashlight against any portion of human body. Keep
away from children.
Ensure that the flashlight cannot be turned on when stored or being transported. If the
lamp is activated while in a case or any container, the lamp could overheat and cause
damage to surrounding materials.
Do not touch a hot lamp assembly. Allow it to cool before handling. Avoid touching
reflector surface. Always wear safety glasses when handling.
Examine battery quality and appearance before use each time and make sure that there
is no leaking or any deformation. Dispose appropriately if there is a problem.
The batteries are pre-charged by the manufacturer, and cannot be recharged.
Recharging can cause battery leakage or, in some cases, high-pressure rupture.
Inadvertent charging can occur if a battery is installed backwards.
Install batteries by aligning the + and – signs marked on the battery with the + and
– signs marked on the battery chamber in the light.
2
Turn off the light when not in use to conserve battery power.
Make sure to turn off the light or disconnect the pressure switch before inspecting bulb
and battery if the light cannot be turned on.
Keep batteries cool and dry. Always remove batteries from light after use. Leaving
battery in the light without use for long period of time may cause damage or danger.
Never use non-rechargeable and rechargeable batteries together in a light. Always
replace batteries with the exact type and size specified for the light.
Always replace the whole set of batteries at the same time. Never mix new and used
batteries in the same light.
Never deliberately short circuit batteries. Prolonged short circuit will cause the battery to
lose energy and result in significant temperature increase.
Do not carry light with batteries installed in the car trunk while driving.
Keep battery compartment clean and keep any metallic object away from the battery.
Lithium batteries can explode or cause burns if disassembled, shorted, recharged,
exposed to water, fire, or high temperatures. Do not place loose batteries in a pocket,
purse, or other container containing metal objects. Do not mix new with used batteries or
mix required batteries with other types of battery. Do not store batteries with hazardous
or combustible materials. Store in cool, dry, ventilated area. Follow applicable laws and
regulations for disposal.
Component
3
Quick Release Tail Cap Locking Lever
Illustration
Integral Mounting Deck
Position Slot
4
Position Slot
Ambidextrous
On/Off Switch
Locking Plate
Integral
Mounting
Deck
LT-ELP116Q
Locking Plate
Ambidextrous
On/Off Switch
Main Body
Quick Release Lever Lock
LT-ELP223Q
Front Head Cap
Main Body
*IRB - Integrated Reflector and Bulb
Front Head Cap
!
Quick Release Lever Lock
The purpose of this diagram is to provide a better understanding of
the structure of the Flashlight (and Laser) System. Please do NOT
disassemble the product which will void its warranty.
5
Operating LT-ELP223Q
Quick Locking Operation
Tail Cap
Battery Installation
1. Press down the grooved area on the Quick Release Tail Cap
Locking Lever, and pull the Tail Cap to open (Fig. 1.1).
2. Insert two 3-volt lithium batteries. Press down the Locking Lever
and push Tail Cap toward the main body until Locking Lever is
securely engaged into position (Fig. 1.2).
Fig. 1.1
Fig. 2
On/Off Operations
1. Tail Cap Ambidextrous On/Off Switch
The flashlight can be turned on permanently by pushing the
Ambidextrous On/Off Switch upward, and can be turned
off by setting the Ambidextrous On/Off Switch in the middle
(Fig. 1.3). The ambidextrous design makes it convenient for
right-handed and left-handed users.
2. Momentary On/Off Switch
The laser/flashlight can be temporarily turned on by pushing
down the Ambidextrous On/Off Switch.
Operating LT-ELP116Q
Fig. 1.2
Fig. 3
Permanent On
Permanent Off
Fig. 1.3
Momentary On
Fig. 4
Flashlight
Head
Battery Installation
1. Unscrew the Flashlight Head.
2. Install one 3-volt lithium battery, following the direction in Fig. 1.4.
Fig. 1.4
Fig. 5
Fig. 1.5
Fig. 6
On/Off Operations
The Ambidextrous Finger Adjustable On/Off Switch has 3 horizontal
positions. In the middle position, the light is off. To turn the light
on, push the On/Off Switch either to the left or to the right position.
(Fig. 1.5)
NOTE:
Photo illustrations in this section show LT-ELP116Q as an
example. The lever lock mechanism on LT-ELP223Q works in
opposite directions from LT-ELP116Q.
1. Turn the Cam Lever to its unlocked position. Place the grip light on
the Picatinny rail at a desired position. (Fig. 2) Seat the locking cross
bolt on the mounting deck into a selected Picatinny slot. (Fig. 3)
2. Turn the Cam Lever to begin locking the grip light on the rail, but
do not complete the locking motion, leaving some travel distance to
allow for adjustment. (Fig. 4)
3. Use the included Allen wrench to adjust the Hex Screw at the side of
the cam for proper tension and fit against the rail. Adjust clockwise to
increase the tension and tighten the clamping width. Adjust counterclockwise to decrease the tension and increase the clamping width.
(Fig. 5)
4. The optimal tension is achieved when the side plate first makes
contact with the Picatinny rail while the Cam Lever still has enough
travel left for you to securely snap into its locking position. Once you
achieve the optimal tension, push the Cam Lever to the positive
locking position. (Fig. 6) You may repeat Step 3 and 4 if needed
to find the best clamping tension and locking position for your grip
light on the rail.
5. After use of the grip over time, adjust the clamp tension with the Allen
wrench if needed to always ensure the most secured installation.
6
7
Specifications
IRB* Replacement
Item Number
LT-ELP223Q
LT-ELP116Q
Battery Operating Time
2hrs+
2hrs+
Bulb Type
23mm LED IRB 16mm LED IRB
Weight with Batteries
4.9 oz
3.1 oz
Voltage
6V
3V
Length
3.38”
3.15”
Max. Lumen
150 lumens
90 lumens
Focus
Preset
Preset
Battery/Qty
CR123A x 2
Replacement Parts
1.Unscrew the Front Head Cap
counterclockwise to expose the
IRB*.
2.Pull out IRB* from the Flashlight
Head.
3.Follow the above step in reverse
order to install a new IRB*.
Front Head Cap
Maintenance
1. Maintain the metal surface of the flashlight by removing any dirt or sand with a soft
brush to avoid scratching the finish.
2. Store the flashlight in a cool dry place when not in use. Be careful to avoid contact with
acid, alkaline or corrosive chemicals.
3. Replace the batteries in your flashlight every few months if it was not used for long
period of time. This insures good working batteries for your light and prevents battery
leakage.
4. Keep a fresh package of batteries next to your flashlight. This gives you back-up
power for your light.
LED IRB
CR123A x 1
(Contact your flashlight distributor for the following replacement parts:)
5. Do not store your flashlight in high temperatures. This would damage your flashlight
and may result in battery leakage.
6. Do not put the flashlight head against any surface especially paper or human skin for it
has heat and may result in accidents.
7. Do not leave your flashlight under the seat in your car, or in direct sunlight to avoid overheating.
8. Do not attempt to lubricate any part of the flashlight.
BAT-LIT880
IRB-ELS016
IRB-EL023
IRB-ELS023
2pc Set of CR123A Lithium
Batteries
16mm 5-function LED IRB
for LT-ELP116Q
23mm LED IRB
for LT-ELP223Q
23mm 5-function LED IRB
for LT-ELP223Q
*IRB - Integrated Reflector and Bulb
9. Do not disassemble the flashlight other than replacing light bulb or pressure switch. Do
not loosen or remove screws or parts. Any such or similar actions will void the warranty.
8
9
One Year Limited Warranty
This warranty covers defects in materials and workmanship of the product, provided
that they are purchased from an authorized distributor and purchased and used in the
United States. The warranty lasts for a period of one year from the date of original
purchase of the product.
You are entitled to rights under this warranty only if you are the original purchaser of
the product and have the original purchase receipt. This warranty is not transferable.
We will at our option, repair or replace products that do not conform to this warranty.
We may use functionally equivalent reconditioned, refurbished, remanufactured, preowned or new products or parts.
This warranty is void if:
• the product has been disassembled, tampered with or parts or screws have been
removed or loosened; or
• the product has been abused, maliciously damaged, mistreated or used for
a purpose contrary to the purpose for which it was designed or the instructions
provided with the product.
For Warranty service, please contact your authorized distributor and provide them
with a written description of the defect and your original purchase receipt. You must
obtain a Return Authorization Number and return procedures with delivery destination
before returning the product for repair or replacement.
Disclaimer and Limitation of Liability
Leapers is pleased to offer suggestions of the use of its products, however Leapers neither
assumes responsibility for any omissions or errors nor assumes liability for any damages that
result from the use of its products in accordance with information provided by Leapers, whether
verbal or written.
EXCEPT FOR THE EXPRESS WRITTEN WARRANTY SPECIFICALLY SET FORTH
ABOVE, ALL EXPRESS AND IMPLIED REPRESENTATIONS AND WARRANTIES ARE
HEREBY DISCLAIMED, INCLUDING ANY IMPLIED WARRANTY OF MERCHANTABILITY,
NON-INTERFERENCE, FITNESS FOR A PARTICULAR PURPOSE, NON-INFRINGEMENT,
OR WARRANTY OF ACCURACY OF ANY INFORMATION PROVIDED WHETHER
WRITTEN OR ORAL. ALL WARRANTIES ARISING FROM ANY COURSE OF DEALING,
LAW, USAGE OR TRADE PRACTICE ARE HEREBY EXPRESSLY EXCLUDED TO THE
EXTENT ALLOWED BY LAW. TO THE EXTENT AN IMPLIED WARRANTY CANNOT BE
EXCLUDED, SUCH WARRANTY IS LIMITED IN DURATION TO ONE YEAR. SOME
STATES OR JURISDICTIONS DO NOT ALLOW LIMITATIONS ON HOW LONG AN IMPLIED
WARRANTY LASTS, SO THE ABOVE LIMITATION MAY NOT APPLY TO YOU.
UNDER NO CIRCUMSTANCES IS LEAPERS, OR ITS SUPPLIERS OR RESELLERS
LIABLE FOR ANY OF THE FOLLOWING EVEN IF INFORMED OF THEIR POSSIBILITY:
1) THIRD PARTY CLAIMS AGAINST YOU FOR DAMAGES; 2) SPECIAL, INCIDENTAL,
OR INDIRECT DAMAGES OR FOR ANY ECONOMIC CONSEQUENTIAL DAMAGES; OR
3) LOST PROFITS, BUSINESS REVENUE, GOODWILL, OR ANTICIPATED SAVINGS.
SOME STATES OR JURISDICTIONS DO NOT ALLOW THE EXCLUSION OR LIMITATION
OF INCIDENTAL OR CONSEQUENTIAL DAMAGES, SO THE ABOVE LIMITATION OR
EXCLUSION MAY NOT APPLY TO YOU.
10