1
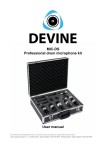
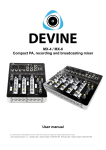
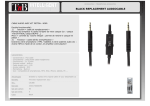
Dual wireless microphone system
Frequency: UHF 840 - 868 MHz
User manual
Introduction
Thank you for purchasing this Devine wireless microphone system. Before you unpack all the received
items, carefully read this manual to become familiar with the functions of the system. Also check the
contents of the box to make sure all necessary parts are included.
If the microphone system fails to operate properly, or if you have any problems while using the system,
turn off the power and contact your selling point for more information and help.
Box contents:
2x wireless microphone
1x 19 inch rack mountable receiver
2x screw-on type antenna for receiver
1x power supply
1x user manual
1x mono 6.35mm jack audiocable
Warning!
- To avoid electric shocks, do not open the system. There are no user serviceable parts inside.
- Before you connect the unit to a power supply, check if the voltage matches with the included power
supply of the system.
- When the system will not be used for a while, remove the batteries from the handheld microphones.
- For optimal performance of the system, do not put any heat sources on it, or place the system on top
of a heat source like microwaves, heating systems and so on.
- Keep the unit and microphones away from intense sunshine, humidity, dust and liquids
- Make sure the unit is placed on a flat surface, or screwed in a 19 inch rack or flightcase.
- To avoid interference, keep the unit and microphones away from devices like large power supplies,
power transformators, radarstations and computers.
- do not place objects on top of the systems (except other 19 inch rack units when mounted in a 19
inch rack
- Keep the unit and handheld microphones away from any sort of liquid to avoid short circuits
Features:
- Works in the international UHF 800 MHz frequency (840 – 868 MHz)
- variable frequency selection, so multiple systems can work together
- high-sensitivity reception of signals
- various internal filters to avoid background noise
- two types of outputs: balanced XLR for each output, or mixed 6.35mm unbalanced output
- auto-mute function to avoid power-on and power-off noise
- double-booster circuit to prevent negative effects (signal dropouts) when the battery status is low
- 19 inch rack mountable construction for the receiver
- two antennas for better signal-reception
- LCD-screen on the receiver and handheld microphones
- easy-to-use menu system on the receiver
- infrared synchronizing functionality for easy and quick setup
NOTE: Illustrations in this manual are only for your reference, illustrations might be slightly
different from the actual product (such as frequencies shown on displays).
Preparing the system
Inserting batteries
This system uses AA 1.5V batteries for the handheld microphones. Each handheld microphone uses 2
AA batteries. Always use good quality batteries, as the battery life may vary. This may result in a
working time between 8 and 20 hours.
Insert the batteries with the right sides up. Pay attention to the placing of batteries, as the microphone
might not work if you put the batteries in wrong.
There is a on/off switch at the bottom of the microphone. When you turn the switch to the ‘ON’
position, the LCD screen of the microphone will turn on, as illustrated below.
Synchronizing the microphones, selecting the right frequencies
When you have set up the receiver and turned it on, synchronize the wireless microphones with the
receiver using the infrared synchronizing system.
To do this, point the infrared sensor of the microphone to the infrared sensor on the unit, while you
hold the microphone in front of the unit.
When you are on stage and need to change frequencies in a hurry, you can also unscrew the bottom
cap of the handheld microphones and hold the UP button for a few seconds. This way, the buttons will
be unlocked. When the buttons are already unlocked, continue to the next step.
Use the UP and DOWN buttons to select the right frequency, use the SET button to confirm and save
the selected frequency.
Distance adjustment
Sometimes, other electronical devices might interrupt your performance as you are performing on
stage. When these disturbing devices are relatively far away, you can decrease the distance setting to
avoid interference at the receiver.
Use the H and L buttons to adjust the distance (by decreasing the signal power). H stands for far
distance, L stands for short distance. You will see on the main display that the RF signal indicator
changes.
Volume adjustment
When you want to change the volume sensitivity on your microphone, press SET on the microphone
(after you removed the cover at the bottom). The display will show ‘VOL’ which means you are able to
change the volume, using the UP and DOWN buttons. After 3 seconds of inactivity, the unit will return
to the frequency display, so you can test the new settings.
Backlight adjustment
When you want to change the backlight of the display (as this might draw too much attention on dark
stages), hold the SET button for about two seconds. The display will show ‘LED’ on the display. Use
the UP/DOWN buttons to increase or decrease the brightness of the display, it is also possible to turn
the backlight completely off. When no activity is detected, the display will turn back to the main display,
with the settings saved.
Setting up the receiver
Install the receiver on a solid surface, or in a 19 inch flightcase or rack. Use the two included antennas
and screw them onto the device at the provided mounting points.
Place the antennas in a V-shape, to create the best signal receiving environment for the antennas.
The best set-up of the antennas would be in a 90 degree angle, compared to each other.
Plug the power supply cable into the provided connector-chassis at the rear of the unit. Check the
power supply you wish to plug the unit into, to make sure the outlet has a proper voltage. Do not turn
the power on or connect any cable if you suspect that the voltage is incorrect, or if the cable shows
defects.
Connecting signal cables
The unit has several professional audio connectors at the rear side of the unit. For both channels there
is a separate balanced XLR output. There also is a MIX output with unbalanced 6.35mm jack (for use
at simple setups). You can not use both outputs (XLR and 6.35mm jack) at the same time. We advise
to use the XLR outputs as much as possible, as this provides a better signal transportation with a
minimum chance of error. A unbalanced 6.35mm jack cable is included.
Setting up the receiver
As shown in the illustration above, the information of both microphones is bundled on 1 display. Each
microphone shows information on the display, regarding the Frequency and the Channel.
To change the selected frequency, press SET, then use the UP and DOWN buttons to adjust the
frequency. Press ESC to exit the menu and save the settings, press IR to match the frequency with
your microphone (by synchronizing, as shown before in this manual).
It is also possible to take over the frequency that you already selected on your microphone. Hold down
the DOWN-button and let the receiver match the frequency automatically.
Lock and unlock the receiver
Hold ESC, after a while the display shows ‘LOCK’. Hold ESC again for a while and the ‘LOCK’ item on
the display will disappear.
Volume settings
Use the VOLUME buttons to adjust the sound of the microphones. Use the LED VU-meters next to the
display to choose the right volume setting.
Technical specifications
Technical specifications microphone:
- Frequency: 840 ~ 868 MHz
- channels: 276 (2 channels, choose from 138 frequencies per microphone)
- oscillation-mode: PLL
- frequency stability: +/- 10 ppm
- modulation mode: FM
- radio frequency power: 10 ~ 30 mW (variable)
- audio frequency response: 40 ~ 18.000 Hz
- distortion: < 0.5%
- batteries: 2x AA, 1.5V
- using time: 8 ~ 20 hours (depends on battery quality)
Technical specifications receiver:
- frequency: 840 ~ 868 MHz
- channels: 276 (2 channels, choose from 138 frequencies per microphone)
- oscillation-mode: PLL
- frequency stability: +/- 10 ppm
- superheterodyne double-supersystem receiving
- sensitivity: -95 ~ -71 dBm
- audio frequency response: 40 ~ 18.000 Hz
- distortion: < 0.5%
- signal to noise ratio (S/N ratio): >110dB
- audio output: 800mV (1x 6.35mm mixed output jack, 2x separate balanced XLR)
- working power: DC 12V (power supply included), 300mV
- power supply: AC 230V, 50 Hz
- 19 inch rack mountable, 1U