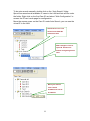
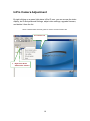
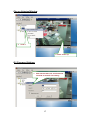
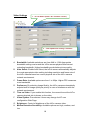
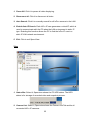
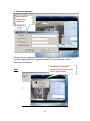
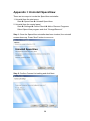
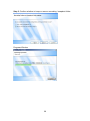
1
InPro Camera SpecoView Speco Technologies 200 New Hwy Amityville NY 11701 TEL: 1-800-645-5516 Http://www. specotech.com INPRO CAMERA SPECOVIEW ...................................................................... 1 INTRODUCTION ............................................................................................... 4 INSTALL SPECOVIEW PROGRAM ....................................................................... 5 STARTUP AND THE LAYOUT OF SPECOVIEW ....................................................... 9 Startup SpecoView ............................................................................................................ 9 Layout of SpecoView ........................................................................................................ 9 Display Mode .................................................................................................................. 10 Auto Search .................................................................................................................... 10 IP Cam online status indicator ........................................................................................ 12 MANAGING INPRO IP CAMERAS ...................................................................... 13 New Camera ................................................................................................................... 13 New Folder ...................................................................................................................... 14 Rename........................................................................................................................... 14 Delete .............................................................................................................................. 15 INPRO CAMERA ADJUSTMENT ........................................................................ 16 Play on Selected Window ............................................................................................... 17 ID / Password Settings .................................................................................................... 17 Video Settings ................................................................................................................. 18 Firmware Upgrade .......................................................................................................... 19 Delete .............................................................................................................................. 20 DISPLAYED VIDEO CONTROL .......................................................................... 21 Full Window..................................................................................................................... 21 Auto Reconnect .............................................................................................................. 21 Stop ................................................................................................................................. 22 Pause .............................................................................................................................. 22 Motion Recording ............................................................................................................ 22 Properties ........................................................................................................................ 22 Snapshot & Continuous Recording ................................................................................. 23 Swap Function ................................................................................................................ 23 SPECOVIEW SOFTWARE FUNCTIONS .............................................................. 24 Camera ........................................................................................................................... 24 View ................................................................................................................................ 25 Settings ........................................................................................................................... 26 Help ................................................................................................................................. 27 APPENDIX I: UNINSTALL SPECOVIEW .............................................................. 28 APPENDIX II: MAXIMUM ALLOWED VIDEO USERS ............................................. 31 APPENDIX III: PERFORMANCE INFORMATION .................................................... 32 APPENDIX IV: FREQUENT ASK QUESTION ........................................................ 33 2 INPRO CAMPLAY USER MANUAL .............................................................. 34 STARTUP AND THE LAYOUT OF CAMPLAY ......................................................... 35 CAMPLAY FILE TREE ..................................................................................... 36 CAMPLAY FUNCTIONS .................................................................................... 37 Camplay .......................................................................................................................... 37 Settings ........................................................................................................................... 37 Language ........................................................................................................................ 38 Help ................................................................................................................................. 38 PLAYBACK FUNCTION BAR ............................................................................. 39 1. SNAPSHOT ............................................................................................ 39 2. ZOOM IN AND ZOOM OUT ......................................................................... 39 INPRO WEB CONFIGURATION MANUAL ................................................... 40 ENTER W EB CONFIGURATION ........................................................................ 41 Information Page ............................................................................................................. 42 Display Page ................................................................................................................... 43 Network Page ................................................................................................................. 44 Advanced Network Page ................................................................................................ 45 Video Settings Page ....................................................................................................... 46 3GPP/RTSP Page ........................................................................................................... 47 Motion Detection Page.................................................................................................... 48 Date / Time Page ............................................................................................................ 49 Admin Page .................................................................................................................... 50 Upgrade Page ................................................................................................................. 51 Reboot Page ................................................................................................................... 52 SAFE MODE ................................................................................................. 53 APPENDIX I: 3GPP/ISMA OPERATION............................................................. 54 3 Introduction SpecoView is a 16 channel video management software package which is included with Speco’s InPro Series IP Cameras. With SpecoView, it is just a mouse-click away to see the video of your IP Camera and, surprisingly, neither technical knowledge nor complex settings are required. Each InPro series IP Camera has a unique Camera ID (9 digits long) and a password for logging in to see the video. 4 Install SpecoView Program Step 1. Please close other windows applications before proceeding. Step 2. Insert the installation CD into your CD-ROM drive and find the SpecoViewInstaller-V1.03.09.exe. Double click it to start the installation process and you will see the “Welcome” window. Click 5 button. Step 3. If you are uncertain if Framework 2.0 is already installed on your PC, please check .NET Framework 2.0. Click installation. Step 4. Click to proceed 6 to proceed Step 5. Make a selection and click Step 6. click to proceed. to proceed. 7 Step 7 Click to exit. SpecoView installation now is completed. 8 Startup and the layout of SpecoView Startup SpecoView You can startup SpecoView from either Start Programs SpecoView or the shortcut of SpecoView on the windows desktop. Layout of SpecoView Video Information Bar Display modes Speaker Cam list Tab Display Area 1 Camera Name Cam Display Status Area 2 Indicator Display Area 3 Auto Search List Display Area 4 Disk space information for recording. 9 Display Mode SpecoView supports 6 display modes. By pressing each mode, you can have a different live view display. Auto Search Auto search is a function that searches for all Speco InPro series IP Cameras on your LAN (Local Area Network). At the very beginning of SpecoView startups, SpecoView automatically does the auto search. Double Click the Folder 10 To do auto search manually, double click on the “Auto Search” folder. SpecoView searches all available IP cams in the LAN and lists all IDs under the folder. Right click on the find Cam ID and select “Web Configuration” to access the IP cam’s web page for configuration. Move the mouse cursor on the Cam ID under Auto Search, you can see the virtual IP in the LAN. Auto Search List: Lists all the found Cam IDs within this LAN. Web configure: Click to open I.E. browser for further configuring this IP Cam. Move your mouse over Cam ID 001006123 to see its IP address. 11 IP Cam online status indicator There is an IP Cam icon in front of the Camera Name which indicates the online status of that IP Camera. RED IP cam is off line, not connecting to internet. GREEN IP is on connected to internet. YELLOW IP is on line but the connection is not good because either side might be behind a router which has strict rules for access. Note: The IP Cam online status refreshes every 30 seconds automatically. Green icon: means this IP Cam is online Red icon: means this IP Cam is offline. Yellow icon: means this IP Cam is online. However, the connection between IP Cam and CamView is bad due to the strict rules of the router or firewall. Note: The green icon indicates the IP Cam is online and responding, but not guarantees that the video session can be established 100%. Unfavorable Firewall setting may block the video. 12 Managing InPro IP cameras Right click the “Camera List” tab. You can add a new InPro IP cam, create a new folder, rename the IP cam or the folder, and delete any InPro IP cams or any folder. Right Click “Camera List” New Camera Users can add a new camera to the list by entering each InPro series IP cam ID and password. Users can also name the IP cam. 1. IP cam shows up under CameraList 2. Enter Name & ID &Password 13 1. New Folder Users can group InPro Series IP cams by creating a new folder. 2. New file shows under Camera List 3. Name the new file Rename You can rename the folder. 2. New file name shows up. 1. Rename file name 14 Delete 1. Delete File 15 InPro Camera Adjustment By right clicking on a green light status InPro IP cam, you can access the video display, do ID and password settings, adjust video settings, upgrade firmware, and delete it from the list. Note: Camera status must be green in order to access function list. 2. Function List 1. Right click Green status InPro Camera 16 Play on Selected Window 2. Click it 2. Video shows up ID / Password Settings 1. Edit Camera Name, ID, and Password. Click OK to activate new setting. 17 Video Settings 1. IP cam Status (Name / ID / Firmware version) 2. Click Update after setting is finalized. A. Bandwidth: Available selections are from 64K to 1.5M. Appropriate bandwidth setting must match the InPro camera physical site internet uploading bandwidth. Higher bandwidth equals better picture quality. B. Auto Select: Enable Auto Select, the InPro camera automatically adjusts the most appropriate video setting including resolution and frame rate of the InPro camera based on current physical site of the InPro camera network environment. C. Frame Rate: Available options are from 1 to 30fps. Higher FPS consumes more bandwidth. D. Preference: By selecting Image Quality, the InPro camera automatically adjusts itself for image quality as priority in case of interference with the network environment. E. Time on Video: If you enable this function, the current time at the InPro camera physical site is shown on the video. F. Video System: Pre-selected. Users may change it at IP cam configuration Web Page. G. Brightness: Control of brightness of the InPro camera video. H. Motion Detection Sensitivity: Available options are high, medium, and low. 18 Firmware Upgrade In case new firmware is released, enter Speco’s FTP site, FTP username, firmware name, and FTP password to upgrade the InPro camera firmware. The default password of Authentication is “admin”. Note: Users can change the default Firmware Upgrade Authentication password in the Web Page Configuration. Please refer to page 49 If you choose Plain text, the passwords are shown. If you choose Protect, then the passwords are shown in ***** format. 2. Enter FTP information. 1. Click Upgrade 3. Enter Password and 4. Upgrading message bar appears. press OK 19 Delete 1. Delete the InPro IP cam. 20 Displayed Video Control Use the mouse to select displayed window. Right click to see various functions. Double click information bar to Snapshot button. Press it to make it full window display take a snapshot. Record Status Light Black: Not recording Red: Continuous recording Green: MD recording Double click displayed video to make it full screen display Full Window Choose it to display video in full window. Users can also double click the information bar to display in full window. Double click the displayed video to make full screen display. One more double click changes to normal window display mode. Auto Reconnect Checking “Auto reconnect” option reconnects the video session automatically once the session is closed by the IP Camera, for example, if the settings of the IP Cam have been changed or the Internet connection of the IP Cam has lost. 21 Stop Click to stop video displaying. Pause Click to pause video displaying. Motion Recording Click to enable motion detection recording. When motion detection recording is activated, recording status turns to Green. Recording status turns into green Properties Show current InPro IP cam’s frame rate, consuming bandwidth, and InPro camera physical site time. Click to do continuous recording. Status light becomes red. 22 Snapshot & Continuous Recording Click to snapshot. Swap Function This function is available only in 6 and 13 window display modes. Press swap button to move the smaller window video to/from main window. Press Swap button to move minor window display video to or from main window display video. 23 SpecoView Software Functions SpecoView Function Bar. Camera 24 1. Pause All: Click it to pause all video displaying. 2. Disconnect all: Click it to disconnect all video. 3. Auto Search: Click it to manually search for all InPro cameras in the LAN. 4. Enable Auto IP Search: Each InPro IP cam generates a virtual IP, which is used to communicate with the PC when the LAN environment is static IP type. Enabling this function allows the PC to find the InPro IP cam in a static IP LAN network environment. 5. Exit: Click to exit SpecoView. View 1. Status Bar: Select it, Specoview shows the PC HDD status. The HDD status is for storage of recorded video and snapshot pictures. 2. Camera List: Select it, Specoview shows the Camera List Tab and its all connected InPro IP cameras. 25 3. CamPlay: Select it to start up CamPlay. Camplay is the software used to play recorded video and snapshot pictures. 4. Open Recorded Files Folder: Click it to open the file folder of recorded video. 5. Open Snapshot Files Folder: Click it to open the file folder of snapshot. Settings 1. Directory: Set up the directory file recorded file and snap shots Recorded video file Current storage folder path HDD drive status Press to set up different path Arrange storage HDD recording space and method Snapshot file folder Press to set up path different path Press Browse button “ ” of recording video path and snapshot path, you can set up different path to save the video and snapshots. 26 2. Firmware Upgrade: Enter Firmware upgrade FTP information. Saving firmware upgrading information in SpecoView allows you to do all InPro cameras upgrading without typing necessary FTP and firmware version information individually. Click Help and click About SpecoView you can see current Help version of SpecoView. 27 Appendix I: Uninstall SpecoView There are two ways to invoke the SpecoView uninstaller. 1. Uninstall from the start menu .Start SpecoView Uninstall SpecoView 2. Uninstall from the control panel .Start Settings Control Panel Add or Remove Programs .Select SpecoView program and click “Change/Remove”. Step 1: Once the SpecoView uninstaller has been invoked, the uninstall screen shows up. Press “Next” button to move on. Step 2: Confirm Camera List setting and click Next. 28 Step 3: Confirm whether to keep or remove recording / snapshot folder. Progress Window 29 Finish Window 30 Appendix II: Maximum Allowed Video Users The maximum allowed video users for a single InPro product at the same time is dependent on the video settings including “Internet speed” and resolution. The followings are the summary of the maximum allowed video users: Resolution of 176 * 120 or 176 * 144 pixels Frame rate\bandwidth 64k ~ 512k 1M ~ 1.5M 5fps ~ 30 fps 20 4 Resolution of 352x240 or 352x288 pixels Frame rate\bandwidth 64k ~ 256k 512k 768k 1M ~ 1.5M 5fps ~ 30 fps 20 18 9 4 Frame rate\bandwidth 512k 768k 1M ~ 1.5M 5fps ~ 30 fps 8 6 4 Resolution of 720x480 or 720x576 pixels 31 Appendix III: Performance Information 1. Video Performance Information The video quality is dependent on the video parameter settings and the network quality. If you want to have a better video quality, you will usually set higher resolution and higher frame rate. This is fine when you are viewing the video locally in the same network. But when you want to see the video remotely through the Internet, you need to know the Internet speed (bandwidth) connected to your home network. If the “Internet speed” setting of your InPro camera is very large, but your real Internet speed (bandwidth) is relatively low, the video quality could be poor. In order to have the best video quality, you should have broadband service from your ISP and set the “Internet speed” of the InPro Camera a little lower than the real Internet speed provided by your ISP. 32 Appendix IV: Frequent Ask Question Q: The InPro Cam status indicator shows a green icon, but I can not view the video or change the settings. A: The green icon only denotes that the InPro Cam is online and responding, but does not guarantees that the video session can be established one hundred percent. The reason is due to the firewall or the strict access rules of the router. Q: The video quality is not perfect when I view it remotely via the Internet. A: The video quality is greatly affected by your Internet connection speed. Therefore, we recommend you to change the bandwidth settings of the InPro Cam to a value which is smaller than the one that your ISP provides. Q. The video quality is not perfect when the status indicator of the IP Cam shows yellow. Why is that? A: If it is yellow, it means the connection between SpecoView and the InPro Cam is not good. There might be a firewall in between or the routers that InPro Cam or SpecoView are behind have strict rules for the access. Q: Can the password for playing video be empty? A: No. For security issue, we do not allow users to make their passwords for playing video empty. Q: Can I change the settings of the InPro Cam through SpecoView? A: Yes, partially. You can change the resolution, frame rate, bandwidth, auto select, indoor/outdoor mode, light frequency, and brightness settings of the InPro Cam through SpecoView. The rest of the settings can only be configured via the web page of the InPro Cam. Q. Sometimes I failed to connect to the InPro Cam after changing the settings of the IP Cam. A: InPro Cam needs some time, around 5 seconds, to re-initialize the system. Therefore, please wait 5 seconds and try to connect again. If the auto reconnection is enabled, then SpecoView will connect it for you in 5 seconds. 33 InPro CamPlay User Manual 34 Speco Technologies 200 New Hwy Amityville NY 11701 TEL: 1-(800)-645-5516 Http://www. specotech.com Startup and the Layout of Camplay CamPlay is a management software for the recorded files and snapshots which were recorded or taken by the SpeoView earlier. You do not have to install it. It comes with the Specoview. To start up CamPlay, double click the Camplay shortcut icon on the PC desktop. List all the found recorded files. List all the found snapshots. Display area. Slider bar. Playing time. Current playing file information. 35 Camplay File Tree Recorded videos and snapshots are listed as shown below: Name / ID of InPro cameras Date: yyyy/MM/dd Time: hh/mm/ss The classification algorithm is: InPro Camera (Name / ID) Date Recorded / Snapshot Time 36 Camplay Functions Camplay 1. Refresh file tree: Click it to refresh the file trees especially after SpecoView has made a recording or snapshot. 2. Exit: Click to exit Camplay. Settings Click to start up recorded video and snapshot directory settings. Click “ ” to set up. 37 Language Click to select available languages. Help Click to show CamPlay version. OK 38 Playback Function Bar Double click a video file, use the playback function bar to operate different functions. Double click a snapshot file, the snapshot picture appears on the display screen. Drag time bar to select target playback video time Pause / Resume Play Mute / Un-Mute Fast Forward Stop 1/2 Speed Play Zoom In / Out Snapshot during playback 1. Snapshot The snapshots you take within CamPlay are stored to snapshot_directory\CamPlay\date\. Snapshot_directory is the directory you configured to store the snapshots. 2. Zoom in and zoom out The maximum resolution you can zoom in to is 640x480 and the minimum resolution you can zoom out to is the original resolution of the video file. To zoom in, click . Click to zoom out and click to change back to the original resolution of the video file. The snapshot is not displayed in the video display area. This gives you the ability to playback the recorded video file and view the snapshot at the same time. 39 InPro Web Configuration Manual Speco Technologies 200 New Hwy Amityville NY 11701 TEL: 1-(800)-645-5516 Http://www. specotech.com 40 Enter Web Configuration Key in the IP address of any InPro IP cameras (when a fixed IP is assigned to InPro) or access via SpecoView (when InPro is in LAN) to access the web configuration page. Enter default username: “admin” to access. No password is necessary 41 Information Page The InPro camera Information Page will appear A. Model: InPro camera firmware version B. IP CAM ID: InPro camera ID number C. Registration Status: Indication of the InPro camera’s registration with SpecoView D. E. F. G. H. Network Type: Indication of the current InPro camera network type. Video Users: Current people accessing the InPro camera. Video Resolution: Current InPro display resolution Video Bandwidth: Current InPro bandwidth setting Motion Detection: Current motion detection status. 42 Display Page This page allows InPro live video to be displayed on IE when accessed. For the first time, an activeX component is automatically downloaded into the browser. The component is downloaded from a public domain, so the computer must be connected to the Internet. To adjust the display size, please refer to the “Video Setting” Web Page. 43 Network Page This page allows you to configure the network setting of an InPro camera. Users can assign an IP to the InPro camera or set up a DHCP to the InPro camera. The default setting of InPro camera is DHCP, which is to obtain an IP address automatically. If the network environment does not support DHCP function, users need to set the network settings of the InPro camera manually. Users need fill in all of the fields including “IP address”, “Subnet mask”, “Default gateway” and “DNS server”. All these settings must be correct for your network environment, 44 Advanced Network Page This page allows users to set the InPro camera for PPPoE connection (ADSL service). Enter PPPoE username and password Note: DHCP or static IP settings in the “Network” page can work together with the PPPoE connection. The PPPoE has higher priority, so, if the PPPoE is working, InPro cameras use PPPoE to connect to the Internet. 45 Video Settings Page This page allows you to make video settings for InPro. Password to display video in SpecoView Current ID Current bandwidth Adjusts to the most Select resolution and common video frame rate settings depending on the current network environment Select preference Select Video format Adjust brightness Enable / Disable time stamp on the live video 46 3GPP/RTSP Page The InPro Series camera can be viewed from a 3G mobile phone. A public IP address is needed for users to see video from 3G mobile phones. The “Access URL” line is the url address for the 3G mobile phone to input for seeing the video of the InPro product. Different 3G mobile may need to input this url in different way, detailed information could be found in the user manual of different 3G mobiles. URL address which you need to input to your 3G mobile phone. Note: For detailed settings on the 3G mobile phone, please refer to Appendix A. 47 Motion Detection Page InPro IP cameras automatically send snapshots of motion detection triggered events to the preset Email account or FTP site. Users can set up an Email account and FTP site in this page. Select motion sensitivity Choose send snapshots to FTP / E mail 48 Date / Time Page InPro series cameras can synchronize the date/time with the universally available time server ( for example stdtime.gov.tw) through NTP protocol. The date/time is corrected with the time server anytime when the Internet is connected. Select time zone 49 Admin Page In this page, you can modify the web login account. With this account, you can login to the InPro product and do any modifications. The default account is “admin” without password. In case of the web log in password is unknown, users can press the InPro camera reset button, which takes the InPro camera back to the default setting. 50 Upgrade Page Users can update the firmware of an InPro camera on this page. You can either upgrade the firmware from Speco’s FTP site or from the local file. Please contact Speco for latest available firmware. While upgrading, the status page appears. Note: Please do not power off the InPro camera during upgrading. 51 Reboot Page On this page, you can reboot the InPro camera. The InPro camera disconnects during rebooting. The Reboot process page appears when users click the reboot button. 52 Safe Mode In abnormal operation such as “power off” during firmware upgrading, the InPro needs to be upgraded to a new firmware in order to recover its function. Steps for recovering from SAFE MODE: ii. Use Specoiew to locate the InPro series product by clicking the “Auto Search” item on the SpecoView software. Login into the web configuration page of the InPro product. iii. Upgrade the firmware from the “Upgrade” page. i. 53 Appendix I: 3GPP/ISMA operation 3GPP/ISMA uses RTSP protocol for 3G mobile phones to display the video stream from some network devices, including InPro cameras. InPro cameras support the RTSP protocol and video/audio codec needed by 3GPP/ISMA. Users only need to access the address rtsp://ip_cam_address/CAM_ID.password on the 3G mobile phone to access the video of the InPro camera. No other extra configuration is needed on the InPro camera. Different 3G mobile phones may need different procedures to be able to key in the rtsp address. Please contact the 3G mobile phone customer service for more details. The video quality and resolution is the same value as set on the “video settings” page. Since the bandwidth provided by the 3G service is under 256k bps, it is better to configure the “Internet speed” of the InPro product to 128k or 64k bps. 54 CR300000252