1
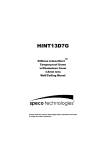
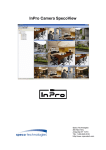
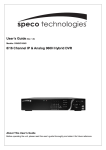
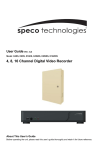
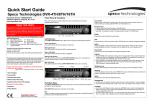
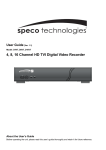
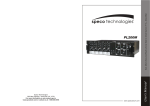
Quick Reference Guide (I) Speco Remote Remote Search Speco Remote Speco Mobile CAUTION: Speco Mobile program uses large amounts of data and you are responsible for all data charges. Please contact your service provider’s customer service to confirm or add an unlimited data plan. 1. Start Internet Explorer on your local PC. 2. Run the Speco Remote program by entering the following information in the address field. “http://IP address:port number” (The DVR IP address and the Speco Remote port number (default: 12088) set in the Network setup screen (Speco Remote tab)) Or, “http://DVRNS server address/DVR name” (The DVRNS server address and the DVR name registered on the DVRNS server) Android Phone NOTE: Dragging screen in the PTZ mode moves the PTZ camera in the opposite direction. 3. Select between the Remote Watch (Web monitoring) and Remote Search (Web search) modes. 4. Enter ID and PASSWORD. Clicking the LOGIN button will log in using the selected mode. Remote Watch 1. Click to log out the Speco Remote. 2. Click to access to the web search mode. 3. Position the mouse pointer on the Remote Watch logo to see the version of the Speco Remote program. 4. The DVR information window displays the login information of Speco Remote. 5. Click the screen format to select the desired display mode. 6. Click the camera button to select the camera to be viewed. 7. Click to adjust the brightness, contrast, saturation and hue of monitoring image. 8. Click to control pan, tilt and zoom of the camera. 9. Click to control alarm out devices at the remote site. 10. Click to set up the image drawing mode and OSD display. 11. Click to save the current image as a bitmap or JPEG file format. 12. Click to change the setup of the remote DVR. (Not supported for all DVR models) 13. The event status window at the bottom displays a list of events that were detected from the remote site. 14. Selecting a camera on the screen and clicking the right mouse button displays the text menu screen. Tap to display a list of camera channels. Tapping a channel displays video from that camera. This function is not supported in landscape. Tap to enter the PTZ mode and control the PTZ camera (in singlescreen layout only). This is not available if a PTZ camera is not configured in the DVR. A PTZ icon is displayed on the camera screen when the PTZ mode is available. Some of PTZ functions may not be supported in landscape. Tap to display the data volume. This function is not supported in landscape. 7. Select a DVR from the DVR list and a menu is displayed. Tap Search. 1. Click to log out the Speco Remote program. 2. Click to access to the web monitoring mode. 3. Position the mouse pointer on the Remote Search logo to see the version of the Speco Remote program. 4. The DVR information window displays the time information of recorded data on the remote DVR and login information of Speco Remote. 5. Click to blur, sharpen, equalize and interpolate playback images. Click to zoom out or zoom in the recorded image. Click to adjust the brightness of the recorded images. 6. The playback function buttons include fast backward, pause, play, fast forward, go to the first image, go to the previous image, go to the next image, and got to the last image. 7. Click the screen format to select the desired display mode. 8. Click to enter the time-lapse search mode which allows you to search for recorded data by time and then play back images found within the time parameters. Click to display an image from a specific time. 9. Click to enter the event search mode which allows you to search for event log entries using specific conditions and play back the images associated with those event entries. 10. Click to set up the image drawing mode and OSD display. 11. Click to save any video clip of recorded data as an executable file. Click to save the current image in a bitmap or JPEG file format. Click to print the current image on a printer connected to your computer. 12. Click to reload the recording data. 13. The Timetable displays recorded data of the selected camera by time (in hour segments). 1. Run the Play Store (Google Play) application in the device. 2. Enter Speco Mobile in the search field. 3. Install the Speco Mobile program and run the program. 4. Tap New site to register DVRs. 5. Enter the DVR information. Enter the DVR name. Enable the Use DVRNS option if the DVR uses the DVRNS function. Enter the IP Address and Watch Port number of the DVR. If the DVR uses the DVRNS function, enter the DVR name registered on the DVRNS server instead of the IP address. Enter the User ID and Password. 6. Select a DVR from the DVR list and a menu is displayed. Tap Watch. Single-screen layout only is supported. Tapping a camera screen hides or displays OSD (On Screen Display) information. / (Play/Pause): Plays or pauses recorded video on the screen. / (Move to the First Image/Last Image): Moves to the first/last recorded image of the date. / (Fast Backward/Forward): Plays back recorded video fast backward or fast forward. / (Move to the Previous Image/Next Image): Moves to the previous/next image (frame). This function is not supported in portrait. (Event Search): Allows you to search video recorded in event recording mode. This function is not supported in landscape. (Calendar Search): Allows you to search video recorded in timelapse recording mode. This function is not supported in landscape. (Camera): Displays a list of camera channels. In landscape, tapping and holding the screen displays a list of camera channels. Tapping a channel displays recorded video from that camera. (Received Data): Displays the data volume. This function is not supported in landscape. 8. Tap the (Event Search) button. A list of event recordings that occurred during the defined time on the same date as the recorded video on the current screen is displayed (supported only for Alarm In, Motion Detection and Video Loss events). If you want to search for event recordings for other dates, change the date by using Calendar Search and repeat Event Search. NOTE: Before changing the playback time, the user has to stop the playback. 14. Selecting a camera on the screen and clicking the right mouse button displays the text menu screen. Video from the DVR is displayed on the screen. Tapping a camera screen displays video from the camera in singlescreen layout. Pushing the Cancel button of the device returns to the previous layout. Dragging the screen moves to the previous or next camera group as long as there is video for the groups in the current screen layout. Tapping a camera screen in single-screen layout hides or displays OSD (On Screen Display) information. Tap to change the screen layout. Tapping the button displays a list of available layouts and allows you to select a layout. In landscape, tapping and holding the screen displays a list of available layouts. Customer Service: 1.800.645.5516 • www.specotech.com Search: If you enter text that you want to search for, search results matching the text are displayed from the event recording list. Event List: Tapping an event from the list displays the event-detected image on the screen. Tapping the Next button at the bottom displays the next 100 events. Quick Reference Guide (II) Speco Remote 9. Tap the (Calendar Search) button. Tapping a date on the calendar displays the recorded data from the selected date by time in one-hour segments at the bottom. → Tapping a specific hour at the bottom allows you to select a precise time down to the minute and second. → Tapping the Move button displays recorded video of the selected time. NOTE: If the DVR uses a NAT (Network Address Translation) device for network connection, it may be necessary to set up port forwarding manually on the NAT device or enable the UPnP function in both the DVR and NAT device. Refer to the user manual of the DVR for details about enabling the UPnP function. NOTE: If video is not displayed after connecting to the DVR, check that the Use Mobile option was enabled during the RTSP setup in the DVR. iPod Touch, iPhone, or iPad Tap to display a list of camera channels (in single-screen layout only). Tapping a channel displays video from the camera. Tap to enter the PTZ mode and control the PTZ camera (in single-screen layout only). This is not available if a PTZ camera is not configured in the DVR. A PTZ icon is displayed on the camera screen when the PTZ mode is available. Some of PTZ functions may not be supported in landscape depending on the mobile device. Tap to enable or disable two-way audio with the DVR (in singlescreen layout only). Tap to display the data volume. NOTE: In landscape of iPod Touch or iPhone, not all buttons above may be displayed. In this case, tapping and holding the screen displays a menu of the buttons. NOTE: Drag the menu bar to display hidden buttons when there is not enough space on the menu bar to display all the buttons. Blackberry Phone 1. Run the App World application in the device. 2. Enter Speco Mobile in the search field. 1. Run the App Store application in the device. 2. Enter Speco Mobile in the search field of the App Store application. 3. Install the Speco Mobile program and run the program. Search: If you enter text that you want to search for, search results matching the text are displayed from the event recording list. Event List: Tapping an event from the list displays the event-detected image on the screen. Tapping the Query Next button at the bottom displays the next 100 events. (Reload): Reloads the event recording list. 9. Tap the (Calendar Search) button. Tapping a date on the calendar displays the recorded data from the selected date by time in one-hour segments at the bottom. → Tapping a specific hour at the bottom allows you to select a precise time down to the minute and second. → Tapping the Move button displays recorded video of the selected time. NOTE: Dragging screen in the PTZ mode moves the PTZ camera in the opposite direction. If you want the PTZ camera to move to the same direction you are dragging, go to Settings → Speco Mobile in the mobile device and set the PTZ Direction – Reverse setting to ON. 7. Select a DVR from the DVR list and a menu is displayed. Tap Search. 3. Install the Speco Mobile program and run the program. 4. Tap Add New Site to register DVRs. 5. Enter the DVR information. Enter the DVR name. Enter the IP Address of the DVR. If the DVR uses the DVRNS function, check that the Use DVRNS option is enabled and enter the DVR name registered on the DVRNS server instead of the IP address. Enter the Rtsp Port and Watch Port numbers of the DVR. Check that the RTSP function is enabled in the DVR. Enter the User ID and Password. 4. Tap the button. 5. Enter the DVR information. Enter the DVR Name. Enter the IP Address and Watch Port number of the DVR. If the DVR uses the DVRNS function, enable the DVRNS option and enter the DVR name registered on the DVRNS server instead of the IP address. Enter the User ID and Password. 6. Select a DVR to monitor from the DVR list in the default menu. 7. Video from the DVR is displayed on the screen. 8. Push the Menu button of the device and a camera list is displayed. 9. Select a desired camera from the camera list and video from the camera is displayed on the screen. 10. Push the Cancel button of the device to monitor video from other DVRs. 6. Select the DVR from the DVR list and tap Watch in the menu. Video from the DVR is displayed on the screen. Tap Site List to release the connection to the DVR and returns to the site list. Tapping a camera screen displays video from the camera in singlescreen layout. Dragging the screen moves to the previous or next camera group as long as there is video for the groups in the current screen layout. Tap to change the screen layout. Tapping the button changes the layout in the following order: single-screen → quad → 3x3 or 4x4. The available layouts vary depending on the mobile device: single-screen only for iPod Touch, single-screen and quad for iPhone, single-screen to 3x3 or 4x4 for iPad. Tap Site List to release the connection to the DVR and returns to the site list. Single-screen layout only is supported. / (Play/Pause): Plays or pauses recorded video on the screen. / (Move to the First Image/Last Image): Moves to the first/last recorded image of the date. / (Fast Backward/Forward): Plays back recorded video fast backward or fast forward. / (Move to the Previous Image/Next Image): Moves to the previous/next image (frame). This function is not supported in portrait. (Event Search): Allows you to search video recorded in event recording mode. (Calendar Search): Allows you to search video recorded in time-lapse recording mode. (Camera): Displays a list of camera channels. Tapping a channel displays recorded video from that camera. (Received Data): Displays the data volume. NOTE: In landscape of iPod Touch or iPhone, not all functions above may be supported. In this case, perform the functions in portrait. 8. Tap the (Event Search) button. A list of event recordings that occurred on the same date as the recorded video on the current screen is displayed. If you want to search for event recordings for other dates, change the date by using Calendar Search and repeat Event Search. V1.9 Customer Service: 1.800.645.5516 • www.specotech.com