1
Power Supply and Isolaion
4.3 Selection Switch and Adjustment Switch
Power supply rated voltage:
15-40 V DC or 100-240 V AC/DC
50/60 Hz
Power supply input voltage:
15-40 V DC (±20%) or 100-240 V AC/DC (−15, +20%) 50/60
Hz
Power consumption:
24 V DC 1.7 W, 110 V DC 1.6 W
100 V AC 3.5 VA, 200 V AC 4.9 VA
Insulation resistance:
100 MΩ at 500 V DC between input, output, power supply, and
grounding terminals mutually.
Withstand voltage:
2000 V AC for 1 minute between input, output, power supply and
grounding terminals mutually.
The following adjustments can be performed using the switches on the
front panel (selection switch and adjustment switch) without the dedicated setting tool (refer to “4.2 Connector for Communication”).
The adjusted value is saved about 1 second after operating the adjustment switch. Also when the rotation direction of the adjustment switch
is changed, the adjusted value becomes effective about 1 second after
the change.
Position of selection switch
0
1
2
5
6
Rotation direction of adjustment switch
Adjustment operation
Increase of output adjusted value and
adjustment of input
Decrease of output adjusted value and
Counterclockwise
reset of input adjusted value
4. DESCRIPTION OF FRONT PANEL
Clockwise
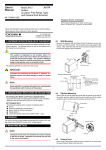
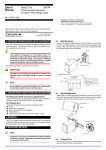
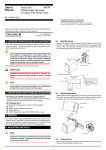
The figure below shows the isolator of which the front panel cover is
open.
[Adjusted volume by the adjustment switch]
One click changes about 0.005% of output range.
Connector for
communication
Operation indicating lamp:
Turns on at power on.
Selection
switch
4.3.1 Adjusting Output Using the Switches on the Front
Panel
(1) Output zero adjustment
Apply the 0% input signal. Turn the selection switch to “1.” Then
turn the adjustment switch clockwise to increase the output, or
turn it counterclockwise to decrease the output.
(2) Output span adjustment
Apply the 100% input signal. Turn the selection switch to “2.”
Then turn the adjustment switch clockwise to increase the output,
or turn it counterclockwise to decrease the output.
Adjustment
switch
4.3.2 Adjusting Input Using the Switches on the Front
Panel
4.1 Operation Indicating Lamp
The operation indicating lamp shows the operation status, abnormalities in a setting, and adjustment operation status by the adjustment
switch on the front panel.
(1) When the lamp is lit:
Power is turned on and the isolator is in the normal status provided that the selection switch is set to the position “0.”
(2) When the lamp is blinking rapidly:
The lamp repeats the rapid blinking until the internal processing is
completed during I/O adjustments by the adjustment switch.
(3) When the lamp is blinking slowly:
The lamp repeats the slow blinking until the isolator regains its
normal status when the following abnormalities occur.
• Abnormalities in a parameter setting
• The selection switch is set to the positions other than “0.”
• Input is outside of the range of −10 to 110%.
When performing the zero/span adjustment of input, be sure to turn the
adjustment switch counterclockwise to reset the adjusted value at first.
(1) Input zero adjustment
Apply the 0% input signal. Turn the selection switch to “5.” Then
turn the adjustment switch clockwise to adjust the input read
value, or turn it counterclockwise to reset the adjusted value.
(2) Input span adjustment
Apply the 100% input signal. Turn the selection switch to “6.” Then
turn the adjustment switch clockwise to adjust the input read
value, or turn it counterclockwise to reset the adjusted value.
NOTE
● Be sure to set the selection switch back to the position
“0” after each adjustment. Otherwise it may cause an
incorrect operation or malfunction because the
positions other than “0” are adjustment modes.
● When the selection switch is set to the positions other
than “0”, the setting tool can not be used for the setting.
4.2 Connector for Communication
Use the connector for communication when setting the parameters using a PC (VJ77 Parameter Setting Tool) or the Handy Terminal.
< How to connect with the setting tool>
JHT200
Handy Terminal
Item to be adjusted
No function
Output zero adjustment
Output span adjustment
Input zero adjustment
Input span adjustment
JUXTA communication cable with
5-pin connector (F9182EE)
[Provided with VJ77 and JHT200]
Modular jack conversion
adapter (E9786WH)
[Provided with VJ77]
Dedicated adapter (E9789HA)
[Provided with VJ77]
Dedicated cable (E9786WK)
[Provided with VJ77]
PC which is installed
with the VJ77.
*: Use the VJ77 of version R1.04 or later.
3
IM 77J04H05-01E
1st Edition
Jul 29, 2005-00