1
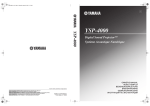
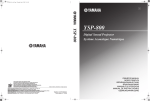
A Short Guide to XGobi
Professor B. D. Ripley
XGobi is a freeware system for dynamic graphics written by Deborah F. Swayne, Dianne
Cook and Andreas Buja at Bellcore, and ported to Windows by me. This short guide does not
explain all the modes of XGobi.
This version of the guide describes the August 2000 release of XGobi.
1
Usage from S-PLUS
The S-PLUS interface is just a wrapper function which produces files for XGobi to read. The
function is xgobi, in the library xgobi, so a typical invocation is
library(xgobi)
xgobi(crabs[,4:8], glyph=c(12,17,22,27)[crabs.grp])
Note that the library command is only needed once per session. The row and column labels
are obtained from the matrix or dataframe, but may also be supplied as arguments rowlab= and
collab= respectively. Argument colors= supplies (not surprisingly) the colour assignment
for each row.
2
Command layout
XGobi is entirely driven by the mouse, and has a number of modes. Its appearance in Grand
Tour mode is shown in figure 1. The window can be resized as a whole using the resize
corners. The proportions of the bottom panel devoted to the buttons, graphics and variable
selection can be adjusted by moving the tabs near the bottom of the separating lines with the
LEFT mouse button (subsequently abbreviated to L, analogously M and R). Depending how
your machine is set up, M may be emulated by pressing L and R together.
Some buttons1 hide menus of exclusive options, which are brought up by holding down L and
releasing it when the desired option is highlighted. Others have menus which are brought up
by a click. All stay-up menus and windows have a Click here to dismiss panel at the bottom—
use L to do so. Many buttons are toggles—click with L to highlight them (and switch the
function on) and click again to switch the function off.
Help is available on any feature of the command layout by clicking with R, which will bring
up a help window. If the window has a scrollbar, clicking L will move the window down by
the distance from the top to the mouse pointer, and clicking M will move the display to that
point proportionally in the total display.
Most of the major options are on the View menu. The Display button has a menu, itself mainly
of toggle actions. The only action you are likely to need is Add axes which is on by default,
but toggles to remove the display of the axes. I quite often deselect centring of the axes. The
1
These are shown with a text-list icon in the figure.
1
Figure 1: Screendump of XGobi in Tour mode on 6 variables, paused.
File menu has an item to Print which pops up a selection box to write postscript to a file or the
printer (but the latter does not work under Windows).
Selecting Variables
The right-hand panel selects variables. The variable name is a button which highlights if
that variable is selected, and hides a menu of transformations (use L on the name). There is
normally a box advising of the current functions of the buttons.
The circles below the variable names have two functions. They are used to select variables (by
clicking with the circle; the precise effect depends on the mode) and the line within the circle
indicates the current projection of that variable axis (as a dot if it is orthogonal to the view
plane). The boundary of the circle is made bolder if that variable is selected (see the figures).
3
Rotate mode
The layout is somewhat different in Rotate mode; see figure 2. Three variables must be
selected, by either clicking either L or M in the variables’s circle. (Initially the first three
2
variables are selected.) There are three sub-modes, corresponding to rotating about the X axis,
the Y axis or an arbitrary axis (the default), and variable selection differs in each.
Figure 2: Screendump of XGobi in Rotate mode.
There is a speed slider which can be dragged with L or clicked with L at the desired speed
of rotation. Change Direction toggles the direction of rotation. Pause is a self-explanatory
toggle; Reinit resets the original set of axes. Rock causes the rotation to change direction
every ten steps, so the speed slider also controls the angle of rock.
Save Coeffs saves the coefficients of the current projection (in two columns, X axis then Y
axis, with rows the variables in order), in a file.
3.1
Oblique axis
The current target variable is marked by a small circle in the centre of its disc when the mouse
pointer is the variable selection panel. Click (with either L or M) on a currently selected
variable to make it the target. Click on an unselected variable to have it replace the target.
In this mode think of the points in the central window as within a transparent ball. When the
rotation is paused, dragging with L or M in the central panel will mimic a reversed ‘trackball’
action rotating that ball.
3.2
Y axis
In this mode there are two X variables and a Y variable. One of the X variables is the target,
and is used for the X axis in the initial display. Click with M on a variable’s circle to make
3
it the Y variable, and with L to make it an X variable. (The last selected X variable is the
target, marked by a small circle in the centre of its disc when the mouse pointer is the variable
selection panel, and it is this X variable which is replaced.)
Rotation is about the Y axis, and ‘trackball’ action still works. The additional option Interpolate rocks 90◦ between the two X axes.
3.3
X axis
As for Y axis, but interchange X and Y throughout.
4
Grand Tour mode
This mode is used for Asimov’s (1985) grand tour and for projection pursuit. Its default
operation is a continuous grand tour through the space of selected variables (or nothing if
there are just two). This continually selects a random new projection in the p-dimensional
space of currently selected variables, and moves continuously (by interpolation) to that new
projection. When the projection is reached, another is chosen (and a slight pause may be
visible).
In this mode variables are selected by clicking L within the variable’s circle, and de-selected
by clicking M. Any number of two or more variables can be selected, but if only two are
currently selected, neither can be de-selected until a further variable is selected.
The left-hand panel controls operations. The slider at the top (see figure 1) controls the speed
of rotation; drag it with L, or click with L to indicate the place you want. Pause is a selfexplanatory toggle; Reinit resets the original set of axes. In Step mode, the tour stops at each
new view; click L on Go to continue. If Local Scan is selected, the tour returns to the starting
position after each new view.
The tour is ‘checkpointed’ at each new view, and can be selectively re-played, using the Backtrack and F or B buttons. (Once Backtrack is selected, F/B selects the direction of replay. The
number between the buttons indicates the last view number.
The I/O button hides a menu to save the coefficients of the current projection, and read/save
the checkpoint history.
The Interp button hides a menu giving a choice of interpolation method.
The PC Basis button transforms the variables to principal components. The variables change
names to PC1, PC2, ... but axes are still displayed in the original variables. When this button is selected or de-selected the previous view is shown in the new coordinate system. Saving
the coefficients in the principal components gives the coefficients of the principal components,
not the original variables. (The principal components may be saved from the I/O menu.) The
PC Axes button toggles showing the axes of the principal components or those of the original
variables.
The Section button switches to a section tour. Points not within a tolerance Eps (set by a
slider) of the current section hyperplane are shown as a single pixel point.
4
Projection Pursuit tours
Selecting the ProjPrst button also selects principal component basis (necessary to ‘sphere’ the
data) and brings up another window which tracks the PP index as the tour progresses. Which
index is selected from a menu hidden on the PP Index button, and this will have a slider
indicating the number of terms in the polynomial or bandwidth of the kernel density estimate
as appropriate. The indices are described in the help for that button; be warned that calculation
of the Friedman-Tukey and Entropy indices seems very slow for large datasets.
N.B. No optimization is done until the Optimz button is selected. This will perform a (rough)
gradient ascent when selecting new projections, and stop when a local maximum appears to
have been found. Allowing the tour to proceed randomly between sessions of optimization
may reveal other local maxima.
5 Enhancing plots
Scale
Select the Scale item on the View menu at any time when the view is stationary. The view can
be dragged with L, and stretched with M. There are also arrow buttons to perform these shifts.
The Stdize view button hides a menu controlling how variables are scaled. There are three
possibilities. The default is to rescale to [0, 1]. Other options are to rescale to mean zero,
largest distance one or to median zero, largest distance one.
Brush
Select the Brush item on the View menu at any time when the view is stationary. Within the
view the brush size can be changed by dragging with M. Brushing is performed by dragging
the brush outline (a rectangle) with L. (The rectangle can be moved without brushing by deselecting Brush on.)
To brush, a colour or glyph (symbol) or both must the selected from the hidden menus on
the Color and Glyph buttons. (The brush rectangle changes to the currently selected brushing
colour.) The effect can be Persistent, Transient or Undo by selecting (with L) the appropriate
button.
There are two erase buttons. The top one changes the effect of brushing to that of erasing
points. The lower button hides a menu which will restore erased points, swap erased and
non-erased points, and so on.
Reset hides a menu of reset actions.
Hide or Exclude allows a subset of the data to be selected in various ways; see its pop-up box.
Identify
Selectthe Identify item on the View menu at any time when the view is stationary. Moving
the pointer over the view labels (by the row label) the nearest point. Clicking L makes the
5
currently displayed label sticky (persistent).
Sticky labels will be preserved in future rotations or tours.
6 References
There is a user manual,
Swayne, D.F., Cook, D. and Buja A. (1991) User’s Manual for XGobi, a Dynamic Graphics
Program for Data Analysis Implemented in the X Window System (Version 2), Bellcore
Technical Memorandum TM ARH-020368.
but it is several versions of XGobi out of date and so rather confusing.
Background references for dynamic graphics and projection pursuit include:
Asimov, D. (1985) The grand tour: a tool for viewing multidimensional data. SIAM J. Sci. Stat.
Comp. 6, 128–143.
Cleveland, W.S. and McGill, M.E. (1988) Dynamic Graphics for Statistics. Wadsworth &
Brooks/Cole.
Cook, D., Buja, A. and Cabrera, J. (1991) Direction and motion control in the grand tour. In
Proc. 23rd Symp. Inter. Comput. Sci. Statist. (ed E. Keramidas), Interface Foundation of
North America.
Friedman, J.H. (1987) Exploratory projection pursuit. J. Amer. Statist. Assoc. 82, 249–266.
Friedman, J.H. and Tukey, J.W. (1974) A projection pursuit algorithm for exploratory data
analysis. IEEE Trans. Comput. 23, 881–889.
Hall, P. (1989) Polynomial projection pursuit. Ann. Statist. 17, 598–605.
Huber, P. (1985) Projection pursuit (with discussion). Ann. Statist. 13, 435–525.
Jones, M.C. and Sibson, R. (1987) What is projection pursuit (with discussion). J. Roy. Statist.
Soc. A 150, 1–36.
Sun, J. (1991) Significance levels in exploratory projection pursuit. Biometrika 78, 759–769.
Fuller details of many of the projection pursuit indices used can be found in:
Cook, D., Buja, A. and Cabrera, J. (1993) Projection pursuit indices based on orthonormal
function expansions. J. Comput. Graph. Statist. 3, 225–250.
6
Figure 3: Screendump of XGobi in Tour mode on 4 variables, after a projection pursuit optimization. The projection pursuit window has been positioned below the main window.
7