1
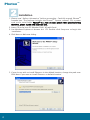
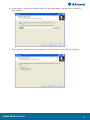
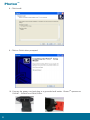
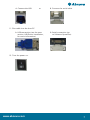
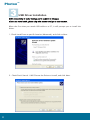
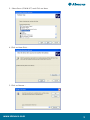
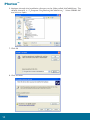
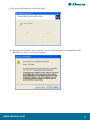
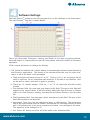
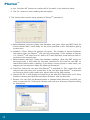
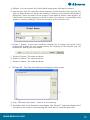
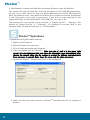
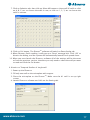
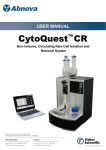
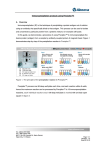
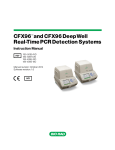
USER MANUAL
Photon
TM
96-well Chemiluminescence System
www.abnova.com
Table of Contents
Safety Items
2
Chapter 1 PhotonTM Overview
3
Chapter 2 Installation
4
Chapter 3 USB Driver Installation
8
Chapter 4 Software Settings
13
Chapter 5 PhotonTM Operations
16
I. Using the Default Settings
16
II. Save File in CSV for MAT
17
III. Kinetics or Temporal Studies
18
www.abnova.com
1
Photon
TM
Safety Items
Caution!
1. The PhotonTM includes the system, manual, CD, power cord, and a serial cable.
PhotonTM is a very delicate system with optoelectronics; therefore, please handle
with extreme care.
2. To prevent electrically related injuries and to identify any property damage during
shipment, properly inspect all electrical equipment priors to use and immediately
report any damage or defects. Contact an Abnova Sales Representative for any
servicing of the equipment that requires removal of covers on system.
3. To avoid electric shock, do not open the system, use the supplied power cords only
and connect to properly grounded wall outlets.
4. Do not expose the system to strong light. Direct sunlight and other strong
illumination may cause damage of the photon detector, even when the system is
not in operation. We recommended that you close the microplate cover immediately
after placing the sample plate into the system.
5. Read all safety instructions and understand the operation procedures before
proceeding with the installation, maintenance, and servicing of all components.
2
PhotonTM Overview
PhotonTM is a compact system designed for highly sensitive chemiluminescence and
bioluminescence detection. The system measures the luminescence intensity in a
96-well microplate (black, white, or opaque). These microplates have microwells
with a “clear bottom”, allowing for luminescence detection from the bottom of the
well. Many companies such as Nunc, Costar, Corning, BD Biosciences, Perkin Elmer,
etc., have microplates for luminescence applications. Because PhotonTM uses a stateof-the-art photoncounting multiplier tube as the detector element, the system is
extremely light sensitive. PhotonTM has the ability to detect very small amounts of
analyte, in the range of attomoles, by counting the number of photons generated
from a chemiluminescent or bioluminescent experiment. The detector is sensitive in
all visible ranges.
PhotonTM combines the latest low-noise detector and electronic circuitry to provide
very low background noise and very high signal. Its broad dynamic range covers
over 7 orders of magnitude. The superior mechanical design eliminates most of the
-5
crosstalk down to ~ 10 between the adjacent wells. The system is flexible and easy
to use. The user can select to scan any one or any set of the 96 wells, at a measuring
time of 0.1 - 10 seconds per well, and any number of scans according to your choice.
The system can also be used for kinetic and luminescence time profile studies. After
clicking on the “Go” bottom, the system will automatically and quickly scan all of the
reactions in the microwells and display the results.
PhotonTM uses a Windows-based PC or notebook computer as its microprocessor.
The system is interfaced to the computer by a simple plug-in (serial port) connection.
A CD, with user-friendly software, is provided for easy installation. The resulting
data can be displayed as a spreadsheet in Microsoft Excel or exported as a commadelimited (.CSV) file. The data, reported as the number of optical counts, is displayed
as it is collected. The software also includes utilities for routine calibration and
operation. The resulting data can be saved or printed out. The system, approximately
16” x 11” x 4” and 20 lbs, is easily portable for sharing between laboratories or
researchers.
www.abnova.com
3
Photon
TM
Installation
1. Please read “Safety Information” before proceeding . Carefully unpack PhotonTM
fromthe box. The package includes the PhotonTM system, manual, CD, a power
cord, and a serial cable.
2. Insert CD in the host PC (Window 2000, XP) with Excel.
3. Use Windows Explorer to browse the CD. Double-click Setup.exe to begin the
installation.
4. Click Next on Welcome dialog.
5. If you do not wish to install PhotonTM in the default location, change the path now.
Click Next if you want to install PhotonTM to default location.
4
6. If you want to change the folder name on the Start Manu, change now, otherwise
click on Next.
7. If you want to create an Icon on desktop, check the box or click Next to continue.
www.abnova.com
5
Photon
TM
8. Click Install.
9. Click on Finish when prompted.
10. Connect the power cord and plug to a grounded wall outlet. PhotonTM operates at
100VAC - 240VAC and 50Hz/60Hz.
6
A. Connect the USB
or
B. Connect the serial cable
11. Plus cable into the host PC.
A. USB connection (see the next
section, USB Driver Installation,
for more information).
B. Serial connection (go
to Software Operation).
12. Turn the power on.
www.abnova.com
7
Photon
TM
USB Driver Installation
When the first time you attach USB cable to a PC, it will prompt you to install the
driver.
1. Check Install from a specific location (Advanced), and click on Next.
2. Check Don’t Search. I Will Choose the Driver to Install, and click Next.
8
3. Select Ports (COM & LPT) and Click on Next.
4. Click on Have Disk…
5. Click on Browse…
www.abnova.com
9
Photon
TM
6. Navigate through the Installation directory to the folder called UsbCableDriver. The
default directory is “C:\Program Files\Photon\UsbCableDriver\”. Select SERWPL.INF
and click on Open.
7. Click OK
8. Click on Next.
10
9. The wizard will begin to install the driver.
10. Windows XP will warn that the driver has not been tested for compatibility with
Windows XP. Click on Continue Anyway.
www.abnova.com
11
Photon
TM
11. Copy files.
12. Click Finish.
12
Software Settings
Start the PhotonTM software from the program icon on the desktop or the Start menu.
The main PhotonTM window is shown below:
There are three tabs (Selection, Setting, and Data) in the main program window.
Each tab button is responsible for specific information and tasks related to PhotonTM
operation.
Click on each tab button to change the display.
1. The Selection (default) tab (shown above) is automatically selected upon launching
the PhotonTM application. The boxes in the window allow the user to select one,
some, or all of the wells in the micoplate.
a. There are eight row buttons from “A” to “H”. Click on A, B, C, etc. to choose the all
wells in that row. For an individual well selection, if the well is not checked, click
on the well to select, and click it again to unselect.
b. There are 12 column buttons. Click on “1” to “12” to select the all wells in that
column.
c. The Operator field. You may type your name in this field. The text in this field will
appear in the spread sheet. It will also effect where the data file save to. Please
refer to IV. How PhotonTM naming the data file and where PhotonTM save the data
file.
d. The Experiment field. You may type a short description in this field. The text in this
field will transfer to the data file.
e. Integration Time (ms): Set the integration time, in milliseconds. The integration
time is the time interval that the Photon will allocate for counting photons at each
well. 100 milliseconds is the most common used value. You can type in the value.
The value has to be multiple of 10
TM
f. Use “Select All” button to select all of the wells in the selection table.
www.abnova.com
13
Photon
TM
g. Use “Unselect All” button to unselect all of the wells in the selection table.
h. The Go! button to start reading the microplate.
2. The Setting tab controls many aspects of PhotonTM operations.
a. Delay between pass(sec): Delay time between each pass. After the PMT finish all
of the selected well, it will delay for the time specified in this field before going
to next pass.
b. Number of Pass: Select the number of passes. The number of passes indicates
how many times the PhotonTM will read the microplate. If the number of passes
is 2, PhotonTM will read from A1 well to H12 well and than come back to well A1
to perform the second pass.
c. Delay between well(sec): Delay time between readings. After the PMT moves to
the target well, it will delay for the time specified in this field for the PMT to
settle down before take a reading. If you have a strong signal in some wells, we
suggest you increase this delay for better performance.
d. Com Port: Select the com port that PhotonTM is attached to. This combo box will
only list the com ports your system has. If the com port that PhotonTM is attached
to does not show in the combo box, please refer to the Q&A section.
e. Output file Dir: It will display the location of the data file. Please refer to IV. How
PhotonTM naming the data file and where PhotonTM save the data file
f. Browse: You can click the Browse button to change which directory to which you
want to save the file. Clicking this button will pop up a directory selection dialog
as shown here.
14
g. Default: You can restore all of the default settings by clicking this button.
h. Save Project: You can save the current settings, so that the next time you can just
click on single button to retrieve the settings. Clicking on this button will display a
dialog box; enter the name of the project if you want to create a new project, or
select which existing project you want to write the settings to (overriding that
project’s existing settings). There are 4 project spaces you can use..
i. Project 1 button. If you have saved the settings for a project, the name of the
project will display on the project button. By clicking on this button you can
retrieve the setting you have saved.
j. Project 2 button. The same as above.
k. Project 3 button. The same as above.
l. Project 4 button. The same as above.
3. The Data tab. The data and reading will display on this screen.
a. Stop: You may stop Photon
TM
while it is still running.
b. Scroll Bar: Due to the limited screen display size, Photon could not display all of
the data in one screen. You may drag the scroll bar to scroll the data view.
TM
www.abnova.com
15
Photon
TM
4. How PhotonTM naming the data files and where PhotonTM saves the data file
The system will save the data file using the file name as YYYY_MM_DD_Experiment_
hh_mm_ss. xls. YYYY stands for year in 4 digits. MM stands for month. DD stands for
date. hh stands for hour. mm stands for minute and ss stands for second. Experiment
is the same text as you type in previously. If you did not type anything in the
Experiment field, the file name will be YYYY_MM_DD__hh_mm_ss .xls.
The system will save the file to the location of “Output file Dir” + Operator. The
default of “Output file Dir” is “C: \Photon\”. For example if you type “Bob” in the
Operator field, the data file will save to “C:\Photon\Bob\”.
TM
Photon Operations
I. Operations using the default settings.
1. Power up the PhotonTM.
2. Allow 30 minutes for warm up.
3. Fill a 96-well microplate with reagents.
4. Place microplate into the PhotonTM.
5. Launch the PhotonTM software and click on the Setting tab.
6. Select the com port that connects to PhotonTM and leave the rest of settings at
default.
16
7. Click on Selection tab; then click on Select All button to choose all 96 wells or click
on A, B. C. etc. to choose the wells in row, or click on 1, 2, 3, etc. to choose the
wells in column.
8. Click on Go! button. The PhotonTM software will switch to Data display tab.
9. When Photon finish reading, it will pop up a “Done” message box. Click “OK” to
dismiss the dialog, and the system will automatically launch Excel spread sheet.
TM
10. When you next launch the PhotonTM software all of the settings will be the same
as from the previous session, therefore you only need to select the well you want
to read and click the Go! button.
II. Kinetics or Temporal Studies of single well
1. Power up the PhotonTM
2. Fill only one well on the microplate with reagent.
3. Place the microplate on the PhotonTM. Make sure the A1 well is on up right
corner.
4. Launch PhotonTM software and click on the Setting tab.
www.abnova.com
17
Photon
TM
5. Change Delay between pass to 60 seconds and change the number of passes to
10. Effectively this setting will read the well 10 times at a 60-second delay
between reads. Make sure you select Use file name and type the file name next
to check box.
6. Click the Save Project button and type Temporal in the project name field. Click on
OK to dismiss the dialog.
7. Click on Selection tab again. Select the single well you want to do temporal study
on and click Go!. This will take more than 10 minutes (60 sec. × 10 passes = 10
minutes).
8. The next time you want to do the same temporal study, you only need to click on
the “Temporal” project button and select the single well you want to read.
III. Kinetics or Temporal Studies of multiple well
1. Power up the PhotonTM
2. Fill the wells on the microplate with reagent.
3. Place the microplate on the PhotonTM. Make sure the A1 well is on up right
corner.
18
4. Launch PhotonTM software and click on the Setting tab.
5. Change Delay between pass to 60 seconds and change the number of passes to
10.
6. Click on Selection tab again. Select the wells you want to do temporal study on and
click Go!.
7. Effectively this setting will read A6 B6 C6 to H7 than delay for 60 second. And go
back to read A6 B6 C6 to H7 again. It will repeat for 10 times.
www.abnova.com
19
Photon
20
TM
Abnova Corporation
9F, No. 108, Jhouzih St., Neihu, Taipei 114, Taiwan
Tel: + 886 2 8751 1888 Fax: + 886 2 8751 1166
version 1.0