1
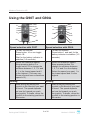
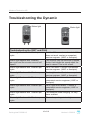
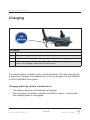
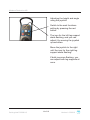
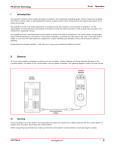
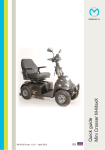
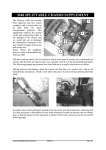
P9-0291-Q ver. 1.0.0 - april 2011
GB
Joystick G90A and G90T
User manual
medemagroup
Medema Production A/S
Quick guide P9-0291-Q
2 of 16
Version 1.0.0/2011
Medema Production A/S
Contents
Introduction................................................................................................ 4
Joystick parts ............................................................................................ 5
Using the G90T and G90A ........................................................................ 6
Selecting seat functions ......................................................................... 8
Safety check............................................................................................... 9
Troubleshooting the Dynamic ................................................................ 10
Programming ........................................................................................... 12
Charging ................................................................................................... 13
Own notes ................................................................................................ 15
Quick guide P9-0291-Q
3 of 16
Version 1.0.0/2011
Medema Production A/S
Introduction
Congratulations on your new joystick G90. It will let you manage your
electric wheelchair in a good and safe way.
On the following pages we will examine the opportunities that lie in the
joystick.
Enjoy.
Quick guide P9-0291-Q
4 of 16
Version 1.0.0/2011
Medema Production A/S
Joystick parts
5
5
2
6
4
1A
3
3
9
7
6
2
4
1
9
3
8
11
10
10
1B
7
8
Dynamic G90T
Dynamic G90A
1A
Start/stop button (push button)
1
Start/stop button
1B
Start/stop button (toggle switch)
2
Display
2
Display
3
Select program
3
Gear down/up
4
Display for seat functions
4
Display for seat functions
5
Battery indicator
5
Battery indicator
6
Magnetic lock
6
Magnetic lock
7
Horn
7
Horn
8
Joystick
8
Joystick
9
Seat function/lights, hazard
warning lights and indicators
9
Seat function/lights, hazard
warning lights and indicators
10
Indicator left/lights
10
Select seat function (toggle
switch)
11
Indicator right/hazard warning
lights.
Quick guide P9-0291-Q
5 of 16
Version 1.0.0/2011
Medema Production A/S
Using the G90T and G90A
5
5
2
6
2
6
4
1A
4
1
3
3
9
7
3
9
11
8
10
10
7
1B
8
Speed selection with G90T
Speed selection with G90A
1
To start the scooter:
Press button 1A or use toggle
switch 1B
Wait for the battery indicator to
stabilise (3-5 seconds)
1
2
2
Select the maximum speed:
Keep pressing button 3 or
toggle switch 10 to change the
numbers between 1, 2, 3, 4 and
5. 1 is the lowest speed and 5
is the highest. (This may vary.
Some scooters have a maximum
speed of 3).
To start the scooter:
Press button 1 and wait for the
battery indicator to stabilise (3-5
seconds)
Select the maximum speed:
Keep pressing button 3 to
change the numbers between
1, 2, 3, 4 and 5 on the display.
Select the speed you want. 1 is
the lowest speed and 5 is the
highest.
Driving
Driving
1
1
Start driving by moving the
joystick in the direction you want
to travel. The speed depends
on how far forward you push
the joystick. To brake, return the
joystick to the starting position in
the centre.
Quick guide P9-0291-Q
6 of 16
Start driving by moving the
joystick in the direction you want
to travel. The speed depends
on how far forward you push
the joystick. To brake, return the
joystick to the starting position in
the centre.
Version 1.0.0/2011
Medema Production A/S
5
5
2
6
2
6
4
1A
4
1
3
3
9
7
3
9
11
8
10
10
7
1B
8
2
It is important to check the
battery indicator regularly to
prevent the scooter stopping
because of flat batteries.
2
It is important to check the
battery indicator regularly to
prevent the scooter stopping
because of flat batteries.
Note!
If you are driving on a sloping surface with poor grip, e.g. gravel or snow, it
is important to brake gently to avoid losing control of the scooter. To brake
gently: move the joystick to the central position SLOWLY.
Quick guide P9-0291-Q
7 of 16
Version 1.0.0/2011
Medema Production A/S
Selecting seat functions
A
B
C
D
E
Selecting seat functions with the
G90T
Selecting seat functions with the
G90A
A
Left footrest
A
Left footrest
B
Seat angle (tilt)
B
Seat angle (tilt)
C
Backrest angle
C
Backrest angle
D
Seat height
D
Seat height
E
Right footrest
E
Right footrest
If A and E are flashing at the same time, you can operate both footrests at
once. This depends on the programming.
Select the icon for the part you want to adjust, then use the joystick to
adjust.
Quick guide P9-0291-Q
8 of 16
Version 1.0.0/2011
Medema Production A/S
Safety check
Daily safety check:
The electronic system has an integrated safety check which runs up to
100 times per minute. To supplement this check, you should carry out the
following regular checks.
•
•
•
•
Switch off the electronic system (no lights in the display)
Check if the joystick is bent
Check if the joystick is damaged in any other way
Check that it returns to the central position when you release it
If the check reveals any problems, contact a competent service engineer
before using the scooter again.
Weekly safety check:
Parking brake: This test must be carried out on a flat surface with at least
one metre of free space around the scooter.
•
•
Start the scooter and slowly move the joystick forward. There is a
clicking sound. (The scooter may start to move in this setting).
Immediately release the joystick and listen for the clicking sound, which
should occur within one second.
Repeat in all directions.
•
•
Check that the rubber bellows around the joystick is intact. This is
important, as the bellows prevent moisture getting into the electronic
system.
Check that the control box is properly secured.
If the check reveals any problems, contact a competent service engineer
before using the scooter again.
Quick guide P9-0291-Q
9 of 16
Version 1.0.0/2011
Medema Production A/S
Troubleshooting the Dynamic
Status light
Status light
Troubleshooting the G90T and G90A
Status light flashes with 1 flash per
cycle
Switch off the scooter and restart. If this
does not work, contact a competent
service engineer. (HMC or therapist).
Status light flashes with 2 flashes
per cycle and the scooter runs at half
speed.
The scooter may be fitted with a speed
limiter that halves the speed when the
seat is raised. This is not a fault.
Status light flashes with 3 flashes per
cycle.
Fault, left motor. Contact a competent
service engineer. (HMC or therapist).
Status light flashes with 4 flashes per
cycle
Fault, right motor. Contact a competent
service engineer. (HMC or therapist).
Status light flashes with 5 flashes per
cycle.
Fault, left motor brake. Contact a
competent service engineer. (HMC or
therapist).
Status light flashes with 6 flashes per
cycle
Fault, right motor brake. Contact a
competent service engineer. (HMC or
therapist).
Status light flashes with 7 flashes per
cycle.
The batteries need charging. Or they
have a defect.
Status light flashes with 8 flashes per
cycle.
The battery voltage is too high.
Quick guide P9-0291-Q
10 of 16
Version 1.0.0/2011
Medema Production A/S
Status light
Status light
Status light flashes with 9 flashes per
cycle.
Electronic fault. Contact a competent
service engineer. (HMC or therapist).
Status light flashes with 10 flashes per
cycle.
Electronic fault. Contact a competent
service engineer. (HMC or therapist).
Status light flashes with 11 flashes per
cycle.
The motor has exceeded the
maximum voltage, or has come close
to exceeding it for longer than the
parameter value. Contact a competent
service engineer. (HMC or therapist).
Status light flashes with 12 flashes per
cycle.
Wrong combination of modules.
Contact a competent service engineer.
(HMC or therapist).
The scooter runs at half speed or not
at all.
If the cause is not a raised seat, this
may be a serious fault. Contact a
competent service engineer as soon as
possible. (HMC or therapist).
Quick guide P9-0291-Q
11 of 16
Version 1.0.0/2011
Medema Production A/S
Programming
The Dynamic electronic system is programmable so that the driving
characteristics can be optimised for individual users. Programming must
only be carried out by people trained in Dynamic’s control systems.
Changing parameters incorrectly can produce driving characteristics that
are dangerous for the user.
Note
Mobile phones should not be used very close to the scooter as they
generate electromagnetic fields that may affect the electronic system.
The electronic system of the scooter itself also generates some
electromagnetic fields, which on rare occasions may affect equipment like
the alarm systems in shops.
Dynamic’s control systems have been tested and meet the requirements of
ISO7176/14 and EN12184
Quick guide P9-0291-Q
12 of 16
Version 1.0.0/2011
Medema Production A/S
Charging
Charging
1
Plug the cable into the control box on the scooter.
2
Plug the charger into the outlet or switch it on.
3
Use the indicator lights on the charger to check that charging has started.
4
When charging has finished, switch off or unplug the charger, and then
remove the charger cable from the control box.
The actual battery indicator on the vehicle will show “full” after charging for
a short time. However, the batteries are not fully charged until the indicator
on the CHARGER turns green.
Charging while the vehicle is switched on
•
•
The battery indicator will flash during charging.
After charging, the battery indicator will flash for about 1 minute after
the charging cable is unplugged.
Quick guide P9-0291-Q
13 of 16
Version 1.0.0/2011
Medema Production A/S
Adjusting the height and angle
using the joystick:
Switch to the seat functions
setting by pressing the red
button.
The icon for the left leg support
starts flashing, and you can
adjust it by moving the joystick
up and down.
Move the joystick to the right
until the icon for the right leg
support starts flashing.
If both icons are flashing, you
can adjust both leg supports at
once.
Quick guide P9-0291-Q
14 of 16
Version 1.0.0/2011
Medema Production A/S
Own notes
Quick guide P9-0291-Q
15 of 16
Version 1.0.0/2011
medemagroup