1
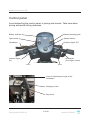
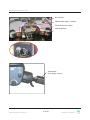
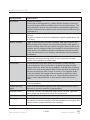
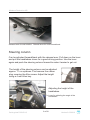
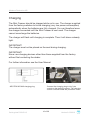
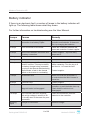
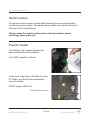
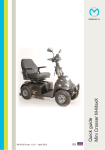
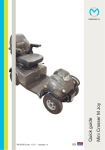
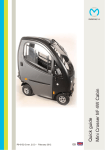
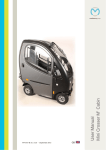
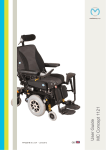
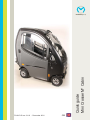
Quick guide
Mini Crosser M1 Cabin
medemagroup
P9-0151-B ver. 2.0.0 - December 2011
GB
Medema Production A/S
Quick guide P9-0151-Q
2 of 20
Version 2.0.0/2011
Medema Production A/S
Contents
Quick guide to the Mini Crosser M1 Cabin .............................................. 4
Introduction................................................................................................ 4
Control panel ............................................................................................. 5
Seat rotation............................................................................................... 8
Steering column ........................................................................................ 9
Charging ................................................................................................... 10
Battery indicator ...................................................................................... 11
Serial number........................................................................................... 12
Fuel for heater.......................................................................................... 12
Heater ....................................................................................................... 13
Windscreen wiper / washer .................................................................... 14
Driving the Mini Crosser M1 Cabin ......................................................... 15
Getting in and out ................................................................................. 15
When driving in traffic... ........................................................................ 17
Electromagnetic compatibility ............................................................... 17
Braking systems ...................................................................................... 18
Own notes ................................................................................................ 19
Quick guide P9-0151-Q
3 of 20
Version 2.0.0/2011
Medema Production A/S
Quick guide to the Mini Crosser M1 Cabin
Introduction
Congratulations on your new Mini Crosser M1 Cabin electric mobility
scooter. You have now taken possession of an electric mobility scooter
developed for outdoor driving by active users. It is what is called a Class C
vehicle in accordance with the European classification of electric scooters.
For optimum enjoyment of this vehicle - and to avoid breakdowns and
accidents - we recommend that you read the User Manual carefully. As a
new user, you should pay particular attention to the section entitled “Driving
the Mini Crosser M1 Cabin”.
Note:
This Quick Guide is to be regarded as a supplement to the User Manual.
The information in the Quick Guide cannot, therefore, be expected to be
complete.
NB: Errors and omissions excepted. Specifications subject to change.
We reserve the right to update this guide as required.
Warning!
The vehicle must not be lent to persons who are not completely familiar
with it.
The vehicle is designed for one person only.
Max. user weight 175 kg. Can be specially adapted at the factory for users
weighing up to 200 kg.
Medema Production A/S is not responsible for any damage or injuries
caused by inappropriate or unsafe use of the Mini Crosser.
Quick guide P9-0151-Q
4 of 20
Version 2.0.0/2011
Medema Production A/S
Control panel
Avoid subjecting the control panel to jarring and knocks. Take care when
driving and avoid hitting obstacles.
Battery indicator
Hazard warning lights
Light switch
Speed selector
Handbrake
Indicator lights, R/L
Accelerator
(four-finger control)
Indicator lights,
R/L
Horn
Horn
Lever for adjusting the angle of the
handlebars
Charging socket
Key switch
Quick guide P9-0151-Q
5 of 20
Version 2.0.0/2011
Medema Production A/S
Air channel
Windscreen wiper + washer
Fresh-air/hot-air switch
Heat regulation
Accelerator
(four-finger control)
Quick guide P9-0151-Q
6 of 20
Version 2.0.0/2011
Medema Production A/S
Designation
Description
Key switch
To start the vehicle:
Turn the key to driving position (1) When the Mini Crosser is turned on,
the control system performs a safety check of the electrical system. The
check lasts half a second. If the accelerator is operated during this time,
the Mini Crosser will not be able to move until you have turned the key to
0 and back to 1.
Speed selector
The tortoise in minimum position indicates the lowest speed range.
0-6 km/h
The hare in maximum position indicates the highest speed range. Up
to 15 km/h
Battery indicator
Lights up when the key is turned. Indicates, after half a second, the
battery charge level. It gives a more precise indication after approx. 1
minute of driving. When the red, amber and green sections are lit, the
batteries are fully charged. When the indicator is at the bottom of the
amber section, the batteries should be charged as soon as possible.
If only the red section is lit or flashing, the batteries must be charged
immediately.
Handbrake
Acts on the rear wheel and should only be used as an extra /
emergency brake and parking brake. It can be secured in locked
position. Also available as a foot brake.
Accelerator
Activate the arm at the front slowly and the Mini Crosser will start
to move forwards. The more the arm is pressed, the faster the Mini
Crosser will move. When the arm is released, it will flip back to starting
position of its own accord and the Mini Crosser will stop. Activating the
rear arm will cause the Mini Crosser to reverse. The magnetic brake
on the rear wheels will engage when the scooter is stationary and is
equivalent to the parking brake on a car. The accelerator can also be
used to control speed downhill. In this case the motor will act as a
brake.
Light switch
Turns on the front and rear lights. The key switch must be in position
1 (driving position).
Hazard warning
lights
Turns on all the indicator lights at once. Also works when the key is
removed or turned to position 0 (stop position).
Indicator switch
Left arrow: indicator, left-hand side. Right arrow: indicator, right-hand
side. Activate the same switch to turn the indicators off.
Horn
Powerful electric horn. Press the horn switch to activate.
Charging socket
Turn off the key switch during charging. Please note that it is
not possible to drive the scooter while the batteries are char-ging. See
also the section entitled “Batteries and charging”.
Quick guide P9-0151-Q
7 of 20
Version 2.0.0/2011
Medema Production A/S
Designation
Description
Windscreen wiper
Starts the windscreen wiper. Notice the variable speed ajustment.
windscreen washer
Spraying washer fluid on the front window.
Fresh-air/hot-air
switch
Switch to toggle between heated and unheated air.
Heat regulation
Adjustable heat in the cabin. Note: Heat can be turned on even if the
key is not in the key switch. Heating ribs should NOT be covered.
REMEMBER! turn off the heat when you leave the vehicle. Otherwise
the batteries may be flat the next time you want to use it.
Seat rotation
It is only possible to rotate the seat in a Mini Crosser with Cabin if both dors
are open.
Pull the release lever back. The seat can be rotated 90° to either side.
When the lever is released, it engages with the seat and holds it in place at
45° intervals.
Other seats that can be supplied for the Mini Crosser work on similar
principles. The release lever is normally mounted on the right, but can be
put on the left if so wished.
IMPORTANT!
The Mini Crosser is most stable when the seat is in its lowest position.
Take extra care when lowering the seat on a Mini Crosser using electric
seat adjustment. Make sure that nothing is trapped in the space between
the seat and the chassis.
Quick guide P9-0151-Q
8 of 20
Version 2.0.0/2011
Medema Production A/S
1
2
Release lever for seat rotation. Release lever for seat forward/back.
Steering column
Can be adjusted forward/back with the release lever. Pull down on the lever
and pull the handlebars closer for a good driving position. Use the lever
again and push the steering column forward to make it easier to get out.
The height of the steering column can be adjusted
approx. 11 cm up/down. First remove the rubber
plug covering the Allen screw. Adjust the height
using a 4 mm Allen key.
Adjusting the height of the
handlebars.
Lever for adjusting the angle of the
handlebars
Quick guide P9-0151-Q
9 of 20
Version 2.0.0/2011
Medema Production A/S
Charging
The Mini Crosser should be charged while not in use. The charger supplied
from the factory switches to trickle charging (very low power consumption)
automatically when the batteries are fully charged. You can therefore leave
the charger connected until the Mini Crosser is next used. The charger
cannot overcharge the batteries.
The charger will flash until charging is complete. Then it will show a steady
light.
IMPORTANT!
The charger must not be placed on the seat during charging.
IMPORTANT!
Never use charging devices other than those supplied from the factory
without first contacting the dealer.
For further information see the User Manual.
NEUTRIK NC3MX charging plug
Quick guide P9-0151-Q
Connect the charging plug to the 3-pin
socket on the steering column. The charging
socket is located under the protective cover.
10 of 20
Version 2.0.0/2011
Medema Production A/S
Battery indicator
If there is an electronic fault, a number of lamps in the battery indicator will
light up. The following table shows what they mean.
For further information on troubleshooting see the User Manual.
Lamps
Causes
Remedy
1 lamp
The batteries need charging or the
connection to a battery is poor.
Check all connections between the
controller and batteries. If these are
fine, try charging the batteries
2 lamps
Poor connection to the motor.
Check the connection between the
motor and controller. Contact supplier.
3 lamps
Short-circuit between the motor and
a battery connection.
Contact supplier - say how many
lamps are lit.
4 lamps
Not in use
5 lamps
Not in use
6 lamps
The S180 is prevented from driving.
Inhibit 2 is active. This may be due to
the battery charger being connected,
the plug to the thermal switches being
disconnected, a fault in the thermal
switch or the scooter is overheating.
Stop the unit and wait 3-5 minutes
before restarting. Turn the key to 0
and then to 1 to reset the fault.
7 lamps
Accelerator fault.
Make sure that the accelerator is
in neutral when the Mini Crosser is
turned on.
8 lamps
Controller fault.
Contact supplier.
9 lamps
Poor connection to motor brake.
Check the connections from brake to
controller, or push the brake lever up.
Check that the vehicle is not
disengaged.
Magnetic brake is disengaged.
Contact supplier.
10 lamps
The controller has been supplied
with a high voltage in excess of 38
V. Usually seen in the case of a poor
connection.
Check all connections from the
batteries to the controller.
Running
lights
Charger is connected.
Remove charger.
Quick guide P9-0151-Q
11 of 20
Version 2.0.0/2011
Medema Production A/S
Serial number
All vehicles have a serial number plate showing the year of production,
month and serial number. The same serial number can also be found on
the front of the User Manual.
Please quote the serial number when making inquiries about
servicing, spare parts, etc.
Fuel for heater
The tank for fuel is placed behind the
seat, and filled from the outside.
Use ONLY paraffin or diesel.
In the front, right side of the Mini Crosser
M1 Cabin, you find the the exhaustion
from the heater.
NOTE! It gets VERY hot.
Exhaustion from heater.
Quick guide P9-0151-Q
12 of 20
Version 2.0.0/2011
Medema Production A/S
Heater
Knob to:
- turn heater on/off
- ajusting the temperature
- remove fault code.
Indicator light for on/off and fault
code readout.
For more information: see Webasto
user guide.
IMPORTANT!
The heating ribs by the window and by the legs should NOT be covered up
when the heating is on. That will cause overheating of the heater.
Quick guide P9-0151-Q
13 of 20
Version 2.0.0/2011
Medema Production A/S
Windscreen wiper / washer
Start the windscreen wiper by
turning this knob.
Notice the smooth speed ajusting.
Windscreen wiper - turn the knob.
Washer - press this button
The Container for washer fluid is
placed under the front cover.
The container for the washer fluid.
Quick guide P9-0151-Q
14 of 20
Version 2.0.0/2011
Medema Production A/S
Driving the Mini Crosser M1 Cabin
Getting in and out
It is important to learn a safe technique for getting in and out of the Mini
Crosser.
In general the following method should be followed:
•
•
•
•
Make sure that the Mini Crosser M1 Cabin is off (switch turned to 0) when
getting in and out, otherwise the Mini Crosser could start if the accelerator was
touched inadvertently.
Make sure that the brake is on. (Lever for disengaging motor in top position.)
Put the steering column in vertical position.
If necessary, raise the armrest.
Note! - Do NOT use the dors as support, when entering or getting out of the
vehicle.
IMPORTANT!
The Mini Crosser will turn itself
off automatically after it has been
stationary for 10 minutes even if
the key has been turned to driving
position.
To restart the vehicle, the key must
be turned to stop position (0) and
then to driving position (1).
Turn the Mini Crosser off, return the steering
column to upright position and raise the
armrest.
Quick guide P9-0151-Q
15 of 20
Version 2.0.0/2011
Medema Production A/S
General safety advice:
•
Make sure that the backrest is upright and the seat is as low as possible.
•
Positioning belts are recommended if the user is unable to maintain a good
driving posture independently.
•
Adjust your driving to road conditions. Take account of light, traffic and weather.
Be particularly careful when driving in the dark or in bad weather, such as rain
or snow. Avoid driving on gradients with poor surfaces, such as: snow, ice, newmown grass, wet grass and wet leaves.
•
Never drive when under the influence. This applies not only to alcohol but also
to drugs and medicines.
•
Reduce speed immediately if you feel you are losing control.
•
Always use the indicators when changing direction.
•
Check that lights and indicators are working before driving off. Use your lights
when driving after lighting-up time.
•
As far as possible, grip the handlebars firmly with both hands.
Take care not to have anything in the basket at the front that might
inadvertently operate the accelerator.
WARNING! Do not lower the handlebars so far that the accelerator
can hit you on the leg when you turn the vehicle and so be operated in
advertently. If the handlebars need to be very low, a twist grip accelerator is
recommended. This is particularly relevant if leg supports are being used.
ALWAYS switch the scooter off when it is not in use. Turn the key to 0.
Note!
Do not drive the Mini Crosser when intoxicated. This applies to both
medicine and alcohol.
Quick guide P9-0151-Q
16 of 20
Version 2.0.0/2011
Medema Production A/S
When driving in traffic...
Be particularly aware of the following when driving in traffic:
•
The Mini Crosser is a low vehicle and not always easy for other road users to
see. Make quite sure that other road users have seen you before driving onto
the highway.
•
Be aware of the blind spots and look around them before changing direction.
•
Keep an eye on traffic behind you. Keep well over to the side of the road when
driving on busy roads.
•
Turning right and left at crossroads. Be aware of cyclists and pedestrians.
Follow the rules of the road for cyclists.
•
How quickly things are happening. How long do the lights stay green? How
quickly are cars approaching? etc.
Electromagnetic compatibility
If the Mini Crosser starts making involuntary movements or if the brakes
are released, turn the Mini Crosser off as soon as it is safe to do so. In
certain circumstances a Mini Crosser can set off shop alarms.
The Mini Crosser satisfies the requirements for the use of scooters in an
environment with electromagnetic noise. There may, however, be rare
situations in which electromagnetic noise can affect the Mini Crosser.
Sources of such noise include radio and television stations, amateur radio
transmitters and mobile phones.
If such equipment is being used close by, it is recommended that the
Mini Crosser is switched off. Mobile phones should not be used while
driving.
Quick guide P9-0151-Q
17 of 20
Version 2.0.0/2011
Medema Production A/S
Braking systems
There are three braking systems on the Mini Crosser:
•
Motor brake - adjusts vehicle speed also when going downhill.
•
Magnetic brake - the magnetic brake is automatic and engages when
the Mini Crosser stops. In an emergency, the Mini Crosser can be
stopped instantaneously by turning the key switch. Please note that this
will cause very sharp braking. The rear wheels will lock.
Must NOT be used in the normal course of driving.
The brake must never be disengaged mechanically using the
disengagement lever on a slope. This function is only designed for use
when pushing the Mini Crosser on a flat road.
•
Handbrake - intended as an emergency brake and parking brake. It
must be operated with caution when driving in slippery conditions and
downhill.
When using the handbrake as a parking
brake, lock it in braking position by pressing
the button in while applying the brake.
To release the brake, press the button
again.
Handbrake lock
Quick guide P9-0151-Q
18 of 20
Version 2.0.0/2011
Medema Production A/S
Own notes
Quick guide P9-0151-Q
19 of 20
Version 2.0.0/2011
19 af 20
medemagroup