1
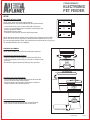
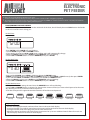
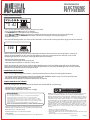
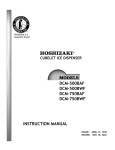
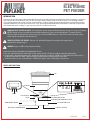
PROGRAMMABLE
ELECTRONIC
PET FEEDER
INTRODUCTION
Thank you for purchasing the Programmable Electronic Pet Feeder. The Programmable Electronic Pet Feeder is a product
that can be easily customized to suit you and your pet’s needs, whether you are home or away. It can be programmed
using an integrated LCD control panel to accommodate a 24 hour period, automatically dispensing convenient, portioncontrolled meals for your pet up to three times a day. The Programmable Electronic Pet Feeder is cord-free and portable
with detachable parts, making it a pet accessory that fits any home with ease.
DANGER: RISK OF ELECTRICAL SHOCK - If using batteries, please refer to the Battery Warnings on page 2. If using an AC adaptor,
DO NOT attempt to access or modify the internal body compartments. There are no serviceable parts. To reduce the risk of
electrical shock, do not expose this unit to water, rain, or moisture. NEVER reach for a unit that has fallen into water or other
liquid. Unplug immediately and discontinue use.
DANGER: POTENTIAL FIRE HAZARD - Only use a UL-certified AC adapter that complies with required output
specifications stated on page 2.
WARNING: For pet use ONLY. Keep away from children.
Never leave your pet unattended for extended periods of time.
To ensure accurate dispensing and your pet’s safety, always conduct a 24-hour test after changing the programming.
The pet feeder is designed to dispense up to 10 pounds of dry dog or cat food only. DO NOT use canned food, moist food, treats, or
any other pet food with this feeder. Never use the pet Feeder to dispense anything other than pet food.
The device contains no user-serviceable parts. NEVER insert fingers, tools, or other objects into the base.
PARTS DESCRIPTION
LID
Meal 1
HOPPER
UP
AM
2 3
11 30
SERVE / SKIP
AMOUNT
ENTER
DOWN
LCD DISPLAY
BASE
CONTROL BUTTONS
LOW BATTERY WARNING LIGHT
REMOVABLE BOWL
BATTERY COMPARTMENT
AC ADAPTER JACK
ON/OFF SWITCH
Printed in China
Page 1
PROGRAMMABLE
ELECTRONIC
PET FEEDER
SETUP
BATTERY INSTALLATION
D
NOTE: Only adults should change batteries.
Alkaline batteries are recommended for best performance
• Locate the battery door on the underside of the base.
• Insert 3 “D” size batteries (NOT included) according to the
polarity direction shown.
• Replace the battery door.
• Switch the main power switch to the ON position.
D
D
NOTE: Remove batteries before using optional AC adapter (not included).
Never use both sources of power at once. Remove batteries if not in use
for a prolonged period of time. The manufacturer recommends using only a
UL-certified OUTPUT DC 4.5V Adapter.
PRODUCT ASSEMBLY
NOTE: All assembly parts MUST be locked into position.
Attaching the Hopper to the Base
• Align the bottom of the hopper to the top of the base.
• Insert the hopper, positioning it so that it sits firmly inside
the base.
• Rotate the hopper clockwise, locking it into position.
LID
Attaching the Lid to the Hopper:
• Line up the two tabs on the underside of the lid to the
arrows on the outside of the hopper.
• Place the lid on top of hopper, push down, and then
rotate clockwise to lock into position.
HOPPER
Attaching the bowl to the Base:
• Slide the bowl into the slot on the side of the base.
• Press down to lock the bowl hooks to the base.
REMOVABLE BOWL
BASE
Printed in China
Page 2
PROGRAMMABLE
ELECTRONIC
PET FEEDER
Never leave your pet unattended for extended periods of time.
To ensure accurate dispensing and your pet’s safety, always conduct a 24-hour test after changing the programming.
The pet feeder is designed to dispense up to 10 pounds of dry dog or cat food only. DO NOT use canned food, moist food, treats, or any other pet food with this
feeder. Never use the pet Feeder to dispense anything other than pet food.
PROGRAMMING YOUR PET FEEDER
NOTE: The main power switch, located on the underside of the base, should already be turned ON. Position the feeder
so the LCD Control Panel is facing you.
Set the Time:
Meal 1
AM
2 3
12 00
• Press ENTER and the HOUR will start blinking.
• Set the HOUR using the UP and DOWN buttons.
• If you need to change from A.M. to P.M., keep scrolling and it will automatically change.
• When the HOUR is correct, press ENTER and the MINUTES will start blinking.
• Use the UP and DOWN buttons to set the MINUTES, then press ENTER.
Set the Meal Time:
Meal
AM
1
2 3
11 30
SERVE / SKIP
AMOUNT
• Press and hold ENTER. Once SERVE is blinking, release the ENTER button.
• SERVE will now be blinking. Use the UP and DOWN buttons to select SERVE or SKIP for meal, then press ENTER.
• If you selected SERVE, the HOUR is now blinking, use the UP and DOWN buttons.
• When the HOUR is correct, press ENTER and the MINUTES will start blinking.
• Use the UP and DOWN buttons to set the MINUTES, then press ENTER.
Set the Meal Amount:
• After you are finished setting the meal time, the AMOUNT icon will start blinking.
• Use the UP and DOWN buttons to increase or decrease the amount of food you want to be dispensed at that time.
• By selecting more bars, more food will be dispensed.
• Each bar corresponds to approximate measurements of food that are dispensed.
1/4 cup
1/2 cup
3/4 cup
1 cup
1 1/4 cups
1 1/2 cups
1 3/4 cups
2 cups
Programming Notes
• Press ENTER
• If meals are skipped, the meal number will not show in the main clock display.
• In program mode, if you idle for more than one minute, it will revert back to the main clock display.
• In program mode, none of the programs preset times will execute.
• Repeat the above meal time and meal amount instructions for up to two additional meals. After all 3 meals are
set, the display will return to the main clock display.
Printed in China
Page 3
PROGRAMMABLE
ELECTRONIC
PET FEEDER
Optional Manual Feeding:
Meal
AM
1
2 3
11 30
SERVE / SKIP
AMOUNT
• You can also choose to feed your pet any time you want.
• Press and hold the UP button for 3 seconds.
• The AMOUNT icon will appear and start blinking.
• Press UP and DOWN buttons to increase or decrease the amount of food you want to be dispensed.
• Press ENTER to set the AMOUNT. The motor should start rotating to start dispensing food.
• Repeat if necessary.
*If in manual feeding mode, user must make a selection or exit mode or else preset timer program will not execute.
err
AMOUNT
NOTE: If after following the above manual feeding instructions the motor does not rotate after 5 seconds or
during program feeding, an “Err” message will appear on the LCD Control Panel. This indicates a jam in the
dispensing mechanism. To clear this message follow these instructions:
• Remove food from container
• Clear food from hopper blade, remove jam
• Hold the down button for 3 seconds to clear error.
NOTE: To prevent this error, always make sure the feeding bowl is NOT overfilled, especially near the discharge
opening from the hopper to the bowl. The dispensing mechanism will jam if the feeding bowl is too full and the
Electronic Pet Feeder continues to dispense food.
CHANGING THE BATTERIES
NOTE: Your programming information is stored and will not be lost when you change the batteries.
• You need to replace the batteries when the LOW BATTERY WARNING LIGHT comes on, OR if your Electronic
Pet Feeder will be unattended for a long period of time.
• Repeat the above “Battery Installation” instructions to replace.
CARING FOR YOUR PET FEEDER
NOTE: All components of the Electronic Pet Feeder are detachable for easy cleaning.
• Hand clean with a slightly damp cloth.
• NEVER soak or submerge in water.
• Store in a cool, dry location away from sunlight
BATTERY WARNING:
• Do not mix old and new batteries.
• Do not mix alkaline, standard (carbon-zinc), or rechargeable (nickel-cadmium) batteries.
• Insert batteries using the correct polarity. Do not short-circuit the supply terminal.
• Remove batteries when not in use. Recycle or dispose of exhausted batteries according to
federal, state, and local laws. Do not dispose of batteries in a fire - they may leak or explode.
• Only use manufacturer specified battery(ies), charger(s) and/or adapter, if applicable, specified
by the manufacturer.
• Always use, replace, and recharge (if applicable) batteries under adult supervision.
KEEP THIS INSTRUCTION MANUAL FOR REFERENCE AS IT CONTAINS IMPORTANT INFORMATION.
©2012 Discovery Communications, LLC. Animal Planet and the Animal Planet logo are
trademarks of Discovery Communications, LLC, used under license. All rights reserved.
©2012 MerchSource, LLC. All rights reserved.
Distributed by MerchSource, LLC, Foothill Ranch, CA 92610.
PATENT PENDING
For customer support, please visit www.mscustomercare.com or call 1-800-374-2744.
PLEASE RECYCLE OR DISPOSE OF ELECTRONICS
PROPERLY. RECYCLING INFORMATION IS
AVAILABLE AT MSCUSTOMERCARE.COM.
Warning: Changes or modifications to this unit not expressly approved by the party
responsible for compliance could void the user's authority to operate the equipment.
NOTE: This equipment has been tested and found to comply with the limits for a Class B
digital device, pursuant to Part 15 of the FCC Rules. These limits are designed to provide
reasonable protection against harmful interference in a residential installation. This
equipment generates, uses and can radiate radio frequency energy and, if not installed and
used in accordance with the instructions, may cause harmful interference to radio
communications. However, there is no guarantee that interference will not occur in a
particular installation. If this equipment does cause harmful interference to radio or
television reception, which can be determined by turning the equipment off and on, the
user is encouraged to try to correct the interference by one or more of the following
measures:
• Reorient or relocate the receiving antenna.
• Increase the separation between the equipment and the receiver.
• Connect the equipment into an outlet on a circuit different from that to which the receiver
is connected.
• Consult the dealer or an experienced radio/TV technician for help.
Printed in China
Page 4