1
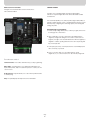
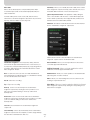
n52te USER MANUAL
CONFIGURING n52te
Software Installation
1. Insert the n52te Installation CD into your PC's drive.
n52te Editor
The n52te Editor is the tool used to customize and program custom
functions to your n52te. Some examples of programmable functions are:
2. The software should start automatically. If it does not, click the “Start”
button and choose “Run”. Click “Browse” and choose your CD drive.
Select “setup.exe” and click “OK”.
Single Key – Make a button on the controller work like a keyboard key.
Macros – Record a sequence of keyboard keystrokes, and/or
mouse-button presses that can be saved and played back by the n52te
at a later time.
3. Follow the on-screen instructions to continue with the
software installation.
4. After the installation is complete, select “Finish” and reboot
when prompted.
Keymap Selector – Switch between the three color Keymaps (Blue,
Green, Red) and effectively triple the number of functions you can
program in a single profile. The default Keymap is Blue.
5. After your PC boots up, connect the n52te to an available USB port
on your computer.
Mouse – Program n52te to emulate mouse clicks or
scroll-wheel functions.
6. If you have Windows® XP and you are prompted to allow “Unsigned
Drivers”, click “Yes” to proceed.
Polling Rate – Sets the polling rate to: 125Hz, 500Hz, or 1000Hz.
7. If you have Windows Vista and you are prompted to verify the
publisher of the driver, click “Install this driver anyway” to proceed.
Note: You need to reduce the polling rate if your computer does not
support USB 2.0.
8. Once the drive have been initialized, please check to see if the
installation was successful by proceeding to the next section of the
manual titled “Installation Verification”.
Razer Synapse™ – Store one of your profiles in the onboard memory to
take it with you! The profile stored with Razer Synapse will be available
on any PC, even without the software installed.
®
Installation Verification
1. You will need to confirm that the installation was successful through
the Device Manager.
2. To get to Device Manager, right-click on “My Computer” and
left-click on “Properties”. Then left-click on “Hardware” and then
on the “Device Manager” button.
3. Check to make sure that the Device Manager list includes:
a) A new entry under Human Interface Devices, “n52te”.
b) A new entry under Human Interface Devices, “Virtual HID Device”.
Page
1
Main Screen of the n52te Editor
This figure shows the n52te Editor screen for the Nostromo
n52 Tournament Edition.
CREATING A PROFILE
A profile is a set of remapped buttons and/or programmable
functions for a specific application that can be saved and recalled
at a later time.
This section will explain how to create a profile using the n52te Editor. In
general, creating a profile consists of remapping button functions for the
three Keymaps, configuring Auto-Switching options, then naming and
saving your profile.
Remapping Single-Key Assignments
1. For the corresponding n52te button you wish to program, left-click on
it to bring up the context menu.
2. Select “Single Key” from the context menu. This will bring up the
“Single Key” assignment dialog box. This screen is used to select a
single key to assign to the selected n52te button. When a single key is
assigned to a button, pushing the button is the same as pressing that
key on the keyboard.
3. At this point, press a key on the keyboard. The screen will display the
name of the key you pressed.
4. Now you can click “OK” if you are happy with the current
assignment, or you can click “Cancel” to abort the key assignment.
The main screen consists of:
View of the Device – This makes clear which keys you are programming.
Macro Editor – This pane allows you to define and edit sequences of
keyboard keystrokes, and/or mouse-button presses to create your own
custom macros.
Profile Selection – This pane allows you to select which profile the n52te
is currently using.
Help – This pane displays the Help menu for the n52te Editor.
Page
2
Macro Editor
Macros are recorded sequences of keyboard keystrokes and/or
mouse-button presses that can be saved and played back by the
n52te at a later time.
Insert Delay – Allows you to manually insert a time delay in the “Current
Macro Assignment” sequence list. Simply select an event, then choose
the desired duration and click on the “Insert Delay” button.
Ignore Delays Between Events – Turns playback of delays during the
macro’s execution On or Off. The macro’s events will then play back
at the maximum possible rate, which is approximately 10 milliseconds
between events. This feature is Off by default.
The Macro Editor pane is used to create, edit, and save macros.
Saved macros can then be assigned to any button in any of the three
Keymaps, and are available for use in any profile.
Advanced – Reveals a list of advanced functions that can be inserted
into the “Current Macro Assignment” sequence list.
Advanced functions that can be inserted into the “Current Macro
Assignment” sequence list from this window include:
Current Macro Assignment – A list of keystrokes, delays, and other
functions that are played back when the macro is executed. As you
record a macro, the keyboard keystrokes that you type along with the
actual time delays between the events will be listed in the “Current
Macro Assignment” window.
Basic Commands – Allows you to insert operations from a list of basic
commands supported in Windows OS.
Note: You cannot record mouse click commands and advanced
functions during the recording phase, but you can add them manually
from the “Advanced Functions” window.
Media Functions – Allows you to insert operations for the default media
player using a list of media commands.
Additional Commands – Allows you to insert operations from a list of
additional commands supported in Windows OS.
Macro – Allows you to insert existing macros into the current one, thus
creating a complex nested macro.
Record – Starts macro recording.
Stop – Stops macro recording.
Mouse Button – Allows you to insert mouse-button clicks into the “Current
Macro Assignment” sequence list by clicking the corresponding mouse
button in the mouse figure.
Move Up – Used to move an event up in the “Current Macro
Assignment” sequence by selecting the event you want to move
with your mouse and left-clicking on “Move Up” until it is in the
desired position.
Move Down – Used to move an event down in the “Current Macro
Assignment” sequence by selecting the event you want to move with
your mouse and left-clicking on “Move Down” until it is in the
desired position.
Select All – Selects all events in the “Current Macro Assignment”
sequence list.
Select All Delays – Selects only the time delays in the “Current Macro
Assignment” sequence list. This is helpful if you want to assign all delays
the same value or eliminate them all at once.
Page
3
MACRO BEHAVIOR
KEYMAPS
These three settings determine how the macro will be played back
when triggered.
1. Run Times: X
This determines how many times the macro will be fully executed
when triggered. This setting defaults to a value of 1, meaning that the
macro will be executed once.
The n52te Editor allows you to program three Keymaps: Blue, Red, and
Green. A Keymap allows you to add another layer of programming
to each button. In order to switch between Keymaps during play, you
must either dedicate a button for switching to the desired Keymap, or
dedicate one to cycle through all three Keymaps. Because the second
option of cycling through Keymaps requires only one button, two extra
buttons are free for further customization.
2. Repeat while pressed.
Using this setting will force the macro to repeat continuously while the
assigned button is held.
Note: Buttons that are selected for one of these Keymap switching
options will be dedicated to this function across all three Keymaps in the
current profile.
3. Repeat until next key is pressed.
Using this setting forces the macro-assigned button to act like
a toggle switch. If you push it once and let go, the macro will
continuously repeat until another key is pressed.
• To program a Keymap-switching function to a button, left-click on the
desired button and select Blue, Red, or Green, or “Cycle Keymaps”.
For Blue, Red, and Green, you can select either “Momentary”
or “Toggle”.
CREATING AND ASSIGNING A MACRO
• If you select “Momentary”, the n52te will only load the desired
Keymap while you hold that button down. If you select “Toggle”, the
button acts like a switch and n52te will remain in the desired Keymap
until another Keymap is selected.
1. Open the “Macro Editor” pane by left-clicking on the arrow on
the tab.
• You can view and edit different Keymaps by clicking on Blue, Red,
or Green labels above the device-view graphic located at the main
n52te Editor screen.
2. Left-click on the “Record” button to start recording keyboard events.
3. Using the keyboard, type in the key-press combination of the macro
you want to create. This will normally be linking spells to create a
new combo, or phrases such as “cover me” you would send to your
teammate. Notice that the keys you press and release are recorded
in the “Current Macro Assignment” sequence list.
• Please make sure to save your work.
4. Left-click on the “Stop” button to stop macro recording.
5. Click “Save” to save your newly created macro.
6. Optionally, you can click on the “Advanced” button to display a list
of Advanced Options, which you can insert into the macro.
7. If you are done editing your macro, return to the main
n52te Editor screen.
8. Left-click on a desired button to open its context menu.
9. You will see your new macro listed in the menu; left-click on it to
assign it.
Page
4
PROFILE MANAGEMENT
Profile Selection and Razer Synapse™
You can manage profiles by using the following buttons on the main
Editor Window.
The “Profile Selection” pane displays the entire library of custom profiles
located on your PC.
New – Creates a new profile with default name “Untitled Profile 0x”.
Thereafter, you can specify a name for the profile.
Save – Saves all changes to the current profile.
Save As – Saves all changes to the current profile under a
user-defined filename.
Import – Allows you to import a shared or downloaded profile into the
n52te Editor and default profile folder.
Apply Changes – Activates recent changes made with the n52te Editor.
This is different than saving in that the changes are made usable, but
your profile is not overwritten. This is useful for testing out new
programmable functions or macros without permanently changing
your profiles.
To change the currently active profile, click the “Profile Selection” tab to
open the pane and choose the desired profile from the list.
Linked Application – Allows you to select an executable file for
Auto-Switching. To do so, single left-click on the area and browse to a
desired executable file or shortcut. To finish, single left-click the direction
arrow to close the pane and click either the “Save” or “Apply Changes”
buttons.
Reset Keymap – Resets all key assignments in the current Keymap to
their default settings. Note that they are not active until saving or
pressing the “Apply Changes” button.
Auto-Switching – Allows you to enable or disable profile Auto-Switching
when the linked application is launched. To enable or disable, click the
Auto-Switching check box next to the desired profile. An “x” indicates
that Auto-Switching is enabled.
Note: In order for Auto-Switching to function, the profile must already be
linked to an application executable.
The n52te is powered by Razer Synapse. This allows you to save one of
your profiles to the n52te’s onboard memory and use it on another PC,
even without installing the n52te Editor software.
To load a profile to the n52te’s onboard memory powered by
Razer Synapse, open the “Profile Selection” pane and double-click on
the desired profile. The profile will be loaded when the Synapse icon
appears next to the name. Now you can take your custom n52te
settings with you anywhere.
Page
5
HELP
ADJUSTMENTS
If you have any problems using the n52te, simply click the “Help” tab to
access the help file for any troubleshooting.
Thumb-Stick
The n52te comes equipped with a removable thumb-stick for
customized control of the 8-way D-pad. Simply pull the thumb-stick up
away from the D-pad to remove it if preferred.
To update the n52te Editor software, simply click on the “Update”
button to download the latest version of the software.
Palm Rest Adjustment
The n52te is designed to adapt to hands of different sizes. There are
three different hand-size adjustments that can be made to the palm rest
in order to help you easily reach all of the n52te’s buttons and keys.
1. For average-sized hands, no adjustment is necessary. The n52te’s
palm rest comes configured for the average-sized hand.
2. For large hands, you can easily increase the distance between the
palm rest and the main keys. Simply pull the palm rest straight up
away from the n52te’s main chassis until it pops free. On the chassis
you will see two sets of holes. Then reinsert the palm rest into the holes
farthest from the main keys and snap it down firmly.
3. For small hands, you can simply remove the palm rest completely for
easier access to the n52te’s array of buttons and keys.
Using the n52te as a Default HID Device
If you choose not to install the software or create custom profiles, then
by default your n52te will utilize the following functions:
1.
2.
3.
4.
5.
6.
7.
8.
9.
10.
11.
12.
13.
14.
15.
Tab
Q
W
E
R
CAPS
A
S
D
F
SHIFT
Z
X
C
SPACE BAR
D-pad directions emulate the keyboard’s arrow keys.
Thumb pad emulates the “Space” key.
Thumb button emulates the “ALT” key.
The scroll wheel emulates a standard mouse scroll wheel with a
third click.
This default configuration works well with the default keyboard setup of
most first-person shooter games.
Page
6
INFORMATION
FCC Statement
DECLARATION OF CONFORMITY WITH FCC RULES FOR
ELECTROMAGNETIC COMPATIBILITY
We, Belkin International, Inc., of 501 West Walnut Street, Compton, CA 90220, declare
under our sole responsibility that the product:
F8GFPC200
to which this declaration relates:
Complies with Part 15 of the FCC Rules. Operation is subject to the following two
conditions: (1) this device may not cause harmful interference, and (2) this device must
accept any interference received, including interference that may cause undesired
operation. This equipment may only be operated indoors. Operation outdoors is in
violation of 47 U.S.C. 301 and could subject the operator to serious legal penalties.
CE Declaration of Conformity
We, Belkin International, Inc., declare under our sole responsibility that the F8GFPC200,
to which this declaration relates, is in conformity with Generic Emissions Standard
EN55022:1998 Class B, EN50081-1, and with Generic Immunity Standard EN50082-1:1992.
Belkin International, Inc., Limited Lifetime Product Warranty
What this warranty covers.
Belkin International, Inc. (“Belkin”) warrants to the original purchaser of this Belkin product
that the product shall be free of defects in design, assembly, material, or workmanship.
What the period of coverage is.
Belkin warrants the Belkin product for the lifetime of the product.
What will we do to correct problems?
Product Warranty.
Belkin will repair or replace, at its option, any defective product free of charge (except for
shipping charges for the product).
What is not covered by this warranty?
All above warranties are null and void if the Belkin product is not provided to Belkin for
inspection upon Belkin’s request at the sole expense of the purchaser, or if Belkin
determines that the Belkin product has been improperly installed, altered in any way, or
tampered with. The Belkin Product Warranty does not protect against acts of God such as
flood, lightning, earthquake, war, vandalism, theft, normal-use wear and tear,
erosion, depletion, obsolescence, abuse, damage due to low voltage disturbances
(i.e. brownouts or sags), non-authorized program, or system equipment
modification or alteration.
How to get service.
To get service for your Belkin product you must take the following steps:
1. Contact Belkin International, Inc., at 501 W. Walnut St., Compton CA 90220,
Attn: Customer Service, or call (800)-223-5546, within 15 days of the Occurrence. Be
prepared to provide the following information:
a. The part number of the Belkin product.
b. Where you purchased the product.
c. When you purchased the product.
d. Copy of original receipt.
1. Your Belkin Customer Service Representative will then instruct you on how to forward
your receipt and Belkin product and how to proceed with your claim.
Belkin reserves the right to review the damaged Belkin product. All costs of shipping the
Belkin product to Belkin for inspection shall be borne solely by the purchaser. If Belkin
determines, in its sole discretion, that it is impractical to ship the damaged equipment to
Belkin, Belkin may designate, in its sole discretion, an equipment repair facility to inspect
and estimate the cost to repair such equipment. The cost, if any, of shipping the
equipment to and from such repair facility and of such estimate shall be borne solely by
the purchaser. Damaged equipment must remain available for inspection until the claim
is finalized. Whenever claims are settled, Belkin reserves the right to be subrogated under
any existing insurance policies the purchaser may have.
How state law relates to the warranty.
THIS WARRANTY CONTAINS THE SOLE WARRANTY OF BELKIN. THERE ARE NO OTHER
WARRANTIES, EXPRESSED OR, EXCEPT AS REQUIRED BY LAW, IMPLIED, INCLUDING THE
IMPLIED WARRANTY OR CONDITION OF QUALITY, MERCHANTABILITY OR FITNESS FOR A
PARTICULAR PURPOSE, AND SUCH IMPLIED WARRANTIES, IF ANY, ARE LIMITED IN DURATION
TO THE TERM OF THIS WARRANTY.
Some states do not allow limitations on how long an implied warranty lasts, so the above
limitations may not apply to you.
IN NO EVENT SHALL BELKIN BE LIABLE FOR INCIDENTAL, SPECIAL, DIRECT, INDIRECT,
CONSEQUENTIAL OR MULTIPLE DAMAGES SUCH AS, BUT NOT LIMITED TO, LOST BUSINESS OR
PROFITS ARISING OUT OF THE SALE OR USE OF ANY BELKIN PRODUCT, EVEN IF ADVISED OF
THE POSSIBILITY OF SUCH DAMAGES.
This warranty gives you specific legal rights, and you may also have other rights, which
may vary from state to state. Some states do not allow the exclusion or limitation of
incidental, consequential, or other damages, so the above limitations may not apply
to you.
Page
7