1
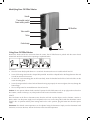
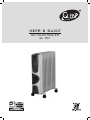
OIL FILLED HEATER
GL 7011
Identifying Your Oil Filled Heater
Handle
Thermostat control
Power setting switch
Oil filled fins
Turbo switch
Turbo
Cord storage
Castors
Using Your Oil Filled Heater
Remove the heater and all the accessories from the carton. The Oil filled heater is packed with the castor wheels
unattached. Attach the wheels before operating as explained below:
ASSEMBLY
• Place the heater body upside-down on a scratch-fee location,make sure it is stable and will not fall.
•
Screw off the wing nuts from the u-shaped bolt provided. Attach the u-shaped bolt to the flange between first and
second fins (near the front cover).
•
To attach the castor mounting plate to the heater body, insert the threaded ends of the u bolt in the holes on the
castor mounting plate.
•
Screw the wing nuts back to the u bolt and fasten the wing nut properly. Do not over tighten, this may damage the
heater flange.
•
The rear flange must be mounted between the end two fins.
Caution: Do not operate without wheels attached. Operate the Oil Filled Heater only in up right position (wheels on
the bottom, controls on the top), any other position could create a hazardous situation.
USAGE
Place the heater on the floor at least 90cm away from the wall and any other objects such as furniture, curtains or
plants. (Make sure the power supply used corresponds to the one on the rating label). With the thermostat control
switch in the “O” position and the power setting switch in the “OFF” position; plug the heater into the mains power
supply.
Thermostat: The desired room temperature can be adjusted using the thermostat. Simply turn the thermostat knob
clockwise, to increase the heat, and anti-clockwise to decrease the temperature.
Power: Switch the heater to the desired power setting. The power switch lights up when activated.
Fins
9
11
13
Switch Position
I
II
I & II
Fan
I
II
I & II
Fan
I
II
I & II
Fan
Watts
800
1200
2000
400
800
1200
2000
400
1000
1500
2500
400
Turbo: The Glen Oil Filled Heater GL 7011 is fitted with a heating fan which warms the room more quickly. To turn
this function ON, push the button .
A safety device, the overload protector, switches off the appliance if it overheats due to an accumulation of dust on
the air intake and output grills. To restart it, unplug from the mains and leave the appliance to cool down. Clean the
air intake and output grills with a vacuum cleaner,then replug into the mains and turn on again. Do not cover the
heater at any time during operation. There is a risk of fire if the heater is covered. After use switch off the power, set
the thermostat control switch to the “0”position and unplug from the mains supply.
CLEANING
Always disconnect the heater from the mains supply before cleaning. Clean the outside of the heater with a damp
cloth. DO NOT use waxes or polishes as these may react with the heater and cause discoloration.
STORAGE
Save the box for off season storage. Clean the heater following the cleaning instructions above. Remove the wheel
base assemblies. Place the heater, and wheel assemblies in the original box, and store in a cool and dry place. If you
choose to store your heater fully assembled be sure to cover it to protect it from dust.
Safety Precautions
•
•
•
•
•
•
•
•
•
•
•
•
•
•
•
•
•
Always disconnect the heater from the mains supply when not in use and when cleaning.
Do not leave the heater “ON”unattended.
Never cover the heater as this may lead to risk of fire.
Keep the heater at distance of at least 90cm from any combustible material, such as furniture, curtains, bedding
clothes or papers.
Do not attempt to open any part of the oil fins.
Keep the heater clean. Do not allow objects to enter the ventilation, as this may cause electric shock, fire or
damage the heater.
Close supervision is required when any appliance is used near or by children.
Never allow the cord to touch wet or hot surfaces, become twisted or be within the reach of children.
Do not use outdoors.
Do not place on or near a hot gas or electric burner.
Never use the appliance with a damaged cord or plug or after the appliance has malfunctioned or been damaged
in any way.
Never attempt to open any part or dismantle the controls. Responsibility for failure cannot be accepted if these
instructions have been ignored.
Do not use the appliance for anything other than its intended use.
This appliance is intended for household use only.
The appliance is not intended for use by young children or infirm persons without supervision.
Do not use this heater in the immediate surroundings of a bath, a shower or a swimming pool.
This heater is filled with a precise quantity of special oil. Repairs requiring opening of the oil container are only to
be made by the manufacturer or his service agent who should be contacted if there is an oil leakage. Regulations
concerning the disposal of the oil when scrapping the appliance has to be followed.
Warranty
GLEN APPLIANCES PVT. LTD. warrantees to get the
Oil Filled Heater or any part thereof repaired free
of charge for a period of one year from the date of
purchase, should any defect develop due to faulty or
defective workmanship or material.
+2 Years Extended Warranty
Here comes another Glen advantage !
Now you can register yourself for a free +2 Years
Extended Warranty on the appliance you just
purchased to get that enhanced peace of mind.
To avail this offer :
Terms to Warranty
•
The Bill/Cash Memo should be presented.
•
No repair work should be carried out by any
unauthorised person.
•
The Oil Filled Heater should be used as per the
directions given in the user’s guide. Any defects
caused by improper or reckless use are not
covered under warranty.
•
No modification/alteration of any nature is made
in the Oil Filled Heater.
•
The company accepts no responsibility for any
consequential losses arising out of misuse or
negligence on the part of the user.
PRODUCT : OIL FILLED HEATER GL 7011
- 9 | 11 | 13 FINS
SERIAL NO.__________________________________
DATE OF PURCHASE__________________________
NAME OF OWNER___________________________
ADDRESS____________________________________
•
Log on to www.glenindia.com and click on the
+2 Years Extended Warranty icon.
•
An application form will pop up.
•
Please fill the details, the product name, the
model number, the serial number, date of
purchase, Invoice number, dealer name and
your personal details.
•
Please ensure that all details filled are correct
and match with the Invoice and the product
purchased.
•
Press submit. A confirmation e-mail will be
sent on your e-mail ID. Keep a print of the
confirmation safely along with the original
Invoice to use the +2 Years Extended Warranty
anytime in future.
Note : The +2 Years Extended Warranty offer is
absolutely free. The offer is available only for 90 days
from the date of purchase of the appliance. In case
the same is not availed it lapses automatically.
As the offer is free of cost the company is not obliged
to refund or return any claims in lieu for the same.
BILL NO._____________ DATE__________________
Specifications
Input Voltage
: 230 V ~ 50 Hz AC
Power Consumption : Fins
Watts
Fan (W)
9
2000
400
11
2000
400
13
2500
400
DEALER’S STAMP & SIGNATURE
Packaging List
: Heater Assy. - 1, Castors with Nuts - 4 each
U Bolt - 2, Plate - 2, Wing Nut - 2,
User manual cum warranty card -1
GLEN APPLIANCES PVT. LTD.
I-34, DLF Ind. Area, Phase-I, Faridabad, India.
Helpline: 0129-2254191 Tolfree: 1800 180 1998
E-mail : [email protected] Website : www.glenindia.com