1
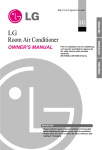
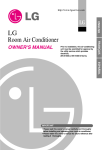
HEAT CONTROLLER, INC.
Wall Mounted
Mini - Split System
DMC09SB-0/DMH09SB-0, DMC12SB-0/DMH12SB-0
DMC18SB-1/DMH18SB-1, DMC24SB-1/DMH24SB-1
Single-Zone
Air Conditioning / Heat Pump
Important Information
• Please read carefully and thoroughly this manual before operating this unit.
• Contact a qualified sevice technician for installation, repair and maintenance of this unit.
• The appliance is not intended for use by young children or those who require supervision.
• Young children should be supervised to ensure that they do not play with the appliance.
##############
Room Air Conditioner Owner’s Manual
TABLE OF CONTENTS
Safety Precautions.........................3
FOR YOUR RECORDS
Write the model and serial numbers here:
Model #
Prior to Operation ..........................8
Serial #
You can find them on a label on the side of each unit.
Dealer's Name
Introduction ....................................9
Electrical Safety ...........................10
Operating Instructions.................11
Maintenance and Service ............24
Date Purchased
■ Staple your receipt to this page in the event you need
it to prove date of purchase or for warranty issues.
READ THIS MANUAL
Inside you will find many helpful hints on how to use
and maintain your air conditioner properly. Just a little
preventive care on your part can save you a great deal
of time and money over the life of your air conditioner.
You'll find many answers to common problems in the
chart of troubleshooting tips. If you review our chart of
Troubleshooting Tips first, you may not need to call
for service at all.
PRECAUTION
• Contact the authorized service technician for
repair or maintenance of this unit.
• Contact the installer for installation of this unit.
• The air conditioner is not intended for use by
young children or invalids without supervision.
• Young children should be supervised to ensure
that they do not play with the air conditioner.
• When the power cord is to be replaced,
replacement work shall be performed by
authorized personnel only using only genuine
replacement parts.
• Installation work must be performed in
accordance with the National Electric Code by
qualified and authorized personnel only.
2 Room Air Conditioner
Safety Precautions
Safety Precautions
To prevent the injury of the user or other people and property damage, the following instructions must be
followed.
■ Incorrect operation due to ignoring instruction will cause harm or damage. The seriousness is classified by
the following indications.
This symbol indicates the possibility of death or serious injury.
This symbol indicates the possibility of injury or damage to properties only.
■ The meanings of the symbols used in this manual are as shown below.
Be sure not to do.
Be sure to follow the instruction.
■ Installation
For electrical work, contact
the dealer, seller, a qualified
electrician, or an Authorized
Service Center.
Install the panel and the
cover of control box securely.
Do not install, remove, or reinstall the unit by yourself
(customer).
• There is risk of fire or electric
shock.
• There is risk of fire or electric
shock.
Be cautious when unpacking
and installing the product.
For installation, always
contact the dealer or an
Authorized Service Center.
Do not install the product on
a defective installation stand.
• Shape edges could cause injury.
Be especially careful of the sharp
edges.
• There is risk of fire, electric shock,
explosion, or injury.
• It may cause injury, accident, or
damage to the product.
• There is risk of fire, electric shock,
explosion or injury.
Owner’s Manual 3
Safety Precautions
Be sure the installation area
does not deteriorate with age.
Install the indoor unit on the
wall where the height from
the floors more than 8ft(2.4m)
Do not handle the pipe by
yourself(Costomer)
• If the base collapses, the air
conditioner could fall with it,
causing property damage, product
failure, and personal injury.
• There are sharp moving parts that
could cause personal injury.
• High-Pressure refrigent may cause
personal injury.
8ft(2.4m)
■ Operation
Do not allow water to run
into electric part.
• There is risk of fire, failure of
the product, and/or electric
shock.
Do not let the air conditioner
run for a long time when the
humidity is very high and a
door or a window is left open.
Do not store of use
flammable gas or
combustibles near the air
conditioner.
• Moisture may condense and wet or
damage furnishings.
• There is risk of fire or product
failure.
x
Wa Thinner
Do not use the product in a
tightly closed space for a
long time.
When flammable gas leaks, turn off
the gas and open a window for
ventilation before turning the
product on. Do not use the
telephone or turn switches on or off.
Turn off breaker to the unit if
strange sounds odors or
smoke comes from it.
• Oxygen deficiency could occur.
• Some ventilation by opening window
is necessary for the fresh air
• There is risk of explosion or fire.
• There is risk of fire, Product faiure,
and/or electric shock.
4 Room Air Conditioner
Safety Precautions
Stop operation and close any
window in storm or hurricane
before the hurricane arrives.
Do not open the inlet grill of
the product during operation.
(Do not touch the
electrostatic filter, if the unit
is so equipped.)
When the product is soaked
(flooded or submerged),
contact an Authorized
Service Center.
• There is risk of property damage,
failure of product, or electric
shock.
• There is risk of physical injury,
electric shock, or product.
• There is risk of electrical shock.
Ventilate the product from
time to time when operating it
together with a stove, etc.
Turn off breaker to the
appliance before performing
cleaning or maintenance.
When the product is not be
used for a long time
disconnect the power supply
by turning off the breaker.
• There is risk of fire or electrical
shock.
• There is risk of electric shock.
• There is risk of product damage or
failure, or unintended operation.
Take care to ensure that nobody could step on
or fall onto the outdoor unit.
Do not insert hands or other objects through
the air inlet or outlet while the air conditioner
is on.
• There could result in personal injury and product
damage.
• There are sharp and moving parts that could cause
personal injury.
Owner’s Manual 5
Safety Precautions
■ Installation
Always check for
gas(refrigerant) leakage after
installation or repair of
product.
Install the drain hose to
ensure that water is drained
away properly.
Keep level even when
installing the product.
• Low refrigerant levels may cause
product failure.
• A bad connection may cause
water leakage.
• To avoid vibration or water
leakage.
90˚
Do not install the product
where the noise or hot air
from the outdoor unit could
offend neighbors.
Use two or more people to lift
and transport the air
conditioner.
Do not install the product
where it will be exposed to
sea wind (salt spray) directly.
• It may cause a problem for your
neighbors.
• Avoid personal injury.
• It may cause corrosion in the
product. Corrosion, particularly on
the condenser and evaporator fins,
could cause product malfunction
or inefficient operation.
Do not direct airflow at room
occupants.
Do not use the product for
special purposes, such as
preserving foods, works of art,
etc. It is a consumer air
conditioner, not a precision
refrigeration system.
Do not block the inlet or
outlet of air flow.
• This could damage your health.
• There is risk of damage or loss of
property.
• It may cause product failure.
■ Operation
6 Room Air Conditioner
Safety Precautions
Use a soft cloth to clean.
Do not use harsh detergents,
solvents, etc.
Do not touch the metal parts
of the product when
removing the air filter. They
are very sharp!
Do not step on or put
anything on the product.
(outdoor unit)
• There is risk of fire, electric shock
or damage to the plastic parts of
the product.
• There is risk of personal injury.
• There is risk of personal injury and
failure of product.
Always insert the filter
securely. Clean the filter
every two weeks or more
often if necessary.
Do not drink the water
drained from the unit.
Use a firm stool or ladder
when cleaning or maintaining
the air conditioner.
• A dirty filter reduces the efficiency
of the air conditioner and could
cause product malfunction or
damage.
• It is not sanitary and could cause
serious health issues.
• Be careful and avoid personal
injury.
■ Disuse
Replace all the batteries in
the remote.
• There is risk of fire or explosion.
Do not recharge or
disassemble the batteries. Do
not dispose of batteries in a
fire.
If the liquid from the batteries
gets onto your skin or
clothes, wash it well with
clean water. Do not use the
remote if the batteries have
leaked.
• They may burn or explode.
• The chemicals in batteries could
cause burns or other health
hazards.
Owner’s Manual 7
Prior to operation
Prior To Operation
Preparing For Operation
1. Contact an installation specialist for installation.
2. Use a dedicated circuit.
Usage
1. Being exposed to direct airflow for a long time may be hazardous to your health. Do not expose
occupants, pets, or plants to direct airflow for a long time.
2. Ventilate the room when the air conditioner is used with other heating devices. Otherwise the oxygen
supply may be inadequate.
3. Do not use this air conditioner for non-specified special purpose (e.g. preserving precision devices, food,
pets, plants, or art objects). Such use may damage your properties.
Cleaning And Maintenance
1. Do not touch the metal parts of the unit when removing the filter. Injury can occur.
2. Do not use water to clean inside the air conditioner. Exposure to water can destroy the insulation,
leading to electric shock.
3. When cleaning the unit, first make sure that the power and breaker are turned off. The fan rotates at a
very high speed during operation. There is a possibility of injury if the unit power is accidently turned on
while the interior of the unit is being cleaned.
Service
For repair and maintenance, contact your authorized service dealer.
8 Room Air Conditioner
Introduction
Introduction
Symbols Used In This Manual
This symbol alerts you to the risk of electric shock.
This symbol alerts you to hazards that may cause harm to the
air conditioner.
NOTICE
This symbol indicates special notes.
Features
• This appliance should be installed in accordance with national wiring regulations. This guide acts
as a guide to help to explain product features.
Indoor
Air Inlet
Front Panel
Air Filter
Signal Receptor
Outdoor
(Side)
(Rear)
Air intake
vents
Piping
Air outlet
vents
Owner’s Manual 9
Electrical Safety
Electrical Safety
• This appliance must be properly grounded.
To minimize the risk of electric shock, the ground wire must be connected
• If you have any doubt whether the air conditioner is properly grounded, have the
circuit checked by a qualified electrician.
10 Room Air Conditioner
Operating Instruction
Operating Instruction
How To Insert The Batteries
Remove the battery cover by pulling it according to
the arrow direction.
Insert new batteries making sure that the (+) and (-)
of battery are installed correctly.
Reattach the cover by sliding it back into position.
NOTICE Use 2 AAA(1.5volt) batteries.
Do not use rechargeable batteries.
Replace both batteries at one time.
Storage And Tips For Using The Remote Controler
• The remote controller may be stored by mounting it
on a wall.
• To operate the room air conditioner, aim the remote
control at the signal receptor.
Signal Receptor
Receives the signals from the remote control.(Signal receiving sound: two short beeps or one long beep.)
Operation Indication Lamps
On/Off
OUT
DOOR
Sleep mode
: Lights up during the system operation, error
code and auto restart setting.
: Lights up during sleep mode auto operation.
Timer
: Lights up during timer operation.
Defrost mode : Lights up during defrost mode or *hot start
operation (Heat pump model only)
Outdoor unit : Lights up during outdoor unit operation.
(Cooling model only)
operation
Power Display : Indicates the setting temperature and operation
mode.
Operation indicating
lamps
Owner’s Manual 11
Operating Instruction
Remote Control Operations
Controls
Signal transmitter
5
1
6
3
4
2
7
11
8
10
CANCEL
ON
OFF
9
12
SET
AUTO CLEAN
15
16
14
13
Flip-up door
(opened)
Operation Mode
Cooling Operation
Auto Operation or Auto Changeover
15. AUTO CLEAN (OPTIONAL)
Used to set Auto Clean mode.
16. ˚C TO ˚F SWITCHING BUTTON
Used to switch temperature reading from
Centigrade to Fahrenheit.
Healthy Dehumidification Operation
Heating Operation
• Cooling Model(
), Heat Pump Model(
12 Room Air Conditioner
1. START/STOP BUTTON
Operation starts when this button is pressed
and stops when the button is pressed again.
2. OPERATION MODE SELECTION BUTTON
Used to select the operation mode.
3. ROOM TEMPERATURE SETTING
BUTTONS
Used to select the room temperature.
4. INDOOR FAN SPEED SELECTOR
Used to select fan speed in four steps
low, medium, high and CHAOS.
5. JET COOL
Used to start or stop the speed cooling.(speed
cooling operates super high fan speed in
cooling mode.)
6. CHAOS SWING BUTTON
Used to stop or start louver movement and
set the desired up/down airflow direction.
7. ON/OFF TIMER BUTTONS
Used to set the time of starting and stopping
operation. (See page 20)
8. TIME SETTING BUTTONS
Used to adjust the time. (See page 20)
9. TIMER SET/CANCEL BUTTON
Used to set the timer when the desired time
is obtained and to cancel the Timer
operation. (See page 20)
10. SLEEP MODE AUTO BUTTON
Used to set Sleep Mode Auto operation.
(See page 20)
11. AIR CIRCULATION BUTTON
Used to circulate the room air without
cooling or heating. (See page 21)
12. ROOM TEMPERATURE CHECKING
BUTTON
Used to check the room temperature.
13. RESET BUTTON
Used prior to resetting time.
14. 2nd F Button
Used prior to using modes printed in blue
at the bottom of buttons. (See page 19)
)
Operating Instruction
Cooling operation
1
Press the Start/Stop button.
The unit will respond with
a beep.
2
Open the door of the remote controller. To select Cooling
Operation, press the Operation Mode Selection button.
Each time the button is pressed, the operation mode is
shifted in the direction of the arrow.
Cooling
3
ON
Auto
Changeover
Healthy
Dehumidification
Heating
(Heat pump model only)
Close the door of the remote controller. Set the temperature
lower than the room temperature. The temperature can be
set within a range of 18°C~30°C(64°F~86°F) at intervals of
1°C(2°F).
To raise the temperature
To lower the temperature
4
Set the fan speed again with the door
of the remote controller still closed.
You can select the fan speed in four
steps-low, medium, high and CHAOS.
Each time the button is pressed, the
fan speed mode is shifted.
Gentle Breeze by the CHAOS logic
❏ For fresher feeling, press the Indoor fan speed selector and set to CHAOS mode. In this mode, the wind
blows like a natural breeze by automatically changing fan speed according to the CHAOS logic.
Owner’s Manual 13
Operating Instruction
Auto operation (Optional)
1
Press the Start/Stop button.
The unit will respond with
a beep.
2
Open the door of the remote controller. To select Auto
Operation, press the operation mode selection button.
Each time the button is pressed, the operation mode is
shifted in the direction of the arrow.
Cooling
ON
3
Auto
Healthy
Dehumidification
Heating
(Heat pump model only)
The temperature and fan speed are automatically set by the
electronic controls based on the actual room temperature.
If you want to change the set temperature, press the Room
Temperature Setting buttons. The cooler or warmer you feel,
the more times (up to two times) you should press the button.
The set temperature will be changed automatically.
To raise the temperature
To lower the temperature
During Auto Operation
❏ You cannot control the indoor fan speed. It has already been set by the Fuzzy rule.
❏ If the system is not operating as desired, manually switch to another mode. The system will not
automatically switch from the cooling mode to the heating mode, or from heating mode to cooling
mode, it must be done by manually resetting.
❏ During Auto Operation, pressing the CHAOS swing button makes the horizontal louvers swing up and
down automatically. If you want to stop auto-swing, press the CHAOS swing button again.
14 Room Air Conditioner
Operating Instruction
Auto changeover operation(Optional)
1
Press the Start/Stop button.
The unit will respond with
a beep.
2
Open the door of the remote controller. To select Auto Changeover
Operation, press the Operation Mode Selection button.
Each time the button is pressed, the operation mode is shifted in the
direction of the arrow.
Cooling
3
Auto
Changeover
Healthy
Dehumidification
Heating
(Heat pump model only)
Close the door of the remote controller. Set the temperature
lower than the room temperature. The temperature can be
set within a range of 18°C~30°C(64°F~86°F) at intervals of
1°C(2°F).
To raise the temperature
ON
To lower the temperature
4
Set the fan speed again with the door
of the remote controller still closed.
You can select the fan speed in four
steps-low, medium, high and CHAOS.
Each time the button is pressed, the
fan speed mode is shifted.
During Auto Changeover Operation
The air conditioner changes the operation mode automatically to keep indoor temperature. When room
temperature varies over ±2°C from the set temperature, air conditioner keeps the room temperature
within ±2°C of the set temperature by auto changeover mode.
Owner’s Manual 15
Operating Instruction
Healthy dehumidification operation
1
Press the Start/Stop button.
The unit will respond with
a beep.
2
Open the door of the remote controller. To select Healthy
Dehumidification Operation, press the Operation Mode
Selection button.
Each time the button is pressed, the operation mode is
shifted in the direction of the arrow.
Cooling
3
ON
Auto
Changeover
Healthy
Heating
Dehumidification (Heat pump model only)
Set the fan speed again with the door
of the remote controller still closed.
You can select the fan speed in four
steps-low, medium, high, or CHAOS.
Each time the button is pressed, the
fan speed mode is shifted.
Gentle Breeze by the CHAOS logic
❏ For fresher feeling, press the Indoor Fan Speed Selector and set
to CHAOS mode. In this mode, the wind blows like a natural
breeze by automatically changing fan speed according to the
CHAOS logic.
During Healthy Dehumidification Operation
❏ If you select the dehumidification mode on the operation selection button, the product starts to run the
dehumidification function. It automatically sets the room temp. and airflow volume to the best condition
for dehumidification, based on the sensed current room temp.
In this case, however, the setting temperature is not displayed on the remote controller and you are not
able to control the room temperature either.
❏ During the healthy dehumidification function, the airflow volume is automatically set according to the
optimization algorithm responding to the current room temp. status, so the room condition is kept
healthy and comfortable even in the very humid season.
16 Room Air Conditioner
Operating Instruction
Heating operation (Heat pump model only)
1
Press the Start/Stop button.
The unit will respond with
a beep.
2
Open the door of the remote controller. To select Heating
Operation, press the Operation Mode Selection button.
Each time the button is pressed, the operation mode is
shifted in the direction of the arrow.
Cooling
3
ON
Auto
Changeover
Healthy
Heating
Dehumidification (Heat pump model only)
Close the door of the remote controller.
Set the temperature higher than the room temperature.
The temperature can be set within a range of
16°C~30°C(60°F~86°F) at intervals of 1°C(2°F).
To raise the temperature
To lower the temperature
4
Set the fan speed again with the door of the
remote controller still closed. You can
select the fan speed in four steps–low,
medium, high and CHAOS. Each time the
button is pressed, the fan speed mode is
shifted.
Gentle Breeze by the CHAOS logic
❏ For fresher feeling, press the Indoor Fan Speed Selector and set to CHAOS mode. In this mode, the
wind blows like a natural breeze by automatically changing fan speed according to the CHAOS logic.
Owner’s Manual 17
Operating Instruction
Jet cool operation
1
Press the Start/Stop button.
The unit will respond with
a beep.
2
Press the Jet Cool button to operate
the speed cooling mode and the unit
will operate at super high fan speed
on cooling mode for 30 minutes.
3
To cancel the Jet Cool mode, press the Jet Cool button, the
fan speed button or the room temperature setting button
again and the unit will operate at high fan speed on cooling
mode.
or
or
NOTICE
❏ During the JET COOL function the A/C starts to blow the cool air at extremely high speed for 30
minutes setting the room temperature automatically to 18°C(64°F). It is especially used to cool
the room temperature quickly in a hot summer.
In heat pump mode or auto changeover mode, however, the JET COOL function is not available.
❏ In order to return to the normal cooling mode from the JET COOL mode, just press the operation
mode selection button, airflow volume selection, temperature setting button or the JET COOL
button again.
18 Room Air Conditioner
Operating Instruction
2nd F operation
1
Press the Start/Stop button.
The unit will respond with
a beep.
2
Open the door of the remote controller and press the 2nd
Function button to operate functions printed blue color under
buttons.
(Check the indication of 2nd function on the display of the
remote controller.)
3
2nd function disappears in a short time automatically or when
the button is pressed again.
CANCEL
ON
OFF
SET
AUTO CLEAN
For more details, refer to functions next pages.
Owner’s Manual 19
Operating Instruction
Additional Features
Sleep mode
1. Press the Sleep Mode Auto button to set the time you want the unit to stop automatically.
2. The Timer is programmed in one-hour increments by pressing the Sleep Mode Auto button 1 to 7 times. The
sleep mode is available for 1 to 7 times. To alter the time period in steps of 1 hour, press the Sleep Mode
Button while aiming at air conditioner.
3. Make sure the Sleep Mode Auto LED lights up .
To cancel the Sleep Mode, press the sleep Mode Auto button several times until the star(
)
disappears from the operation display.
NOTICE
The Sleep Mode will be operated at slow fan speed (cooling) or medium fan speed (heat pump only) for
a comfortable sleep.
In cooling mode or healthy dehumidification mode:
The setting temperature will automatically rise by 1°C(2°F) over the next 30 minutes and by 2°C(4°F) in 1 hour for a
comfortable sleep.
Setting the time
1. Time can be set only when you press the Reset button. When you replace the batteries,
you should press the reset buttons to reset the time. Press the Start/Stop button.
2. Press 2nd F button and check if 2nd F icon is on.
3. Press the Time Setting buttons until the desired time is set.
CANCEL
4. Press the Timer SET button.
SET
NOTICE
Check the indicator for A.M. or P.M.
Delay start/Pre-set stop
1. Make sure the time is set correctly on the display of the remote controller.
2. Press 2nd F button.
3. Press the ON/OFF Timer buttons to turn Timer on or off.
ON
OFF
4. Press the Time Setting buttons until the desired time is set.
CANCEL
5. To set the selected time, press the Timer setting button aiming the remote controller at the
signal receptor.
To cancel the timer setting
Check if 2nd F icon is off.
Press the Timer Cancel button aiming the remote controller at the signal receptor.
(The timer lamp on the air conditioner and the display will go out.)
SET
CANCEL
SET
NOTICE
Select one of the following four types of operation.
Delay OFF Timer
Delay ON Timer
20 Room Air Conditioner
with the unit running
Delay OFF and ON Timer Delay ON and OFF Timer
Operating Instruction
Vertical Airflow Direction Control
The up/down airflow (Vertical Airflow) can be
adjusted by using the remote control.
1. Press the Start/Stop button to start the unit.
2.Open the door on the remote control.
Press Chaos Swing button and the louvers will
swing up and down. Press the Chaos Swing
button again to set the vertical louver at the
desired airflow direction.
NOTICE
❏ If you press the CHAOS swing button, the vertical
airflow direction is changed automatically based on the
CHAOS algorithm to distribute the air in the room
evenly and at the same time to make the human body
feel most comfortable, as if enjoying a natural breeze.
❏ Always use the remote control to adjust the up/down
airflow direction. Manually moving the vertical airflow
direction louver by hand could damage the air
conditioner.
❏ When the unit is shut off, the up/down airflow direction
louver will close the air outlet vent of the system.
Air Circulation Mode
Circulates the room air without cooling or heating.
1. Press the Start/Stop button. The unit will respond with a beep.
2. Open the door on the remote control. Press the Air Circulation button. Close the door on the
remote control. Now each time that you press the Indoor Fan Speed Selector, the fan speed is
shifted from low to CHAOS and back to low again.
CHAOS Air
Fan speed is on low.
Fan speed is on medium.
Fan speed is on high.
NOTICE
❏ CHAOS Air economizes power consumption and prevents overcooling. The fan speed is automatically
changed from high to low or vice versa, depending on the ambient temperature.
Owner’s Manual 21
Operating Instruction
Auto clean (Optional)
1. Whenever you press the AUTO CLEAN button, Auto Clean Function will be
selected or cancelled.
2. Auto Clean function works before and after cooling or dehumidification mode.
For details, refer to the below points.
3. When the unit is started after selecting Auto Clean ,the Cool Start function
operates and indoor Fan is started after 20 seconds.
4. When you press Start/Stop button to turn off the unit after the you have selected
Auto Clean function, the air-conditioner circulates the indoor air in the Auto
Clean mode with no more Cooling or Dehumidification operation. It lasts for 30
minutes.
5. If you press the AUTO CLEAN button again during the product operation , Auto
Clean function will be cancelled.
AUTO CLEAN
NOTICE
❏ During Auto Clean function, moistures left in indoor units after Cooling Operation or Healthy
Dehumidification Operation can be removed.
❏ During Auto Clean function, only Start/Stop button, Plasma button and AUTO CLEAN button are
available.
Forced operation
Operation procedures when the remote control can't be used.
The operation will be started if the ON/OFF button is pressed.
If you want to stop operation, re-press the button.
ON/OFF
button
Cooling Model
Room Temp. ≥ 24°C(75.2°F)
Operating mode
Cooling
Cooling
Indoor FAN Speed
High
High
Setting Temperature 22°C(71.6°F)
22°C(71.6°F)
Heat pump Model
21°C(69.8°F) ≤ Room Temp. < 24°C(75.2°F) Room Temp. < 21°C(69.8°F)
Healthy Dehumidification
Heating
High
High
23°C(73.4°F)
24°C(75.2°F)
Test operation
During the TEST OPERATION, the unit operates in cooling mode at high speed fan, regardless of room
temperature and resets in 18 minutes.
During test operation, if remote controller signal is received, the unit operates as remote controller sets.
If you want to use this operation, Press and hold the ON/OFF button for 3~5 seconds, then the buzzer sound
1 "beep".
If you want to stop the operation, re-press the button.
22 Room Air Conditioner
Operating Instruction
Auto restart
In case the power comes on again after a power failure, Auto Restarting Operation is the function to operate
procedures automatically to the previous operating conditions.
So there is no need of activating this function by pressing any key or button.
In the initial mode, the fan operates at a low speed and the compressor starts 2.5~3 minutes later.
As the compressor starts, the fan speed also resumes its previous setting mode.
Helpful information
Fan speed and cooling capacity.
The cooling capacity indicated in the specification is the value
when the fan speed is set to high, and the capacity will be lower
at low or medium fan speed.
High fan speed is recommended when you wish to cool the room
quickly.
High
Speed
NOTICE
Auto restart function has been set as a factory default.
But customer can set up by following this instruction.
To disable function
- Press and hold the ON/OFF button for 6 seconds, then the buzzer sound 2 "beep" and the indicator lamp (1)
blinks 4 times.
To enable function
- Press and hold the ON/OFF button for 6 seconds, then the buzzer sound 2 "beep" and the indicator lamp (1)
brights 4 times.
Owner’s Manual 23
Maintenance and Service
Maintenance And Service
Before performing any maintenance, turn off the main power to the system.
Indoor Unit
Grille, Case, and Remote Control
Turn the system off before cleaning. To clean, wipe with a soft, dry
cloth. Do not use bleach or abrasives.
NOTICE
Supply power must be disconnected before cleaning the indoor unit.
Air filters
Air inlet vent
Air outlet vent
Air filters
(behind front panel)
Vertical louver Horizontal louver
The air filters behind the front grille should be checked and
cleaned once every 2 weeks or more often if neccessary.
1. Open the front panel as shown.
2. Pull the filter tab slightly forward to remove the filter.
3. Clean the filter with a vacuum cleaner or warm, soapy water.
• If dirt is conspicuous, wash with a solution of
detergent in lukewarm water.
• If hot water (40°C(104°F) or more) is used, it may
deform the filter.
4. After washing with water, dry well in the shade.
5. Re-install the air filter.
TRIPLE DEODORIZER filter (Optional)
1. After removing the air filters, pull slightly forward to remove
the TRIPLE DEODORIZER filter.
2. Dry in the sunlight for two hours.
3. Re-install the TRIPLE DEODORIZER filter to the original
position.
TRIPLE
DEODORIZING
Filter
Never use any of the followings:
• Water hotter than 40°C(104°F)
Could cause deformation and/or discoloration.
• Volatile substances
Could damage the surfaces of the air conditioner.
24 Room Air Conditioner
Pow
d er
G a s o li n e
Maintenance and Service
Outdoor Unit
The heat exchanger coils and panel vents of
the outdoor unit should be checked regularly.
If clogged with dirt or soot, the heat exchanger
and panel vents may be professionally steam cleaned.
NOTICE
(Side)
Air intake
vents
(Rear)
Piping
Air outlet
vents
Dirty or clogged coils will reduce the
operating efficiency of the system and cause
higher operating costs.
Common Problems And Solutions
Before calling for service
If you have problems with your air conditioner, read the following information and try to solve the problem. If you
cannot find a solution, turn off the air conditioner and contact your dealer.
Air conditioner does not operate
1. Check the fuse or circuit breaker.
2. Check whether the voltage is unusually high or low.
Air does not feel cold enough on the cooling setting
1. Ensure that the temperature settings are correct.
2. Check to see if the air filter is clogged with dust. If so, replace the filter.
3. Ensure that the air flow from the outside is not obstructed and that there is a clearance of over 20" between the
back of the air conditioner and the wall or fence behind it.
4. Close all doors and windows and check for any source of heat in the room.
Owner’s Manual 25
Maintenance and Service
Troubleshooting
The air conditioner may be operating abnormally when:
Problem
Air
conditioner
does not start
Air
conditioner
does not cool
as it should
Possible Causes
What To Do
■ The fuse is blown/circuit
breaker is tripped.
• Check the house fuse/circuit breaker
box and replace the fuse or reset the
breaker.
■ Power failure.
• If power failure occurs, turn the mode
control to Off.
When power is restored, wait 3
minutes to restart the air conditioner
to prevent tripping of the compressor
overload.
■ Airflow is restricted.
• Make sure there are no curtains,
blinds, or furniture blocking the front of
the air conditioner.
■ The air filter is dirty.
• Clean the filter at least every 2 weeks.
See the care and Maintenance
section.
■ The room may have been
hot.
• When the air conditioner is first turned
on, you need to allow time for the
room to cool down.
■ Cold air is escaping.
• Check for open furnace floor registers
and cold air returns.
26 Room Air Conditioner
Specifications and performance data subject to change without notice.
HEAT CONTROLLER, INC.
1900 WELLWORTH AVENUE • JACKSON, MICHIGAN 49203
THE QUALITY LEADER IN CONDITIONING AIR
P/No.: 3828A20434K