1
HIGH SPEED DOME CAMERA
USER’S MANUAL
Rancent Technologies Ltd,.
10/F Hong Kong Trade Centre, 161 Des Voeux
Road Centrl, Hong Kong
Tel: +852 2816 7037
Fax: +852 2855 8158
.
Table Of Contents
1 Precautions ………………………………………………1
2 Features………………………………………………… 2
3 Technical Data……………………………………………3
4 Installation Guide…………………………………………4
5 Settings……………………………………………………8
6 Preset Setting……………………………………………12
7 The OSD Menu Setting…………………………………13
1 Precautions
1.Transportation Security
No heavy stress, violent vibration or water splash are allowed during
transportation,storage.The unit should be transported in separated
packing.In shipments of distributor and delivery of maintenance,any
damages caused by integral packing are not covered by warranty.
2.Installation
Avoid heavy stress and violent vibration during installation. Don’t
touch the dome cover directly by hand. When connecting the power
source, please follow all electric safety standards and only use the
power supply designated for this device. Keep the video and control
signal in a decent distance from high voltage devices and cable. Don’t
3.Internal Environment
entering the dome. If occur this, please shut down the power and pull
out the plug. Then inform the technical personnel immediately.
4.Electrical Safety
The video image would be interfered when the dome is installed near
5.Camera Protection
Avoid shooting very bright objects directly into the camera’s CCD (such
6.Cleaning Method
Please don’t use abrasive and violent detergent to clean the dome.
Please choose dry fabric and neutral detergent. Use lens paper to
clean the lens.
1
2 Features
2.1 Built-in Decoder
ƔSURJUDPPDEOHSUHVHWV
ƔFUXLVLQJWUDFNVHDFKFUXLVLQJWUDFNKDVSUHVHWSRVLWLRQV
ƔSDWWHUQWRXUVHDFKRQHZLWKVPHPRU\
Ɣ56EXV
ƔJURXSVRIDXWRVFDQWKHOHIWDQGULJKWERXQGDU\DQGVFDQ
VSHHGFDQEHVHW
Ɣ3HOFRB3DQG3HOFRB'+6FRPSDWLEOH
ƔDODUPLQSXWVDQGRXWSXWV
Ɣ*XDUGORFDWLRQWKHGRPHFDQRSHUDWHSUHVHWDXWRVFDQ
FUXLVLQJDQGSDWWHUQWRXUVIXQFWLRQVDIWHUDVKRUWSDXVH
Ɣ $ODUPWULJJHULQJWKHDODUPFDQWULJJHUSUHVHWDXWRVFDQ
FUXLVLQJDQGSDWWHUQWRXUVIXQFWLRQV
,QWHJUDWHG8QLYHUVDO6SHHG&KDQJH5RWDWRU
Ɣ'HOLFDWHVWHSSLQJPRWRrVWDEOHVHQVLWLYHDQGDFFXUDWH
ƔFRQWLQXRXVSDQZLWKRXWEOLQGDUHD
Ɣ6WHSOHVVVSHHGFKDQJHDXWR]RRPVSHHGPDWFKLQJ
Ɣ $XWRRYHUWXUQIXQFWLRQ
Ɣ0DQXDOVSHHG3DQ6 TLOW6
Ɣ3UHVHWVFDOOLQJVSHHG6
Ɣ $XWRLULVDXWREDFNOLJKWFRPSHQVDWLRQ
Ɣ $XWRPDQXDOZKLWHEDODQFH
Ɣ $XWRPDQXDOIRFXV
Ɣ $XWRPDQXDOEULJKWQHVVFRQWURO
Ɣ0XOWLSOHNLQGVRIFDPHUDIRURSWLRQV
$OOZHDWKHU2XWGRRU'HVLJQ
Ɣ%XLOWLQKHDWHU
Ɣ%XLOWLQIDQFDQRSHUDWHLQć
Ɣ+LJK'LHFDVW $OXPLQXP&RQVWUXFWLRQ
Ɣ,3ZDWHUSURRI
Ɣ9OLJKWQLQJDQGVXUJHFXUUHQWSURRI
2
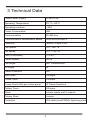
3 Technical Data
PowerPower Supply
AC24V/2.5A
Operating Temperature
-35 °C—60°C
Operating moisture
< 95%
Power Consumption
55W
Communication
RS-485 bus
Communication transmission speed
2400/4800/9600BPS
Protocols
Pelco-D, Pelco-P,HS
Pan speed
0.01°-180° /s
Titlt speed
0.01° -120° /s
Pan/Tilt Accuracy
+/- 0.05°
Preset Speed
600°/s
Pan Angle
360° Continuously
Tilt Angle
90°
Preset Positions
220
Auto Scan
8 Groups
Cruise Track
8 Groups
Cruise Points Qty per cruise group
32 Preset Positions
Pattern Tours
4 Groups
Alarm
4 alarm inputs and 2 outputs
Privacy Zone
8 zones
Protection
IP66 water proof/3000V lightning proof
3
4 Installation Guide
4.1 Installation Preparation
Video Coaxial Cables
Mode
Max Distance
RG59/U
750ft(229m)
RG6/U
1,000ft(305m)
RG11/U
1,500ft(457m)
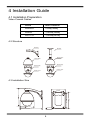
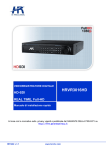
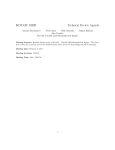
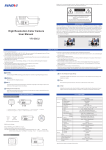
4.2 Structure
Bracket
Bracket
Dome base
Dome base
Dome body
Dome body
Dome cover
Dome cover
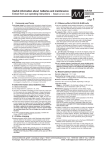
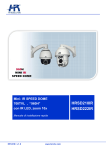
4.3 Installation Size
110 mm
85 mm
220 mm
10 mm
340 mm
4
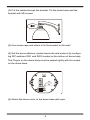
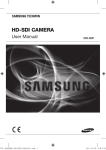
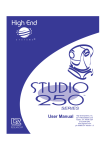
4.4 Installation Procedures
*Notice: The wall must be thick enough to install the expansion
screws and can bear 4 times the weight of the dome camera itself.
(1) Bore 4 holes by using templates included on the wall.
110 mm
85 mm
10 mm
(2) Mount 4 expansion screws into the holes
5
(3) Put the cables through the bracket. Fix the dome base and the
bracket with M5 screws.
(4) Use screw-caps and shims to fix the bracket on the wall.
(5) Set the dome address, system baud rate and protocol by configuring DIP switches SW1 and SW2 located on the bottom of dome body.
The Plug-in on the dome body must be seated rightly with the socket
on the dome base.
6:
6:
6:
6:
(6) Attach the dome cover to the dome base with rope.
6
(7) To lock the dome body to the dome base, line up the A and B tabs
on the dome body with the A and B label on the dome base. Push in on
the tabs. Insert one side and then the other side. Continue pushing one
the ends of the tabs until both sides click into place. Make sure the
plug-in on the dome body is fully locked by the socket on the dome
base. Then press the dome body lightly and check if the dome body is
fully locked to avoid shedding and abrasion with the dome cover.
$
%
(8) Fix the dome cover with screws.
7
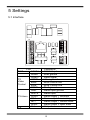
5 Settings
5.1 Interface
3
$$%6*1'9,'(29*1'
3
$&96*1'$&9
*1'$21&&2012$,1$,1$,1$,1*1'
Port
P1 Power AC24V
SGND
VIDEO
P2
VGND
Video
485A
Control
485B
SGND
GND
AIN1-4
P3 Alarm COM1
NO1
NC1
AOD2
Net
P4
3
3
Comments
AC24V Input
Shell ground
Video signal
Video ground
485A Control line
485B Control line
Shell ground
Alarm input ground
Alarm input
Alarm output 1 common
Alarm output 1 normal open
Alarm output 1 normal close
Alarm output 2 open drain
Net port
8
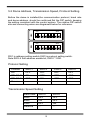
5.2 Dome Address, Transmission Speed, Protocol Setting
Before the dome is installed,the communication protocol, baud rate
and dome address, should be confirmed.Set the DIP switch, keeping
the setting consistent with the control system. The relative DIP switch
site and connecting wires are diagramed below for reference.
ON
DIP
ON
DIP
SW1 is address setting switch,SW2 is protocol setting switch.
1RWH6:6RIWDGGUHVVHQDEOHELW6:ȍ
Protocol Setting
Protocol
HS
SW2-1
OFF
SW2-2
OFF
SW2-3
OFF
SW2-4
OFF
PELCO P
PELCO D
Reserve
ON
OFF
...
OFF
ON
...
OFF
OFF
...
OFF
OFF
...
Transmission Speed Setting
Baud Rate
9600
4800
2400
Reserve
SW2-5
OFF
ON
OFF
...
9
SW2-6
OFF
OFF
ON
...
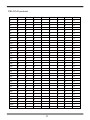
Dome Address Setting
PELCO-P & HS protocol
Address SW1-1
SW1-2
SW1-3
SW1-4
SW1-5
SW1-6
SW1-7
SW1-8
1
0
0
0
0
0
0
0
0
2
1
0
0
0
0
0
0
0
3
0
1
0
0
0
0
0
0
4
1
1
0
0
0
0
0
0
5
0
0
1
0
0
0
0
0
6
1
0
1
0
0
0
0
0
7
0
1
1
0
0
0
0
0
8
1
1
1
0
0
0
0
0
9
0
0
0
1
0
0
0
0
10
1
0
0
1
0
0
0
0
11
0
1
0
1
0
0
0
0
12
1
1
0
1
0
0
0
0
13
0
0
1
1
0
0
0
0
14
1
0
1
1
0
0
0
0
15
0
1
1
1
0
0
0
0
16
1
1
1
1
0
0
0
0
17
0
0
0
0
1
0
0
0
18
1
0
0
0
1
0
0
0
19
0
1
0
0
1
0
0
0
20
1
1
0
0
1
0
0
0
21
0
0
1
0
1
0
0
0
22
1
0
1
0
1
0
0
0
23
0
1
1
0
1
0
0
0
24
1
1
1
0
1
0
0
0
25
0
0
0
1
1
0
0
0
26
1
0
0
1
1
0
0
0
27
0
1
0
1
1
0
0
0
28
1
1
0
1
1
0
0
0
29
0
0
1
1
1
0
0
0
30
1
0
1
1
1
0
0
0
31
0
1
1
1
1
0
0
0
32
1
1
1
1
1
0
0
0
...
...
...
...
...
...
...
...
...
254
1
0
1
1
1
1
1
1
255
0
1
1
1
1
1
1
1
10
PELCO-D protocol
Address SW1-1
SW1-2
SW1-3
SW1-4
SW1-5
SW1-6
SW1-7
SW1-8
1
1
0
0
0
0
0
0
0
2
0
1
0
0
0
0
0
0
3
1
1
0
0
0
0
0
0
4
0
0
1
0
0
0
0
0
5
1
0
1
0
0
0
0
0
6
0
1
1
0
0
0
0
0
7
1
1
1
0
0
0
0
0
8
0
0
0
1
0
0
0
0
9
1
0
0
1
0
0
0
0
10
0
1
0
1
0
0
0
0
11
1
1
0
1
0
0
0
0
12
0
0
1
1
0
0
0
0
13
1
0
1
1
0
0
0
0
14
0
1
1
1
0
0
0
0
15
1
1
1
1
0
0
0
0
16
0
0
0
0
1
0
0
0
17
1
0
0
0
1
0
0
0
18
0
1
0
0
1
0
0
0
19
1
1
0
0
1
0
0
0
20
0
0
1
0
1
0
0
0
21
1
0
1
0
1
0
0
0
22
0
1
1
0
1
0
0
0
23
1
1
1
0
1
0
0
0
24
0
0
0
1
1
0
0
0
25
1
0
0
1
1
0
0
0
26
0
1
0
1
1
0
0
0
27
1
1
0
1
1
0
0
0
28
0
0
1
1
1
0
0
0
29
1
0
1
1
1
0
0
0
30
0
1
1
1
1
0
0
0
31
1
1
1
1
1
0
0
0
32
0
0
0
0
0
1
0
0
...
...
...
...
...
...
...
...
...
253
1
0
1
1
1
1
1
1
254
0
1
1
1
1
1
1
1
11
6 Preset Setting
Speed dome camera supports 220 preset positions. The
code numbers 1- 64 and 100-255 represent the 220 preset
positions. You can activate some special functions by calling
upon code number 65-99.
NO.
Command
Command packet Comments
1
Start Auto Scan
Call 99
Default to start the
first group of auto scan
2
Start Sequence
Call 98
Default to start the
first group of sequence
3
Start Pattern
Call 97
Tours
Default to start the
first group of Pattern
Tours
4
5
6
7
Start the scan
Call 80 + call pp
PP means group
of group
+ call 99
No.1-8
Start sequence
Call 80 + call pp
PP means group
of group N
+ call 98
No.1-8
Start pattern
Call 80 + call pp
PP means group
tour of group N
+ call 97
No.1-4
Stop Auto mode Call 96
End setting
8
Open the menu
Call 95
9
Remote reset
Call 94
10
Restore factory
Call 82
default setting
12
7 The OSD Menu Setting
Operation Method of the Menu:
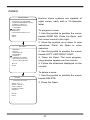
1.Access main menu (call preset 95).
2.Use the joystick to position the cursor beside menu selection.
NOTE:
If your controller does not have a joystick, use the up or down key.
3.Press Iris Open, the submenu/cursor moves to the right.
4.Move the joystick up or down to view selections.
5.Press Iris Open to make selection.
6.Press Iris Close to cancel selection.
13
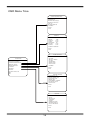
OSD Menu Tree
SYSTEM INFORMATION
DOME ID: 123456789 0
ADD RESS: 001
BAUD RATE: 9600,N,8,1
PROTOCOL: PELCO P
7(03: 31C
ALARM: 000000 00
<OTHERS>
BACK
EXIT
DISPLAY
DOME TITLE : OFF
PRESET :
5 SEC
5 SEC
MOTION :
5 SEC
ZONES :
DATE/TIME : ON
5 SEC
PAN/TILT :
5 SEC
ALARM :
<DISPLAY POSITION>
BACK
EXIT
DOME SETTINGS
<IDLE>
<ALARM>
<PRIVACY MASK>
<CLOCK>
<PASSWORD>
<DOME TITLE>
<ADVAN CED>
<OTHERS>
MAIN MENU
LANGUAG E: ENGLISH
<SYSTEM INFORMATION>
<DISPLAY SETUP>
<DOM E SETTINGS>
<CAMERA>
<MOTION>
BACK
EXIT
RESTART
FACTORY DEFAULTS
HELP
EXIT
CAMERA SETTING
AUTO FOCUS: ON
DIGITAL ZOOM: OFF
BACKLIGHT: OFF
FREEZE: OFF
ZOOM SPEED: NORMAL
DAY NIGHT: AUTO
<ADVAN CED>
BACK
EXIT
MOTION
<PRESET>
<SCAN>
<SEQUENCE>
<PATTERN>
<ZONES>
<TIMING ACTION>
<MOTION DETECT>
<AUTO TRACKING>
BACK
EXIT
14
LANGUAGE
MAIN MENU
LANGUAG E: ENGLISH
<SYSTEM INFORMATION>
<DISPLAY SETUP >
<DOME SETTINGS >
<CAMERA>
<MOTION>
RESTART
FACTORY DEFAULTS
HELP
EXIT
The language for the on-screen menus is
selectable. Available languages include
English and Chinese.
To change the display language:
1. Use the joystick to position the cursor
beside LANGUAGE.
2. Press Iris Open. The cursor moves to
the right, beside the current, selected
language.
3. Move the joystick up or down to view
selections. Press Iris Open to enter selection.
All on-screen menus are changed to the
selected language.
15
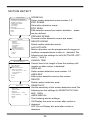
SYSTEM INFORMATION
MAIN MENU
LANGUAGE: ENGLISH
<SYSTEM INFORMATION>
<DISPLAY SETUP>
<DOME SETTINGS>
<CAMERA>
<MOTION>
RESTART
FACTORY DEFAULTS
HELP
EXIT
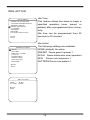
The System Information screen displays
dome drive model, software version, and
other
diagnostic
information.System
settings cannot be changed using this
screen. This screen is for reference only.
Use the following steps to display the
System Information screen:
SYSTEM INFORMATION
DOME ID: 1234567890
ADDRESS: 001
BAUDRATE: 9600,N,8,1
PROTOCOL: PELCO P
TEMP: 31C
ALARM: 000000 00
<OTHERS>
1. Use the joystick to position the cursor
beside SYSTEM INFORMATION.
2. Press Iris Open. The SYSTEM INFORMATION screen opens.
BACK
EXIT
OTHERS
TITLE: DOME
VERSION: V28200
DATE: 2008-01-08
TIME: 10:20:00
TEMP SCALE: CELSIUS
BACK
EXIT
16
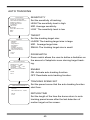
DISPLAY SETUP
MAIN MENU
LANGUAG E: ENGLISH
<SYSTEM INFORMATION>
<DISPLAY SETUP >
<DOM E SETTINGS>
<CAMERA>
<MOTION>
RESTART
FACTORY DEFAULTS
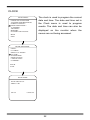
The following settings are available for
each label:
OFF
HELP
EXIT
DISPLAY
DOME TITLE : OFF
PRESET :
5 SEC
MOTION :
5 SEC
ZONES :
5 SEC
DATE/TIME : O N
PAN/TILT :
5 SEC
ALARM :
5 SEC
<DISPLAY POSITION>
BACK
EXIT
DISPLAY POSITION
<DAT E/TIME>
<DOM E TITLE>
<ZONES>
<MOTION>
<ALARM>
<PAN/TILT>
BACK
EXIT
Display setup allows you to program how
labels are displayed on the monitor.
Label is not displayed when
activated.
ON
The label is continually
displayed when activated.
2 SEC The label is displayed for 2
seconds after activation.
5 SEC The label is displayed for 5
seconds after activation.
10 SEC The label is displayed for
10 seconds after activation.
Labels can be placed anywhere on the
monitor. This feature allows you to customize the appearance of your monitor
screen. To set a label position:
1. Use the joystick to position the cursor
beside a label.
2. Press Iris Open.
3. Use the joystick to move the label up,
down, left, or right.
4. Press Iris Open.
5. Repeat steps 1 through 4 to position
other labels.
6. Position the cursor next to BACK or
EXIT. Press Iris Open to save settings
and exit menu.
17
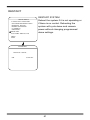
IDLE ACTION
MAIN MENU
LANGUAG E: ENGLISH
<SYSTEM INFORMATION>
<DISPLAY SETUP >
<DOME SETTINGS >
<CAMERA>
<MOTION>
RESTART
FACTORY DEFAULTS
HELP
EXIT
DOME SETTINGS
<IDLE>
<ALARM>
<PRIVACY MASK>
<CLOCK>
<PASSWORD>
<DOM E TITLE>
<ADVAN CED>
<OTHERS>
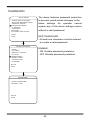
Idle Time
This feature allows the dome to begin a
specified operation (scan, preset, or
pattern) after a programmed time of inactivity.
Idle time can be programmed from 30
seconds to 30 minutes.
Idle Action
The following settings are available:
NONE (default) No action.
PRESET Dome goes to preset 1.
SCAN Dome starts auto scan operation.
SEQ Dome runs sequence 1.
PATTERN Dome runs pattern 1.
BACK
EXIT
IDLE ACTION
TIME :
30 SEC
ACTION: NON E
BACK
EXIT
18
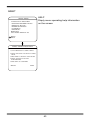
ALARM
The dome system has 4 alarm inputs and 2
MAIN MENU
LANGUAG E: ENGLISH
<SYSTEM INFORMATION>
<DISPLAY SETUP >
<DOM E SETTINGS >
<CAMERA>
<MOTION>
RESTART
FACTORY DEFAULTS
HELP
EXIT
alarm outputs. When an alarm is received, an
input signal to the dome triggers the user
defined action (go to preset, run pattern, etc.)
INPUT STATE
Used to Set the alarm contact.There are
two input states,OPEN and CLOSE.
OPEN
Normally open.
CLOSE Normally close.
DOME SETTINGS
<IDLE>
<ALARM>
<PRIVACY MASK>
<CLOCK>
<PASSWORD>
<DOM E TITLE>
<ADVAN CED>
<OTHERS>
ALARM MODE
BACK
EXIT
ACTION
OFF
Alarm function is deactivated.
ON
Alarm function is activated.
AUTO Alarm function will be activated .
between START TIME and STOP TIME.
Set the alarm action:
NONE (default) No action.
PRESET Dome goes to preset.
ALARM SETTING
ALARM NO. : 1
INPUT STATE: OPEN
ALARM MODE: OFF
ACTION:
NON E
ALARM OUT: O FF
RESET TIME : 10 SEC
START TIME : 00:00
STOP TIME: 00:00
BACK
EXIT
SCAN
Dome starts auto scan operation.
SEQ
Dome runs sequence.
PATTERN Dome runs pattern.
ALARM OUT
Set the auxiliary to activate:
OFF
Not activated.
OUT1 An alarm action will close AUX 1.
OUT2 An alarm action will activate AUX
2 open drain output.
ALL Both AIX 1 and AUX 2 are activated
RESET TIME This is the amount of time the
dome deactivates the alarm ouputs.
19
PRIVACY MASK
MAIN MENU
LANGUAG E: ENGLISH
<SYSTEM INFORMATION>
<DISPLAY SETUP >
<DOME SETTINGS >
<CAMERA>
<MOTION>
RESTART
FACTORY DEFAULTS
HELP
EXIT
Privacy mask allows a user to program areas
that cannot be viewed by the operator of the
dome system. A blanked area will move with
pan and tilt functions and automatically adjust
in size as the lens zooms telephoto and wide.
MASK NO.
Move the cursor to MASK NO. to set
the
NO. of privacy mask zone.
DOME SETTINGS
<IDLE>
<ALARM>
<PRIVACY MASK>
<CLOCK>
<PASSWORD>
<DOME TITLE>
<ADVAN CED>
<OTHERS>
ENABLE
Move the cursor to to enable or disable the
privacy mask zone.
SET
Move the cursor to SET and press Iris Open
BACK
EXIT
to enter the edition mode of privacy mask
zone.
Then the sentence “PRESS IRIS OPEN TO
CONFIRM” will be displayed on the monitor.
PRIVACY MASK
MASK NO.: 1
ENABLE : OFF
<SET>
DELETE
BACK
EXIT
Use joystick to move the dome to the area
you want to cover and press IRIS OPEN to
confirm. There will be a privacy zone in the
middle of the monitor. Move joystick up,
down, left and right to adjust the size of
privacy zone.
DELETE
Move the cursor to DELETE and press IRIS
OPEN to delete the current privacy zone.
20
CLOCK
MAIN MENU
LANGUAG E: ENGLISH
<SYSTEM INFORMATION>
<DISPLAY SETUP >
<DOM E SETTINGS >
<CAMERA>
<MOTION>
RESTART
FACTORY DEFAULTS
The clock is used to program the current
date and time. The date and time set in
the Clock menu is used to program
events. The date and time can also be
displayed on the monitor when the
menus are not being accessed.
HELP
EXIT
DOME SETTINGS
<IDLE>
<ALARM>
<PRIVACY MASK>
<CLOCK>
<PASSWORD>
<DOM E TITLE>
<ADVAN CED>
<OTHERS>
BACK
EXIT
DATE/TIME
DATE:200 9-01-01
TIME :12:00
SAVE
CANCEL
22
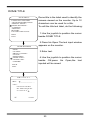
PASSWORD
MAIN MENU
LANGUAG E: ENGLISH
<SYSTEM INFORMATION>
<DISPLAY SETUP >
<DOME SETTINGS >
<CAMERA>
<MOTION>
RESTART
FACTORY DEFAULTS
HELP
EXIT
The dome features password protection
to prevent unauthorized changes to the
dome settings. An operator cannot
access any of the dome settings menus
without a valid password.
EDIT PASSWORD
At least one character must be entered
to create a valid password.
DOME SETTINGS
<IDLE>
<ALARM>
<PRIVACY MASK>
<CLOCK>
<PASSWORD>
<DOM E TITLE>
<ADVAN CED>
<OTHERS>
ENABLE
ON Enable password protection.
OFF Disable password protection.
BACK
EXIT
PASSWO RD
<EDIT PASSWO RD>
ENABLE: OFF
BACK
EXIT
22
DOME TITLE
MAIN MENU
LANGUAG E: ENGLISH
<SYSTEM INFORMATION>
<DISPLAY SETUP >
<DOME SETTINGS >
<CAMERA>
<MOTION>
RESTART
FACTORY DEFAULTS
HELP
EXIT
DOME SETTINGS
<IDLE>
<ALARM>
<PRIVACY MASK>
<CLOCK>
<PASSWORD>
<DOME TITLE>
<ADVAN CED>
<OTHERS>
Dome title is the label used to identify the
camera viewed on the monitor. Up to 12
characters can be used for a title.
To edit the title text label, do the following:
1.Use the joystick to position the cursor
beside DOME TITLE.
2.Press Iris Open.The text input window
appears on the monitor.
3.Enter text.
4.Use the joystick to position the cursor
beside OK,press Iris Open,the text
inputed will be saved.
BACK
EXIT
'20(7,7/(6( 7
,0387:
_______________ _
&$36!
A BCD EFG H IJ
KLMNOPQRST
UVWXYZ.
2.
&$1&( /
23
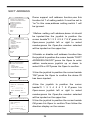
SOFT ADDRESS
MAIN MENU
LANGUAG E: ENGLISH
<SYSTEM INFORMATION>
<DISPLAY SETUP >
<DOM E SETTINGS>
<CAMERA>
<MOTION>
RESTART
FACTORY DEFAULTS
Dome support soft address function,use this
function bit 7 of setting switch 2 must be set to
"on".In this case,address setting switch 1 will
be ignored.
HELP
EXIT
1.Before setting soft address,dome id should
be inputed.Use the joystick to position the
DOME SETTINGS
<IDLE>
<ALARM>
<PRIVACY MASK>
<CLOCK>
<PASSWORD>
<DOME TITLE>
<ADVAN CED>
<OTHERS>
BACK
EXIT
cursor beside"0 1 2 3 4 5 6 7 8 9",press Iris
Open,move joystick left or right to select
number,press Iris Open,the number selected
will be inputed on the upper line.
2.Enable or disable soft address function.Use
ADVAN CED
<SOFT ADD RESS SET>
<VIDEO LINE LOCK>
<AUX>
<SOFT LIMIT>
<POW ER ON ACTION>
<COMMUNICATION TEST>
BACK
EXIT
the joystick to position the cursor beside "SOFT
ADDRESS:ON/OFF",press Iris Open to enter
edition mode,move joystick up or down to
select ON or OFF,press Iris Open to confirm.
3.Use the joystick to position the cursor beside
"OK",press Iris Open to confirm the dome ID
has been inputed.
DOME SOFT ADD RESS SET
SOFT ADD RESS˖001
INPUT ID˖123456789 0
INPUT˖__________ _
SOFT ADD RESS: OFF
OK
CANCEL
DOME SOFT ADD RESS SET
SOFT ADD RESS˖001
INPUT (000-255)
INPUT˖___
4.Use the joystick to position the cursor
beside"0 1 2 3 4 5 6 7 8 9",press Iris
Open.move joystick left or right to select
number,press Iris Open,the number selected
will be inputed on the upper line.
5.Use the joystick to position the cursor beside
OK,press Iris Open to confirm.Then follow the
direction display on the screen.
SOFT ADD RESS: OFF
CANCEL
OK
24
VIDEO LINE LOCK
MAIN MENU
LANGUAG E: ENGLISH
<SYSTEM INFORMATION>
<DISPLAY SETUP >
<DOM E SETTINGS>
<CAMERA>
<MOTION>
RESTART
FACTORY DEFAULTS
HELP
EXIT
DOME SETTINGS
<IDLE>
<ALARM>
<PRIVACY MASK>
<CLOCK>
<PASSWORD>
<DOME TITLE>
<ADVAN CED>
<OTHERS>
BACK
EXIT
ADVAN CED
Line sync refers to a programmable function
that allows you to synchronize all cameras
within a matrix system.
VIDEO LINE LOCK
ON Adjusts the phase of the line sync to
synchronize input power.
OFF The dome synchronizes to the internal
clock.
PHASE TURNOVER
ON Line sync phase turn over 180 degrees.
OFF Line sync phase is not turn over.
PHASE ADJUST
Adjust line sync phase from 0 to 180 degrees.
<SOFT ADD RESS SET>
<VIDEO LINE LOCK>
<AUX >
<SOFT LIMIT>
<POW ER ON ACTION>
<COMMUNICATION TEST>
BACK
EXIT
VIDEO LINE LOCK
VIDEO LINE LOCK˖OFF
PHASE TURNOV ER˖OFF
PHASE ADJUST
˖000
BACK
EXIT
25
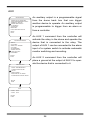
AUX
MAIN MENU
An auxiliary output is a programmable signal
LANGUAG E: ENGLISH
<SYSTEM INFORMATION>
<DISPLAY SETUP >
<DOME SETTINGS >
<CAMERA>
<MOTION>
RESTART
FACTORY DEFAULTS
from the dome back box that can trigger
another device to operate. An auxiliary output
is programmable to trigger from an alarm or
from a controller.
HELP
EXIT
An AUX 1 command from the controller will
DOME SETTINGS
<IDLE>
<ALARM>
<PRIVACY MASK>
<CLOCK>
<PASSWORD>
<DOM E TITLE>
<ADVAN CED>
<OTHERS>
BACK
EXIT
ADVAN CED
activate the relay in the dome and operate the
device that is connected to the relay. The
output of AUX 1 can be connected to the alarm
input of a system switch to activate automatic
monitor switching and recording.
An AUX 2 command from the controller will
place a ground at the output of AUX 2 to operate the device that is connected to it.
<SOFT ADD RESS SET>
<VIDEO LINE LOCK>
<AUX >
<SOFT LIMIT>
<POW ER ON ACTION>
<COMMUNICATION TEST>
BACK
EXIT
AUX
AUX1: OFF
AUX2: OFF
BACK
EXIT
26
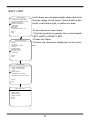
SOFT LIMIT
MAIN MENU
LANGUAG E: ENGLISH
<SYSTEM INFORMATION>
<DISPLAY SETUP >
<DOM E SETTINGS>
<CAMERA>
<MOTION>
RESTART
FACTORY DEFAULTS
HELP
EXIT
DOME SETTINGS
<IDLE>
<ALARM>
<PRIVACY MASK>
<CLOCK>
<PASSWORD>
<DOME TITLE>
<ADVAN CED>
<OTHERS>
Limit stops are programmable stops that limit
the pan range of the dome. There must be two
limits, a left and a right, to define an area.
To set manual or scan stops:
1.Use the joystick to position the cursor beside
LEFT LIMIT or RIGHT LIMIT.
2.Press Iris Open.
3.Follow the directions displayed on the monitor.
BACK
EXIT
ADVAN CED
<SOFT ADD RESS SET >
<VIDEO LINE LOCK>
<AUX>
<SOFT LIMIT>
<POW ER ON ACTION>
<COMMUNICATION TEST>
BACK
EXIT
LIMIT SETTING
SOFT LIMIT ˖OFF
<LEFT LIMIT>
<RIGHT LIMIT>
LIMIT DELETE
BACK
EXIT
27
POWER ON ACTION
MAIN MENU
LANGUAG E: ENGLISH
<SYSTEM INFORMATION>
<DISPLAY SETUP >
<DOM E SETTINGS>
<CAMERA>
<MOTION>
RESTART
FACTORY DEFAULTS
HELP
EXIT
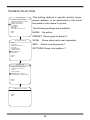
This setting defines a specific activity (scan,
preset, pattern) to be performed in the event
the power to the dome is cycled.
The following settings are available:
NONE
No action.
PRESET Dome goes to preset 1.
DOME SETTINGS
<IDLE>
<ALARM>
<PRIVACY MASK>
<CLOCK>
<PASSWORD>
<DOME TITLE>
<ADVAN CED>
<OTHERS>
SCAN
SEQ
Dome starts auto scan operation.
Dome runs sequence 1.
PATTERN Dome runs pattern 1.
BACK
EXIT
ADVAN CED
<SOFT ADD RESS SET >
<VIDEO LINE LOCK>
<AUX>
<SOFT LIMIT>
<POW ER ON ACTION>
<COMMUNICATION TEST>
BACK
EXIT
POWER ON ACTION
ACTION˖NON E
BACK
EXIT
28
COMMUNICATION TEST
MAIN MENU
LANGUAG E: ENGLISH
<SYSTEM INFORMATION>
<DISPLAY SETUP >
<DOM E SETTINGS>
<CAMERA>
<MOTION>
RESTART
FACTORY DEFAULTS
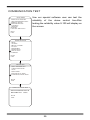
Use our special software user can test the
reliability of the dome control line.After
testing,the reliability value 0-100 will display on
the screen.
HELP
EXIT
DOME SETTINGS
<IDLE>
<ALARM>
<PRIVACY MASK>
<CLOCK>
<PASSWORD>
<DOME TITLE>
<ADVAN CED>
<OTHERS>
BACK
EXIT
ADVAN CED
<SOFT ADD RESS SET >
<VIDEO LINE LOCK>
<AUX>
<SOFT LIMIT>
<POW ER ON ACTION>
<COMMUNICATION TEST>
BACK
EXIT
COMMUNICATION TEST
RECEIVE/SEND:100/100
RELIABILITY :100%
BACK
EXIT
29
DOME OTHER SETTINGS
MAIN MENU
LANGUAG E: ENGLISH
<SYSTEM INFORMATION>
<DISPLAY SETUP >
<DOME SETTINGS >
<CAMERA>
<MOTION>
RESTART
FACTORY DEFAULTS
HELP
EXIT
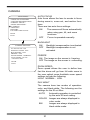
TEMP MODE Temperature control mode
COOL Fan pwoer on,heater auto
AUTO Fan auto,heater auto
HEAT Fan power on,heater power on
OFF Fan power off,heater power off
INTERNAL FAN
Control internal fan speed.
PRESET FREEZE
This feature freezes the scene on the monitor
DOME SETTINGS
when going to a preset. This allows for
<IDLE>
<ALARM>
<PRIVACY MASK>
<CLOCK>
<PASSWORD>
<DOME TITLE>
<ADVAN CED>
<OTHERS>
smooth transition from one preset scene to
BACK
EXIT
rotates 180 degrees. When the dome rotates
another.
AUTO FLIP
When the camera tilts downward and goes
just beyond the vertical position, the dome
(flips), the camera starts moving upward as
long as you continue to hold the joystick in the
down position. Once you let go of the joystick
after the dome
OTHERS
TEMP MODE
: AUTO
INTERNAL FAN : AUTO
PRESET FREEZE: OFF
AUTO FLIP
: OFF
STOP TIME
: 30 SEC
MENU OFF TIME: 5 MIN
˘NORTH SET˚
BACK
EXIT
rotates, joystick control returns to normal
operation.
STOP TIME
This is the amount of time the dome stops
after receiving the last command.
NORTH SET
North is the pan angle from zero to 359
degrees.zero is the pan position you specify
to be the zero degree point. zero is normally
set to magnetic north. Once set, north and
compass readings are based on the set North
Zero point.
30
CAMERA
MAIN MENU
LANGUAG E: ENGLISH
<SYSTEM INFORMATION>
<DISPLAY SETUP >
<DOM E SETTINGS>
<CAMERA>
<MOTION>
RESTART
FACTORY DEFAULTS
HELP
EXIT
CAMERA SETTING
AUTO FOCUS: ON
DIGITAL ZOOM: O FF
BACKLIGHT: OFF
FREEZE: OFF
ZOOM SPEED : NORMAL
DAY NIGHT: AUTO
<ADVAN CED>
BACK
EXIT
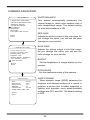
AUTO FOCUS
Auto focus allows the lens to remain in focus
during zoom-in, zoom-out, and motion functions.
There are two auto focus settings:
ON
The camera will focus automatically
when using pan, tilt, and zoom
functions.
OFF
Focus is operated manually.
BACKLIGHT
ON
Backlight compensation is activated.
OFF Backlight compensation is not
activated.
FREEZE
ON The image on the screen is freezing.
OFF The image on the screen is unfreezing.
ZOOM SPEED
Zoom speed allows the user to define how
fast the dome will go from full wide zoom to
the max optical zoom.Available zoom speed
settings include the following:
HIGHǃNORMALǃLOW.
DAY NIGHT
The camera have two modes of operation:
color, and black-white. The following are the
settings for the IR cut filter:
AUTO
Automatic operation is controlled
by the auto IR level setting.
COLOR Images are always displayed in
color mode.
BW
Images are always displayed in
black-white mode.
31
CAMERA ADVANCED
MAIN MENU
LANGUAG E: ENGLISH
<SYSTEM INFORMATION >
<DISPLAY SETUP>
<DO ME SETTINGS>
<CAMERA>
<MOTION>
RESTART
FACTORY DEFAULTS
HELP
EXIT
CAMERA SETTING
AUTO FOCUS: O N
DIGITAL ZOOM: OFF
BACKLIGHT: OFF
FREEZE: OFF
ZOOM SPEED: NORMAL
DAY NIGHT: AUTO
<ADVAN CED>
BACK
EXIT
WHITE BALANCE
This feature automatically processes the
viewed image to retain color balance over a
color temperature range. The default setting
for auto white balance is ON.
RED GAIN
Adjusts the picture output in the red range. As
you change the value, you will see the color
change on your monitor.
BLUE GAIN
Adjusts the picture output in the blue range.
As you change the value, you will see the
color change on your monitor.
BRIGHT
Set the brightness of image display on the
monitor.
EXPLOSURE
Set the explosure mode of the camera.
ADVAN CED
: AUTO
WB
: 208
RED GAIN
:167
BLUE GAIN
: 01
BRIGHT
: AUTO
EXPOSURE
WIDE DYNA MIC : OFF
BACK
EXIT
WIDE DYNAMIC
Wide dynamic range (WDR) balances the
brightest and darkest sections of a scene to
produce a picture that is better balanced in
lighting and provides more detail.Available
settings are OFF and ON. The default setting
is OFF.
32
PRESET
MAIN MENU
LANGUAG E: ENGLISH
<SYSTEM INFORMATION>
<DISPLAY SETUP >
<DOM E SETTINGS>
<CAMERA>
<MOTION>
RESTART
FACTORY DEFAULTS
HELP
EXIT
Use the following steps to program a
preset.
1. Select the preset number:
a. Use the joystick to position the cursor
beside PRESET NO. Press Iris Open.The
cursor moves to the right.
b. Move the joystick up or down to view
selections. Press Iris Open to enter selection.
MOTION
<PRESET>
<SCAN>
<SEQUENCE>
<PATTERN>
<ZONES>
<TIMING ACTION>
<MOTION DETECT>
<AUT O TRACKING>
BACK
EXIT
b. Follow the directions displayed on the
monitor.
3. Edit the preset scene:
a. Use the joystick to position the cursor
beside SET.
PRESET
PRESET NO. : 001
TITLE
: PRESET0 1
CALL
<SET>
DELETE
BACK
EXIT
2. Edit the preset label:
a. Use the joystick to position the cursor
beside TITLE.
b. Press Iris Open.
c. Follow the directions displayed on the
monitor.
4. Delete the preset scene:
a. Use the joystick to position the cursor
beside DELETE.
b. Press Iris Open.
33
SCAN
MAIN MENU
LANGUAG E: ENGLISH
<SYSTEM INFORMATION>
<DISPLAY SETUP >
<DOM E SETTINGS>
<CAMERA>
<MOTION>
RESTART
FACTORY DEFAULTS
HELP
EXIT
SCAN NO.
Use the joystick to position the cursor beside
SCAN NO. and press Iris Open to enter the
edition mode of scan No., move the joystick
up or down to select number. Then press IRIS
Open to confirm.
TITLE
Use the joystick to position the cursor beside
TITLE and press Iris Open to enter the edition
MOTION
<PRESET>
<SCAN>
<SEQUENCE>
<PATTERN>
<ZONES>
<TIMING ACTION>
<MOTION DETECT>
<AUT O TRACKING>
BACK
EXIT
mode of scan title.
START
Use the joystick to position the cursor beside
START and press Iris Open to start the
current scan.
LEFT LIMIT
Use the joystick to position the cursor beside
LEFT LIMIT and press Iris Open to start
setting the left limit of the current scan.
RIGHT LIMIT
SCAN
SCAN NO. : 1
TITLE: SCAN 1
START
<LEFT LIMIT >
<RIGHT LIMIT>
SCAN SPEED : 20
BACK
EXIT
Use the joystick to position the cursor beside
RIGHT LIMIT and press Iris Open to start
setting the right limit of the
current scan.
SCAN SPEED
Use the joystick to position the cursor beside
SCAN SPEED and press Iris Open to enter
the edition mode of scan speed.
Move the joystick up or down to select a
speed scale, then press Iris Open to confirm.
The speed scale ranges from 1-30.
34
SEQUENCE
MAIN MENU
LANGUAG E: ENGLISH
<SYSTEM INFORMATION>
<DISPLAY SETUP >
<DOM E SETTINGS>
<CAMERA>
<MOTION>
RESTART
FACTORY DEFAULTS
SEQ NO.
Use the joystick to position the cursor beside SEQ
NO. and press the key Iris Open to enter the edition
mode, move the joystick up or down to select
number.Then press Iris Open to confirm.
HELP
EXIT
TITLE
Use the joystick to position the cursor beside TITLE
MOTION
and press Iris Open to enter the edition mode of
<PRESET>
<SCAN>
<SEQUENCE>
<PATTERN>
<ZONES>
<TIMING ACTION>
<MOTION DETECT>
<AUT O TRACKING>
BACK
EXIT
sequence title.
START
Use the joystick to position the cursor beside
START and press Iris Open to start the current
sequence.
SEQUENCE SET
Use the joystick to position the cursor beside
SEQUENCE
SEQ NO. : 1
TITLE: SEQ 1
START
<SEQUENCE SET>
DELETE
SEQUENCE SET,press Iris Open to enter the
sequence setting .
Move the cursor to EDIT and press Iris Open to
BACK
EXIT
enter edition mode. Move the joystick right or left to
select item.
a. When the < > is on the item NO., move joystick up
or down to select the NO.ofthe preset in a
SEQUENCE
NO.I
PRESET
>> 0 1
02
03
04
05
06
(',7 0 1
BACK
002
0 0 10
-- ------- 00 3
sequence. There are up to 32 presets in a single
NTERVAL
03
3
-
sequence.
b. When the < > is on the item PRESET, move the
---
joystick up or down to select the preset NO. you
--
want to add in the sequence.
03 ,16
EXIT
c.When the < > is on the last item, move the joystick
up or down to select edition mode as “insert”, “ok”
and “delete”.
d. Press Iris Close to quit the edition.
35
PATTERN
MAIN MENU
LANGUAG E: ENGLISH
<SYSTEM INFORMATION>
<DISPLAY SETUP >
<DOM E SETTINGS>
<CAMERA>
<MOTION>
RESTART
FACTORY DEFAULTS
HELP
EXIT
MOTION
<PRESET>
<SCAN>
<SEQUENCE>
<PATTERN>
<ZONES>
<TIMING ACTION>
<MOTION DETECT>
<AUT O TRACKING>
BACK
EXIT
A pattern is a memorized, repeating
series of pan, tilt, zoom, and preset functions that can be recalled with a command from a controller.
To program a pattern:
1. Use the joystick to position the cursor
beside PATTERN NO. Press Iris
Open.The cursor moves to the right.
2. Move the joystick up or down to view
selections. Press Iris Open to enter
selection.
3. Use the joystick to position the cursor
beside SET.
4. Press Iris Open. The Patterns
programming window appears on the
monitor.
5. Follow the directions displayed on the
monitor.
PATTERN
PATTERN NO. : 1
TITLE : PATTERN 1
START
<SET>
DELETE
To delete a pattern:
1. Use the joystick to position the cursor
beside DELETE.
2. Press Iris Open.
BACK
EXIT
36
ZONES
MAIN MENU
LANGUAG E: ENGLISH
<SYSTEM INFORMATION>
<DISPLAY SETUP >
<DOM E SETTINGS >
<CAMERA>
<MOTION>
RESTART
FACTORY DEFAULTS
HELP
EXIT
MOTION
<PRESET>
<SCAN>
<SEQUENCE>
<PATTERN>
<ZONES>
<TIMING ACTION>
<MOTION DETECT>
<AUT O TRACKING>
BACK
EXIT
Horizon dome systems are capable of
eight zones, each with a 12-character
label.
To program a zone:
1. Use the joystick to position the cursor
beside ZONE NO. Press Iris Open, and
the cursor moves to the right.
2. Move the joystick up or down to view
selections. Press Iris Open to enter
selection.
3. Use the joystick to position the cursor
beside LEFT LIMIT,RIGHT LIMIT.
4. Press Iris Open. The zone programming window appears on the monitor.
5. Follow the directions displayed on the
monitor.
To delete a zone:
ZONES
ˉ ZONE IS NOT SET ˉ
ZONE NO. : 1
TITLE: ZONE 1
<LEFT LIMIT>
<RIGHT LIMIT>
DELETE
1. Use the joystick to position the cursor
beside DELETE.
2. Press Iris Open.
BACK
EXIT
37
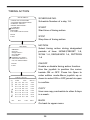
TIMING ACTION
MAIN MENU
SCHEDULE NO.
LANGUAG E: ENGLISH
<SYSTEM INFORMATION>
<DISPLAY SETUP >
<DOM E SETTINGS>
<CAMERA>
<MOTION>
RESTART
FACTORY DEFAULTS
HELP
EXIT
Schedule Number of a day 1-8.
START
Start time of timing action.
STOP
Stop time of timing action.
MOTION
MOTION
Select timing action during designated
periods of time: NONE,PRESET 1-8,
SCAN 1-4, SEQUENCE 1-4, PATTERN
<PRESET>
<SCAN>
<SEQUENCE>
<PATTERN>
<ZONES>
<TIMING ACTION>
<MOTION DETECT>
<AUTO TRACKING>
1-4
BACK
EXIT
ON/OFF
Enable or disable timing action function.
Use the joystick to position the cursor
beside ON or OFF. Press Iris Open to
7,0,1*$&7,21
6723
12 67$57
1 00:00 00:00
2 00:00 00:00
3 00:00 00:00
4 00:00 00:00
5 00: 00 0 0 :00
6
7
8
2))
00:00 0 0:00
00:00 00:00
00:00 00 : 00
021
&23<
027,2 1
121(
121(
121(
121(
121(
121(
121(
121(
%$&.
enter edition mode.Move joystick up or
down to select ON or OFF,press Iris open
to confirm.
COPY
User can copy a schedule to other 6 days
in a week.
BACK
Go back to upper menu.
38
MOTION DETECT
MAIN MENU
LANGUAG E: ENGLISH
<SYSTEM INFORMATION>
<DISPLAY SETUP >
<DOM E SETTINGS>
<CAMERA>
<MOTION>
RESTART
FACTORY DEFAULTS
HELP
EXIT
MOTION
<PRESET>
<SCAN>
<SEQUENCE>
<PATTERN>
<ZONES>
<TIMING ACTION>
<MOTION DETECT>
<AUT O TRACKING>
BACK
EXIT
MOTION DETECT
SCENE NO. : 1
<EDIT SCENE>
<EDIT AREA>
<PREVIEW SCENE >
<DELETE SCENE >
AUX ACTIVATE :OFF
CANCEL(SEC ):5
<START>
BACK
EXIT
AREA EDIT
AREA NO. : 1
<AREA EDIT>
DELETE
SENSITIVITY : MID
AREA DISPLAY
: OFF
BACK
EXIT
SCENE NO.
Select motion detection scene number 1-8.
EDIT SCENE
Set motion detection scene.
EDIT AREA
Edit detection areas,four motion detection areas
can be defined.
PREVIEW SCENE
Preview motion detection scene and areas.
DELETE SCENE
Delete motion detection scene.
AUX ACTIVATE
Motion detection can be programmed to trigger an
auxiliary command when motion is detected.The
following are the settings for AUX ACTIVATE: OFFǃ
AUX 1ǃAUX 2.
CANCEL TIME
Cancel time is the length of time the auxiliary will
remain on after motion is detected.
AREA NO.
Select motion detection area number 1-4.
AREA EDIT
Edit motion detection area on the screen.
DELETE
Delete motion detection area.
SENSITIVITY
Set the sensitivity of the motion detection area.The
following are the settings for SENSITIVITY:LOWǃ
MIDǃHIGH.
AREA DISPLAY
The following are the settings:
ON Display the area on screen after motion is
detected.
OFF Do not Display the area after motion is
detected.
39
AUTO TRACKING
MAIN MENU
LANGUAG E: ENGLISH
<SYSTEM INFORMATION>
<DISPLAY SETUP >
<DOM E SETTINGS>
<CAMERA>
<MOTION>
RESTART
FACTORY DEFAULTS
HELP
EXIT
SENSITIVITY
Set the sensitivity of tracking:
HIGH The sensitivity level is high.
MID Average sensitivity.
LOW The sensitivity level is low.
TARGET
MOTION
<PRESET>
<SCAN>
<SEQUENCE>
<PATTERN>
<ZONES>
<TIMING ACTION>
<MOTION DETECT>
<AUT O TRACKING>
BACK
EXIT
AUTO TRACKING
SENSITIVITY : MID
TARGET : MID
ZOOM MATCH : X22
ENABLE : OFF
<TRACKING SCENE SET>
BACK
EXIT
Set the tracking target size:
LARGE The tracking target size is large.
MID Average target size.
SMALL The tracking target size is small.
ZOOM MATCH
Zoom match allows the user to define a limitation on
the amount of telephoto zoom durning target tracking.
ENABLE
ON Activate auto tracking function.
OFF Deavtivate auto tracking function.
TRACKING SCENE SET
TRACKING SCENE SET
<TRACKING SCENE SET>
DELETE
RETURN DELAY˖10SEC
BACK
EXIT
Set the preset scene that the auto tracking function
start from.
RETURN TIME
Set the length of the time the dome return to auto
tracking preset scene after the last detection of
motion target on the screen.
40
RESTART
MAIN MENU
LANGUAG E: ENGLISH
<SYSTEM INFORMATION>
<DISPLAY SETUP >
<DOM E SETTINGS>
<CAMERA>
<MOTION>
RESTART
FACTORY DEFAULTS
RESTART SYSTEM
Reboot the system if it is not operating or
if there is no control. Rebooting the
system will cycle dome and camera
power without changing programmed
dome settings.
HELP
EXIT
WA RNING
ARE YOU SURE...
OK
CANCEL
41
FACTORY DEFAULTS
MAIN MENU
LANGUAG E: ENGLISH
<SYSTEM INFORMATION>
<DISPLAY SETUP >
<DOM E SETTINGS>
<CAMERA>
<MOTION>
RESTART
FACTORY DEFAULTS
Restore factory default settings of the
dome.
HELP
EXIT
WA RNING
ARE YOU SURE...
OK
CANCEL
42
HELP
HELP
MAIN MENU
LANGUAG E: ENGLISH
<SYSTEM INFORMATION>
<DISPLAY SETUP >
<DOME SETTINGS >
<CAMERA>
<MOTION>
RESTART
FACTORY DEFAULTS
Disply menu operating help information
on the screen.
HELP
EXIT
MENU OPERATION HELP
1.CALL PRESET95 TO OPEN MENU.
2.MOVE JOYSTICK TO SELECT MENU
ITE M.
3.IRIS OPEN TO ENTER EDIT MODE
.
4.MOVE JOYSTICK TO EDIT
PARAMETERS.
5.IRIS OPEN TO CONFIRM.
BACK
EXIT
43