1
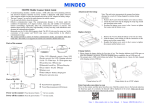
MS3390 Mobile Scanner Quick Guide
)
)
)
)
)
)
A standard packing includes a mobile scanner, a USB cable and a CD (containing software
and electrical manuals). Optional accessory includes a Bluetooth USB adapter BA2110
which supports reliable wireless data transmission and an AC/DC adaptor for battery charge.
The term “scanner” as used in this guide denotes the mobile scanner.
Use dry and soft cloth to clean the scanner.
Effective communication range: The communication distance is 30 meters under the
condition of temperature at 27 degrees Celsius, sunny day, and visibility of 5 kilometers.
Natural surroundings significantly affect the communication distance in practice. The
distance drops quickly in the rainy, high-humidity, or heavy haze day; radio interference also
shortens the communication distance.
Bluetooth uses the 2.4 GHz ISM frequency band. The WLAN also uses the same one. So
the coexistence of the scanner and WLAN may cause a strong decline in the effective
communication range.
The scanner provides a variety of wireless communication modes, and supports batch data
mode and U disk mode. It is suggested to read the user manual in details before use.
Attach neck/wrist strap
Note: The neck/wrist strap protects the scanner from being
damaged as a result of it being dropped by mistake during
movement.
1. Remove the 3 screws from the battery cover (one at a time).
2. Attach the neck/wrist strap by hanging the strap ring around
the raised part at the corner.
3. Re-place the battery cover, screw in the 3 screws to tighten
the scanner and the battery cover.
Replace battery
1. Remove the 3 screws from the battery cover (one at a time).
2. Load the battery while sliding it with the connection on the
battery pack on the scanner body.
3. Re-place the battery cover, screw in the 3 screws to tighten
the scanner and the battery cover.
Parts of the scanner
Charge battery
1 Blue LED (Bluetooth power); Green LED
○
(Decode success); Red LED (Charging indicator)
2 LCD ○
3 ~○
4 Soft keys ○
8 Navigation keys
5 ~○
○
1. Please charge the battery before the first time of use. The charging indicator (red LED) turns on
when the charging is in process. When the charging process completes, the red LED turns off.
2. The scanner uses a 950 mAh Lithium-ion battery. The charging time is 3.5 hours for fully charged
with charging current of 300 mA.
9 Scan/Select key ○
10 Return key
○
11
12 Power/Sleep key
○Bluetooth® on/off key ○
13 Scan window ○
14 Label ○
15 Beeper
○
16 Battery cover
○
17 Mini USB port / Battery charging port
○
18 Hook for neck/wrist strap
○
Charge battery by a PC
Charge battery by an AC/DC adapter
Parts of BA2110
Enter barcode scan status to scan
19 Reset/Firmware upgrade key
○
20 Power/Data transmission LED (Green)
○
Power on the scanner: Press the power button
Power off the scanner: Press the power button
Power on the scanner, and then press Scan Key once. Hold the scanner close to the barcode and
press the Scan Key again. In a moment, the barcode will be displayed on the screen. Make sure
the scan line crosses every bar and space of the barcode symbol.
for two seconds.
for two seconds.
Document version: 1.1.5.
Configure Bluetooth SPP slave profile communication
Establish Bluetooth communication
LCD Icon indication for Bluetooth
or blue LED on
Bluetooth is on.
Bluetooth network is working.
or blue LED off
Bluetooth is off.
Bluetooth network is disconnected.
Note: Make sure the Bluetooth module of the scanner is powered on (blue LED is on) and the
selected profile is System SettingÆBluetoothÆBT SPP Slave.
Step1-9: The same as Configure Bluetooth HID keyboard step 1~9.
Step10. Run a Serial Port Tool, e.g. HyperTerminal on your computer. This step guarantees the
scanner to complete establishing Bluetooth communication. And then scan a barcode to
confirm the success of data transmission.
Select Bluetooth functionality according to practical need
HID Keyboard
SPP
Master/Slave
The scanner connects to the PC via Bluetooth and behaves like a keyboard.
The scanner connects to the PC via Bluetooth and behaves like there is a
serial connection. A master SPP mainly differs from a slave one in the
process of connection and they are identical in the process of use in terms
of function. Note: Bluetooth-enabled smart phones and PDAs can host
the scanner in general. However, ordinary mobile phones with Bluetooth
function can not be a host of the scanner because in most cases neither
HID nor SPP profile is supported by them.
Step 10
Step 9
Configure Bluetooth SPP master profile communication
Configure Bluetooth HID keyboard profile communication
Note: Make sure the Bluetooth module of the scanner is powered on (blue LED is on) and the
selected profile is System SettingÆBluetoothÆBT HID Keyboard.
Step1. Plug a Bluetooth USB adapter into the USB port of the PC.
).
Step2. Double-click the Bluetooth icon at the right bottom corner on Windows XP (
Alternatively, you may go to Control Panel->Bluetooth Device.
Step3. Click Add to search devices nearby.
Step4. Click to select “My device is set up and ready to be found” and click Next.
Step5. It takes a few seconds for the Wizard to search devices. The scanner will appear with its
“serial number” as the device name, click and select the target scanner. Click Next.
Step6. Click and select “Let me choose my own passkey”. Enter a passkey, e.g. 1111, and click Next.
Step7. The scanner promotes the user to accept the connection request. Press Left Soft Key to accept.
Step8. Enter a passkey which is exactly the same as that entered from the PC.
Step9. Wait for a few seconds for Windows to exchange passkeys. Click Finish.
Step10. Run the desired application, such as a Notepad and scan barcodes to check data transmission.
Step 7
Step 8
Step 3
Note: Make sure the Bluetooth module of the scanner is powered on (blue LED is on) and the
selected profile is System SettingÆBluetoothÆBT SPP Master.
Step1. Press Left Soft Key to the window below.
Step2. Press Left Soft Key to trigger searching.
Step3. Wait for about 20 seconds and then the devices list will be shown.
Step4. Use Navigation Key to move the cursor and press Scan/Select Key to connect.
Step5. The remote device will promote user to accept the connection request, and then user enters the
passkey. The default passkey of the Bluetooth module of the scanner is “0000”. So enter “0000”,
and click OK. The Bluetooth device connected to the scanner is labeled √.
Step 1
Step 2
Step 3
Step 4
Step 5
Configure Bluetooth USB adapter BA2110
Note 1: BA2110 is provided by the manufacturer to support reliable wireless data transmission and
is advised in applications whereas unacknowledged communication is unacceptable.
Note 2: Make sure the Bluetooth module of the scanner is powered on (i.e. The blue LED is on).
Step1. Scan the barcode (see right) on the back of BA2110. The
scanner will beep twice to indicate a successful scan.
Step2. Connect BA2110 to a PC within 10 seconds. Then wait for
about 5 seconds. The scanner will give 2 long beeps upon a successful
connection, or 3 short beeps upon a failed connection.
Step 5
Document version: 1.1.5.