1
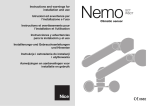
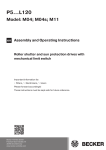
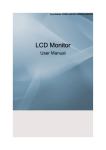
User manual
Audio Visual Facilities
in the
Montesquieu Learning Centre
(MLC)
Library and IT Services
Tilburg University
Contents
Introduction
3
Accessibility AV cabinet
3
AV cabinet facilities
3
AV cabinet software
3
AV cabinet control panel
Side panels
4
4
Side panel M11
4
Side panel M20 and M21
5
Side panel M23
5
Control panels
6
Control panel projector
6
Control panel DVD recorder
6
Control panel video cameras M11
7
Control panel video cameras M20, M21 and M23
7
Use of the AV cabinet
8
Start up AV cabinet
8
Turn off AV cabinet
8
Use of the projector
8
Use of the PC
8
Use of a laptop
8
Use of the DVD recorder for recording
9
Use of a video camera for recording
10
Activate control panel in M11
10
Select video camera in M11
10
Operate video camera
10
Start recording
10
Stop recording
10
Pause recording
10
Finalise DVD disc
11
Use of the DVD recorder for playing
User manual
AV-facilities MLC, version 1, 2007
11
page 2 of 11
Library and IT Services
Tilburg University
Introduction
This manual deals with the audio and video (AV) facilities in the Montesquieu Learning Centre
(MLC). The MLC has four classrooms, each (standard) equipped with a projector, a video camera
and an AV cabinet. The AV cabinet is equipped with a DVD recorder, PC and laptop connection.
These facilities have especially been equipped for giving, recording and playing presentations.
Accessibility AV cabinet
The PCs in the AV cabinets are accessible with a general username and password:
classroom
username
password
M11
colm11
college
M20
colm20
college
M21
colm21
college
M23
colm23
college
It is also possible to gain access to the PC with one’s personal username and password. As a
standard students can log in with their administration number and password. The first time, staff
members should report to their local IT support unit one week before use at the latest. This unit
provides access for staff to the PC and also to their personal M-drive with their personal
username and password.
AV cabinet facilities
Classrooms are equipped with a projector, video camera and an AV cabinet. The AV cabinet is
equipped with a DVD recorder and a PC. The control panels of the AV facilities are on top of the
cabinet.
AV cabinet software
The AV cabinet has a standard student desktop PC. Staff has access to all software after logging
in, except for the use of Microsoft Outlook.
User manual
AV-facilities MLC, version 1, 2007
page 3 of 11
Library and IT Services
Tilburg University
AV cabinet control panels
The AV facilities in the classrooms can be operated via the AV cabinet. A number of control
panels for the equipment are located at the top of the AV cabinet.
Side panels
Each AV cabinet has a number of functionalities attached to the side panel. This control panel
differs per classroom and depends on the possibilities in the room in question.
Side panel M11
The side panel in M11 has an on/off switch (‘aan/uit’) for the AV cabinet, a laptop connection for
the Internet (‘laptop netwerk’) and three LCD screens on behalf of the video cameras. The actual
picture of camera 1 is shown in the the bottom right corner and the actual picture of camera 2 in
the bottom left corner. When a camera is selected for recording, a preview of the selected camera
follows in the top LCD screen.
User manual
AV-facilities MLC, version 1, 2007
page 4 of 11
Library and IT Services
Tilburg University
Side panel M20 and M21
The side panels in the classrooms M20 and M21 are identical. They have an on/off switch
(‘aan/uit’) for the AV cabinet, a laptop connection for the Internet (‘laptop netwerk’) and one
preview screen to view the actual picture of the camera.
Side panel M23
The side panel in classroom M23 has an on/off (‘aan/uit’) switch for the AV cabinet, a laptop
connection for the Internet (‘laptop netwerk’) and one preview screen to view the actual picture of
the camera. The panel also offers switches for the sunblinds (‘zonnewering’), blackboard lights
(‘bordverlichting’) and room lights (‘zaalverlichting’).
User manual
AV-facilities MLC, version 1, 2007
page 5 of 11
Library and IT Services
Tilburg University
Control panels
Control panel projector
The keys to the left of the black panel are for the projector operation. They switch the projector on
and off, select the video signal and adjust the volume.
Control panel DVD recorder
The keys to the right are the remote control of the DVD recorder.
Behind the left door of the AV cabinet you find a DVD recorder. A DVD-R disc can be inserted in
the drawer of the DVD recorder. The display shows the settings.
User manual
AV-facilities MLC, version 1, 2007
page 6 of 11
Library and IT Services
Tilburg University
Control panel video cameras M11
Classroom M11 has two video cameras. You can select, operate and set these video cameras
with the grey control panel. The keys of this control panel can be identified in the manual by the
grey colour.
Control panel video cameras M20, M21 and M23
Classrooms M20, M21 and M23 each have one video camera. You can select, operate and set
these video cameras with the grey control panel. The keys of this control panel can be identified
in the manual by the grey colour.
User manual
AV-facilities MLC, version 1, 2007
page 7 of 11
Library and IT Services
Tilburg University
Use of the AV cabinet
Start up AV cabinet
•
Press the red switch on the side panel of the AV cabinet in order to switch it on.
Turn off AV cabinet
•
•
•
Press the switch OFF on the black control panel of the projector in case it is on ON.
Turn off the the PC via the menu start.
Press the red switch on the side panel of the AV cabinet to turn off the cabinet.
Use of the projector
Press the ON key on the black control panel of the projector.
Wait for 30 seconds till the projector has fully started up.
Turn the VOLUME key on the black control panel for the required sound level.
The projector is now ready for use of PC, DVD or laptop application. Should the screen have to
be turned off temporarily, you press PIC MUTE. Press the AUTO IMAGE key on the black control
panel in case the image flashes or has moved.
•
•
•
Use of the PC
•
•
•
Press the on/off key at the front side of the PC to start it up.
Press the on/off key at the front side of the LCD screen in case it is off.
Press the PC key on the black control panel to project the image of the PC on the projection
screen.
Use of a laptop
Two cable connections for a laptop stick out on the top side of the AV cabinet. First connect both
cables before starting up the laptop.
• Connect the large connector to the monitor exit and the small connector to the sound exit of
the laptop.
• Subsequently start up the laptop entirely.
• Press the LAPTOP key on the black control panel to project the image of the laptop on the
projection screen.
• Press the AUTO IMAGE key on the black control panel in case the image flashes or has
moved.
User manual
AV-facilities MLC, version 1, 2007
page 8 of 11
Library and IT Services
Tilburg University
Use of the DVD recorder for recording
•
•
•
•
Press the on/off key on the left side of the DVD recorder to turn it on.
Wait for 20 seconds till the DVD recorder has started up completely.
Enter a DVD-R disc into the DVD-recorder by means of the OPEN/CLOSE key.
Check whether the DVD-recorder’s display mentions A4. Should the display not mention A4,
you tune the channel to A4 with the up/down CH keys at the front of the DVD recorder.
•
Check whether the DVD recorder’s display shows XP. Should the display not mention XP,
you tune the recording method to XP with the RECMO key on the black control panel on top
of the AV cabinet.
•
Check whether the DVD recorder’s display shows sufficient remaining recording time. For
instance: A time of 1 hour and 0 minutes is displayed as R 1:00 and a time of 0 hours and 47
minutes as R 0:47.
• Press the CAMERA key on the black control panel so that it illuminates.
The DVD recorder is now ready for recording.
User manual
AV-facilities MLC, version 1, 2007
page 9 of 11
Library and IT Services
Tilburg University
Use of a video camera for recording
Classrooms M20, M21 and M23 each have one video camera. Classroom M11 has two video
cameras and a deviating control panel. In M11 first activate the control panel. The second step is
to select a video camera. Below we explain step by step how this is done and subsequently how
to record. The keys of the grey control panel are identified in the manual by the grey colour.
Activate control panel in M11
Press the CAM (SET) key.
Subsequently press the keys 1 2 3 4 5.
Again press the CAM (SET) key.
The control panel of the video camera is now ready for use.
•
•
•
Select video camera in M11
First select a video camera before using it.
• Press the 1 key and then the CAM (SET) key to select video camera 1.
• Press the 2 key and then the CAM (SET) key to select video camera 2.
The selected video camera is now active for use.
Operate video camera
Move the joystick on the grey control panel to focus the video camera.
Press the WIDE or TELE key to zoom the picture in or out.
The video camera is now ready for recording.
•
•
Start recording
• Press the REC key on the black control panel to start the recording.
The video camera continues to record till the STOP or PAUSE key is pressed.
Stop recording
Press the STOP key on the black control panel to stop the recording.
The preview-screen shows the report: ‘De informatie wordt op de disc geschreven. 0%
Finaliseren is noodzakelijk voor compatibel terugspelen’ , meaning: ‘The information is written on
the disc. 0% Finalizing is necessary for compatibe replay’. The video images are now stored in a
scene. When the REC key is pressed again, the recording starts in a new scene.
•
Pause recording
• Press the PAUSE key to pause a recording.
The recording is now paused.
• Press the REC key to continue the recording.
The recording is now continued in the same scene.
User manual
AV-facilities MLC, version 1, 2007
page 10 of 11
Library and IT Services
Tilburg University
Finalize DVD disk
A recorded DVD can only be played on regular DVD players when the disc is locked, this is called
finalizing. After finalizing it is no longer possible to record with this DVD. The time required to
finalize a DVD differs and can increase to well over 15 minutes.
Finalizing can be done by the IT&AV Service Desk in the hall of the Montesquieu Learning
Centre. The DVD can be collected at a later time.
Below you find the steps to take in order to finalise a DVD disc yourself.
• Press the FUNCT key on the black control panel to call for the DVD recorder’s function
screen.
The function screen is now visible in the preview screen.
• Press DOWN three times and then ENTER to select Naar overige.
• Press DOWN twice and then ENTER to select DISC-MANAGEMENT.
• Press DOWN twice and then ENTER to select Finaliseren.
The preview screen now displays the report ‘Finaliseren is nodig voor compatibel terugspelen. Dit
zal ongeveer ... minuten duren. De disc finaliseren?’
• Press the LEFT key and then ENTER to select JA.
The preview screen now displays the report ‘Finaliseren zal de disc alleen terug kunnen spelen.
Het finaliseren van de disc starten.’.
• Press the LEFT key and then ENTER to select JA.
The preview screen displays, after a short display of the recordings, the report ‘Finaliseren van de
disc’. Finalising will be completed after a few minutes.
Use of the DVD recorder for playing
If the lamp of the CAMERA key on the black control panel is on, then press this key to turn off
the lamp.
• Press the TMENU key to open the title menu.
The title menu is now visible in the preview screen.
• Use the LEFT RIGHT UP DOWN keys to select the required scene.
• Press the ENTER key to play the selected scene.
• Press the STOP key to stop the scene.
• Press the TMENU key to close the title menu.
•
User manual
AV-facilities MLC, version 1, 2007
page 11 of 11