1
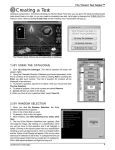
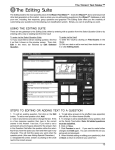
Inspiration® Quick Start Tutorial
Inspiration® Quick Start Tutorial
This tutorial is a great starting point for learning how to use Inspiration. Please
plan on 45-60 minutes from start to finish.
If you’re new to Inspiration and like to learn while working on screen, this
tutorial is for you. We have kept the information in small, manageable chunks to
make it easy to learn the basics quickly. Before you know it, you'll be using
Inspiration to develop your own great ideas!
You use Inspiration the same way as most Mac OS and Windows programs. For
example, you use the mouse to drag objects and to select text. You also click and
double-click, as well as enter information using the keyboard. If you’re not
comfortable doing these things, take a moment now and refer to the user’s guide
that came with your computer.
Conventions we use
The tutorial has instructions for both Mac OS and Windows-based computers.
When you’re asked to press a key or click a command on a menu, the Mac OS
instructions appear first, and the Windows instructions are in parentheses
immediately afterward. Here are two examples: Press Return (Enter) and press
the Command (Ctrl) key.
When you’re asked to enter specific text, the text you type appears in bold. For
example, The Enlightenment. When referring to a symbol or name you already
entered, it appears in italics, like The Enlightenment.
And a special note . . . Because people work in different ways, Inspiration
offers many ways to do things—from toolbar buttons to menu commands to
keyboard shortcuts. While these options are all readily available, this tutorial
usually shows one way to do a task. By limiting the alternatives presented, we
hope to make it easier to learn the task. In the Help system and the Inspiration
User’s Manual, you will find many ways to do each task so you can pick the one
that’s most comfortable for you.
1
2
Inspiration® Getting Started Guide
How we organised the tutorial
In the Inspiration tutorial, you will follow a series of straightforward, step-by-step
instructions to create a simple visual representation of an idea called a diagram.
You also work with an outline: a text-based, hierarchical display of the same
idea. Finally, you will create a mind map to visually represent a concept with
branches of associated thoughts.
The tutorial is organised into five lessons. They're designed to be completed in
order, but you don't need to do them all at one time. Each lesson introduces you
to a set of the unique features in Inspiration. When you finish the tutorial, you'll
be ready to create diagrams, mind maps and outlines on your own.
Lesson One: Introduction to Diagram View
In this lesson, you'll create a diagram about the Enlightenment period using
symbols, links and notes. You'll learn to do the following:
• Start Inspiration
• Start a new diagram
• Enter a main idea
• Add ideas quickly using the RapidFire tool
• Point and type to add an unconnected symbol
• Use the Create tool to add a linked symbol
• Search for a symbol
• Browse symbol libraries
• Connect ideas using the Link tool
• Label the connections between ideas
• Add a note to a symbol
• Move a note
• Save a document
• Quit Inspiration
Inspiration® Quick Start Tutorial
Start Inspiration
Note: Before you can start the program, Inspiration needs to be installed.
To start Inspiration on a computer running Windows
• Click the Start button, point to Programs, then click Inspiration 8 IE.
The Inspiration Starter opens.
To start Inspiration on a Macintosh computer
• Open the Inspiration 8 IE folder, then double-click the Inspiration icon.
The Inspiration Starter opens.
Start a new diagram
From the Inspiration Starter you can quickly begin a new project, open existing
documents and access the many different Inspiration templates. You can also
open any of the resources, including examples and training videos, provided to
help you learn and use Inspiration.
3
4
Inspiration® Getting Started Guide
You'll begin this tutorial by starting a new diagram.
• To start a new diagram, click the Create a diagram button.
A new document opens with the Main Idea symbol centred on screen.
Enter a main idea
The Main Idea symbol provides a starting point for your work. It's easy to get
started—just type!
• Type the diagram topic, The Enlightenment, into the Main Idea symbol.
Now you're ready to add topics that expand or explain your main idea.
Add ideas quickly using the RapidFire tool
The RapidFire tool allows you to add a series of ideas that are connected to a
symbol (RapidFire With Links option) or to add a series of unconnected ideas
(RapidFire Without Links option). When you use the RapidFire tool, you can
concentrate on adding ideas rather than creating symbols one at a time.
The RapidFire tool places information in a freeform structure. There's no need to
think about organising yet; you're still getting ideas down to "see" what you
think. You'll learn more about organising the information later in this tutorial.
First, you'll add linked symbols to your main idea.
1.
Select The Enlightenment if it's not already selected. On the Main toolbar,
click the RapidFire button.
A red lightning bolt appears in the symbol to show that the RapidFire tool is
turned on.
2.
Type Scientific Discoveries and press Return (Enter).
3.
Type Inventions and press Return (Enter).
4.
Type Political Events and press Return (Enter).
5.
Type Arts.
6.
Click the RapidFire button again to turn the RapidFire tool off.
Inspiration® Quick Start Tutorial
You'll notice there's now a Subtopic Quick Control
corner of The Enlightenment.
near the upper right
The Subtopic Quick Control appears next to a symbol to show that it has a
subtopic. Clicking the Subtopic Quick Control will hide and show the subtopics.
Here's what the diagram looks like now.
Now use the RapidFire tool again, this time adding a series of unconnected ideas.
1.
Select The Enlightenment if it's not already selected. On the Main toolbar,
click the RapidFire Options button. Select Without Links.
Again, a red lightning bolt appears in the symbol to show that the RapidFire
tool is turned on.
2.
Type Law of Gravity and press Return (Enter).
3.
Type Steam Engine and press Return (Enter).
4.
Type American Revolution.
5.
Click the RapidFire button to turn the RapidFire tool off.
5
6
Inspiration® Getting Started Guide
Here's what the diagram looks like now.
Tip: If you made a mistake while entering text into a symbol, don't worry.
Simply double-click the text in the symbol. Then select the words to change and
type over them. You can also insert text by clicking where you want to make a
correction and entering the new text.
Inspiration® Quick Start Tutorial
Point and type to add an unconnected symbol
Pointing and typing anywhere on the workspace is another quick way to add an
unlinked idea. When you type, a new symbol is automatically created.
1.
Click in the open area of the diagram above Arts.
2.
Type Montesquieu.
Here's what the diagram looks like now.
7
8
Inspiration® Getting Started Guide
Use the Create tool to add a linked symbol
To add a linked symbol in any direction, use the Create tool.
1.
Select Political Events. On the Main toolbar, position the cursor over the
middle left point on the Create button.
When you roll over a point on the Create button, it highlights to show the
direction in which the new symbol will be created.
2.
Click the middle left point. A new symbol appears connected to and directly left
of Political Events. This symbol is selected and ready for you to enter an idea.
3.
Type French Revolution into the new symbol.
Search for a symbol
Inspiration provides a wide variety of pictures and images to represent concepts and
ideas. In the built-in libraries, you'll find more than 1,000 symbols organised into
curriculum-based categories. In addition to the libraries that come with Inspiration,
the program offers an online collection of more than one million images.
Inspiration's search function makes finding just the right image a snap. When
you search for symbols, Inspiration searches both the Inspiration libraries on
your computer and the online collection.
Note: The Online Access option is selected by default. To turn Online Access
off, select Preferences in the Utility menu, then click the Online Access tick box.
1.
Select French Revolution if it's not already selected.
2.
In the box at the bottom of the Symbol palette, type the words French and
flag.
3.
Click the Find button
.
Inspiration searches for all images containing your keywords.
4.
Click one of the images that appear. Since it was selected, the French
Revolution symbol automatically changes to your selection.
Inspiration® Quick Start Tutorial
Here's what the diagram looks like now.
Browse the symbol libraries
You can also browse Inspiration's built-in libraries to see a variety of symbols
within a specific category. To scroll through Inspiration's built-in libraries one by
or Previous Library
buttons on the Symbol palette.
one, use the Next Library
1.
Select the Arts symbol.
2.
On the Symbol palette, click the Libraries tab.
3.
Click the Next Library button
be visible.
eleven times. The Art tools library should
9
10
Inspiration® Getting Started Guide
4.
Click on the Palette.
Arts automatically changes to the shape of this palette.
You may want to reposition Arts to make more of the link visible.
Inspiration makes it easy move symbols—you just click and drag them
anywhere on the workspace. When you move a symbol, any links
automatically adjust.
• With Arts still selected, drag the symbol down so your diagram looks like
the one below.
You can also use drag and drop to add a symbol from the Symbol palette to
to
represent a new idea. This time, you'll click the Select Library button
Inspiration® Quick Start Tutorial
jump right to your chosen library. The Select Library button offers a category list
of all of Inspiration's built-in symbols.
. Navigate to the Food-Health category,
1.
Click the Select Library button
and choose the Health library.
2.
Drag the Glasses symbol until it is positioned to the left of Inventions and
release the mouse button.
When you add a symbol using drag and drop, it is not connected to any other
symbols.
11
12
Inspiration® Getting Started Guide
Connect ideas using the Link tool
Links show the relationships and connections between ideas. When you use the
RapidFire With Links tool or the Create tool, your ideas are automatically
linked. You can also create links.
1.
Select Political Events. This is the symbol where the link will start.
2.
On the Main toolbar, click the Link button to turn on the Link tool.
The cursor now looks like this
3.
.
Click American Revolution. This is the symbol where the link will end.
A link with the arrowhead pointing to the American Revolution symbol
appears.
4.
Click American Revolution again.
5.
Now click Montesquieu.
A second link appears and the arrowhead points to the Montesquieu symbol.
6.
Continue to link symbols together. Click on the first symbol and then the
symbol where you want the link to end.
• Link Scientific Discoveries to Law of Gravity.
• Link Inventions to Steam Engine.
• Finally, link Inventions to Glasses.
7.
Click the Link button again to turn off the Link tool.
Inspiration® Quick Start Tutorial
Here's what the diagram looks like now.
Label the connections between ideas
Each link has a text box that appears when the link is selected. Adding text to
this box defines the relationship between the symbols.
1.
Select the link between Inventions and Glasses if it's not already selected.
When a link is selected, you see the outline of the text box associated with
that link. It's ready for you to enter text.
2.
Type bifocals.
13
14
Inspiration® Getting Started Guide
Add a note to a symbol
A note is available for each symbol in a diagram. Notes allow you to expand ideas
and actually begin the writing process while continuing to work in a visual format.
1.
Select Montesquieu. On the Main toolbar, click the Note button.
A note opens below the symbol.
2.
Type Montesquieu's work influenced the writing of constitutions in
many countries, including the United States.
Move a note
After you add a note to a symbol, it's easy to move the note to another location
on the symbol, or to any open place in the workspace.
1.
Click the note title bar to select the open note.
2.
Drag the note to the lower right side of Montesquieu.
Here's what the diagram looks like now.
Inspiration® Quick Start Tutorial
Save a document
Whenever you're working on a document, it's a good idea to save it on a regular
basis. To save a document for the first time, or to save a document you've
already saved using the current file name, use the Save command.
1.
On the File menu, choose Save.
2.
If necessary, select the folder in which you want to save the document.
3.
Click Save.
Note: All Inspiration documents are automatically saved with an ISF extension.
Quit Inspiration
If you're ready to take a break from the tutorial, you can quit Inspiration after
saving your changes. If you want to continue, just skip this procedure and turn to
the next lesson.
1.
To close your file and quit Inspiration, on the File menu, choose Quit (Exit).
If you've made changes to the document, Inspiration prompts you to save
those changes.
2.
Click Yes to save your changes and quit Inspiration. You can start again
with the next lesson.
15
16
Inspiration® Getting Started Guide
Lesson Two: Introduction to Outline View
Inspiration's diagramming environment is fully integrated with the outline
environment. While you've been creating a web of your ideas in Diagram View,
Inspiration has also been working behind the scenes, building an outline of your
work.
You can always begin a new outline from scratch by clicking the Create an
outline button on the Inspiration Starter. For this lesson though, open the
diagram created in the previous lesson by clicking the Open a file button.
Inspiration® Quick Start Tutorial
Working in Outline View, you'll learn to do the following:
• Switch from Diagram View to Outline View
• Add a topic
• Add a subtopic
• Organise topics
• Move a topic by dragging
• Change the level of a topic
• Hide and show subtopics
• Add a note
• Hide and show a note
• Set topic defaults
• Change topic prefixes
Switch from Diagram View to Outline View
When you switch to Outline View, your information is instantly displayed in a
traditional hierarchy.
1.
Select The Enlightenment.
2.
To view your information in Outline View, click the Outline button on the
Main toolbar.
The diagram is transformed into an outline. The symbols now appear as topics
and subtopics, and the notes text is visible. Even though you did not name the
Glasses symbol in Diagram View, the Picture-to-Topic option automatically
provided a label for the topic to ensure you didn't lose the relationship between
ideas when you switched views.
17
18
Inspiration® Getting Started Guide
Here's what the outline looks like now.
Add a topic
Topics are the core ideas in your outline. You can add a new topic in Outline
View as easily as you added a new symbol in Diagram View.
1.
Select Political Events by clicking in the Selection control column.
A selection box appears around the topic to show it's selected.
2.
On the Main toolbar, click the Topic button.
Inspiration inserts a new topic and automatically assigns it a prefix. The
cursor moves to the new line so you're ready to enter text for your new idea.
3.
Type Influential People.
Inspiration® Quick Start Tutorial
Add a subtopic
In the same way you added a new topic, you can add new subtopics. These ideas
provide information subordinate or supplemental to a topic.
1.
With Influential People selected, click the Subtopic button on the Main
toolbar.
When you add a subtopic, Inspiration automatically indents it one level
below the selected topic and assigns it a prefix. The cursor also moves to the
new line so you can enter text for the new idea.
2.
Type Voltaire.
Here's what the outline looks like now.
19
20
Inspiration® Getting Started Guide
Move a topic by dragging
There are many ways to organise your outline. The most direct is simply
dragging a topic up or down in the outline. Any subtopics associated with this
topic move too.
1.
Select Montesquieu.
2.
Drag the topic so it is positioned directly below Voltaire. Release the mouse
button.
While you drag, the topic remains in its original position until you release
the mouse button. You can tell where the topic's new location will be by
watching the gray line as you drag. The small highlighted dot indicates the
indentation level of the topic's new location.
Montesquieu now appears as a subtopic of Influential People, at the same
level as Voltaire.
Here's what the outline looks like now.
Inspiration® Quick Start Tutorial
Change the level of a topic
To move a topic to a lower level in the outline, drag it to the right or use the
Right tool to move it down in the hierarchy.
1.
Select Inventions.
2.
On the Main toolbar, click the Right button.
The Inventions topic and its subtopics move to the right and are now
subtopics of Scientific Discoveries.
Here's what this section of the outline looks like now.
Hide and show subtopics
When working with a complex outline, it's often useful to hide subtopics so you
can concentrate on the main topics.
1.
to the left of Scientific Discoveries.
Click the Subtopic Quick Control
The subtopics for this topic are now hidden.
2.
Click the Subtopic Quick Control again to show the subtopics.
21
22
Inspiration® Getting Started Guide
Add a note
Notes text is a good way to further develop ideas in Outline View. You can add
anything from one sentence to multiple paragraphs to several pages of text.
1.
Select Glasses.
2.
On the Main toolbar, click the Note button.
The cursor moves to a new line so you can enter the notes text.
3.
Type Benjamin Franklin invented bifocals in the 1700s. He was tired of
switching between two pairs of glasses.
When you add a note, a Note Quick Control appears in the Note control
column to the left of the topic. The Note Quick Control indicates that the
topic's note is either hidden
or showing
.
Set topic defaults
To clearly define the structure of your outline, you can set the defaults for any or
all topic levels and notes. Default options include font, text size, text colour and
other style choices.
1.
Select The Enlightenment.
2.
On the Formatting toolbar, click the Topic Defaults button
Defaults dialog box appears.
3.
Select Level 1 and change the colour to dark green. Click Preview.
4.
Select a new font. Click OK.
. The Topic
Inspiration® Quick Start Tutorial
Here's what the outline looks like now.
Change topic prefixes
Inspiration offers a variety of prefix styles you can use in your outline.
1.
On the Formatting toolbar, click the Prefix button
2.
Select a new prefix style.
.
All of the prefixes in the outline are changed to reflect your selection.
Taking a break
If you're ready to take a break from the tutorial, save your changes and quit
Inspiration. If you want to continue, just skip this procedure and turn to the next
lesson.
23
24
Inspiration® Getting Started Guide
Lesson Three: Advanced Diagram View
Since the diagram and outline views are fully integrated, when you return to
Diagram View, you see the diagram has changed to reflect the work done in
Outline View.
In this lesson, you complete your diagram as you learn to do these things:
• Switch from Outline View to Diagram View
• Set symbol defaults
• Change note colours
• Arrange a diagram using the Arrange tool
• Control the arrangement of a diagram using AutoArrange
• Change the view scale
• Insert a hyperlink
• Record a sound
• Create a video symbol
• Print your document
• Transfer to a word processor
• Export diagrams and outlines
Inspiration® Quick Start Tutorial
Switch from Outline View to Diagram View
1.
Select The Enlightenment if it's not already selected.
2.
To view your information in Diagram View, click the Diagram button on the
Main toolbar.
The outline is transformed into a diagram.
Here's what the diagram looks like now, including the work done in Outline View.
25
26
Inspiration® Getting Started Guide
Set symbol defaults
Changing the defaults for symbols allows you to quickly create multiple symbols
with the same characteristics.
1.
Select Political Events.
2.
On the Formatting toolbar, click the Fill Colour button. Select a light colour
from the palette.
The colour inside the symbol changes to reflect your selection.
3.
On the Symbol palette, click on the basic rounded rectangle shape that
appears at the top of the palette. The Political Events symbol now looks
something like this.
4.
With Political Events still selected, on the Formatting toolbar, click the
Defaults button
5.
. Choose Set Default.
Now select Influential People and Scientific Discoveries—the other basic
symbols at the same level as Political Events.
Tip: To select more than one item, press the Shift key and click each item.
6.
Click the Defaults button
, then choose Apply Default.
These symbols now exhibit the same formatting as the Political Events symbol.
Any new symbols added to the diagram will also have these same characteristics.
Note: You can also use the Topic Defaults tool to set defaults for links and notes.
Inspiration® Quick Start Tutorial
Here's what the diagram looks like now.
Change note colours
Note colours are also changeable, so you can customise them to match symbols.
1.
Select Glasses. Click the Note Quick Control
.
The note opens.
2.
On the Formatting toolbar, click the Line Colour button and choose a light
blue colour from the palette. This will change the colour around the note.
27
28
Inspiration® Getting Started Guide
Arrange a diagram using the Arrange tool
The Arrange tool changes a freeform diagram into a more structured layout. You
can apply one of three basic arrangements to a diagram, then make refinements
using the Arrange options.
1.
Select The Enlightenment.
2.
On the Main toolbar, click the Arrange button.
The Arrange dialog box appears.
3.
Select Tree.
4.
Click the More Options button.
5.
In the Links box, choose Straight.
6.
Click OK.
The diagram automatically rearranges into the new format.
Here's what the diagram looks like now.
Inspiration® Quick Start Tutorial
Control the arrangement of a diagram using
AutoArrange
AutoArrange makes it easy to maintain the structure of your diagram. As you work,
AutoArrange continuously arranges any linked symbols you add to your project.
1.
On the Main toolbar, click the Arrange Options button. Select AutoArrange
from the drop-down list.
Note that this drop-down list also offers quick access to Inspiration's basic
arrangement styles.
2.
Select The Enlightenment if it's not already selected.
3.
Now you'll add two new topics. Click the RapidFire Options button on the
Main toolbar, and select With Links. The red lightning bolt tells you the
RapidFire tool is turned on.
4.
Type Daily Life and press Return (Enter).
5.
Type Exploration.
6.
Click the RapidFire button again to turn the RapidFire tool off.
Your new symbols are automatically incorporated into the diagram
arrangement.
Note: When AutoArrange is on, you can continue to move symbols to
change their order of position.
29
30
Inspiration® Getting Started Guide
Here's what your diagram looks like now.
Change the view scale
Magnifying and reducing the view allows you to work with specific parts of your
diagram or outline, or to see the entire screen at one time. To see more of the
diagram or outline in the window, you zoom out. To make symbols or topics
look bigger, you zoom in. You can also zoom in or out to a specific percentage.
several
1.
To the left of the bottom Scroll bar, click the Zoom In button
times. This makes your diagram appear larger on the screen.
2.
If you'd like the diagram to appear smaller on screen, click the Zoom Out
.
button
3.
To size your diagram to fit nicely on screen, click the Fit to Window button
.
Inspiration® Quick Start Tutorial
Insert a hyperlink
You can further enhance a project by integrating resources from the Internet. You can
also hyperlink directly to a document created in Inspiration or another application.
1.
Select the words "American Revolution".
2.
On the Main toolbar, click the Hyperlink button.
The Hyperlink dialog appears.
3.
Select Web Page.
The selected text appears in the Hyperlink Text box.
4.
In the Link To box, type www.americaslibrary.gov. Click OK. This creates
a hyperlink to a Library of Congress web page.
Note: You can also simply drag and drop or copy and paste a URL or file from
your computer's desktop onto your diagram.
Record a sound
You can also annotate diagrams, mind maps and outlines with recorded comments.
Note: To record sounds, Record Sound must be made available in Preferences,
and your computer must have a microphone. You will find Preferences on the
Utility menu.
1.
Select Voltaire.
2.
On the Tools menu, point to Insert Video or Sound, and then click Record Sound.
31
32
Inspiration® Getting Started Guide
3.
In the recording control box, click Record to begin recording.
4.
Say “I disapprove of what you say, but I will defend to the death your
right to say it. ~Voltaire”
5.
When you finish recording, click Save.
The Audio Quick Control is now displayed next to the Voltaire symbol.
Click the Audio Quick Control to play your recorded sound.
Create a video symbol
You can add video to diagrams and mind maps for research and reports,
planning multimedia projects and creating more dynamic presentations. You can
even make a video a symbol in your diagram.
Note: To insert and play a video, your computer must have QuickTime. To
install QuickTime, choose Get QuickTime on the Inspiration Help menu.
1.
Select Law of Gravity.
2.
On the Tools menu, point to Insert Video or Sound, and then select Video.
3.
Navigate to the Inspiration 8 IE folder on your hard drive. Select the
Tutorial Support folder and open Isaac_Newton.mov.
The first frame of the video is now the image for the Law of Gravity symbol.
to play the video.
Click the Video button
Note: You can also simply drag and drop or copy and paste a video file onto
your diagram.
Inspiration® Quick Start Tutorial
Here's how the diagram looks now.
Print your document
Before you print your project, you can determine layout, margins, headers and
footers, etc., by selecting Page Setup on the File menu. Page Setup also allows
you to preview the diagram, mind map or outline before printing and—once
you're ready—to print.
1.
On the File menu, choose Page Setup.
2.
Make your selections and choose Print Preview to preview your work.
3.
Click Print.
Note: If you're creating a bulletin board or other display, you can scale your
work to fill a specified number of pages.
33
34
Inspiration® Getting Started Guide
Transfer to a word processor
When you are ready to finalise your work for publication, you can easily transfer
it to a word processor. The Transfer tool automatically launches Microsoft®
Word or Appleworks®.
1.
Click the Transfer button on the Main toolbar.
The Transfer Options dialog appears.
2.
Select your preferred options and click OK.
Inspiration automatically launches your preferred word processor and
transfers your work.
Note: In some cases, it may be advantageous to simply transfer your notes.
Using this option, each note becomes a separate paragraph, making it easy to
finalise your paper or report.
Export your document
Diagrams, mind maps and outlines can be exported for use in a variety of other
programs.
• On the File menu, choose Export and make your selections.
You're finished creating your Enlightenment project. Please save your changes
before continuing on to lessons four and five.
Inspiration® Quick Start Tutorial
Lesson Four: Create a mind map
Inspiration’s mind map environment allows you to create a mind map using the
techniques developed by Tony Buzan and others. Many of the same features found
in Diagram View are available when creating a mind map. We will review some of
these commonly used features in the mind map lessons; however, we recommend
you review topics covered in the previous lessons for additional details.
In this lesson, you’ll learn to do the following:
• Start a new mind map
• Enter a central idea
• Add branch text
• Use the Add Topic Quick Control to add a topic
• Add subtopics using the RapidFire tool
• Point and type to add detached topic
• Rearrange topics and branches
• Move topics and branches to a different branch
Start a new mind map
You'll begin this lesson by creating a new mind map document.
A new document opens with the Central Idea symbol centred on the screen and
four starter branches.
35
36
Inspiration® Getting Started Guide
Enter a central idea
The Central Idea symbol provides a starting point for your work. Just enter an
idea to get started!
• Type Effects of Global Warming into the Central Idea symbol.
Add branch text
Now you're ready to add topics that expand or explain your main idea.
1.
Select the blue branch in the upper left and type ecosystems.
2.
Select the orange branch in the upper right and type droughts and floods.
3.
Select the purple branch in the lower right and type agriculture.
4.
Select the red branch in the lower left and type weather.
Here’s what your mind map looks like now.
Note: To wrap text, press Return (Enter) between words.
Use the Add Topic Quick Control to add a topic
You can add subtopics to expand on your ideas. The Add Topic Quick Control
adds a linked subtopic in one click.
1.
Select ecosystems.
2.
Click the Add Topic Quick Control at the end of the ecosystems branch.
3.
Type coral reefs.
Inspiration® Quick Start Tutorial
Here’s what your mind map looks like now.
Note: If you select ecosystems, you'll notice there's now a Subtopic Quick
Control
near the upper right corner of the topic. The Subtopic Quick Control
appears next to a topic to show that it has a subtopic. Click the Subtopic Quick
Control to hide and show the subtopics.
You can also add a new branch off the Central Idea symbol using the Add Topic
Quick Control.
1.
Select Effects of Global Warming.
Add Topic Quick Controls appear on either side of the central idea and at
every junction of the branches.
2.
Click the Add Topic Quick Control on the left side of Effects of Global
Warming. A new branch appears. The topic is selected and ready for you to
enter text.
3.
Type sea levels into the new topic.
37
38
Inspiration® Getting Started Guide
Here’s what your mind map looks like now.
Add subtopics with the RapidFire Tool
The RapidFire tool allows you to quickly add a series of ideas to your map.
When you use the RapidFire tool, you can concentrate on adding information
rather than creating new branches or topics. You can choose to add attached or
detached topics.
1.
Select sea levels if it's not already selected.
2.
Click the RapidFire Options button. Select Attached.
A red lightning bolt appears in the topic text area to show that the RapidFire tool
is turned on.
3.
Type land loss and press Return (Enter).
4.
Type flooding and press Return (Enter).
5.
Type saltwater intrusion.
6.
Click on the RapidFire button again to turn the RapidFire tool off.
Inspiration® Quick Start Tutorial
Here’s what your mind map looks like now.
Point and type to add a detached topic
Another easy way to capture your ideas is to just point and type anywhere on the
workspace. When you type, a new topic is automatically created.
1.
Click on an open area of the mind map.
2.
Type melting glaciers.
Tip: Deleting topics and branches is easy. Just select a topic and press Delete or
Backspace. The selected topic and all associated subtopics will be deleted. To
delete a single topic in the middle of a branch, select the topic, go to the Branch
menu and then select Delete topic only. Keep in mind that you cannot delete the
Central Idea.
39
40
Inspiration® Getting Started Guide
Rearrange topics and branches
There are many ways to organise your mind map. One way is to drag a branch or
topic anywhere on the workspace. When you drag a branch, it moves as a single
unit. When you drag a topic, any subtopics associated with the topic move as well.
1.
Select sea levels.
2.
Drag the topic to the upper right of the mind map. When the branch passes
the Central Idea, the subtopics flip to the other side.
Move topics and branches to a different branch
Topics can also be moved from one branch to another by dragging. As the
dragged topic or branch passes directly over another topic, a highlight indicates
where it will be attached when you release the mouse button. If you continue to
drag beyond the topic, the highlight disappears.
1.
Select droughts and floods and drag it over weather. Release the mouse
button when you see the highlight.
Droughts and floods becomes a subtopic of weather and inherits the
formatting characteristics of weather.
2.
Select melting glaciers. Drag it over weather and release the mouse button.
Inspiration® Quick Start Tutorial
Here’s what your mind map looks like now.
Tip: Magnifying and reducing the view allows you to work with specific parts of
your mind map, or to see the entire mind map on your screen. The Zoom
controls are found to the left of the bottom Scroll bar.
Taking a break
If you're ready to take a break from the tutorial, save your changes and quit
Inspiration. If you want to continue, just skip this procedure and turn to the next
lesson.
41
42
Inspiration® Getting Started Guide
Lesson Five: Enhance a mind map
In this second mind mapping lesson, you will continue to work with the document
created in the previous lesson and use colour and images to customise your work
and make it compelling and memorable. You will learn to do the following:
• Change the colour of branches and text
• Add a symbol to a topic
• Connect ideas using the Relationship tool
• Add a label to a relationship link
• Adjust a relationship link
• Add a note
Change the colour of branches and text
Colour is a great way to enhance and customise the look of your mind map.
1.
Open the document you saved in the previous lesson if it’s not already open.
2.
Select sea levels. The entire branch is highlighted.
3.
On the Formatting toolbar, click the Line Colour button. Select a bright blue
colour from the palette. The entire branch changes to reflect your selection.
4.
Now click the Text Colour button on the Formatting toolbar and select the
same blue colour so the text matches the branch.
Inspiration® Quick Start Tutorial
Add symbols to topics
Inspiration offers a wide variety of pictures and images to represent concepts and
ideas. In the built-in libraries, you'll find more than 1,000 symbols organised into
curriculum-based categories. In addition to the libraries that come with Inspiration,
the program offers an online collection of more than one million images.
Inspiration's search function makes finding just the right image a snap. When
you search for symbols, Inspiration searches both the Inspiration libraries on
your computer and the online collection.
Note: The Online Access option is selected by default. To turn Online Access
off, select Preferences in the Utility menu, then click the Online Access tick box.
1.
Select coral reefs.
2.
In the box at the bottom of the Symbol palette, type the words coral and
reef.
3.
Click the Find button
.
Inspiration searches for all images containing your keywords.
4.
Click one of the images that appear. Since coral reefs was selected, the
image is automatically added above this branch text.
Here’s what your mind map looks like now.
You can also browse Inspiration’s symbol libraries to see a variety of images
within a specific category. To scroll through Inspiration's built-in libraries one
or Previous Library
buttons. You can also
by one, use the Next Library
to jump right to your chosen library.
use the Select Library button
43
44
Inspiration® Getting Started Guide
1.
On the Symbol palette, select the Libraries tab.
2.
Click the Select Library button
choose the Community library.
3.
Drag the Farm symbol until it is positioned over agriculture. When you see
a highlight, release the mouse button. The symbol appears above the text.
. Navigate to the Everyday category, and
Here’s what your mind map looks like now.
Tip: To delete a symbol from a topic, select the topic. On the Effect menu,
choose Symbol, and then select Remove.
Connect ideas using the Relationship tool
Using relationship links, you can indicate a connection between two topics on
your mind map. The topics can be detached, on the same branch or on two
separate branches.
1.
Select agriculture if it’s not already selected. This is the topic from which
the relationship link will start.
2.
On the Main toolbar, click the Relate button to turn on the Relationship tool.
The cursor now looks like this
.
3.
Click weather. This is the topic where the relationship link will end.
4.
Click the Relate button again to turn off the Relationship tool.
Inspiration® Quick Start Tutorial
Here’s what your mind map looks like now.
Add a label to a relationship link
Each relationship link has a text box that appears when it is selected. Adding text
to this box defines the relationship between the topics.
1.
Select the relationship link between agriculture and weather if it's not
already selected.
When a relationship link is selected, you see the outline of the text box
associated with that link.
2.
Type depends on.
45
46
Inspiration® Getting Started Guide
Adjust a relationship link
You can easily change the connection points of a relationship link by dragging
the handle at either end of the link to a new location. You can also change the
direction of the curve by adjusting the link’s resize handles.
• Play with these tools to adjust the relationship link between agriculture and
weather.
Tip: You can move the text on a relationship link by dragging the round
selection handle on the text box.
Add a note
A note can be added to any topic in a mind map. Notes allow you to expand
ideas and begin the writing process while continuing to work in a visual format.
1.
Select agriculture. On the Main toolbar, click the Note button.
A note opens below the topic.
2.
Type Fluctuations in weather patterns could have a significant impact
on agricultural production.
Inspiration® Quick Start Tutorial
Switch from Map View to Outline View
You can easily create an outline from your mind map by switching to Outline
View. In Outline View, your information is displayed in a traditional hierarchy.
The two views are fully integrated; any changes made in one are automatically
made in the other.
• To view your information in Outline View, click the Outline button on the
Main toolbar.
The mind map is transformed into an outline. As discussed in the previous
lessons, in Outline View you can add and organise topics and subtopics, add
notes, set defaults, change prefix styles and more.
Here's what your outline looks like.
Congratulations! You've finished creating your Effects of Global Warming
project. If you’d like to return to your mind map, simply click the Map button on
the Main toolbar.
47
48
Inspiration® Getting Started Guide
Other inspiring resources
To learn more about using Inspiration, check out these inspiring resources.
Training videos
Inspiration includes access to online training videos that show how to do specific
tasks using Inspiration, including creating symbol libraries, using templates and
more.
Note: To view a video, your computer must have QuickTime. To install
QuickTime, choose Get QuickTime on the Inspiration Help menu.
1.
On the Inspiration Starter, click Learn to Use.
2.
Double-click Training Videos to see the list of available videos.
3.
Select a video title in the list, then click Open.
Online Help
The Inspiration Help system contains detailed information about how to use
Inspiration, including special features, tools and commands.
• To open the Help file, choose Inspiration Help on the Help menu. If the Help
system is not available, you must install it using the Inspiration CD-ROM.
Inspiration User’s Manual
The Inspiration User’s Manual contains all the information in the Help system.
The manual is available as a PDF file, which you can view and print using
Adobe Acrobat Reader.
• To open the User’s Manual PDF file, choose Inspiration Documentation on
the Help menu. Double-click User’s Manual.pdf.
Note: If your computer does not have Acrobat Reader, you can download a
free copy from Adobe at www.adobe.com.