1
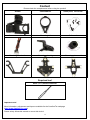
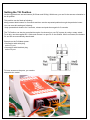
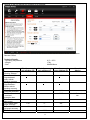
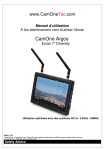
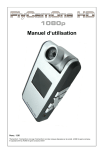
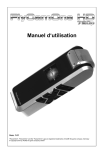
CamOne Gravity Air 2D Gimbal
Manual
This manual is available here:
www.CamOneTec.com/gimbal
Vers. 1.0
"FlyCamOne" and „CamOne” are registered trademarks of ACME the game company GmbH, Germany
© copyright 2014 ACME the game company GmbH
This user manual is protected by international copyright laws.
No part of this manual may be reproduced without the prior written permission of ACME the game company GmbH
in any form or by any means, electronic or mechanical, including Photocopying, recording or storing in any information storage and retrieval system,
reproduced, distributed, translated, or transmitted.
Safety advice
SERVICE & SUPPORT
WARNING:
PLEASE NOTE THE FOLLOWING ADVICES
TO AVOID SHOCKS OR DAMAGES
ON THE PRODUCT:
- DON’T USE THE PRODUCT WHEN RAINING, OR AT
WET PLACES
- KEEP THE DEVICE AWAY FROM WATER
- ONLY USE ORIGINAL SPARE PARTS
DO NOT DISMANTLE THE DEVICE. INSIDE ARE NO
PARTS THAT CAN BE REPAIRED BY THE USER. THE
SERVICE SHALL BE PERFORMED BY THE SUPPLIER
OR PRODUCER.
ACME the game company GmbH
Boikweg 24
33129 Delbrück
Germany
Tel: +49 2944 9738 30
[email protected]
or
http://www.camonetec.com
Information on the contained LiPo- Battery
Attention
If a battery is incorrectly replaced, there is danger of
explosion.
Replace the battery only with the same manufacturer's
recommended battery or an equivalent type. Dispose of
used batteries according to the manufacturer's instructions.
Risk of fire, explosions and
burns. Do not dismantle the battery.
Do not exceed the below quoted
temperature and do not burn the
battery.
LiPo-Battery <50°C
CE Declaration
We hereby declare that this model meets the essential
requirements and other relevant provisions of Directive
2004/108/EC. A copy of the Declaration of Conformity can
be obtained at the above address.
This product contains a LiPo- battery. Bring used batteries
to a designated collection point..
2
WEEE Reg. Nr.: DE64989527
Information for Users on Disposal
of electrical and electronic
equipment
According to the company principles
of ACME the game company GmbH
high-quality reusable components
have been installed in this product.
This symbol on the products and / or
accompanying documents means that
the product must be disposed of
separately at the end of life from
household waste.
Bring these products, even the battery
for proper and environmentally
friendly disposal of your nearest
collection (or recycling).
Content
Please check the completeness before using the product!
Gimbal
Camerabail 2x
Small parts, screws etc.
Connection cables 2x
Mountingbail
Bellows 8x
Retaining bracket 2x
Mounting plate big
Mounting plate small
Required tool
Allen 1,5 + 2,0mm Screwdriver
Important note!
More information, adjustments and tips are available 0n the CamOneTec webpage
(http://www.CamOneTec.com).
Please strictly follow this manual to mount this device!
3
Index
Safety advice……..………………...……………………………………………………………………………………..2
Content / Required components............………………………………….………………….….………………………3
Important notes....……………………………………………………………………………………………….…….…..3
Index....................…………………………………………………………………………………………………….……4
Disclaimer and warnings.......................…………..………………...…………………………………….…………….4
Connection / Mounting advice..……………………………….……………………………………………………….…5
Mounting………...…………………………………………..……………………….……………………………….…….5
Cable connection…………………………………………………………………………………………………..……...7
First use....................…………………………..………………………………………………………………………….7
Setting the tilt position.........………………………………………………………………………..……………………..8
Technical Details………………...………………….……………………...……………………………………………...9
Warranty............................……………………………………………………………………….……………………..11
Disclaimer and warnings
Read these instructions before commissioning and use of the article and its components!
With the start of the article, you agree to the terms of the disclaimer and agree to the instructions.
Assemble the items according to the instructions. Any changes to this or uses of third-party products / spare
parts can cause damage.
This excludes the acquisition of warranty claims!
The article is already in a functional state after delivery. Take your time before you start.
There is no responsibility for damage or injury from the manufacturer, importer or distributor acquired, resulting
from the use of the product.
Make sure prior to attachment to your flight model which can optionally consist requirements and
recommendations of the manufacturer for the use of gimbal system.
Operating voltage 7.0V -17.0V (2-3S LiPo recommended)
Use only with inserted camera!
Outer influences while operation may damage the Gimbal!
Please note that the flight time of your model decreases as soon as
you connect a Gimbal and further FPV- equipment!
When using video transmitters, make sure that its connection cables
do not interfer the Gimbal.
4
Connection / Mounting advice
Mounting
Use the supplied screws to mount the unit.
If there are no matching holes inside your RC models fuselage, please contact your supplier for further advice.
Make sure that the screws are tightened before every flight. The Gimbal needs to be mounted downwards.
5
1. Gimbal Mounting
Screw the Mountingbail with 2 screws (M2x6mm) and spring washers with the Gimbal-System. The tabs shall
point in direction of the camera holder. Use a 1.5mm Allen screwdriver to perform this work.
Attach the mounting bracket with three screws (M3x8mm) on the small plate. Insert the screws through the
plate and fasten them to the mounting bracket.
2. Bellows and mounting on the RC- Model
Push the bellows into the 4 holes on the big mounting plate (see picture).
Make sure that these are mounted firmly and even.
Screw the big mounting plate onto your model.
Use the matching screws according to your model. If needed, you can also use the small white plates to avoid
a direct contact between main board and RC fuselage.
Please note, that the side with the connection ports of the main board shall be visible from below.
The big mounting plate already has some holes that you can use to mount it on your RC model.
Now place the pre-mounted plate with the Gimbal on the big mounting plate with the bellows.
Push the bellows into the plate.
6
When the bottom part of the Gimbal is completely mounted and screwed, insert the mounted bellows into the
bigger plate. Make sure, that the side with the ports points to the lower plate.
This work requires some patience.
If this has been successful, connect the fixed cable from the Gimbal (white/wide plug) with the matching port
P1 on the bigger plate.
3. Camerabail
You will find 2 bails for the following camera models inside this content:
-CamOne infinity
-GoPro Hero 3 / 3plus Series
Choose the matching one for your camera. Make sure that you tighten the bail safely.
Cable connection
The operation voltage is
between 7.0V and 17.0V
The supply of the Gimbal is made via the port P2 on the bigger plate.
It comes with two connection cables.
One with an open end and one with a connection to the balancer port of a 3S LiPo batteries.
Select a cable and plug it into the port P2. Make sure that the cable is fixed firmly and secure.
The power is supplied via the operating voltage of the model. The easiest way is to connect it to the balancer
port of the battery. Make sure that this cable is not pinched.
Take the Gimbal into service only when a camera is inserted!
First use
All parts have been mounted by you according to the instructions of this manual. The Gimbal shall absolutely
not have any contact to the ground, the landing gears of your model shall always be longer!
Power up your model before you power the Gimbal.
Place the model on an even surface and do not move it until the Gimbal has been adjusted.
After connecting to a power source, the blue LED of the Gimbal will start flashing. The Gimbal will adjust itself
within a few seconds.
DO NOT MOVE THE GIMBAL BY HAND DURING THIS PERFORMANCE!
Take the gimbal into service only when a camera is inserted!
Test the function of the Gimbal via manual movements of the flight model. Pan the model for example by hand
from right to left and check the always straight alignment of the Gimbal.
7
Setting the Tilt Position
On the big plate there are two buttons (S1/Down and S2/Up). With these, you can fix the camera orientation in
the tilt position.
This position can be fixed as following:
Keep pressed both buttons for 5 seconds and then set the requested position through the particular button.
You can reset this setting as following:
Keep pressed both buttons for 5 seconds, release and push them again for 5 seconds.
The Tilt Position can also be controlled through a free channel on your RC system by using a rotary switch.
To do this, use the supplied RC- Cable and connect it to port P3 on the Gimbal. When connected, the buttons
S1 and S2 are automatically deactivated.
Example on the DJI Naza system:
>Connection with white plug
on the F1 port
>Connection with black/red plug
on the F2 port
To have access on the ports, you need to
dissamble the model.
8
Settings on the DJI Naza-M V2 Software as an example:
You can align the tilt position of the camera on the Gimbal via the rear X1-channel on the DJI Phantom
Remote Control.
Technical Details:
- Operating temperature
- Weight
- Size
Betriebsspannung /
Working Voltage
Feststehende
Signaltaktrate/
static attiude
tracking accuracy
Bewegung
Signaltaktrate /
Motion attiude
tracking accuracy
Überlastschutz /
Overload protection
Zeit Überlastschutz
/ overload
protection time
Max. Drehmoment /
Max torque
Tilt / Controll pitch
angle accuracy
Rollwinkel / Controll
roll angel accuracy
Tilt Rate
0°C ~ 50°C
170g
90x80x90mm
Min. Spannung /
min working vol.
7,0V
Stdrd. Spannung /
std. working vol.
12,0V
+0,01°
+0,1°
Max. Spannung /
max. working vol
17,0V
Hinweis/
Advice
2S-4S LiPo
+0,04°
+0,2°
+0,5°
0,8A
600S
330us
+ 45°
0°
-90°
+45°
0°
+45°
10°/S
9
Nach 6 Sek. /after 6
sec.
Spare parts and accessories for the DJI Phantom Multicopter
Artikelnummer
DJB100
DJB110
DJB111
DJB112
DJB113
DJB114
DJB115
DJB116
DJB117
DJB118
DJB123
DJB124
DJB128
HEOS0100
DJB131
HS1132
AA1119
Bezeichnung
DJI Phantom Quadrokopter RTF-Kit
DJI Phantom Propellerschutz
DJI Phantom Landegestell
DJI Phantom Ersatz Elektromotor
DJI Phantom Propellerpaar 8x4,5 (1x Links /1x rechts)
DJI Phantom ESC red front (rote LED´s)
DJI Phantom ESC green rear (grüne LED´s)
DJI Phantom Kompass Modul
DJI Phantom Gehäuse Schalen (Set)
DJI Phantom LiPo Akku 3s 2200mAh
DJI Phantom Verbindungsteile
DJI Phantom Schraubensatz
Carbon Propeller Set 1xL + 1xR 8.0x4.5
LiPo Warner & Akkutester 1-8S (Pieper)
CamOne 2 Axle Kamera Gimbal
LiPo Ladegerät / Balancer 2/3 12V Input /KFZ
KFZ Adapter 12V (für HS1132)
EAN-Nummer
4260033046079
4260033046093
4260033046109
4260033046116
4260033046123
4260033046130
4260033046147
4260033046147
4260033046154
4260033046161
4260033046284
4260033046291
4260033041517
4260033041548
4260033040466
4260033047748
CamOne FPV cameras and accessories
Artikelnummer
FCHD01A
FCHD02
FCHD03
FCHD05
FCHD08
FCHD09
FCHD10
FCHD15
FCHD16
FCHD38
FCHD49
FCHD50
FCHD51
FCHD52
FCHD53
FCHD58
FCHD74
FCHD80
FCHD80-B
COIN01
FCHD91
COIN22
COIN31
COIN32
COIN34
COIN36
Kurzbezeichnung
FlyCamOne HD 1080p 96° Kamera inkl. MGN-Mount
FlyCamOne HD Screen 2,5“
FlyCamOne HD Transmitter Set 5.8GHz
FlyCamOne HD RX-Kabel 720p
FlyCamOne HD V-Eyes Set
FlyCamOne HD 720/1080p Lens 133°
FlyCamOne HD 720/1080p Lens 170°
FlyCamOne HD GPS Modul
CamOne Rapid Rush 16GB Micro SD-Card Class4
FlyCamOne HD FPV Head inkl. 2 Servos
FlyCamOne HD 720/1080p Lens 96° AS
FlyCamOne HD 720p Venus
FlyCamOne HD 720p Mars
FlyCamOne HD 720p New Moon
FlyCamOne HD 720p Nova
FlyCamOne HD RX-Kabel 1080p zoom/pan/tilt
FlyCamOne HD 7" Screen 5.8 GHz Dual-Receiver
FlyCamOne HD eco 1080p 96° CMOS
FlyCamOne HD eco 1080p 142° CMOS
CamOne infinity 1080p Full HD Kamera
CamOne Video Transmitter 5,8GHz 25mW
CamOne Infinity 170° Linse
CamOne Infinity 142° Linse
CamOne Infinity 96° Linse
CamOne Infinity 3fach Akku-Lader
CamOne Infinity Power + View Kabel
10
EAN-Nummer
4260033047908
4260033049520
4260033049537
4260033049551
4260033049582
4260033049599
4260033049605
4260033049650
4260033049667
4260033049889
426003304
4260033049971
4260033049964
4260033049957
4260033049940
4260033047588
4260033045843
4260033046963
4260033046581
4260033041906
4260033047496
4260033042620
4260033042811
4260033042828
4260033049414
4260033049346
Guarantee
The consumer is without prejudice to any claim against the seller a
Manufacturer's Guarantee under the conditions set out below :
» New devices and their components , or arising from manufacturing and /
Material faults within 24 months of purchase develop a fault , are of
ACME the game company GmbH exchanged at its option against a prior -art device to the original purchaser
or repaired free of charge .
For wear parts , this warranty is valid for 3 months from purchase.
" This warranty does not apply if the device defect is attributable to improper treatment
and / or non-observance of the information presented is based .
" This warranty does not extend to self- paid by the customer services
(eg conversions)
»Warranty claims are to be claimed at once , to the knowledge of the warranty claim .
" Ownership of devices or components that are returned to ACME the game company GmbH in the framework
of exchange, become the property
ACME the game company GmbH .
» By services rendered under warranty , the warranty period is not extended
" Insofar as no Guarantee default exists, ACME the game company GmbH reserves the right to charge the
customer for replacement, repair , or shipping costs. The customer will be informed in advance .
Service & Support
ACME the game company GmbH
Westwood
Boikweg 24
33129 Delbrück
Germany
Phone: +49 2944 9738 30
E-Mail: [email protected]
11
FPV (First Person View)
The premier competition of model flight
DJI Phantom + CamOne infinity + 5,8 GHz Transmitter Set and
7“ (178mm) Diversity Screen
12