1
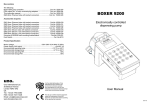
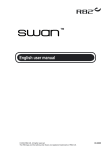
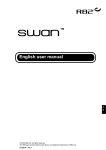
SHARK EVOLUTION
User’s manual for aquarium refill.
Carefully read the following instructions Before use.
Table of Contents:
1. Introduction
2. Connectiona
3. Start-Up
4. Troubleshooting / Regulation
5. Lubrication Of Head
6. Replacing The Santopren Hose
7. Precautions
8. Specifications
1. Introduction.
You have become the owners of a very modern and technologically advanced equipment
which Shark Evolution refill Aquarium is.
The device is used for maintaining the water level in the tank at the appropriate level.
With detection sensors the device determines the water level in the tank and on the basis of
this reading controls the peristaltic pump. Refill has two standard detection sensors one of
which (indicated in green) is responsible for ongoing monitoring of the water level and the
second (marked in red) protects the system against overflow in case of failure of the first
sensor. The device also has the ability to connect a third sensor, which is responsible for
controlling the water level in the tank from which it is collected.
2. Connections
The first thing you need to do is to connect the device and to install the level sensors. Sensors
are mounted on the outside of the glass sump (technical tank) or aquarium by gluing them
using double-sided tape attached at such a height that the desired water level is in the middle
of the sensor.
The maximum thickness of the glass is 12mm
Caution!
The minimum horizontal distance between the sensors is 20cm
Critical sensor
triggering sensor
tank
20cm
water level
The next step is to connect the suction and forcing hose to the pump (hose with an internal
diameter of 5 mm is required). The peristaltic pump operates according to a clockwise
direction. The left nozzle of hose should be connected to suction hose and its other end should
be put in the tank with RO water, the right end should be connected to forcing hose and its
end is placed over the surface of the water in the aquarium / sump.
3. Start up.
If all connection steps have been performed correctly then after the powering up to the mains
green LED on the panel indicates the readiness status. If the water level in the tank is equal to
the desired, the trigger sensor will signal this by the illumination of the red LED and the LED
"level control" will be extinguished on the panel. If the water level is too low, the sensor red
LED will be extinguished and controller signals the status lighting up of the orange LEDs
"level control" and will start the peristaltic pump.
Emergency sensor will be launched in case the water level is above the desired state, this
situation is indicated by the illumination of the red LED on the sensor, and "critical level"
LED on the main panel. The device blocks the action of the pump and activates an acoustic
signal.
Additional sensor (not included) can be used to control the water level in the tank from which
it is drawn. With this feature, the device tells us about the ending resource of water abstracted.
The sensor must be connected to the mini jack on the side panel of the case.
Water level
Water tank
extra sensor
Caution!
At any time, you can manually start the pump regardless of the status of sensors through the
"start" button on the device.
4. Troubleshooting / Regulation
Please note that in order for the device to work properly, the user must provide adequate
ventilation of aquarium cabinet (where the sensors are mounted on the sump glass), otherwise
sensors will identify high level of humidity as the level of the water.
You should also keep in mind about taking care of cleanliness of the inside surface of the
glass in the area of detection sensors, calcareous deposits, algae, etc., may interfere with the
sensors.
Probably to work properly, the device will need adjustment of the sensitivity of sensors
(which is subject to the thickness of glass tank). The adjustment is done by removing the
white security stickers off the sensors. Using a small screwdriver turn the adjustment screw
until the desired degree detection sensor ( determine the sensitivity at which the sensor
responds to the level of water in the middle of its height). Turning the screw clockwise will
reduce the sensitivity, turning the screw counter-clockwise increases the sensitivity.
The only corrective action that the user can do on its own is replacing the fuse for power
supply. In the case of the unit stopped working and the POWER LED on the main panel is
off, and you made sure that the supply voltage is present; you can try to replace it. To do this,
disconnect the unit from the mains, remove the fuse holder on the side panel of the case and
make the replacement (the type of used fuse is 250V 200mA). Do not use a fuse with other
parameters. If this action does not cause activation of the appliance, contact our service
5. Lubrication of santopren hose / intestines
Dosing head requires periodic lubrication with silicone grease (included).
In order to lubricate inject a small amount (about 1 ml) of silicone grease to the head with a
syringe through the hole between the tubing, the operation should be repeated every 2-3
months.
6. Replacing the santopren hose / intestines
Santopren hose mounted in the head wears out and needs changing, the user should check the
condition of the hose and replace it if a leak or rupture occurs, but not less frequently than
every six months. Always replace santopren hose after disconnecting the device from the
network.
Replace the santoprene tube by "pulling off " the old hose and "pulling on" the new one. To
pull out the old hose, take off the connector pipes, then gently pull the hose from the head.
Pulling on the new tube is done in the opposite way. First inject a small amount of silicone
grease into the head and then push a new santoprene tube through one of the holes (left) with
the pump switched on until the appearance of the other end in the right head hole, then using
tweezers or fine pliers pull the hose out (assembly is much easier if we chop one end of the
hose with slanting. The connectors should be placed on the ends of the newly pulled-in hose.
Dosing head
Feeding tube
Connection pipe
Head with removed connector pipes..
The head with the feeding hose removed.
Note! When you replace the hose, do not unscrew the head from the casing, tubing exchange
is made "on the device."
7. Precautions.
The user is obliged to check the state of santopren hose and replace it every six months.
Like any electrical equipment, the refill shall be isolated from the environment with high
humidity, so always place it outside the cabinet with sump (technical tank), or provide
optimal ventilation in the cabinet.
Due to the possibility of failure of the device, always use additional safeguards to protect
against flooding.
If you notice any abnormal operation stop any further use, disconnect it from the power
source and contact the service center.
8. Specifications.
Supply voltage 230VAC
Power consumption max 5W
Pump capacity 2L / H
GUARANTEE CARD
1. The guarantee period is 24 months and is calculated from the date specified on the guarantee certificate.
2. Any complaints should be reported at the purchase place of the product or directly to the manufacturer; while
reporting, the proof of the purchase, and description of the damage and guarantee card should be provided. After
reading the documents and checking the state of the product, the seller will decide on further guarantee
proceedings.
3. The guarantee card is valid only with the proof of the purchase (an original or a photocopy), when it has the
date of sale, the name, the model and is confirmed with the stamp and signature of the seller.
4. The product under complaint may require a thorough expertise in order to determine the existence of the
damage and the legitimacy of the complaint. The product under complaint should include all accessories
supplied by the manufacturer.
5. The product under complaint should be delivered at the expense of the user.
6. The guarantee does not cover:
a. Consumables such as pumping and feeding hoses
b. Damages caused by the use of the device being not in accordance with the product instructions
c. Damages due to improper product installation or storage
d. Permanent contamination causing deterioration of the performance of the product
e. Damages due to unauthorized repairs or modifications of the product
f. Damages due to random events (e.g. fire, lightning, flooding)
g. Damages due to transport to the service
7. The service reserves the right to charge the customer with the costs of materials, labor and transport, if the
damage is not covered by the guarantee or the product proves to be working.
8. The guarantee does not cover the right of the customer for the compensation for the loss of the expected
benefits and costs incurred, resulting for the use or inability to use the product.
Breaking or damaging the guarantee seals voids the guarantee.
Product made in Poland.
Manufacturer: Aqua-Trend
Lokatorska 11 Lok. 6
93-021 Lodz
DATE OF SALE: ... ... ... ...
MODEL: ... ... ...
SIGNATURE:... ... ...