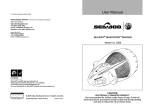
1
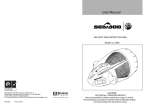
US
USER MANUAL
• When passing on this device, include the user manual and
all relevant warning information and parts.
• It is the responsibility of the owner to give proper instruction
and precaution (regarding the risk associated with this
device) when lending the device to other people.
I Seascooter™ RS1
I SD15001 I
Seascooter™
R
S
2
I
I SD15002 I
I Seascooter™ RS3 I SD15003 I
CAUTION
ELECTRICALLY OPERATED PRODUCT
Not recommended for children under 14 years of age. As with all electrical products, precautions should be observed during handling to
reduce the risk of electric shock.
www.seadooseascooter.com
CONTENTS
INTRODUCTION
2
WARNING
3
PARTS DIAGRAM
5
BATTERY CAUTION
6
CHARGING THE BATTERY
7
REPLACING THE BATTERY
GETTING STARTED
8-9
10-11
CARE & MAINTENANCE
12
BUYING PARTS
12
TROUBLESHOOTING
- Unit does not function
- Blocked propeller
- Flooding events
- Blocked triggers
13
TECHNICAL SPECIFICATIONS
16
WARRANTY & CUSTOMER SERVICE
17-18
Discarded electrical appliances are recyclable and should not be discarded in the domestic
waste! Please actively support us in conserving resources and protecting the environment by
returning this appliance to the collection centers (if available).
1
INTRODUCTION
I DISCOVER I
There is nothing ordinary about the way it looks….
Or the way it glides for that matter…..
You submerge and it reacts and adapts…..
You toggle into gear, it comes to life….
THE NEW SEA-DOO® SEASCOOTER™ RS-SERIES!
The Seascooter RS introduces the first LI-ION battery system in a lightweight recreational DPV that can be charged inside the unit, but that is also
removable for external charging and simple battery replacements required for back-to-back dives or snorkel runs.
I OTHER FEATURES I
BUOYANCY
The Seascooter RS contains a self-filling ballast hull to achieve neutral buoyancy almost instantly in seawater. Strategically placed drain holes allow water
to freely enter and exit the ballast space making the Seascooter RS assume neutral buoyancy when submerged, and expel it as soon as it hits the
surface.
The Seascooter is designed for use in seawater. It will have less buoyancy in fresh water and pool and may sink in such waters.
FINS
The strategically placed front foil and pectoral glide fins prevent upward skidding of the Seascooter RS when accelerating and allow for the fastest
straight-line forward navigation underwater. The fins allow you to rest your arms while you use the Seascooter in the water.
HANDLEBAR + LED BATTERY STATUS INDICATOR
The handlebar of the Seascooter RS is the user’s main navigation tool and is made of the best impact resistant material. It features smart ergonomically
positioned triggers for a natural thumb position during trigger operation, accessory D-ring attachment points and a dashboard-style LED battery status
indicator for an accurate voltage display during use.
2
WARNING
• This is not a life saving device.
DO NOT use it as a buoyancy aid.
• Always inspect the swimming area to ensure it is free
of hazards or obstacles such as boats or swimmers
before using the Seascooter.
• A child under 14 years old should never operate this
product.
• The Seascooter is designed for 1 person use.
• Read the user manual carefully before using this
product.
• Be careful when you are transporting the
Seascooter and setting it down to avoid crushing
hazard on hands, foot or toes.
• Crushing / Cutting Hazard
• Do not attach your body, clothing, other equipment
to the seascooter in any way.
3
• ALWAYS wear a life vest (personal floatation device - PFD)
approved by your local authorities for Snorkeling: (U.S.
Coast Guard Type III vest in the US or Canadian Coast
Guard approved life vest in Canada or SAI Approval PFD
in Australia or CE Approved PFD in Europe).
• Never stick body parts, clothing or other objects in the
vicinity of the propeller. Do not wear loose or flowing
clothing or equipment that could be drawn into the
propeller.
• Particular care should be exercised when using the
Seascooter near anybody with long hair. Users with long
hair should tie it up or wear a swimming cap when using
the Seascooter.
• Be aware of appropriate water levels, tidal changes,
dangerous currents, weather change and strong offshore
winds. ALWAYS scout unfamiliar water before venturing
out.
• Always ensure sufficient charge remains in the battery to
return to the shore surface before using the Seascooter.
• Do not use alcohol or drugs prior to and during use of this
product.
CAUTION:
•
•
•
•
•
•
•
•
•
NEVER remove the grilles except for maintenance.
Familiarize yourself with the Seascooter functions and battery life before embarking on any dives or excursions.
Always charge battery to its fullest before using the Seascooter.
Do not allow sun tan oils or lotions to be in prolonged contact with the Seascooter plastic as it may cause the plastic to become brittle and
break apart.
If the propeller becomes intermittent, and/or a buzzer is heard, water has entered the housing(s). If safe to do so, turn OFF the master switch,
remove the Seascooter from the water and check it for water ingress. ALWAYS observe safe diving practice if this occurs during a dive.
ALWAYS keep the Seascooter out of direct sunlight when not in use. HEAT KILLS BATTERIES AND IT MAY EXPLODE OR LEAK.
Never open the Nose Cone of the Seascooter in the water.
When not in use, always turn the Master Switch to the OFF position.
Do not use the Seascooter RS1 and RS2 below the recommended maximum depth of 40m/130ft.
• Do not use the Seascooter RS3 below the recommended maximum depth of 30m/100ft.
• Use appropriate equipment such as wetsuit, BCD (Buoyancy Control Device), fins, mask & snorkel, surface signaling devise, regulator(s)
approved life jacket etc. when using the Seascooter.
• The Seascooter shall not be used in reverse direction.
• Adequate lighting shall be used when using the Seascooter in dark waters and during night diving.
• This machine is not intended for mixing or working with sand, concrete and material with similar physical characteristics. This machine is only
intended for swimming and diving in the water.
• Do not use the unit if it is damaged in any way.
• Replace the battery immediately if it is damaged.
• The Seascooter should only be used for scuba diving by qualified divers.
• When using the Seascooter for scuba diving, ascents and descents should be made in accordance with recognized diving practices.
• Due to safety considerations those who have not obtained a C-Card (attesting to completion of training) from an entity providing diving
instruction must not under any circumstances use this product for diving.
• In different waters (seawater, lake, pool) and conditions such as currents, temperature and pressure can affect the buoyancy of the
unit which may cause the unit to sink if accidentally released.
• DO NOT release or leave the Seascooter in the water. Always take the unit out of water when not in use.
4
PARTS DIAGRAM
16
20
15
14
22
12
10
24
25
26
23
6
2
27
1
21
19
18 17
13
9
7
8
11
28
5
4
1
1
2
3
4
5
6
7
8
5
3
Outer Nose Cone Protector
Outer Nose Cone
Front Foil
Vent Plug
Inner Nose Cone
Battery Pod Handle
Battery Pod
Side Latches
9 Base Latch
10 PCB (Printed Circuit Board)
Box Assembly
11 Rear Foil
12 Triggers
13 Handle
14 LED Battery Status Indicator
15 Master Switch
16 Front Grille
17
18
19
20
21
Nozzle Support
Propeller
Nozzle
Rear Grille
Fin x 2
(NOT included with RS3)
22 Charger
23 Extended Charging Cable
24 Rubber Ring x 2
25 Pump
26 Pump Nozzle
27 Ballast weight x 4
(NOT included with RS3)
28 Silicone Grease
BATTERY CAUTION
RS 1
RS 2
RS 3
Battery: Suitable for use in the RS1 / RS2 / RS3 Seascooter
Battery: Only suitable for use in the RS2 / RS3 Seascooter
Battery: Only suitable for use in the RS3 Seascooter
• Replace the battery immediately if it is damaged.
• Use the specified charger only.
• Must be disposed of properly.
• Always store the battery in well ventilated areas where it is out of the reach of children and away from heat and
ignition sources.
• Do not incinerate, disassemble, damage, short-circuit or expose to heat.
• The battery contains safety and protection devices which, if damaged, may cause the battery to generate heat,
rupture or ignite.
• Do not place the battery in fire, direct sunlight or apply heat to the battery; it may explode or leak.
• Do not leave the battery in direct sunlight or use or store the battery inside high temperature containers. Doing so may
cause the battery to generate heat, rupture, or ignite. Using the battery in this manner may also result in a loss of
performance and a shortened life expectancy.
• Do not place the battery on or near fires, stoves, or other high temperature locations.
• DO NOT THROW WATER ON A BURNING LI-ION BATTERY. If an exposed battery does ignite, it will burn even more
violently if it comes into contact with water or even the moisture in air. A fire extinguisher must be used.
• Do not expose the battery to water or salt water, or allow the battery to get wet.
• Do not subject the battery to strong impacts or shocks.
• Do not pierce the battery with nails, strike the battery with a hammer, step on the battery, or otherwise damage the
outer casing.
6
CHARGING THE BATTERY
To remove the Nose Cone and charge the Battery Pod, user MUST follow these instructions to avoid any injury.
1. ALWAYS ensure that the Master Switch is in OFF position. (see Fig. 2)
2. ALWAYS ensure that the Seascooter is out of the water, dry and placed in a dry area.
3. Pull the three Latches down and remove the outer nose cone (see Fig. 3 & 4)
4. Release the Vent Plug on top of the Nose Cone. (see Fig. 5)
5. Connect the extended charging cable to the charging plug of the charger. (see Fig. 6)
6. Plug the extended charging cable into the battery pod through the vent plug hole and then plug the Charger into the mains (wall socket), and turn on
the supply. (see Fig. 7)
7. Charging will take around 3-5 hours for a fully discharged RS3 battery, 4-6 hours for a fully discharged RS2 battery and 7-9 hours for a fully discharged
RS1 battery. When the Battery Pod is charging, the LED light of the charger turns RED. When the battery is fully charged, the LED light turns GREEN
(see Fig. 8)
8. Once the battery pod is fully charged, unplug the Charger from the mains (wall socket).
9. Unplug the extended charging cable from the battery pod.
10. MAKE SURE the seals and sealing surface are clean and fully lubricated with the supplied grease EVERYTIME (you can also buy this at your local
hardware store) before replacing the vent Plug (see Fig. 9 & Fig. 10) and CLOSE THE VENT PLUG TIGHTLY. (see Fig. 11). MAKE SURE the plastic link
of the vent plug is not jammed in between the vent plug and the o-ring when tighten the vent plug.
11. Close the outer nose cone with the 3 latches
2
3
4
5
6
Sealing Surface
Seals
7
7
LED light
8
9
Silicone
Grease
10
11
REPLACING THE BATTERY
To remove the Inner Nose Cone and replace the Battery Pod, user MUST follow these instructions to avoid any injury.
1. ALWAYS ensure that the Master Switch is in OFF position. (see Fig. 12)
2. ALWAYS ensure that the Seascooter is out of the water, dry and placed in a dry area.
3. Pull the three Latches down and remove the outer nose cone. (see Fig. 13 & 14)
4. Release the Vent plug on top of the Nose Cone. (see Fig. 15)
5. Tie up the rubber rings together and pull them through the slots of the inner nose cone and attach both ends around the handle and bottom latch
hinge as shown in Fig. 16.
6. Remove the pump nozzle from the pump, and screw it to the vent chamber.
7. Connect the pump to the Pump nozzle and pump air in until the Nose Cone pops off (see Fig. 17).
IMPORTANT: ALWAYS attach the Rubber Ring before using the pump. The Nose Cone can pop off and cause injury if the Rubber Ring is not
attached and tightly secured.)
8. Remove the Rubber Ring and the Inner Nose Cone. (see Fig. 18)
9. Take out the Battery Pod from the unit. (see Fig. 19)
10. Replace with a new suitable battery pod.
IMPORTANT: RS1 battery pod is suitable for use in the RS1, RS2 and RS3 Seascooter. RS2 battery pod is only suitable for use in the RS2 & RS3
Seascooter. RS3 Battery pod is only suitable for use in RS3 Seascooter).
12
13
14
15
16
8
11. MAKE SURE the seals and sealing surface are clean and Fully lubricated with the supplied grease EVERYTIME (you can also buy this at your local
hardware store) before replacing the Inner Nose Cone. (see Fig. 20 and 21)
12. Align the arrow marking and close the inner nose cone by pushing all the way down. (see Fig. 22)
13. MAKE SURE the seals and sealing surface are clean and lubricated before replacing the vent Plug and CLOSE THE VENT PLUG TIGHTLY.
MAKE SURE the plastic link of the vent plug is not jammed in between the vent plug and the o-ring when tighten the vent plug.
14. Close the outer nose cone and the three latches.
Sealing Surface
17
22
9
18
19
Seals
20
Silicone
Grease
21
GETTING STARTED
Before you use the RS series Seascooter for the first time, the battery needs to be charged. Follow the Battery Cautions on page 6 and Charging
instructions on page 7.
Your Seascooter RS1 & RS2 can be used for swimming, snorkeling or diving up to 40m/130ft (by qualified divers).
Your Seascooter RS3 can be used for swimming, snorkeling or diving up to 30m/100ft (by qualified divers).
To use the Seascooter, follow these instructions.
1. Follow instructions on page 7 and charge the battery just before use.
2. Place the Seascooter into the water and rock gently to release trapped air.
3. The RS unit automatically assumes neutral buoyancy. Use the accessory lead ballast weights for making small buoyancy adjustments (see Fig. 23).
4. Slide both clip-on accessory fins onto the rear grille fixture points of your RS unit (see Fig. 24).
5. When ready to set off, switch the Master Switch to the ON position (see Fig. 25).
6. The RS unit can be operated by pushing only one trigger or both triggers at the same time. Push the left or right Trigger to start the Propeller
(see Fig. 26). The Seascooter will accelerate up to speed 1. (There is a short delay before the Propeller begins to rotate).
7. To increase speed at any time, simply pulse the left or right trigger off and on again within half a second. The Seascooter will accelerate up to the next
speed level.
8. When at maximum speed, further pulses will have no effect.
(RS1 & RS2 - 3 speeds, RS3 - 2 speeds)
9. To stop the Propeller, simply release both Triggers.
10. Always set the Master Switch to the OFF position when the RS unit is out of the water. (see Fig. 27)
11. Maintain proper posture to achieve the maximum speed when using the Seascooter.
– see Fig. 28 for the correct position of the Seascooter when using it.
Plug in Ballast Weight
and click to hold 23
24
25
26
27
10
1. User should always try and assume the most horizontal body position for the
best performance results. (see Fig. 28)
Good
Best
28
LED battery status indicator (operates when Master Switch is on)
Your Seascooter has a Battery Status Indicator (see Fig. 1 “Parts Diagram” - part 15), which can be seen through the LED Window located in the Handle.
When the battery is full, 3 green LEDs are on. When 2 LEDs are on, 2/3 of power remains. When 1 LED is on and flashing, about 1/3 of power remains.
When all 3 LEDs are off, the machine will run 3 minutes and then will automatically shut down.
29
11
30
31
32
CARE & MAINTENANCE
Washing and Care
• DO NOT leave the Seascooter in the water. Always take the unit out of water when not in use.
• Always rinse the Seascooter with fresh water and allow it to dry before storage.
• Whenever possible rinse the Seascooter with fresh water immediately after use.
• To clean the Seascooter do not use detergents; only use a damp cloth to wipe the unit clean.
• The battery housing interior should be kept dry at all times.
• If the battery housing interior gets wet, see page 14, “Flooding Events” for procedure.
BUYING PARTS
Additional battery pods, chargers or RS series accessories can be purchased separately. Please contact your Local Customer Service Center /
Distributor, or visit www.seadooseascooter.com to purchase them.
Using the Optional Extended Life Battery for RS2 and RS3
An optional extended life battery is available through your Local Customer Service Center / Distributor (or visit www.seadooseascooter.com).
The battery fits into the Battery housing in the same position as the Normal battery, and can be charged the same way as the standard battery.
Optional Extended Life Battery Running Time (Normal Use)
RS1 battery
RS2 battery
RS3 battery
RS1
90 minutes
NA
NA
RS2
120 minutes
75 minutes
NA
RS3
160 minutes
100 minutes
60 minutes
CAUTION:
The Seascooter RS2 and RS3 will assume slight negative
buoyancy when using the extended life RS1 Battery,
because this battery is heavier than the standard batteries
included with the RS2 and RS3 Seascooter.
12
TROUBLESHOOTING
Unit does not function
If the Propeller does not start when the trigger(s) is/are pressed, make sure:
1. The Master Switch is ON.
2. The Battery Pod is fully charged. (see page 7, Charging The Battery)
3. The battery compartment is dry.
Blocked Propeller
If the Propeller becomes blocked, it will be necessary to open the Protective Grilles to remove the obstacle.
UNDER NORMAL USE the grilles must not be opened.
NEVER turn the propeller ON when it is blocked; it would cause serious damage to the gear box.
Opening the Grilles to Remove Obstruction
WARNING
Crushing / Cutting Hazard
Before opening the grille for maintenance purposes, make sure the master switch is in off position, and the battery is disconnected.
1.
2.
3.
4.
5.
6.
7.
8.
Take the Seascooter out from the water.
Make sure the Master Switch is in the OFF position.
Disconnect and remove the Battery Pod - see page 8, step 1 - 9.
Unscrew the five Rear Grille screws to remove the rear grille. (see Fig. 33)
While holding the Propeller, use an M6 socket wrench to remove the nut from the Propeller shaft as shown in Fig. 34.
Slide the Propeller off the shaft, taking care not to lose the drive pin or washers.
Remove the blockage from the Propeller or Propeller Shaft.
Replace the drive pin (if removed), see Fig. 35, and Propeller. Turn the Propeller slowly until you locate the pin and push the Propeller fully on.
33
13
Beware of
sharp corners
when servicing
Drive Pin In Position
34
35
9. Replace the washer and nut and tighten with the socket wrench while holding the Propeller; make sure it is securely fastened. (see Fig. 36)
10. Re-install the rear grille.
11. Install the Battery Pod and replace the Nose Cone when ready for use.
Propeller Shaft
Propeller
Drive pin
Washer
Nut
36
Sand or Grit on O-ring Seal
Ensure that sand/grit does not get on the seals as correct maintenance and care is essential. To remove sand or grit from the O-ring Seal, rinse the
O-ring Seals with fresh water and apply fresh lubricant. If there is sand inside the Battery Housing, gently brush the sand from the unit, taking care not
to scratch the sealing surfaces.
If an O-ring Seal is damaged, replace it with a new one and apply fresh lubricant before use.
Flooding Events
Be sure to keep the O-ring Seal sand and grit free to ensure it keeps water out and to close the latches fully after accessing the battery chamber.
However, should the O-ring Seal not be clean or the latches not fully closed and water enters the battery chamber, your Seascooter will not be
damaged as it is designed for protection against accidental flooding.
Water Leakage Sensor (operates when propeller is turning)
Your Seascooter has a built-in water leakage sensor – when the unit experiences accidental flooding, the motor will stop momentarily every 10
seconds. At the same moment, a buzzer will beep every 10 seconds.
If water enters the battery chamber:
1. Remove the Seascooter from the water if safe to do so. Always observe safe diving practices.
2. Remove outer and inner nose cone and tip out any excess water.
3. Remove battery pod.
4. If salt water has entered, rinse battery, battery pod and housing with fresh water.
5. Dry housing and battery pod thoroughly.
If the battery chamber is dry and the water leakage sensor continues to beep, there is a leakage in the motor housing; contact customer service
center/repair center for maintenance.
DO NOT OPERATE A UNIT WITH A SUSPECTED LEAK INTO THE MOTOR CHAMBER.
14
Blocked triggers
If not washed properly, sand, salt or grit build-up could harm the operation trigger mechanism. Please follow below maintenance instruction:
1. Pull out the triggers button and remove the rubber cap located at the bottom of the handle. (See Fig.37)
2. Spray and flush water into the triggers, or the Rubber cap holes to clear any debris. (See Fig.38)
3. Put the Triggers and the Locking Buttons back in position and test if they operate smoothly.
4. MAKE SURE to put the Rubber caps back in position before use.
rubber cap
Trigger button
37
15
38
TECHNICAL SPECIFICATIONS
I SEASCOOTER™ RS 1 I
SD15001
Unit Dimensions
Unit Weight
Battery Type
Battery Life / Fully Charged
Depth rating (Maximum advised depth rating for recreational diving)
□Gears / Speed
I SEASCOOTER™ RS 2 I
SD15002
Unit Dimensions
Unit Weight
Battery Type
Battery Life / Fully Charged
Depth rating (Maximum advised depth rating for recreational diving)
□Gears / Speed
I SEASCOOTER™ RS 3 I
12.6 inches x 11.8 inches x 24 inches (319 x 300 x 610 mm)
21 lb (9.5 kg) (with rechargeable Li-ion battery)
1 x 22 V / 12000 mAh rechargeable Li-ion battery
*Runs up to 90 minutes with normal use (∆Continuous use up to 30 minutes)
40 m / 130 ft
3 speeds / Up to 4.35 mph (7 km/h)
12.6 inches x 11.8 inches x 24 inches (319 x 300 x 610 mm)
19 lb (8.6 kg) (with rechargeable Li-ion battery)
1 x 22 V / 8000 mAh rechargeable Li-ion battery
*Runs up to 75 minutes with normal use (∆Continuous use up to 30 minutes)
40 m / 130 ft
3 speeds / Up to 3.7 mph (6 km/h)
SD15003
Unit Dimensions
Unit Weight
Battery Type
Battery Life / Fully Charged
Depth rating (Maximum advised depth rating for recreational diving)
□Gears / Speed
12.6 inches x 11.8 inches x 24 inches (319 x 300 x 610 mm)
19 lb (8.6 kg) (with rechargeable Li-ion battery)
1 x 22 V / 4000 mAh rechargeable Li-ion battery
*Runs up to 60 minutes with normal use (∆Continuous use up to 30 minutes)
30 m / 100 ft
2 speeds / Up to 3.1 mph (5 km/h)
*Normal Use
The definition of normal use is based on the average general time during which the user activates the Seascooter in the water
∆
Continuous Use
The definition of continuous use is based on a fully charged battery whereby the Seascooter is used continuously in the water without stopping.
□Gears / Speed
May vary depending on diver’s posture, physique, equipment configuration and water conditions.
16
WARRANTY & CUSTOMER SERVICE
Distributors ONLY warrant products with an active Warranty Registration
ALWAYS ACTIVATE YOUR WARRANTY IMMEDIATELY ON
http://www.seadooseascooter.com/warranty.html
Distributors in the United States and Canada provide a standard Limited Warranty for 6 months from the date of purchase for new products. If you're not located
in the United States or Canada, please contact your Local Distributor for warranty arrangements in your territory. Please visit www.seadooseascooter.com for
Distributor / Service Center details. Distributors ONLY warrant the products purchased from an authorized dealer.
Ask your Local Distributor for the warranty period in your region by calling their Service Center. Any part of the product supplied by the Distributor and found in the
reasonable judgment of the Distributor to be defective in material or workmanship will be repaired or replaced by the Distributor without charge for parts or labor.
The product including any defective part must be sent to the Distributor within the warranty period. The customer will pay for the expense of delivering the product
to the Distributor. The Distributor will pay for the expense of returning the product to the customer.
This warranty does not cover any product that has been subject to misuse negligence or accident, or that has been operated in any way contrary to the operating
instructions as specified in the User Manual. Any flood, loss or damage, for any reason, that is caused by accidental release and sinking of the unit, or from
flooding an o-ring sealed or water tight area will not be covered under warranty. This warranty does not apply to any damage to the product that is the result of
improper maintenance or to any product that has been altered or modified so as to change its intended use. This warranty does not extend to repairs made
necessary by normal wear or by the use of parts or accessories which are either incompatible with the product or adversely affects its operation, performance or
durability.
In addition, this warranty does not cover items that experience normal wear and tear.
All implied warranties are limited in the duration to the warranty period. And such implied warranties including merchantability, fitness for a
particular purpose, or otherwise, are disclaimed in their entirety after the expiration of the appropriate warranty period. The distributor’s obligation
under the warranty is strictly and exclusively limited to the repair or replacement of defective parts and return of the product to the customer. The
distributor does not assume or authorize anyone to assume for them any other obligation.
The distributor assumes no responsibility for incidental, consequential or other damages including, but not limited to expense of returning the
product to the distributor, loss of use of product and loss of time or inconvenience.
EXCLUSIONS
BATTERY. This warranty does not include the battery.
CUSTOMER ENQUIRIES
If your unit is not operating, please refer to your User Manual before contacting our Customer Service Center.
For any damage or repair work required, please do not return your product to the store where it was purchased.
17
RETURN / REPAIR POLICY
Customers must call our Customer Service Center and ask for a Return / Repair Authorization Number before sending the product to the Service Center.
Returned products must be shipped with original packaging including the polystyrene packing material and all defective parts. Please contact our Customer
Service Center for assistance in handling your case.
UNITED STATES WEST, MEXICO & PUERTO RICO SEA-DOO® SEASCOOTER™ CUSTOMER SERVICE CENTER
Phone No.: +1-800-361-2781 Email: [email protected]
UNITED STATES EAST SEA-DOO® SEASCOOTER™ CUSTOMER SERVICE CENTER
Phone No.: +1-888-506-3281 Email: [email protected]
CANADA SEA-DOO® SEASCOOTER™ CUSTOMER SERVICE CENTER
Phone No.: +1-888-388-8837 Email: [email protected]
HONG KONG SEA-DOO® SEASCOOTER™ CUSTOMER SERVICE CENTER
Phone No.: +852 3516 2388 Email: [email protected]
EMEA SEA-DOO® SEASCOOTER™ CUSTOMER SERVICE CENTER
Please visit our website www.seadooseascooter.com for a listing of distributor contacts in Europe, Middle East and Africa
(For other territories, please visit www.seadooseascooter.com and contact your Local Distributor)
RETURN / REPAIR PROCEDURE
1. Call the Customer Service Center for your Return / Repair Authorization Number.
2. Make a copy of your Proof of Purchase (receipt).
3. Pack the defective unit in its original packaging including the polystyrene foam and include the unit and all defective parts.
4. Attach the copy of your Proof of Purchase (receipt) to the outside of the box (clearly visible), together with the Return / Repair Authorization Number.
5. Ship the package to the Service Center.
PLEASE NOTE: Deliveries that do not have the Proof of Purchase (receipt) and Return / Repair Authorization Number attached clearly to the outside of
the box, will not be accepted by the Service Center.
FOR ANY QUESTIONS OR QUERIES YOU MAY HAVE REGARDING YOUR SEA-DOO® SEASCOOTER™, PLEASE FOLLOW THE BELOW STEPS FOR
EASY AND FAST RESOLUTION:
- STEP 1Please read your User Manual. For a copy of the User Manuals, please visit www.seadooseascooter.com
- STEP 2Go to www.seadooseascooter.com and see our FAQ section to find instant answers.
- STEP 3Contact one of our Customer Service representatives at the Customer Service Center in your region.
18
For more information on Sea-Doo® Seascooter™ Products
(Warranty, Customer Care / Maintenance, Parts & Battery Purchase)
PLEASE VISIT www.seadooseascooter.com
All corresponding specification appear in this manual are correct at the time of printing.
For the latest updates and further information on the complete range of the RS series Seascooter™,
PLEASE VISIT www.seadooseascooter.com
Designed and manufactured by
Please visit our website at www.seadooseascooter.com to find out your local distributor.
SEA-DOO® and the BRP logo are trademarks of
Bombardier Recreational Products Inc.
or its affiliates, used under licence by Stallion Sport Ltd.
For more information on SEA-DOO® products,
visit www.sea-doo.com
PATENTED and PATENT PENDING
PRINTED IN CHINA
#SDXXXXXXXXX