1
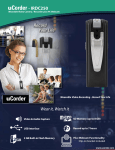
Wearable Video Recording
INTRODUCTION
2) CONTROLS - OVERVIEW
Thanks for purchasing the uCorder from IRES Technology.
Before using the uCorder to record aspects of your life,
please review the instructions in this Guide plus the
additional information found in the online references at
1) Mini LED Flashlight
2) Microphone
3) CMOS camera lens
4) Record/Stop button
5) Mode selector
(Video/Audio)
6) LED indicators
Blue LED (Video)
Green LED (Audio)
Red LED (Power)
7) ON/OFF switch
(plus flashlight)
8) Memory Card slot*
9) USB Connection
User Manual
Model IRDC150 / IRDC250
Version 1.01
1) CONTENTS
The IRDC150 package includes the following:
• uCorder
• Neck Strap
• Clothing Clip
• USB cable
• 1 GB Internal memory
• Quick Start Guide
• Warranty Card
The IRDC250 also features Webcam functionality and
includes:
DO NOT RETURN TO THE STORE
For more information visit:
* Micro SD memory card is optional and not included.
3) BATTERY CHARGING
Before using the uCorder, you must first charge its builtin lithium battery directly from a running computer via
mini USB cable.
Complete charging time takes 3-4 hours.
Follow these steps for Computer Connection:
1) Use the mini USB cable to connect the uCorder to a
computer. Insert the small end of the mini USB cable into
the socket at the bottom of the unit, the large end at the
computer’s USB input.
2) The Red light on the uCorder will flash while the unit
is charging. It will stop flashing and remain ON once the
battery power is fully charged.
Note: it is not possible to record while USB is connected.
4) INSTALLATION
The uCorder does not require any proprietary software
interface. Your operating system will read the Flash / SD
memory just like it would a USB Memory drive.
Depending on your operating system, Driver installation
messages may appear as the new USB Device hardware
is detected.
• 2 GB Internal memory
• PC Webcam mounting bracket
Click “Continue” if prompted.
5) MICRO SD MEMORY (OPTIONAL)
7) PREPARE TO RECORD VIDEO
8) OPERATION - RECORD VIDEO
9) OPERATION - RECORD AUDIO
The IRDC150 uCorder has 1 GB built-in flash memory
and the IRDC250 is equipped with 2 GB. To extend the
memory, you may insert a Micro SD card into the
Memory Card slot.
With a charged uCorder, you’re almost ready to record.
Follow these steps to prepare for Video recording:
You can now attach the uCorder to your clothing and
enjoy hands-free video & audio recording.
Follow these steps:
The uCorder also allows you to record Audio files to WAV
format. To record Audio only, follow these steps:
1) Set the ON/OFF switch to OFF.
2. Set the ON/OFF switch to ON.
1. Set the Video/Audio switch to Video.
2) Insert the Micro SD card as shown.
It will lock in.
3) To remove the card, push it in
gently so that it ejects.
1. Set the Video/Audio switch to Audio.
1) While the system is in Video standby mode (with the
Blue LED appearing ON), press the Record button as
shown below.
2. Set the ON/OFF switch to ON. A Green LED indicates
Audio mode.
2) The Blue LED will flash slowly while Recoding.
3. Press the Record button.
3) Press the Record button again to Stop recording.
4) The Blue LED will flash quickly, indicating that the
video file is being saved to memory. It will then return to
standby mode.
Note: do not remove the card
during playback or while the
power is on.
6) FLASHLIGHT
After switching the Power to ON, the unit is in Standby
mode.
The uCorder is equipped with a bright LED
flashlight. The light found at the top of the
unit can be tilted to point at the object
you wish to record. To activate the light,
switch the ON/OFF selector above ON to the light icon.
The Red LED will appear ON for a couple seconds to
indicate power-up and the Blue LED illuminates to
indicate that Video mode is ready. If the Red LED
continues blinking, the uCorder requires further
charging.
Congratulations, you have successfully recorded an AVI
video file. Remember to turn the uCorder OFF to
conserve battery life.
The Green LED flashes slowly while recording.
Press the Record button again to Stop recording.
The Green LED will then flash quickly, indicating that the
audio file is being saved to memory. When saving is
complete, it will return to standby mode.
Remember to turn the uCorder OFF when finished in
order to conserve battery life.
10) FILE RETRIEVAL
11) PLAY FILES
12) IRDC250 - DUAL USB FUNCTION
13) IRDC250 - WEBCAM FUNCTION
To view / listen to your recordings, you first need to
connect the uCorder to a computer via the USB cable.
Upon opening the memory drive, you will find a main
folder titled “uCorder”.
Sections 11-12 are only applicable if you purchased the
IRDC250 model with Webcam functionality.
When set to PC CAM mode, the Blue LED will illuminate
upon connection to computer.
The Internal Flash memory is recognized by the system
as a Memory Drive, similar to a USB memory stick.
If you have inserted a Micro SD card, it will appear as a
separate Memory Drive. By default, recordings go to the
Micro SD memory first (until the memory is full) before
using the Internal Flash memory.
Double-click on the folder to open it and find two subfolders: AUDIO and VIDEO.
The IRDC250 can be set to serve as either:
1) a USB memory device (USB);
or
2) a Webcam (PC CAM).
The uCorder will be recognized by the operating system
as a Video Device rather than a disk drive. The Webcam
can be integrated into Chat programs including MSN
Messenger and Skype.
To alternate between modes, note
the options on the selector switch.
For some Chat or Conferencing applications, you will first
need to “initialize” the Webcam. Go to My Computer,
and you will find the uCorder appearing as a USB Video
Device listed under “Scanners and Cameras”.
Depending on the settings in your Operating System, you
may see an alert / prompt to open the files in the newly
detected drive (or multiple drives if a Micro SD card is
inserted).
You can go to My Computer in Windows and see the
connected memory drives. They will appear similar to:
The AUDIO folder contains a list of all Audio recordings
in WAV format and the VIDEO folder contains the Video
recordings in AVI format. Files are named numerically.
You can double-click on the files and play them directly
from the uCorder memory. Alternatively, you can copy
them to a folder on your computer and delete the files
from the device memory.
The AVI video files and WAV audio files will open in your
default media player for each file extension. Windows
Media Player and QuickTime are recommended players
for these standard type of files.
Note: “uCorder1GB” or “uCorder2GB” is the name
assigned to the Internal Flash memory. The Micro SD
card name varies by manufacturer, but can be changed.
If you are unable to see video, you need to download the
appropriate video codec pack to support AVI files.
When set to USB mode, the Green LED will illuminate
upon connection to computer to indicate File Retrieval.
The operation in USB mode is described in section #10.
To access the Webcam functionality, the selector switch
must be set to PC CAM before connecting to the
computer.
Note: the system will not accept changes from USB to
PC CAM mode while the uCorder is connected to the
computer. To change modes, you need to disconnect
the cable, set the selector switch as required and then
reconnect.
14) TIPS / GOOD PRACTICES
15) PRIVACY
17) FCC INFORMATION
Following these guidelines will optimize your experience
with the uCorder.
By using the uCorder you acknowledge and agree that you have read
the DISCLAIMER and agree to observe and abide by the provisions
contained therein.
1) Charge the unit completely - the uCorder needs a few
hours to fully charge the same way that a cell phone
does. Please be patient.
DISCLAIMER
This equipment has been tested and found to comply with the limits
for a Class B digital device, pursuant to Part 15 of the FCC Rules. These
limits are designed to provide reasonable protection against harmful
interference in a residential installation. This equipment generates,
uses and can radiate radio frequency energy and if not installed and
used in accordance with the instructions, may cause harmful interference to radio communications. However, there is no guarantee that
interference will not occur in a particular installation. If this equipment does cause harmful interference to radio or television reception, which can be determined by turning the equipment off and on,
the user is encouraged to try to correct the interference by one or
more of the following measures:
2) Safely remove the device - when disconnecting the
uCorder from the computer, be sure to follow the
“Safely Remove Hardware” process used by your
operating system.
3) Bright Light - for best results, the uCorder is intended
for video recording under bright lighting conditions.
4) Remember to turn OFF - once you have made a
recording and do not anticipate further immediate
recordings, it’s best to turn the uCorder OFF and
conserve its battery life.
5) Recharge - once you see the Red light flashing on the
unit, that means it’s time to refuel the battery by simply
connecting to your computer.
You agree to use the uCorder in accordance with all privacy laws in effect in your jurisdiction and to observe all such laws and regulations.
The use of the video, recording and/or audio functions of the uCorder
shall not be used, without limitation, for immoral, criminal, tortious
acts and other civil wrongdoings, harassment and disturbance of
others. At all times you agree to indemnify and save harmless IRES
Technology Corp., its officers, directors, employees, shareholders and
contractors in connection with the use and operation of the uCorder
and/or breach of any of the provisions herein.
16) WARRANTY
IRES Technology warrants all of its products for one year, starting from
the date of purchase. Please refer to the included Warranty card or go
to www.ucorder.com for more details. In no event shall IRES be liable
for incidental, accidental or consequential damages arising from the
use or inability to use its products.
Double-click the USB Video Device icon. The device will
initialize and live video will appear. The webcam is now
ready for integration with virtually any live messaging
software.
Note: for best results, download the latest version of the
chat program being used (eg: Messenger 2009 / Skype 4).
18) SPECIFICATIONS
Image Sensor
Resolution
Video Format
Video File Size
Recording Speed
Max recording distance
Viewing Angle
Built-in Lithium Battery
Battery Life
Charging Time
Interface
SD Card
Internal Memory
SD Capacity
Compatible Systems
Operating Temperature
Dimensions
CMOS
300,000 pixels
AVI 640 x 480
Up to 600 KB/s
Up to 25 fps
Up to 25 feet away (Video & Audio)
60°
3.7 V
Up to 2 hours
Up to 3 hours
Mini USB 1.1
Micro SD card (not included)
1 GB (IRDC150) / 2 GB (IRDC250)
Up to 8 GB
Windows 2000/XP/Vista, Mac, Linux
-15°C ~ 65°C (5~145°F)
1.1” x 0.6” x 3.5”
* Reorient or relocate the receiving antenna.
* Increase the separation between the equipment and receiver.
* Connect the equipment into an outlet on a circuit different from
that to which the receiver is connected.
* Consult the dealer or an experienced radio/TV technician for help
This Class B digital apparatus complies with
Canadian ICES-003.
Copyright © 2009 IRES Technology Corp.
Specifications are Subject to Change. E&OE