1
BreezeMAX Extreme 5000 – Centralized
Provisioning
Technical Note
Software Version: 1.7
March 2011
DN1110
Centralized Provisioning
Legal Rights
Date
Document Name
Document Number
March 7, 2011
BreezeMAX Extreme 5000 – Centralized Provisioning
DN1110
Written By: Adrian Stefan
No. of pages: 35
Title: BreezeMAX Extreme Product Expert
Rev: D
Approved By:
Name:
R&D PM
Ionel Ghita
PLM
Yaniv Benami
Product Experts Team Leader
Johnny Croitoru
Rev.
Date
Name
Notes
A
3 December 2009
Adrian Stefan
B
5 May 2010
Adrian Stefan
Updated for 1.5 content
C
16 September 2010
Daniel Munteanu
Updated for 1.5 content
D
04 March 2011
Daniel Munteanu
Updated for 1.7 content
© Copyright 2011 Alvarion Ltd. All rights reserved.
The material contained herein is proprietary, privileged, and confidential and owned by Alvarion or its
third party licensors. No disclosure thereof shall be made to third parties without the express written
permission of Alvarion Ltd.
Alvarion Ltd. reserves the right to alter the equipment specifications and descriptions in this publication
without prior notice. No part of this publication shall be deemed to be part of any contract or warranty
unless specifically incorporated by reference into such contract or warranty.
Alvarion®, BreezeCOM®, WALKair®, WALKnet®, BreezeNET®, BreezeACCESS®, BreezeMAX®,
®
®
BreezeLITE , 4Motion , and/or other products and/or services referenced here in are either registered
trademarks, trademarks or service marks of Alvarion Ltd.
All other names are or may be the trademarks of their respective owners.
“WiMAX Forum” is a registered trademark of the WiMAX Forum. “WiMAX,” the WiMAX Forum logo,
“WiMAX Forum Certified,” and the WiMAX Forum Certified logo are trademarks of the WiMAX Forum.
Limitation of Liability:
(a) Alvarion shall not be liable to the purchaser or to any third party, for any loss of profits, loss of use,
interruption of business or for any indirect, special, incidental, punitive or consequential damages of any
kind, whether arising under breach of contract, tort (including negligence), strict liability or otherwise and
whether based on this agreement or otherwise, even if advised of the possibility of such damages.
(b) To the extent permitted by applicable law, in no event shall the liability for damages hereunder of
Alvarion or its employees or agents exceed the purchase price paid for the product by purchaser, nor
shall the aggregate liability for damages to all parties regarding any product exceed the purchase price
paid for that product by that party (except in the case of a breach of a party’s confidentiality obligations).
BreezeMAX Extreme 5000 - DN1110
ii
Centralized Provisioning
Contents
Contents
1 Scope ........................................................................................................ 1 2 Site Description........................................................................................ 1 3 Configuring the BTS – via Monitor ......................................................... 2 3.1 Configuring the Management Connection ............................................................. 2 3.2 Configuring the Radio Parameters .......................................................................... 5 3.3 Configuring Services ................................................................................................ 9 3.3.1 Forwarding Rules ............................................................................................... 10 3.3.2 Service Interfaces .............................................................................................. 11 3.3.3 Service Group .................................................................................................... 11 3.3.4 Multiple Service Flows ....................................................................................... 13 3.3.5 Service Profile .................................................................................................... 14 3.3.6 Default Services ................................................................................................. 15 4 Configuring the CPE – via the WEB ..................................................... 16 5 Provisioning the CPE ............................................................................ 20 5.1 Radiator .................................................................................................................... 23 5.2 Freeradius ................................................................................................................ 23 5.3 Aradial ...................................................................................................................... 23 6 Configuring the BTS – via AlvariCRAFT .............................................. 26 BreezeMAX Extreme 5000 - DN1110
iii
Centralized Provisioning
1
Scope
Scope
This document provides general guidelines to the centralized provisioning
scheme of BreezeMAX PRO 5000 CPEs using an AAA RADIUS server, and
BreezeMAX Extreme 5000 BTSs operating under centralized provisioning.
In the example detailed here, a Radiator AAA server is used.
NOTE
"Centralized Provisioning" means that authentication is performed versus an AAA RADIUS
server (central entity) and that the authentication is based on USER NAME and PASSWORD
that are configured on the SU. This is in contrast to "Local Provisioning" under which
authentication is performed on the BTS, and is based on the CPE-MAC address (wireless port
MAC address).
This document should be used as a supplement to the system manual.
Not all the configurable parameters are mentioned in this document.
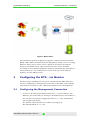
2
Site Description
A basic site configuration is illustrated in Figure 1.
BreezeMAX Extreme 5000 - DN1110
1
Centralized Provisioning
Configuring the BTS – via Monitor
Figure 1: Basic Setup
The minimum required equipment comprises a Base Transceiver Station
(BTS), a PRO 5000 Customer Premises Equipment (CPE), a server running
Radiator radius server and a router capable of serving as the Default
Gateway and DHCP server. The network structure can be modified
according to the available equipment, without restraining the generality of
this document (i.e. the radius server can be used also as the Default
Gateway and the DHCP server).
3
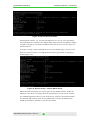
Configuring the BTS – via Monitor
The first step in building the setup is to commission the BTS. This step
involves configuring a management connection to the BTS, radio settings
(the wireless connection to the CPE) and available service management.
3.1
Configuring the Management Connection
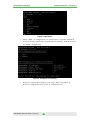
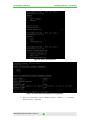
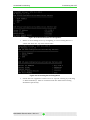
1. Connect a PC with an IP address from the 1.1.1.0/24 subnet to the
Ethernet port of the IDU (or directly to the Ethernet port of the BTS, if
the unit has a DC power supply) and telnet to 1.1.1.23. The Monitor
telnet application opens.
The default admin password is “admin” (see Figure 2).
The default BTS IP is 1.1.1.23.
BreezeMAX Extreme 5000 - DN1110
2
Centralized Provisioning
Configuring the BTS – via Monitor
Figure 2: Main Menu
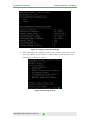
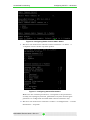
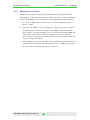
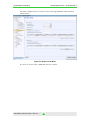
2. Select 1.BTS > 4.Configuration > 3.Connectivity > 2.Update and fill in
all the necessary information (management IP, Subnet, Default Gateway
and VLAN – if applicable).
Figure 3: Configure Connectivity
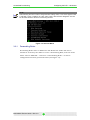
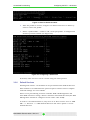
3. Verify the connection settings by selecting 1.Show (see Figure 4).
Incorrect configuration may result in connectivity loss.
BreezeMAX Extreme 5000 - DN1110
3
Centralized Provisioning
Configuring the BTS – via Monitor
Figure 4: Verifying Connection Settings
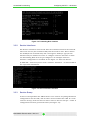
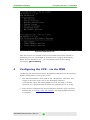
4. After confirming the configured values are accurate, reboot the unit by
selecting 1.BTS > 5.Unit Control > 2.Reset BTS > Confirm Reset and
telnet again using those values.
Figure 5: Rebooting the Unit
BreezeMAX Extreme 5000 - DN1110
4
Centralized Provisioning
3.2
Configuring the BTS – via Monitor
Configuring the Radio Parameters
1. From the main menu select 1.BTS > 4.Configuration. It is not
mandatory to set the parameters in the General Parameters menu.
NOTE
When using AlvariSTAR or AlvariCRAFT, make sure the BTS Number (1.General Parameters
> 2.Update > 1.BTS Number) is different for each unit commissioned.
2. For centralized provisioning, select 1.BTS > 4.Configuration > 2.BTS
Working Mode > 2.Update >1 (1 - Embedded Distributed ASN-GW
Centralized Authentication). In the Monitor application use the TAB key
to see the available options.
Figure 6: Configuring the Working Mode
3. Navigate back to the BTS > Configuration menu. Configuring the
Authorized Managers is not mandatory.
NOTE
If default values are changed, only the NMS stations explicitly added will be able to access the
unit using SNMP.
4. Select 1.BTS > 4.Configuration > 5.Radio > 2.Update menu. It is
mandatory to set the Operator ID and Service Zone ID options with non
default values. The Operation mode menu parameters (options depend
on HW type and applied licenses), Band Name menu parameters and
the DFS menu parameters (if applicable) must be the same as the
parameters set on the CPE unit. The DFS specific parameters (CAC,
Detection threshold etc) are the ones specified by the Regulatory
Authority for the chosen Frequency Band and they cannot be changed.
The only country code that allows creating/modifying DFS related
parameters is “Universal”.
BreezeMAX Extreme 5000 - DN1110
5
Centralized Provisioning
Configuring the BTS – via Monitor
Figure 7: Radio Channel Parameters
5. Navigate back to the main menu and then select 3.Sector > 2.Select >1
(Sector1) 2.Configuration > 1.General Parameters.
6. Select 2.Update and set the mandatory parameters (Sector Heading,
Bandwidth, Frequency and Tx Power), and the optional descriptive
parameters (Sector Name and Sector Location).
When selecting the Tx Power consider local regulation, and the
saturation threshold (-16dBm) of the CPE. Exceeding the saturation
threshold could damage the unit.
NOTE
For ease of installation, remembering the selected frequency value can be helpful in
narrowing the search band when configuring the PRO 5000 unit.
The DFS options should be set according to local regulation and are not
the object of this document.
7. Return to the main menu. The options in the BS menu should be set,
but the process is straightforward and leaving the default values will not
affect the scenario presented in this document.
BreezeMAX Extreme 5000 - DN1110
6
Centralized Provisioning
Configuring the BTS – via Monitor
Figure 8: Sector Configuration
Figure 9: Sector General Parameters Configuration
8. From the main menu select 5.Radio Chanel > 2.Select > 1 > 2.Update >
Admin Status: 1 (Enable).
BreezeMAX Extreme 5000 - DN1110
7
Centralized Provisioning
Configuring the BTS – via Monitor
Figure 10: Configuring Radio Channel Admin Status
9. Return to the main menu and then select 6.Antenna > 2.Select > 1
>2.Update and set all the required options.
Figure 11: Configuring Antenna Parameters
Make sure the antenna parameters, correspond to the parameters
actually used (integral/external, polarization etc).The antenna gain
parameter is configurable for BTSs with external antennas only
10. Return to the main menu and select 7.GPS > 2.Configuration > 1.Chain
Parameters > 2.Update.
BreezeMAX Extreme 5000 - DN1110
8
Centralized Provisioning
Configuring the BTS – via Monitor
Figure 12: Configuring GPS
If the setup is carried out in laboratory conditions (no GPS satellites
available) make sure the GPS type is set to 0 (None) otherwise the radio
channel will not go UP. If satellites are detected, the system needs at
least four of them in order to start and at least two in order for the BTS
to be synchronized.
NOTE
The GPS chain must be different from the default value.
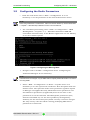
3.3
Configuring Services
The mechanism of selecting flows of data and offer quality of service (QoS)
according to predefined criteria is realized through the “Services”. In order
to offer maximum flexibility and modularity, the services are broken in
several interlaced modules.
To configure “Services” select 2.ASN GW > 2.Services.
Because some modules depend on other modules in order to create a
Service, start from the bottom of the list (6.Forwarding Rule) and work your
way up to the top (2.Service Profile). For example, in order to define a
Service Interface, a Forwarding Rule must be created first.
In order to delete a Service, start from the top down (one cannot delete a
module unless all the dependencies on that module are deleted). A
synthetic list of all the necessary modules to be configured is presented in
Figure 13.
BreezeMAX Extreme 5000 - DN1110
9
Centralized Provisioning
Configuring the BTS – via Monitor
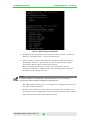
NOTE
After rebooting the unit in order to change the BTS working mode, a new menu appears under
2.ASN GW: 1.AAA. In addition, the “Add” option under 1.MSs Services disappears. This will
be discussed further in Section 5 Provisioning the CPE.
Figure 13: Services Menu
3.3.1
Forwarding Rules
Forwarding Rules refers to Multicast and Broadcast traffic and how it
should be treated by the ASN. To create a Forwarding Rule, from the main
menu select 2.ASN GW > 1.Services >6.Forwarding Rules > 4.Add. A
configuration model is presented below (see Figure 14).
BreezeMAX Extreme 5000 - DN1110
10
Centralized Provisioning
Configuring the BTS – via Monitor
Figure 14: Forwarding Rule Creation
3.3.2
Service Interfaces
The Service Interfaces menu deals with the transition between the network
side of the service (the backbone link) and the wireless side. This is where
the VLAN (for the network side) and Convergence Sublayer type (for the
wireless side) are defined. In order to configure a Service Interface at least
one Forwarding Rule must be preconfigured. An example of Service
Interface configuration is available in the Figure 15. From the Service
(2.ASN GW > 2.Services) menu select 5.Service Interfaces > 4.Add and fill in
the requested information.
Figure 15: Service Interface Creation
3.3.3
Service Group
A Service Group defines the DHCP mode to be used for acquiring IP address
configurations for the CPE, and for other devices behind the CPE. To create
a Service Group, from the Services menu select 4.Service Groups > 4.Add. A
configuration model is presented below (see Figure 16).
BreezeMAX Extreme 5000 - DN1110
11
Centralized Provisioning
Configuring the BTS – via Monitor
Figure 16: Service Group Creation
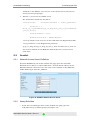
Starting with release 1.5, an internal DHCP server can be used and Relay
functionalities are enabled. The DHCP Relay and Forward capabilities imply
complex settings on network and DHCP side and they are not the object of
this document.
In order to setup an internal DHCP server select DHCP type 5 (server) and
fill in the desired values. A configuration model is presented in the figure
below (Figure 18).
Figure 18: Service Group – Internal DHCP Server
DHCP Pool IP represents the subnet pool for the DHCP Clients, DHCP IP
Address is the Server’s IP (the IP of the subinterface in the served subnet),
the CPE Management Server is the ACS server address, the Default GW is
the Default GW address sent in the DHCP Offer and the VLAN ID is the
VLAN of the Service Interface used for the clients.
BreezeMAX Extreme 5000 - DN1110
12
Centralized Provisioning
3.3.4
Configuring the BTS – via Monitor
Multiple Service Flows
Multiple Service Flows is where the ASN behavior regarding data flows
belonging to certain Service Groups is defined. In order to create a Multiple
Service Flow (MSF) at least one Service Group should be already defined.
1. To create an MSF, from the Services menu select 3.Multiple Service
Flows > 4.Add.
2. After the new MSF is created, navigate to 2.Select from list or 3.Select
by name option to select the newly created MSF. The Service Rules
menu allows a new Service Rule to be created for the selected MSF. The
rules apply to the Service Interface defined in the menu. After the
Service Rule is created, a Classifiers menu becomes available under the
newly created Service Rule.
The Classifiers are used to classify the Downlink and Uplink streams of
each defined service flow. The next figures show a configuration model
for each of the previously discussed parameters.
BreezeMAX Extreme 5000 - DN1110
13
Centralized Provisioning
Configuring the BTS – via Monitor
Figure 17: MSF Creation
Figure 20: Service Rule Creation
Figure 18: Classifiers Creation
3.3.5
Service Profile
The Service Profile Menu (2.Service Profiles > 4.Add from the services menu)
enables QoS treatment for defined service flows. The current software
version supports six types of service profiles (1 - Data, 2 - VoIP, 3 Management, 4 - PPPoE, 6 – Reliable Video, 7 – Optimized Video).
1. In order to create a QoS profile a Service Profile must be first created.
BreezeMAX Extreme 5000 - DN1110
14
Centralized Provisioning
Configuring the BTS – via Monitor
Figure 19: Service Profile Creation
2. After the profile is created, navigate to 2.Select from list or 3.Select by
name to select the profile.
3. Select 4.QoS Profiles > 4.Add to add a new QoS profile. A configuration
model is presented below (see Figure 20).
Figure 20: Configuring a QoS Profile
If needed, other services can be created using the same pattern.
3.3.6
Default Services
Starting with release 1.5 the BTS can be provisioned with Default Services.
This method is recommended for quick setups for trials or where complex
network settings are not available.
There is one provisioning scenario available: ETH CS Management and
Data.ETH CS Data is using a Service Interface with VLAN ID 1234 (the BTS
Management should be configured on the same 1234 VLAN).
In order to use Default Services, they have to be first created. Go to 2. ASN
GW -> 1. Services -> 7. MSs Default Services and select option 2. Create
Default Services.
BreezeMAX Extreme 5000 - DN1110
15
Centralized Provisioning
Configuring the CPE – via the WEB
Figure 24: Default Services
After the services are created (a list of successful transactions should be
displayed), you can check them by browsing each category (Forwarding
Rules, Service Interfaces etc) – you can identify them by the naming
convention: [[ServiceName]].
4
Configuring the CPE – via the WEB
Configuring the Customer Premises Equipment (CPE) from the web browser
implies having direct access to the device.
1. The default IP address of the CPE is 192.168.254.251. Therefore, first
assign an IP of the same class to the managing computer
(192.168.254.250 is the default TFTP server for the CPE, so if other
operation are considered this would be the preferred choice of an IP).
2. After the IP is configured on the management machine, open a browser
window and go to http://192.168.254.251. The default login password
is “installer”.
BreezeMAX Extreme 5000 - DN1110
16
Centralized Provisioning
Configuring the CPE – via the WEB
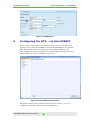
Figure 21: CPE Default Screen
3. From the main menu select Radio > Frequency Scanning and select an
appropriate start and end frequency for the scanning and also the
scanning main step and bandwidth.
Figure 22: Configuring Scanning Parameters
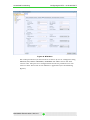
4. Click Apply and make sure that the scanning table list is updated. If the
range is correctly chosen, after few minutes the Best BS scanning table
should also be populated (see Figure 23).
BreezeMAX Extreme 5000 - DN1110
17
Centralized Provisioning
Configuring the CPE – via the WEB
Figure 23: Scanning Table
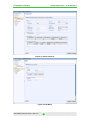
The same information is also available in the BST/AU menu.
Figure 24: BST/AU Menu
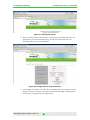
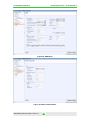
5. In the Registration menu, select Registration submenu. Fill in the user
name and password (also retype the password) and check the “EAP
TTLS” radio button. Reset the unit whenever requested to.
BreezeMAX Extreme 5000 - DN1110
18
Centralized Provisioning
Configuring the CPE – via the WEB
Figure 25: Registration Menu
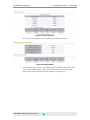
6. Click “Show all”.
Figure 26: Identifying the CPE MAC
NOTE
The printed MAC Address (as shown in Figure 26) is the MAC used for the Ethernet link of the
CPE. The MAC address used on air (the one seen by the BTS) is hexadecimal incremented
by 1 (in the above example the air MAC would be 00:10:E7:41:43:90).
BreezeMAX Extreme 5000 - DN1110
19
Centralized Provisioning
5
Provisioning the CPE
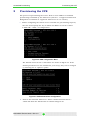
Provisioning the CPE
The process of provisioning the service flows to each CPE for centralized
provisioning is handled by the AAA server (release 1.7 supports Aradial and
Bridgewater in addition to supported AAA servers in 1.5 release).
1. Before configuring the radius server to handle the provisioning requests,
the user must specify the way in which the BTS is to reach it. Select
2.ASN GW > 1AAA > 2.Configuration.
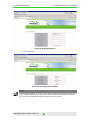
Figure 30: AAA configuration Menu
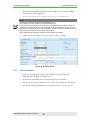
The default values for the 1.AAA Client are shown in Figure 27. If the
default parameters are not suitable for your setup, they can be changed
by selecting the "2. Update” option.
Figure 27: Default AAA Client Configuration
2. Point to the intended AAA server. Select 2.Authentication Server >
3.Add and fill in the information as shown in Figure 28.
BreezeMAX Extreme 5000 - DN1110
20
Centralized Provisioning
Provisioning the CPE
Figure 28: Authentication Server Designation
3. Select an accounting server by navigating to 3.Accounting Servers >
3.Add and fill in the required information.
Figure 29: Accounting Server Designation
4. Check that the appointed radius server is up and running by selecting
“1.Show Summary”. This is correlated with the AAA Client setting
mentioned previously.
BreezeMAX Extreme 5000 - DN1110
21
Centralized Provisioning
Provisioning the CPE
Figure 30: Authentication Server Status
5. Upon successfully adding all the required services (see sections 5.1,5.20
for basic guidelines for configuring AAA server), check that the CPE is
up and running, by selecting 8.MS > 1.Show Summary from the BTS
main menu.
Figure 31: CPE Status Checking
BreezeMAX Extreme 5000 - DN1110
22
Centralized Provisioning
5.1
Provisioning the CPE
Radiator
1. Edit the file /opt/Radiator/config/include/Clients.inc
The declaration format for the file is:
<Client <BTS_IP>>
Secret <secret>
DupInterval 0
NasType unknown
</Client>
<BTS_IP> is the BTS IP, and <secret> is the chosen secret (the one set
in the previous paragraph).
2. Edit the file/opt/Radiator/etc/wimax_users
The Declaration format for this file is:
<user>@<realm>
Password=<user_password>
Reply-Message="<custom reply message>",
Session-Timeout=2000,
FilterId="SP=sp_ip_cs_mng:MSF=msf_ip_cs_mng;SP=sp_eth_cs_data:MSF
=msf_eth_cs_data;"
<user>@<realm> is the user set on the CPE under the Registration TAB.
<user_password> is the Registration password
sp_ip_cs_mng, msf_ip_cs_mng, sp_eth_cs_data and msf_eth_cs_data are
the services defined for the BTS.
5.2
Freeradius
Access the Radiator server and edit the significant configuration files.
1. Edit the file /usr/local/etc/raddb/Clients.conf
The declaration format for the file is:
client <BTS_IP> {
secret = <secret>
shortname = justaname
}
BreezeMAX Extreme 5000 - DN1110
23
Centralized Provisioning
Provisioning the CPE
<BTS_IP> is the BTS IP, and <secret> is the chosen secret (the one set
in the previous paragraph).
2. Edit the //usr/local/etc/raddb/ users
The Declaration format for this file is:
<user>@<realm>
Cleartext-Password := "<user_password>"
Filter-ID = "
SP=sp_ip_cs_mng:MSF=msf_ip_cs_mng;SP=sp_eth_cs_data:MSF=msf
_eth_cs_data;",
Session-Timeout = 1200,
Termination-Action = RADIUS-Request
<user>@<realm> is the user set on the CPE under the Registration TAB.
<user_password> is the Registration password
sp_ip_cs_mng, msf_ip_cs_mng, sp_eth_cs_data and msf_eth_cs_data are
the services defined for the BTS (the Default Services created can be
used also).
5.3
Aradial
5.3.1
Network Access Server Definition
From the NAS&Proxy tab of the Aradial web page open the Add/Edit
Network Access Server to add a NAS client. Include the IP address of the
Extreme BS and a shared secret code that is also defined on the BTS side.
Define Model type: Alvarion_4Motion.
Figure 32: Add/Edit Network Access Server
5.3.2
Group Definition
1. From the User Manager menu of the Aradial web page open the
Add/Edit Group to define groups (see Figure 33).
BreezeMAX Extreme 5000 - DN1110
24
Centralized Provisioning
Provisioning the CPE
2. In the Extended Radius Attributes field configure all the SP and MSF
pairs as follows (see Figure 33):
FID=SP=sp1:MSF=msf1;SP=sp2:MSF=msf2;SP=sp3:MSF=msf3;
NOTE
The filter ID for the Extreme BTS has the following format
SP=sp1:MSF=msf1;SP=sp2:MSF=msf2;SP=sp3:MSF=msf3;.
The Aradial AAA server does not allow this string to be updated into the Filter ID field in the
Add/Edit Group window due to the maximum length of this filed. Therefore, in order to have a
filter ID that is compliant with the Extreme ASN-GW, configure all the SP and MSF pairs in the
Extended Radius Attributes as described in Step 2 above.
This is interpreted as a filter ID and will be sent to the BS as it is defined.
3. Define the Service Type from the group you create as PPP.
Figure 33: Add/Edit Group
5.3.3
Users Definition
1. From the User Manager menu of the Aradial web page open the
Add/Edit User window (see Figure 34).
2. In the Association field select the defined group to associate.
3. Set the Service Type to None in order to use the settings for the filter ID
and Session Timeout defined for each group (refer to section 5.3.2).
BreezeMAX Extreme 5000 - DN1110
25
Centralized Provisioning
Configuring the BTS – via AlvariCRAFT
Figure 34: Add/Edit User
6
Configuring the BTS – via AlvariCRAFT
All the above configurations can also be carried out via a Graphic User
Interface (GUI) using AlvariCRAFT. Launch AlvariCRAFT for the selected
BTS. (For information on installing and using AlvariCRAFT see the
AlvariCRAFT user manual). Make sure that the BTS is manageable from
AlvariCRAFT. The state of the BST must be Up.
Figure 35: AlvariCRAFT Default Screen
The general connectivity options (as discussed in section 3.1) can be
configured using the various tabs of the BTS menu.
BreezeMAX Extreme 5000 - DN1110
26
Centralized Provisioning
Configuring the BTS – via AlvariCRAFT
Figure 36: BTS Menu
The radio parameters (as discussed in section 3.2) can be configured using
SECTOR, BS, RADIO CHANNEL, ANTENNA and GPS screens and their
various tabs. The process is straight forward and the parameters are the
same as those discussed for the “Monitor” application (see the following
figures).
BreezeMAX Extreme 5000 - DN1110
27
Centralized Provisioning
Configuring the BTS – via AlvariCRAFT
Figure 37: Sector ID menu
Figure 38: BS Menu
BreezeMAX Extreme 5000 - DN1110
28
Centralized Provisioning
Configuring the BTS – via AlvariCRAFT
Figure 40: GPS Menu
Figure 39: Radio Channel Menu
BreezeMAX Extreme 5000 - DN1110
29
Centralized Provisioning
Configuring the BTS – via AlvariCRAFT
The AAA configuration is carried out by selecting ASN GW >AAA >Radius
Client menu.
Figure 40: Radius Client Menu
To create a service select ASN GW >Services menu.
BreezeMAX Extreme 5000 - DN1110
30
Centralized Provisioning
Configuring the BTS – via AlvariCRAFT
Figure 41: MSF Menu
Figure 42: SP Menu
BreezeMAX Extreme 5000 - DN1110
31
Centralized Provisioning
Configuring the BTS – via AlvariCRAFT
The rules described in section 3.3 still apply for creating the services.
Modules should be configured bottom up: from Forwarding Rules to Service
Profiles, and deleted top down. After creating objects under each menu,
double click on them to expand, if needed.
BreezeMAX Extreme 5000 - DN1110
32