1
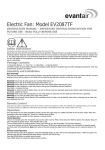
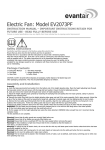
Electric Fan: Model EV2068PF
INSTRUCTION MANUAL – IMPORTANT INSTRUCTIONS RETAIN FOR
FUTURE USE - READ FULLY BEFORE USE
Pictures or product specifications may vary slightly from those indicated due to ongoing product improvement.
________________________________________________
Safety Instructions
Carefully read this manual in full before using this electric fan.
Ensure that you know how the fan functions and how to operate it.
Maintain the fan in accordance with the instructions to ensure that it functions properly.
Keep this manual with the fan. If the fan is to be used by a third party, this instruction manual must be supplied with it. The safety
instructions do not by themselves eliminate any danger completely and proper accident prevention measures must always be used. No
liability can be accepted for any damage caused by non -compliance with these instructions or any other improper use or mishandling.
Package Contents
1 x Instruction Manual - 1 x Pedestal Fan - 1 x Remote Control - 1 x Safety Guard - 1 x Fan Blade - 1 x Height Adjusting Tube
1 x Set Base Plates – 1 Base Cover
CAUTION. Confirm all parts before disposing of packaging. Safely dispose of all plastic bags and other packaging components. They may
be potentially dangerous to children.
Assembly and Installation
Base Assembly
Place the two base legs in a ‘cross’ position on the floor. Unscrew the four securing screws from the base assemblies.
Place the height adjusting tube (large end with flange) onto the base assembly and fix using the four screws from the base plates.
Undo the height adjusting clamp and remove. Place the base assembly cover over the height adjusting tube and lower into position to
cover the base assembly join.
Extend the height adjusting tube and tighten by replacing the height adjusting clamp and tightening to secure the tube.
Fan Assembly
Place fan motor assembly onto height adjusting tube and secure with the locking knob.
Remove the rear guard-fixing locknut and the fan blade-fixing locknut from the motor assembly and spindle.
Fit the rear safety guard to the fan motor assembly and secure with the guard-fixing locknut.
Place the fan blade over the motor spindle and secure with the fan blade-fixing locknut. Do not over tighten.
Attach the front safety guard to the rear safety guard taking care to align the fixing boltholes carefully. Clamp the side securing clips to
secure the two sides of the guards. Fit the fixing bolt to secure the two guards together. The fan is now ready for use.
Warning! Ensure that all safety guards are correctly fitted before use.
Warning! Ensure that all fan blades are securely fitted before use.
Warning! Ensure that the fan is switched OFF from the mains supply before removing the guard.
Warning! For fans installed at a high level. Ensure that the fan is installed so that the blades are more than 2.1m above the floor.
Warning! To reduce the risk of electric shock, do not use this fan with any solid state speed control device unless that device has been
specifically supplied for this fan.
Warning! Avoid contact with moving parts. Do not insert objects or body parts into the safety grill when the fan is operating.
Warning! Do not cover the safety grill or place near curtains.
Warning! This fan should not be placed in the immediate vicinity of water, such as bathtub, wash bowls, swimming pool or other area
were splashing may occur.
Remote Control
Open the rear battery compartment door of the remote control and install two “AAA” size batteries (not supplied) taking care to install
as directed. Always use batteries of the same type and make. Used batteries may leak remove when not in use.
Operation.
Once the electric fan has been assembled correctly connect the supply plug to a suitable 230-240V AC 50 Hz power outlet. When first
connected to the mains supply the “Power On” indicator lamp will glow.
The appliance can be operated by ether Remote or manual control.
Manual Operation
To turn on manually press the “On/Off pad once. To adjust the speed of the fan press “Speed” button for LOW, MED or HIGH fan speed.
The indicator lamp will glow indicating the speed chosen. Press the OFF pad to stop.
To turn swing function on simply press the “Oscillating” pad when fan is in the ON position. Fan will start oscillating.
Timer Delay Function
To use timer function set fan to ON as normal and then press TIMER pad to desired time setting. Fan will operate for selected period
and then switch off automatically. Note. Each press of the pad increases the delay time by 30 minutes, up to a maximum period of 4
HRS.
Mode Function (Nature or Sleep)
This fan is fitted with a function that controls the fan action. In both NATURE and SLEEP function the fan will operate to a pre-set
program to simulate the changing effect of a natural breeze. To set mode control select power on fan speed and oscillation as normal.
Press MODE pad to select either NATURE or SLEEP function.
Nature Mode
In this mode the fan will operate for short periods cycling between ON and OFF to simulate the changing effect of a natural breeze.
Sleep Mode
Note. In this mode you need to set the TIME DELAY combined with the SLEEP Function. In Sleep mode the fan will operate as for
Nature mode above but the fan speed will diminish over a period. In Sleep mode the fan will operate for 30 minutes in whichever speed
setting is selected as in Nature mode above, before automatically changing to the next lowest speed where it will operate for a further
30 minutes until the program reaches LOW setting, where it will operate until it is switched OFF or the delay time is reached.
To set for example the fan to operate from High to Low and then to automatically switch off after 30 minutes follow the following steps.
Example: Press On pad to start. Set fan speed to High. Set delay time to 30 minutes. Set Mode function to SLEEP.
Fan will operate for 30 minutes in HIGH speed then switch to MED speed for 30 minutes then LOW speed for 30 minutes and switch Off
automatically after the delay time of 30 minutes.
Remote Control Operation
The remote control has all the same functions as the manual keypad. To operate simply point the remote control at the appliance. Press
the desired button as described in the above process. To switch fan OFF press the ON/OFF button.
IMPORTANT SAFETY INFORMATION
When using electric appliances always observe safety regulations where applicable to reduce the risk of fire, electric shock and personal
injury including the following.
Always check that the power supply corresponds to the voltage on the rating plate.
Supply
This electric appliance must be connected to a suitable 230-240 V ~ 50Hz power supply. If using an extension cord, ensure that the
extension cord is of a suitable 10-amp power rating. Fully unwind the supply cord when in use as a coiled cord may overheat. Do not
abuse or damage the power cord. If the supply cord is damaged, it must be replaced by the manufacturer or its service agent or a
similarly qualified person in order to avoid a hazard. Warning! Always unplug from the mains supply when not in use.
Children
Caution. Keep out of reach of children. This appliance is not intended for use by young children or infirm persons. Young children must
be supervised by a responsible person to ensure that they can operate the appliance safely. Young children should be supervised to
ensure that they do not play with the appliance
Use and environment
Do not use outdoors. Do not leave in direct sunlight as this may damage the plastic. This appliance is for household use only, not
commercial or industrial use. The power socket must be readily accessible so that the appliance can be unplugged in an emergency.
Damaged or dropped
Always inspect your fan before use. Do not use this fan if it has been damaged, dropped, left outdoors or dropped in water. Return it to
an authorised service dealer for examination and repair.
Water
Do not immerse in water or other liquids or use near washbasins or sinks or wet environments. Ensure that the fan does not get wet
(water splashes etc.) and do not use it with wet hands.
Danger to children
Safely dispose of plastic bags and other components of the packaging. They may be potentially dangerous to children.
CLEANING
Before cleaning.
When not in use or before cleaning, always disconnect the fan from the mains supply.
Warning! Ensure that the fan is switched OFF from the mains supply before removing any guard.
Carefully wipe the outer surface with a damp cloth, dry with a dry towel. Do not use harsh abrasives, solvents, chemical cleaners, petrol
or similar to clean this appliance as these may damage the plastics. Always replace any guard before use.
Store in a safe place
When not in use store your appliance and instruction manual in a safe and dry place.
Pictures or product specifications may vary slightly from those indicated due to ongoing product improvement.
Warranty
This product is for household use only. This product is guaranteed against faulty materials and workmanship for a period of 24 months
from the date of purchase. The obligation to the purchaser under this warranty is limited to servicing the unit and replacing defective
parts when the product is returned freight prepaid to the retailer. This warranty becomes void if the product has been tampered with,
damaged by accident, damaged in any other way by improper use or has been purchased second hand. All production orders have
quality inspections. In the unlikely event of a deficiency, please contact the retailer from whom this product was purchased.
Model No.: ________ Purchase date:____________________ Product Purchased From:__________________________________
IMPORTANT!
Please retain this warranty card along with your purchase receipt. Please do not post to the retailer or importer. If
service is required, both of these documents are to be returned with the appliance to your retailer, otherwise a fee may be charged.