1
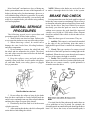
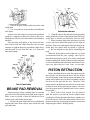
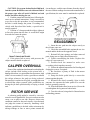
HOW - TO SERVICING DISC BRAKES Tool And Material Checklist Brake Pad Kit Jack and Jack Stands Large Screwdriver Socket and Wrench Assorted Wrenches Drift Brake Cleaner C-Clamp Micrometer Service Manual Hammer Needle-Nose Pliers Wheel Chocks Safety Glasses or Goggles * This How-To Guide is designed as a general overview of a vehicle repair procedure. You should always refer to a service manual designed for your vehicle for detailed instructions. incorrect procedure. Parts Plus assumes no liability for an Most “backyard” mechanics are leery of doing any NOTE: Whenever the brakes are serviced, be sure brake system maintenance because of the importance of to make a thorough check for leaks in the system. brakes to driving safety. Such maintenance, however, is well within the range of the do-it-yourselfer. If you study a service manual and work carefully, you can easily and It is important that worn disc brake pads be replaced safely do a complete brake job at home using ordinary before they cause extensive rotor damage. There are ways tools and equipment. to determine when the pads need replacing. Some make it easy for the driver: they have built-in wear sensors that notify you when the pads are worn. In vehicles without wear sensors, the pads should be inspected visually every 10,000 to 12,000 miles. (More frequent The following general service procedures and checks are needed if the vehicle is driven under severe precautions apply to all disc brake systems: conditions.) 1. Work on only one wheel at a time. Failure to do There are three types of wear sensors. They are: so can cause the pistons to come out of the other caliper. 1. Audible: This sensor is a soft metal tab attached 2. When removing a wheel, be careful not to to the edge of the pad backing plate that emits a damage the rotor, brake lines, bleeding hardware, high-pitched squeal when it contacts the rotating rotor and other components. face. 3. Do not attempt to remove the wheel hub with 2. Visual: This type consists of a sensor recessed the wheel and tire mounted to the vehicle. The wheel, in the back of the brake pad and a warning light on the tire, and caliper must be removed before the hub and dashboard. When the rotor wears through and contacts rotor can be removed. the face of the sensor, the light is activated. 4. Keep the caliper, rotor, and pad and plate 3. Tactile: This is actually two sensors; one on the assembly clean at all times. Avoid contact with grease, rotor face and one on the lower portion of the brake pad. oil, and other fluids; wear safety glasses or goggles When the two sensors contact, a pedal pulsation is for eye protection. created to warn the driver. BRAKE PAD CHECK GENERAL SERVICE PROCEDURES 5. Do not allow the caliper to hang by the brake hose; the hose could split as a result. Instead, hook one end of a wire coat hanger into one of the caliper boltholes and hang the caliper on a part of the chassis. If a visual check of the pads must be made, there are 6. Periodically check the fluid level in the master a few guidelines to keep in mind. For example, the cylinder reservoirs. friction material on nonmetallic pads should protrude at 7. After repairing disc brakes, check for a firm pedal least 1/16" above the rivets; on semi-metallic pads, it action before road testing the vehicle. should be at least 1/32" above the rivets. On pads that are bonded to the backing plate, the amount of friction material should equal the thickness of the backing plate. If the pads fail meet these specifications, replace them, keeping in mind that disc brake pads should always be replaced in axle sets. To make a complete brake pad inspection, following these steps: 1. Engage the parking brake and position wheel chocks behind the wheels to prevent the car from rolling. 2. Use a large screwdriver (or the pointed end of the jack handles) to remove the wheel covers from the front wheels. 3. Use the wrench end of the jack handle or socket wrench to loosen the lug nuts on both front wheels approximately one turn. 4. Jack up the front of the car until the wheels are off the ground. Position jack stands under the car. 5. Remove the lug nuts, then the wheel and tire assembly. 6. Inspect both sides of the rotor for signs of excessive wear, cracks, scoring, corrosion, discoloration, or unevenness. If any of these conditions are detected, consult a qualified mechanic. 7. Find the inspection hole on the caliper. This hole allows you to view one or both linings and judge the extent of wear without removing the caliper—provided the pads are bonded to the backing plates. If the pads are riveted, it is not possible to accurately judge the extent of wear using the inspection hole. 8. If necessary, remove the caliper and pads to inspect the pads. NOTE: Follow the service manual instructions. On some vehicles, the pads can be removed without removing the caliper; it is a simple matter of removing a bolt and swiveling the head of the caliper out of the way. CALIPER REMOVAL Keep in mind that these are general instructions. For specific directions on caliper removal, consult the service manual. If the caliper is secured to its supports with bolts follow these steps: 1. Push the piston back into the bore (see “Piston Retraction”). 2. Determine if the bolts are fastened on the outboard end of the caliper (the side resting on the outside surface of the rotor) with retaining clips. 3. If so, pull the clips off and remove the bolts. 4. Calipers retained by clips can usually be tapped out with a hammer and drift. Those secured with Hex or Allen head screws must be removed with the appropriate wrench. Calipers without bolts are usually secured at the top and bottom by slide plates. Remove them as follows: 1. Locate the spring pins holding the slide plates. There are normally two pins on each plate. 2. Pull out the pins, using needle-nose pliers, and retain them. 3. Use a screwdriver to tap out the top and bottom slide plates. In some cases, the caliper is secured on its machined guides by a support key and screw. Remove the screw, and then drive the key out of the anchor with a hammer and drift. Once the bolts, slide plates, or key and screw have been removed, lift the caliper from the rotor. In some instances, it might be necessary to push the caliper down, and then pull it away from the rotor so it clears the anti-rattle springs. 2. Clean the caliper, disc and entire brake assembly with a good brake cleaner. If petroleum-based fluids get on the disc or friction pad, the brake will not work. 3. While cleaning, inspect the dust boot for cracks or cuts, and check around the piston bore for signs of moisture. If the boot is damaged or fluid is leaking at the piston base, the caliper must be rebuilt or replaced. 4. Be sure all parts are dry before reinstalling the pads. When the brake pads must be replaced, it is often recommended that the pins, springs, and clips be discarded and replaced as well. You can buy a brake pad kit that contains pads and all of the necessary hardware, as well as installation and lubrication instructions. Never reuse any parts that are worn, bent, or corroded. PISTON RETRACTION BRAKE PAD REMOVAL Support springs, shims, retaining clips, or retaining pins may be used to hold the brake pads in the calipers. Make a note or sketch of how this hardware fits in relation to the pads before removing it. 1. Remove the pads. If the brake uses two differently shaped pads in the same caliper, note which side each pad came from. Before installing the new pads, the pistons must be forced all the way back into the bores. All disc brakes are self-adjusting; as the friction pad wears thinner, the piston comes farther out of its bore to maintain a proper seat between the pad and the disc. Therefore, each piston must be pushed back into its bore to create room to slide the new, thicker pad into the caliper. (On some cars, the pistons must be pushed back even to remove the old pads.) 1. Some brake fluid should first be drained from the system to prevent the master cylinder from overflowing. Fluid is drained at the master cylinder or at the bleeder screw. Follow the instructions in the service manual carefully to avoid getting air into the system and hampering the vehicle’s braking ability. CAUTION: Never pour drained brake fluid back circumference, each the same distance from the edge of into the system. Refill the reservoir with new fluid of the rotor. If these readings do not meet the manufacturer’s the proper type after all work is finished on both specifications, the rotor must be machined or replaced. brakes but before driving the car. 2. Push the piston back into the bore, following the exact service manual instructions. Using a screwdriver or pry bar to do this procedure is not recommended, because it could damage the piston. If working on a vehicle with four-wheel disc brakes, a special tool is usually required. 3. Position a C-clamp around the caliper; tighten it to force the piston into the bore. A wood block might be needed to retract the piston. REASSEMBLY 4. If the piston fails to move with pressure, the caliper must be rebuilt or replaced. CALIPER OVERHAUL Some of the conditions that demand overhauling the caliper include fluid leaking at the piston bore, a damaged dust boot, or a piston that does not retract. And while it is not essential, it is also a good idea to rebuild the caliper whenever the pads are being replaced. Because this is a rather involved job, you might not want to rebuild the caliper yourself; other possibilities are having the job done professionally or buying a rebuilt unit. ROTOR SERVICE A pulsating pedal might be caused by excessive runout or out-of-parallelism. Excessive runout can also cause a car to pull to one side. However, these rotor conditions cannot be detected visually. A professional can judge the extent of runout by mounting a dial indicator; parallelism is checked with a micrometer by taking readings at four or more points around the 1. Insert the new pads into the caliper exactly as the old ones came out. 2. Check the assembled brake against the set-vice manual and the brake on the opposite wheel. 3. Reinstall all pins, springs, and other removed parts, being sure to replace those that need it. 4. Finish reassembling the brake. Replace the caliper if it was removed. 5. Double-check the manual to make sure everything is back together correctly. 6. Follow the manual instructions for bleeding and closing the system, if required. 7. Be sure there is plenty of fluid in the master cylinder reservoir. 8. Pump the brake pedal slowly to reseat the pistons against the pads. 9. Reinstall the wheel assembly. Spin it while someone else operates the brake pedal to be sure the brake is operating correctly. 10. When both brakes have been serviced, lower the car and tighten the lug nuts on both wheels. 11. Test-drive the car, being alert for Unusual noises and braking patterns.