1
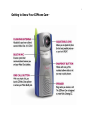
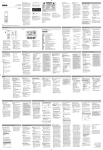
EZPhone Cam USB
User Manual
Copyright © 2000 Ezonics Corp. All rights reserved.
FCC STA TE MEN T
This equipment has been tested and found to comply with the limits for a Class B digital device, pursuant to Part 15 of the FCC Rules.
These limits are designed to provide reasonable protection against harmful interference in a residential installation. This equipment
generates, uses and can radiate radio frequency energy. If not installed and used in accordance with the instructions, it may cause
harmful interference to radio communications. However, there is no guarantee that interference will not occur in a particular installation.
If this equipment does cause harmful interference to radio or television reception, which can be determined by turning the equipment on
and off, the user is encouraged to try to correct the interference by doing one or more of the following:
•
•
•
•
Reorient or relocate the receiving antenna.
Increase the distance between the equipment and the receiver.
Connect the equipment to a different power outlet other than the one where the receiver is connected.
Consult a certified television or radio technician.
CA U TION
T o compl y wit h the limi ts f or a Class B di gital devi ce, p ursuan t t o Part 15 of t he FCC Rules, this devi ce mus t o nly be i nstalled on comp uter
equipme nt certifie d t o com ply with t he Class B limi ts.
W A RRA N TY
In no event will Ezonics Corporation be liable for direct, special, incidental or consequential damages arising out of the use or inability to
use this product or documentation even if advised of the possibility of such damages. In particular, Ezonics Corporation shall not have
liability for any hardware, software or data stored or used with the product including any costs of repairing, replacing or recovering such
hardware, software or data. Product names mentioned in this user guide are trademarks of their respective companies.
The limited warranty period should appear on your warranty card. If not, contact your retailer for information about the limited warranty.
The warranty does not apply nor is exclusive to:
• The damages or problems resulting from misuse, abuse, accident, alteration or incorrect electrical current or voltage.
• Any product without serial number or shipped without its warranty card.
• Any costs for shipping and handling the product to Ezonics Corporation for warranty purposes.
• Normal wear and tear.
• Use of the product outside the borders of the country intended for use.
All specifications are subject to change without notice.
EZONICS END-USER SOFTWARE LICENSE AGREEMENT
This is a contract. By installing the Ezonics EZPhone Cam bundled software, you accept the terms and conditions of this license agreement.
1. Property Rights: This software program(s) (the "Ezonics bundled software") and the accompanying written materials are copyrighted and are
proprietary products of Ezonics Corporation. United States Copyright Law and International Treaty Provisions also protect the software. Trademarks
shall be used in accordance with accepted trademark practice, including identification of trademark owner's name. Trademarks can only be used to
identify printed output produced by the software. Such use of any trademark does not give you any rights of ownership in that trademark. Except
as stated above, this Agreement does not grant you any intellectual property rights in the software program(s).
2. Use of the Software: You may (1) use the software program(s) on any single computer, provided that the software program(s) is in use on
only one computer at a time. The software is "in use" on a computer when it is loaded into the temporary memory (i.e., RAM) or installed into the
permanent memory (i.e., hard disk) of that computer; (2) make a single copy of the software program(s) for backup or archival purposes; and (3)
permanently transfer all your rights to use the software program(s) to another person or legal entity provided that you transfer this Agreement, the
software, and all accompanying written materials, provided that you retain no copies of the software program(s) or written materials and that the
other party agrees to the terms of this License Agreement. You may not (1) make, or have made, any form of copy, whether digital, printed
photographic or otherwise, of the software program(s), except insofar as such software program(s) may be incorporated by you into on-screen or
printed material; (2) place, or have placed the software program(s) on an electronic bulletin board or other form of on-line service; (3) use, or have
used, the software program(s) in any form of pornography, or in any matter which is in any way defamatory of any person or business entity in any
such image, or which implies any form of endorsement by the software program(s), its suppliers, its licensors, or any individual or entity depicted in
the software program(s); (4) reverse engineer, decompile or disassemble or otherwise attempt to discover the source code of the software
program(s); (5) modify, adapt, translate, rent, lease, loan or create derivative works from the software program(s); or (6) export the software
program(s) in any form without the appropriate United States and foreign government licenses.
3. Term: This license shall continue for as long as you use the software program(s), except that it will terminate if you fail to comply with any term
or condition of this Agreement. Upon such termination, or in order for you to terminate the Agreement, you agree to destroy the original and any
copies of the software program(s).
4. Limitation of Liability: IN NO EVENT WILL EZONICS CORPORATION BE LIABLE FOR ANY DAMAGES, INCLUDING ANY LOSS OF PROFITS, OR
OTHER INCIDENTAL OR CONSEQUENTIAL DAMAGES, ARISING OUT OF YOUR USE OR INABILITY TO USE THE SOFWARE PROGRAM(S) OR WRITTEN
MATERIAL, EVEN IF EZONICS CORPORATION HAS BEEN ADVISED OF THE POSSIBILITY OF SUCH DAMAGES. Some states or jurisdictions do not
allow the exclusion or limitation of incidental, consequential or special damages, so the above limitations may not apply to you.
PRODUCT RETURNS
If you must ship or mail the product to Ezonics Corporation for warranty service, you must prepay shipping/handling costs, insure the product and
assume all risks of loss or damage in transit. Ezonics Corporation does not provide any refund policies for end-users. For return or refund policy,
please refer to your retailer for more information.
Contents
Page
Getting to Know Your EZPhone Cam ................................................................................................... 1
Getting Started with EZPhone Cam..................................................................................................... 2
Quick Start EZ ...................................................................................................................................... 3
1. Installation of EZPhone Cam USB Camera ...................................................................................... 3 - 5
a. Register with EZChat Server .................................................................................................... 5 - 7
b. Start Video Chatting .................................................................................................................. 7
2. Basics of Using EZVideo Chat Software ........................................................................................... 8 - 9
a. On-line features make chatting more fun ................................................................................. 9 - 10
b. Search for an on-line friend....................................................................................................... 10 - 11
c. Three ways to start a call .......................................................................................................... 12
3. The Basics of Capturing and Sending Video E-mail Using Live Express Video Panel ...................... 13
Defining your video display and capture settings ......................................................................... 13 - 14
Using the control buttons.............................................................................................................. 14
Recording audio and video files .................................................................................................... 14
Capturing an image frame............................................................................................................. 15
Installing your own PC microphone (optional-not included)........................................................ 15
Controlling audio recording........................................................................................................... 16
Controlling the sound output ........................................................................................................ 16
Opening a video/audio file............................................................................................................ 16
Saving a video/audio file............................................................................................................... 17
Opening other Live Express programs .......................................................................................... 17
Page
4. Troubleshooting............................................................................................................................... 18
There is no response from Windows when I plug in the camera. ................................................ 19
When installing the driver for the EZPhone Cam, I get the following message: "USB
hardware may not be operational. You may need to enable your USB port in your PC
BIOS." ........................................................................................................................................ 20
When I open up Live Express, I get a "No GSM Support" message. ............................................. 20
After installing Microsoft GSM 6.10 CODEC, I still get a "NO GSM Support" message. ................ 20
Error message, "Failed sending mail" appears in Live Express Send Mail. ................................... 21
When installing EZPhone Cam, I get the following message: "USB Supplement
needed" or "USB Supplement is obsolete."................................................................................ 21
I have a VIA Tech VT82C586B or VT82C596 USB port.................................................................. 21
EZPhone Cam is loaded as an unknown device under 'Device Manager.' ..................................... 21
My EZPhone Cam’s microphone does not work. ........................................................................... 22
Setup program executed successfully. However, the system prompts for Windows 98
CD-ROM when I install the camera............................................................................................ 22
The Ezonics EZPhone Cam CD-ROM disc does not automatically run when you insert
the disc in the CD-ROM drive. .................................................................................................... 22
EZPhone Cam and system malfunction (crash) while in video chatting session. ......................... 22
After all bundled software are installed, EZVideo Chat software displays "EZVideo Chat
did not detect Internet connection" message. .......................................................................... 23
My audio and video starts breaking up. ........................................................................................ 23
5. Technical Support ............................................................................................................................ 24
6. System Requirements...................................................................................................................... 25
7. Lens Cleaning and Image Focusing ................................................................................................. 25
8. EZPhone Cam Technical Specifications............................................................................................ 26
1
Getting to Know Your EZPhone Cam
TM
Getting Started with
EZPhone Cam
TM
Congratulations! You have just purchased Ezonics EZPhone Cam, the best-valued video USB camera around!
The EZPhone Cam will change the way you communicate. It allows you to video chat and capture full motion
video and still pictures, the EZ way. You will be amazed at the possibilities.
This EZPhone Cam manual introduces you to the EZPhone Cam and gets you up and running in just a few
minutes. Please refer to the Quick Start EZTM section of this manual for quick and easy-to-follow installation
instructions.
Thank you for choosing the Ezonics EZPhone Cam. We hope this product will bring you years of joyful service.
For information on our limited warranty, please see the warranty section of this manual.
Your Ezonics EZPhone Cam should come with the following:
•
•
1 EZPhone Cam USB Camera
Bundled Software CD:
ü
ü
ü
ü
ü
ü
ü
ü
ü
EZPhone Cam hardware drivers
Ezonics, EZVideo Chat
Ezonics, Greeting Cam Deluxe
Ezonics, EZSuite Interface
Live Express, Video Panel
Live Express, Composer
Live Express, Live Monitor
Live Express, Snapshot
Ulead, iPhoto Express
2
3
Quick Start EZ
TM
Installation of EZPhone Cam USB Camera
IMPORTANT : Be sure to install all bundled software and EZPhone
Cam driver before plugging the EZPhone Cam to the USB port.
•
•
Turn on your computer.
Insert the Ezonics software CD.
•
•
•
Wait until Software Installer appears on your screen as shown.
Click ‘Install’ to install bundled software and hardware driver.
Follow the on-screen instructions to complete setup.
Note: In order to install EZPhone Cam properly, you must install the
bundled EZVideo Chat software and the EZPhone Cam driver.
4
•
Restart your system by clicking ‘OK.’
•
•
Plug your EZPhone Cam to the USB port.
Your EZPhone Cam will be installed automatically.
Note: EZPhone Cam is a USB device which can be plugged and
unplugged (hot-swappable) during system start up. However, we
recommend you to plug the camera into the USB port before or
after Windows start up to prevent system conflicts.
•
•
•
The computer will detect and automatically install your
EZPhone Cam.
Click Start>Settings>Control Panel>System>Device Manager
under Imaging Device and you should find EZPhone Cam
installed.
Close all opened application windows on your desktop after
system restarts.
5
•
•
EZVideo Chat Connectivity Wizard appears.
Click ‘Continue’ to register to our server.
Note: Contact your ISP (Internet Service Provider) if you
have problems connecting to our server. EZVideo Chat
requires a real IP address in order to function properly.
a. Register with EZChat Server
•
Click the ‘Register’ to logon to our server for first time
use. You will see this logon window when you logon the
next time.
6
•
Follow the on-screen installation instructions and input all fields.
Store your password in a separate location for future reference.
You will need your password each time you wish to
logon to our server.
•
Click ‘Finish’ to complete the registration.
7
•
EZVideo Chat software will initialize and setup your server
information for chatting.
b. Start video chatting
•
The EZVideo Chat user interface appears and you are now ready to use your
EZPhone Cam to call a friend.
8
Basics of Using EZVideo Chat Software
•
•
•
•
To start using the EZVideo Chat software, click
to expand Video
Window.
Streaming video image capture from the EZPhone Cam will appear in the
Video Panel as shown:
To expand the EZVideo Chat Control Panel, click the
Status Display Center
•
•
To start/end a call
To play/pause streaming video image
•
To enable/disable picture-in-picture
•
For additional features:
unifold button.
9
•
To send animation to a friend
•
•
•
To change video chat options
To change audio output volume
To change microphone input volume
a. On-line features make chatting more fun:
•
•
•
•
•
•
•
To open PhoneBook option
To close Video Window
To access the Ezonics web site
To search for a friend on-line
To stay on-line
To stay off-line
To enable ‘Do Not Disturb’ (this is to notify a friend that you are busy)
10
You may also (by right clicking on the buddy):
1. Call a buddy
2. Send an instant message
3. Rename a buddy’s name
4. Edit a buddy’s profile
5. Delete a buddy
6. Move a buddy to a group
7. Capture an icon using on-line still picture capture
b. Search for an on-line friend
•
Click
to search for a friend on-line
by User ID, Nickname or E-mail address.
11
•
Click and highlight the buddy you wish to add. Then click ‘Next’ to
continue.
•
Server will send your request to your friend and ask for his/her
confirmation. Click ‘Finish’ to add your buddy on the chat list.
12
c. Three ways to start a call:
•
•
Right click on the icon of your friend, then choose ‘Call Buddy’ from
the pop-up menu
Double click on the icon of your friend under the EZ Buddies list.
•
Choose a buddy, then click the
Call/Hang Up button.
& You may access more information such as Instant messages, Video Settings, Edit Buddy and much more by
clicking . This will bring you to the EZVideo Chat Help file.
13
The Basics of Capturing and Sending Video E-mail Using Live
Express Video Panel
- Defining your video display and capture settings
- Using the control buttons
- Recording audio and video files
- Capturing an image frame
- Installing your own PC microphone
- Controlling audio recording
- Controlling the sound output
- Opening a video/audio file
- Saving a video/audio file
- Opening other Live Express programs
_____________________________________________________________
Defining your video display and capture settings
1.
Click
to display the Video Options panel.
2. Drag the
video quality slider to adjust the level of compression to apply. Setting a
high value produces better output display, but in effect, creates larger file sizes as you increase it.
3. Drag the
capturing.
frame rate slider to specify how many frames to record per second when
4. Click to open the Video Format dialog box of your capture driver for specifying video compression, frame
size, color channels and other settings. This dialog box varies depending on the type of capture driver and
14
device you have installed on your system.
5. Click
to open the Video Source dialog box for adjusting the colors of capture device, zoom level and
other settings to improve capture and device display capabilities. This dialog box varies depending on the type
of video capture driver and device you have installed on your system.
6.
Click
again to hide the Video Options panel and switch back to the Capture Options panel.
Using the control buttons
The control buttons are located below the Video Capture panel; they are the Record,
Stop, Pause, and Play buttons, respectively. These are the controls you will need for
capturing and/or viewing video files. Click the appropriate button to perform the
desired action.
Recording audio and video files
The Video Panel program allows you to choose whether to capture video, audio or both.
1.
2.
3.
4.
Check if you have the appropriate channel buttons of the data you wish to include.
Adjust your camera to the desired view. Check the display on the Video Capture panel.
When satisfied, click the Record button to start capturing.
Click the ‘Stop’ button when done.
15
Capturing an image frame
1.
Adjust the camera to the desired view. Check the display on the Video Capture panel.
2. Click the
Snapshot button on-screen or directly on the camera.
3. From the Snapshot dialog box, select where to send the captured image frame. Choose from the following
options:
•
Clipboard copies image data onto the clipboard or memory.
•
File opens a dialog box for specifying where to save the captured image.
4. The capturing process starts after you have specified the necessary information in their related dialog
boxes. If your captured image is not satisfactory, repeat from step 1.
Installing your own PC microphone
1. Plug the microphone mini-plug to your sound card’s microphone jack.
2. Make sure the microphone is working properly in the Video Panel by referring to the next sections.
3. If audio (sound) comes through the speakers, access Volume Control by clicking Start\ Programs\
Accessaries\ Entertainment\ Volume Control\ to mute the microphone playback.
4. If you are experiencing recording difficulties, do the following:
Click Options\ Properties\ Adjust Volume for\ Recording\ to select microphone for recording if no audio is being
recorded in the Video Panel.
If you’re still experiencing recording difficulties, enable or disable AGC (Auto Gain Control) or boost control by
accessing Options\ Properties\ Adjust Volume for\ Recording\ Microphone\ Advanced\.
16
Controlling audio recording
1. Click and drag the
Microphone volume control to the desired level. This will determine the
capability of your audio capture device’s pick-up level while capturing.
2. Click the
Record button (with the Audio Channel active) to test audio capturing level. The
sensitivity of your audio recording is reflected on the Audiometer located at the right hand side of the Video
Capture panel. (Note: Set the Speaker volume control to mid level for manageable testing.)
3. Click the Play button to listen to the playback.
4. Start the actual recording when satisfied with the volume in the playback.
Controlling the sound output
1. Click and drag the
Speaker volume control to the desired level.
2. Play an audio file to listen to the volume level. If you hear no sound when the Audiometer indicates audio
data, try adjusting the volume control higher or check your speaker’s connection.
Opening a video/audio file
To preview previously saved audio and/or video files:
1.
2.
3.
4.
Click
the Open button.
Locate the file you wish to play back (*.exe or *.wav file).
Click Open. This closes the Open dialog box.
Click the
Play button.
17
Saving a video/audio file
After you have recorded audio and/or video data, you may wish to save them to a file.
1. Click the
Save button.
2. In the Save As dialog box, locate the folder where you wish to save.
3. Specify a file name for the recorded clip.
4. Live Express will automatically detect the file format for saving. Video with audio data is saved to a selfexecutable file format (*.exe) and audio data is saved to a wave file format (*.wav). You may choose to the
save a file as an avi file format (*.avi).
5. Click Save to start the process.
Opening other Live Express programs
Take advantage of quick access to different programs that are included in the Live Express package. Click the
appropriate button to invoke the related program.
Send Mail: For sending messages online.
Composer: For still and video image render.
18
Troubleshooting
Some common problems when installing EZPhone Cam
& There is no response from Windows when I plug in the camera.
& When installing the driver for the EZPhone Cam, I get the following message: "USB hardware may not be
operational. You may need to enable your USB port in your PC BIOS."
& When I open up Live Express, I get a "No GSM Support" message.
& After installing Microsoft GSM 6.10 CODEC, I still get a "NO GSM Support" message.
& Error message, "Failed sending mail" appears in Live Express Send Mail.
& When installing EZPhone Cam, I get the following message: "USB Supplement needed" or "USB Supplement is
obsolete."
& I have a VIA Tech VT82C586B or VT82C596 USB port.
& EZPhone Cam is loaded as an unknown device under 'Device Manager.'
& My EZPhone Cam’s microphone does not work.
& Setup program executed successfully. However, the system prompts for Windows 98 CD-ROM when I install
the camera.
& The Ezonics EZPhone Cam CD-ROM disc does not automatically run when you insert the disc in the CD-ROM
drive.
& EZPhone Cam and system malfunction (crash) while in video chatting session.
& After all bundled software are installed, EZVideo Chat software displays "EZVideo Chat did not detect Internet
connection" message.
& My audio and video starts breaking up.
There is no response from Windows when I plug in the camera.
Make sure that your USB port(s) is working properly. Warning: You could damage your USB port(s),
mainboard and the EZPhone Cam camera if you installed the USB port yourself. Always consult a certified PC
technician and have the proper version of Windows 98. To check what version of Windows you have installed,
right click on ‘My Computer’ and click on ‘Properties.’ You should get the following screen:
Make sure that the version number is 4.00.98 or higher.
Make sure that your USB port is working properly by right clicking on ‘My Computer’ and clicking ‘Properties.’
Click on device manager and the USB port should be at the bottom of the list of
devices, as illustrated:
Check to make sure that the "USB universal host controller" is listed under the
"Universal serial bus controller" category. If it is listed under "other devices" or
shows up with a yellow exclamation point next to it, the USB port is not
operational.
19
When installing the driver for the EZPhone Cam, I get the following message: "USB hardware may
not be operational. You may need to enable your USB port in your PC BIOS."
If you receive this message, you need to contact your system integrator to ensure proper operation of the USB
port.
When I open up Live Express, I get a "No GSM Support" message.
To correct this, do the following:
1. Go to your Control Panel.
2. Click on "Add New Hardware."
3. Choose "No" not to search.
4. At one point it will ask if you wish to choose a device from a list. Click "yes."
5. Choose "Sound video and game controller."
6. Under Manufacturers, select "Microsoft Audio CODECS."
7. Under models, select "GSM 6.10 Microsoft Audio CODECS."
8. Click enter and finish the installation procedure. Reboot your system.
After installing Microsoft GSM 6.10 CODEC, I still get a "NO GSM Support" message.
Do the following to confirm your GSM CODEC is functioning:
1. Go to your Control Panel.
2. Click on Multimedia.
3. Go to the Devices tab.
4. Find Audio Compression CODECS.
5. Double click on "Audio Compression CODECS."
6. Look for the Microsoft GSM 6.10 Audio CODECS.
7. Double Click on the "Microsoft GSM 6.10 Audio CODECS."
8. Make sure 'Use this audio device' radio button is enabled.
9. Change priority setting to number one then click settings and click Auto-Configure to set Compression and
Decompression rate.
20
Error message, "Failed sending mail" appears in Live Express Send Mail.
Verify that Simple Mail Transfer Protocol (SMTP) provided by your Internet Service Provider (ISP) is correct and
is in the mail server line of Live Express Send Mail setup.
*AOL users: Required SMTP not available through American Online (AOL); the Send Mail function in Live
Express may not be available.
AOL and all Live Express users having SMTP problems can send mail as file attachments by using other E-mail
applications provided by the respective ISP.
When installing EZPhone Cam, I get the following message: "USB Supplement needed" or "USB
Supplement is obsolete."
You need Windows 98, Windows ME or Windows 2000 to operate EZPhone Cam.
I have a VIA Tech VT82C586B or VT82C596 USB port.
Visit http://www.viatech.com/drivers/index.htm for the USB Filter Driver to enhance your USB hardware
compliance.
EZPhone Cam is loaded as an unknown device under 'Device Manager.'
Check your USB ports under Start/Settings/Control Panel/System/Device Manager to check for your USB
function, you may have a malfunctioned USB ports or your USB ports are not enabled. Contact your PC
manufacturer for help.
21
My EZPhone Cam’s microphone does not work.
Click Start>Programs>Accessories>Internet Tools>NetMeeting; go through the NetMeeting setup wizard and
audio tuning wizard (NetMeeting will appear if you already have audio settings tuned). Click on ‘Tools’ on top
of the NetMeeting user interface, then click ‘Options’ and choose the ‘Audio’ tab. Under the ‘Advanced’ button,
check to see if your EZPhone Cam is using ‘Omni Vision Composite input device.’ You may also switch to use
your regular microphone from your sound card.
Setup program executed successfully. However, the system prompts for Windows 98 CD-ROM
when I install the camera.
This limitation is imposed by Microsoft to avoid version conflict and incompatibility issues. DO NOT ignore
those files.
The Ezonics EZPhone Cam CD-ROM disc does not automatically run when you insert the disc in the
CD-ROM drive.
The Windows 98 Auto Insertion Notification may not be enabled. Do the following to install the Ezonics
bundled software:
1.
2.
3.
4.
Double click on the 'My Computer' icon on the desktop area.
Right click to your CD-ROM drive.
Click Autorun.
You should see title screen running.
EZPhone Cam and system malfunction (crash) while in video chatting session.
Your EZPhone Cam and Video Chat software utilizes state-of-the-art technologies combined with proven
communication protocol and architecture from Microsoft NetMeeting. It is important that your ISP connection
speed is at the optimal level for real-time A/V performance.
22
23
After all bundled software are installed, EZVideo Chat software displays "EZVideo Chat did not
detect Internet connection" message.
Contact your ISP (Internet Service Provider) to confirm Internet connection. In order to initialize EZVideo Chat
software and logon to Ezonics’ server(s) properly, you will need a real IP address assigned by your ISP. For
more information about real IP address, contact your Internet provider.
My audio and video start breaking up.
EZVideo Chat Software utilizes the latest technology combining proven communication protocol and Microsoft
NetMeeting Architecture to deliver the highest A/V chatting performance. However, performance is largely
bandwidth dependent. Please view the following for bandwidth (network speed) comparison.
24
Technical Support
Enjoy and thank you for choosing Ezonics. Should you encounter any technical issues concerning the EZPhone
Cam, please visit our web site at http://www.ezonics.com customer support link for our troubleshooting
walk-through.
To better serve you, we encourage you to use our on-line technical, troubleshooting walk-through or
troubleshooting guide; there you will find answers to most of your technical issues. We also update our
downloadable driver link to post fixes and drivers pertaining to our products.
You can also reach us by e-mail at [email protected]. Provide us with the product model, serial number,
descriptions of your system and the problem that you are having. The normal turn-around time for e-mail
service is 24 hours once the request is received by our technical support engineer.
For after-hours technical assistance, please visit our web site at http://www.ezonics.com customer support
link. Then access our support walk-through service for immediate technical assistance.
For phone support, call us at toll-free 1.800.377.8688. Technical support is available 5 days a week, from 8:30
a.m. to 5:30 p.m., Pacific Standard Time. Toll-free phone support is available for one year from the date of
purchase.
25
System Requirements (minimum)
Note: Incompatibility issues may arise due to your computer system's hardware and software configuration.
•
•
•
•
•
•
•
•
USB Equipped PC (required)
IBM Compatible PC with 266 MHz (or greater) Intel Pentium CPU
Minimum 32MB RAM memory (64 MB or better preferred)
CD-ROM Drive (for drivers and software installation)
SVGA or VGA monitor capable of displaying 256 colors or higher
Windows 98, Windows ME or Windows 2000
Sound Blaster or compatible sound card
28.8 Kbps Modem (56 Kbps or above connection for Video Chatting preferred)
Lens Cleaning and Image Focusing
•
•
•
The lens of the camera should rarely need cleaning, but if needed, a dry lint-free cloth is recommended.
Use the lens focus dial for image focus.
Use lens pivot module for angular adjustment.
EZPHONE CAM TECHNICAL SPECIFICATION
Product type
Interface:
Sensor
Resolution
Graphical User
Interface:
Lens
Refresh Rate
Video Output
Shutter Control
White Balance
Power Source
Compatibility
Operating System
Dimensions
Weight
Warranty
Technical Support
EZPhone Cam
2.0 Meter USB Cable
320K pixels CMOS Image Sensor
640 x 480
352 x 288
320 x 240
176 x 144
160 x 120
Multimedia graphical user interface
Manual focus from 10 cm to infinite
Up to 30 frames per second
24 bits (RGB), 1420
Software controlled button for
controlling Shutter, changing Video
Modes, and adjusting
Contrast/Brightness
Auto White Balanced
5.0V DC @450ma provided via USB
Port
TWAIN for acquiring still images
Video for Windows and WDM for
acquiring video
Windows 98, ME, 2000
116 x 60 x 51 mm (H x W x D)
390 grams
One Year (see warranty details)
One Year Toll-free phone support
(from the date of purchase)
Design and specifications are subject to change without notice.
26