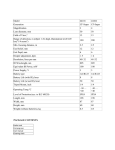
1
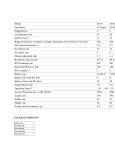
Owner’s Manual
Version 7
Covers serial #3664 and higher…
June 2013 and later
Basic History of major TTE Revisions
Serial# 2326 6/2008: Discontinue 12AT7 for V3 Erase tube. Change to Fulltone
12AU7. Warning! You must use either Shugwang 12AU7 or Fulltone 12AU7. Most
tubes will not erase properly, no matter how much you’d like to use that vintage NOS
tube you bought for way too much money ;)
Serial# 3179 4/2011: Discontinue padded gig bag, first TTE with removable, hinged
Lid. Majority of production uses Blonde Tolex.
Serial# 3460 5/2012: Changed Preamp circuit, revised EQ of preamp to be more
Full-range, with less change to the original instrument tone. Previous versions were
much brighter, lacking in bass frequencies.
Serial# 3480 10/2012: First production TTE with “Relay-Activated Echo Cancel.”
This is a major improvement in that using an Echo Cancel Footswitch no longer has
a negative effect on the sound quality and volume of the Echoes! From this point on,
you are not limited to using a short cable for an Echo Footswitch, and instead can
use up to 500’ of any 2 conductor, standard instrument cable. Fulltone unveils our
Echo Cancel Footswitch (ECF) which requires no external power for its status LED’s
(more info or purchase here)
Serial# 3664 6/2013: TTE goes to all black metal and black Tolex cabinet & lid.
Major improvement to tape transport initiated by changing the spacing on the tape
guide posts, eliminating much of the friction and reducing tape jam.
Table of Contents
Page 1
Product Overview
Page 2
Top Panel Diagram
Page 3
Additional Diagrams
Operating the TTE
Page 4
Initial Set-Up
Page 5
Let’s Play in Mono!
Page 6
Let’s Play in Mono! (Continued)
Page 7
All about ((STEREO))
Maintenance and Service
Page 8
Service Diagrams
Page 9
Service Diagrams (Continued)
Page 10
Tape, Tape Heads, and Transport
Page 11
Tape, Tape Heads, and Transport (continued)
Page 12
Additional Tape Path Maintenance
Page 13
Tubes!
Page 14
Rewiring transformer to 220/240 Operation
Page 15
Warranty and Contact
Product Overview
Page 1
The Fulltone Tube Tape Echo, although inspired by Market Electronics’ Echoplex of the early to
mid-‘60’s, is a far more evolved design which eliminates all of the noise, inconsistencies, and
reliability issues associated with the Echoplexes.
Some of the TTE’s features include:
1. 1 x 12AX7 Tubes for Record, 1x12AX7 for Playback, 1 x 12AU7. Use only Fulltone brand
12AU7 for V3 (Erase tube) or unit may not erase properly!
2. Mono and ((Stereo)) outputs with 3 distinct stereo image choices!
3. DC on the Tube filaments for no-hum operation.
4. Torroidal Transformer for low EMF, quiet operation.
5. Brushless/3 phase DC Servo Motor for reliable, quiet tape transport.
6. Blushless DC Fan to keep the whole thing running cool.
7. Nickel-plated steel with all stainless-steel hardware, every bolt and spacer.
8. Super-Tough Baltic Birch-ply cabinet with Blonde Tolex covering.
9. Proprietary Erase, Record, and Playback heads designed to outlive you.
10. All Hand-Wired point-to-point Audio pathway. All Handmade in the U.S.A.
11. Removable Lid (should be closed and latched while transporting)
12. 2-Speed operation (with trimmer adjustment) for a choice between Hi-Fi or Warm Vintage
sounds.
13. Adjustable Tube-Powered Volume Control for up to 25 dB volume-boost.
14. A Tone control affecting the Repeats only.
15. Our own Echo Tape Cartridge (ETC-1) is loaded with Mastering quality tape and designed
to last many months, unlike the few weeks you get from other Echoplex-type cartridges.
16. True Bypass toggle switch for setting the right Volume for your rig as well as a 1/4" jack for
“Echo Cancel” allowing you to keep the TTE’s Tube Preamp in the signal path at all times.
Top Panel Diagram
Page 2
Additional Diagrams
Page 3
Operating your Tube Tape Echo
Page 4
Warning! Always unplug the guitar cable from the Main Output when not in use!
Not doing so for an extended time period may cause the pinch roller to go out-of-round making the
tape transport unstable, the repeats out of tune, and may void warranty service claims relating to
this issue.
Initial Set-Up
Refer to Diagrams on Pages 2 and 3
1) Remove the Top Cover Plate (see #32) by unscrewing the 2 thumbscrews (see # 31) and
sliding the plate carefully off to the left side of the TTE.
2) Make sure that the Thumbscrews for the Echo Tape cartridge (ETC-1) are secure (see
#30) and that the tape is following the correct path (see Tape Path diagram, Page 3) Make
sure that the tape is not too loose, knotted up, or has not slipped away from any of the
Tape Guides (see #24 and #19) Make sure that it is seated properly on the Corner Roller
(see #25), resting under the Tape Felt (see #26), and Tape Felt Tension Arm. (see #27)
Now check that the tape is resting between the Capstan and Pinch-roller (see #16 and
#17)
3) Insert the detachable AC cable (see #34) in to the TTE AC Inlet (see #33) and connect
other end to a 3-prong 120-volt wall outlet. Make sure to use the same outlet as your guitar
amplifier to avoid possible grounding issues.
4) Turn on the Power Switch (see #35) and allow unit to run for about a minute, this lets the
Tubes warm up.
5) Plug your guitar cable into the Input Jack. (see #1)
6) Slide the Transport Clutch lever (see #13) to the right…this starts the Tape Rolling. Hold
it there and insert another guitar cable into the Main Output jack (see #12). This cable
holds the Transport Clutch Lever in place and keeps the Tape running while you’re using
the TTE. Tip: Let the Tape Cartridge (ETC-1) run for a while and it will stabilize. When first
turned on, the ETC-1’s windings may be uneven and can cause the notes to seem out-oftune. Allowing the ETC-1 to spin for a minute or so evens out the Tape windings so that it
rolls smoothly and stays that way for the remainder of your session.
7) Now connect the other end of the guitar cable to your amplifier.
8) Turn on your amp and you’re ready to make a few setting adjustments and play your TTE!
9) Important! Please use “Low Speed” setting during first2-3 hours of operation for proper
break-in
Let’s Play in Mono!
Page 5
Refer to Diagrams on Pages 2 and 3
So you’ve gone through all of the steps in the “Initial Set-Up” Chapter?
Now you’re ready to check a few more things and play.
Terms: CW= Clockwise CCW= Counter-Clockwise
1) You’re now running in Mono (only one amplifier) so make sure the Stereo Mode
Switch (see #2) is set to Position 1 or Position 2, it makes no difference which of the
two you choose. But if you set this switch to Position 3 you will only hear the “Echo”
and not the original note, which can be a bit confusing. See “STEREO” chapter for
more in-depth discussion regarding this switch.
2) Now locate the True Bypass Switch (see #3) and toggle back and forth between
“Bypassed” and “On” while strumming some open strings. Is the sound louder when
set to “Bypass” or when set to “On”? Setting this to “On” will send your Guitar signal
through the all-Tube circuitry as well as allow you to add any amount of “Echo” to your
sound. You can adjust the volume with the Guitar Volume knob. (#4) Turning this
knob clockwise will increase the level of the guitar sound.
Tip: Set the “On” sound to be slightly louder than your “bypassed” sound and you will
notice a bigger sound that will drive long lengths of guitar-cable while restoring that
“punch” that is lost when there are too many effects in the signal chain between your
Guitar and Amp.
3) Locate the Record Level trimmer (see #6) and set it to about 3 O’clock. This trimmer
controls the strength of the signal being “printed” to tape. Turning the trimmer CW
increases the recording level. Tip: This trimmer should always be set to 3 O’clock or
higher because, the hotter the recorded signal, the lower the noise and the fatter the
tone of the repeats. But don’t let this talk of Noise concern you…the TTE is quieter
than all analog delay pedals, most digital delay pedals, and many of the most
expensive rackmount units!
4) Locate the Echo Volume knob (see #5) and turn it CW until you hear the desired level
of the Echo Repeats. Turning this CCW makes the Echo repeats more faint sounding.
Notice that there is a white silkscreen to the left of this knob, which highlights the
suggested useable range for the Echo Repeats. When properly set-up, your TTE
should offer an equal volume relationship between the Guitar and the Echo Repeats
with this knob set to about 9 O’clock. Tip: Operating your TTE in this range (or lower)
results in optimal sound quality and lower noise/hiss.
5) Now it’s time to decide what Delay Time you’d like: This can be accomplished by
setting/sliding the position of the moveable Playback Head. (see #20) By sliding the
Playback Head to the right, you are making the repeats slower, also called longer
delay time. By sliding this to the left you are make the repeats faster, also called
shorter delay time.
Page 6
Let’s Play in Mono! (Continued)
Refer to Diagrams on Pages 2 and 3
6) Another way to alter the available Delay Times is via the Tape Speed Switch. (see
#18) With this switch, you are given a choice of High Speed or Low Speed tape
movement, and you will see the Tape flow at a slower or faster rate depending on
which setting you choose. Tip: As a general rule of thumb: The faster the tape speed,
the more in-tune the repeats will be, the more full-range the repeats will sound, and
the lower the noise level will be. Conversely, the slower the tape speed, the less intune the repeats will be, the warmer the repeats will sound, and you’ll get more of a
“Vintage Echoplex” vibe!
.
Available Delay Range set to Low Speed (factory internal Trimmer setting):
@ 40 milliseconds to 1.3 seconds
Available Delay Range set to High Speed (factory internal trimmer setting):
@ 20 milliseconds to 650 milliseconds
7) Locate the Echo Repeats Knob, (see #7) turning this CW will increase the number of
repeats. Conversely, turning this knob CCW will reduce the number of echo repeats.
Tip: Turn this knob up to around 2 O’clock or higher and you can get a very cool
recycling/regenerating sound that adds tremendous depth to (especially) non-distorted
clean sounds.
8) Locate the small Echo Tone trimmer (see #8) and notice that as you turn this CW, the
repeats sound brighter and a little louder. Conversely, turning this trimmer CCW
warms up the repeats and pushes them into the background. Tip: 12 O’clock or Lower
is the normal setting when running the TTE at High Speed, but when running at Low
Speed I find that 5 O’clock yields a nice clarity to the repeats.
9) Relay-Activated Echo Cancel jack (see #10) This jack is designed to accept a
standard (tip-grounding) ¼” amp-style footswitch (not included). With the TTE’s Cancel
function, you still get the benefit of running through the unit’s tube preamp even when
the Echo is cancelled! Because this feature is Relay-Activated, you can use any length
of cable to the Cancel jack with absolutely no adverse effect on the TTE’s sound,
unlike older versions of the TTE (and every Echoplex ever made) where the Playback
signal was significantly affected by the cable length.
Page 7
All about ((Stereo))
Refer to Diagrams on Pages 2 and 3, and 9
Warning! Running multiple amps can be dangerous or even fatal due to the possibility of a
ground loop being created when two or more AC powered devices do not share a common
ground reference point. Care must be taken to ensure that your signal chain (effects, amps,
and even P.A. system) is configured correctly to not only be hum-free, but to ensure the safety
of you and your band mates.
One of the things you should do is to always put your various AC powered devices on the
same wall outlet to ensure proper grounding!
Another thing that some people do is lift the ground on one or more of the AC powered
devices (in this case, the TTE) by placing a 3 to 2 prong ground lift adapter on the end of the
Detachable AC cord. (See Page 9, Ground Lift Adapter Diagram) We cannot recommend that
you do this (for legal reasons) but I personally do it while running stereo when grounding
issues dictate, and others are known to do this as well. If you do not have a Hum problem and
are not receiving a shock there is no reason to use a Ground Lift Adapter.
((Stereo))
1) You’ve already got one amp hooked up to the Main Output Jack, now it’s time to take
another guitar cable and plug it into Output 2 (see #11) with the other end of this cable
connecting to your second amp.
2) With the TTE on and warmed up, turn on both amps and (with your guitar volume set
full) let go of your strings and check for any audible buzzing due to grounding issues.
Is there buzzing when you let go? No? Then proceed to Step 3.
Yes? Then flip the ground switches on one or both of the amps until this goes away, or
you may choose to install the Ground Lift Adapter.
3) Locate the Stereo Mode switch, (see #2) this offers you 3 distinct stereo voicings:
Position 1: Guitar and Echo out of both Outs.
Position 2: Guitar+strong Echo from one Out, Guitar+slight echo on other.
Position 3: Guitar-only out of one amp, Echo-only from other Out.
4) Tips: Position 2 has a very lush, 3-dimensional sound that is my personal favorite
when the TTE is set for longer delays, 500ms or longer.
Position 3 is excellent for super-short, slap-back Country-Style stereo splits!
Also, try making one amp wet (with Reverb) and one amp dry (without reverb)
Service Diagrams
Page 8
Only use a 250volt / 2 amp Slo-Blow (20mm x 5.2mm)
Page 9
Service Diagrams (Continued)
Tape, Tape Heads, and Transport
Page 10
Refer to diagrams on Pages 2 and 3
Most of the procedures outlined on this page require the removal of the Top Cover Plate, for
an explanation on how to do this, see page 4.
Tape Cartridge (ETC-1) is available for direct purchase (only for sale with proof of TTE ownership)
at our website
Your ETC-1 is a plastic cartridge that houses about 1 minute of Hi Quality Recording Tape. Under
normal use, you should get many months of service out of the ETC-1, especially if you follow the
guidelines set forth in this manual.
Care must be taken at all times that the tape flows with proper tension, a key to the proper tension
is the Tape Felt (see #26) and Tape Felt Tension Arm (see #27) believe it or not!
The Tape Felt must be resting against your Tape, holding the Tape against the Corner Roller (see
#25), and this tension can be adjusted, although you won’t need to touch it until you change the
ETC-1 further down the road. Tip: You’ll know when the pressure is correct when the Echo
Repeats sound in-tune and are not modulating out of pitch in a rapid fashion.
The way to adjust this pressure is simply by bending the Tape Felt Tension Arm until it is barely
putting any pressure on the Corner Roller.
If the Tape ever unravels and starts rolling off the TTE, remove the guitar cable from Main Output
immediately, which will disengage the Transport Clutch (see #13). Now check that the tape is
following the Tape Path (see page3) correctly, not caught up on one of the Tape Guides (see #19
and #24), and that there isn’t too much tension on the tape somewhere. After this is corrected,
engage the Transport Clutch again and most likely the ETC-1 will stabilize after a minute or so of
motion.
Record/Erase and Playback Heads
There are (what appear to be) only 2 heads on the TTE, one used to Record the signal (Record
Head, see #22) and one used to Playback the recorded-signal. (Playback Head, see #21)
But there is actually an Erase Head located within the Record Head assembly that erases the
signal after the Tape makes a full pass through the ETC-1 approximately 1 minute after you’ve
played something.
Cleaning your Tape Path: Due to the ETC-1 being loaded with excellent quality tape, you won’t
experience the shedding and build-up associated with other Echoplex-type tape cartridges.
But occasional cleaning of the Heads, Tape Path, Capstan, and Pinch-roller are necessary
to keep the sound and performance up to par, perhaps once a month.
First: Remove the tape from the Tape Path, and remove the ETC-1.
Second: Use American Recorder Technologies (americanrecorder.com) Item# S-721H-4 Tape
head Cleaner. It is safe to use on the TTE’s, heads, rubber roller, all guides….everything!
For Pinch Roller (see #17) DO NOT USE ALCOHOL to clean this as it will cause it to dry-out and
crack! Again, I recommend using the S-721H-4 fluid.
Tape, Tape Heads, and Transport (Continued)
Page 11
Refer to diagrams on Pages 2,3, 8 and 9
With the TTE is turned on, dab some S-721H-4 on a Q-Tip, engage the Transport Clutch and press
the swab up against the roller with pressure being careful not to get the swab caught in between the
Pinch-Roller and the Capstan (see #16).
Repeat process until swab stays appears fairly clean and is relatively free from brown color. Now
clean the Capstan in a similar manner.
Demagnetizing Heads:
Once every couple of months it’s not a bad idea to demagnetize the recording heads using a low
powered demagnetizer such as the $17 Specialty AV Brand, which is available through
amazon.com Follow the instructions included with the demagnetizer, and always make sure that
there is no audio recording tape within 10 feet of this thing when it’s on, and this includes the TTE’s
ETC-1 cartridge.
The following procedures require that the Chassis be removed from the cabinet. (Refer to
the diagram at the top of Page 8) Remove the 4 Chassis screws and the 2 Bottom cabinet
screws, but not until after you read the following!
Warning! Turn off and unplug the removable AC Cable from the TTE before disassembling your
TTE. This unit contains High Voltages that may cause injury if you touch the wrong thing, so use
caution or don’t attempt unless you know what you’re doing!
Playback Headmount Adjustment:
(Refer to Diagram on Page 8)
The Playback Headmount must glide freely along the chassis yet be tight enough to not be pushed
out of desired position by the moving Tape. This balance is achieved by a combination of grease
and the proper tension applied by the two locknuts, which are accessed underneath the rear of the
chassis. You shouldn’t have to adjust this, but should you need to, use Lithium grease and be sure
not to get any on the Tape, Heads, or any other part of the Transport! Feel free to contact us for
guidance if need be. Beware, the slightest tightening or loosening of these nuts makes a BIG
change is the ease-of-movement of the sliding Playback head!
High and Low Speed Trimmers:
See page 9, Motor Assembly Diagram
Trimmer 1 is for High Motor Speed fine adjustment
Trimmer 2 is for Low Motor Speed fine adjustment
There’s no need to mess with these, but we’ve marked “factory settings” just in case you do and
want to go back to our settings later. Caution: setting the Low speed trimmer too slow can cause
the transport to become unstable and may cause the motor to emit a strange whining noise.
Page 12
Additional Tape Path Maintenance
Tubes!
Page 13
Refer to Page 9, Main Chassis Diagram
Tubes in your TTE
Buy Fulltone Tubes at the following link http://www.fulltone.com/products/tube-tape-echo-tubetrio
Tube #2 (V2) is a 12AX7, which is powering the Guitar Preamp section, and Tube #1 (V1) is a
12AX7 powering the Echo playback stage of the circuit. You can experiment with other 12AX7’s
but your unit comes with Pre-Tested and selected Fulltone 12AX7’s, which are the most natural
and uncolored sounding 12AX7’s you can find for your Tube Tape Echo.
V3 is actually the most CRUCIAL tube as it is used for the Bias Oscillator/Erase function of the
TTE.
Warning! Changing the Erase tube to anything other than a Fulltone 12AU7 will result in the unit
not erasing properly!.
Fulltone sells a matched & tested Tube Trio for your TTE direct for $49.95 (shipping included) to
US resident only! You get 2 x Fulltone 12AX7 tubes, and 1 x Fulltone 12AU7.
Replacing Fuse in your TTE:
Only use a 250volt / 2 amp, Slo-Blow fuse, with a size of 20mm x 5.2mm.
These are widely available, standard type fuses, one place to get them is at amazon.com.
Page 14
Converting Transformer to Operate at 220/240 Voltage
Warning! This procedure is ONLY to be done by an experienced Technician.
Serious injury or death and/or irreparable damage to the unit may occur if done improperly.
Note: the only changes are to the White and Brown Wires…all other wires are left alone
Page 15
Warranty Information:
The TTE carries a 5 year Limited Warranty Parts and Labor to the original owner
only. This warranty covers failure due to manufacturer’s error only and does not
cover items that are prone to daily wear including the ETC-1.
The Tubes carry a 3-month warranty that only covers failure, not breakage.
Owner is responsible for all shipping and insurance charges both ways.
Fulltone Musical Products Inc. (and its employees) is not liable for any damages or
injuries resulting from the misuse of this unit and/or carelessness of the user.
For service, please contact [email protected]
Please check www.fulltone.com for regular revisions to the posted Acrobat
PDF Manual or contact us for a printed revised version in the future.
Fulltone Musical Products Inc.
11018 Washington Blvd. Culver City, CA 90232
fax 204-0156
www.fulltone.com email: [email protected]