1
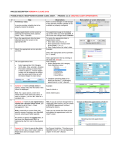
Instruction Manual for
Reference Acoustic Fixed Frame Screens
EluneVision
A Division of Edith-Min International Inc.
Thank you for purchasing a Reference Acoustic Fixed Frame projection
Visit our website for updated product information
www.EluneVision.com
screen. Before use, please read the instructions carefully. After installation,
please store the instructions for future reference.
About Contents of Package
Your product should come with the items shown below. Contact immediately
with your dealer if anything is missing. Keep the original packing materials
for future reshipment.
Long frame (2 pcs)
M5x40mm tapping screw with anchor (8 pcs)
Short frame (2 pcs)
Wall bracket (2 pcs)
Tension Hook (some)
material tensioner
Caution: Please follow these instructions carefully to ensure proper
maintenance of your product.
1、When hanging the screen up, make sure no other objects like power
switches occupy the space designated for your screen.
2、 Frame are made of high quality aluminum and should be handled
carefully.
3、 When not using the fixed frame for a long period of time, cover the
screen with a furniture sheet to protect it from dirt, grime, and paint
4、Use a soft cloth with warm water to remove any marks on the frame
or screen surface when cleaning.
5、Never use solutions or chemicals cleaners on the screen surface.
6、Avoid touching screen directly with your fingers, tools or other sharp
objects.
7、Spare parts should be placed out of children's reach. In accordance
with household safety guidelines.
Illustration
5mm horizontal tension rod (4 pcs)
bottom view
Corner joint connector (8 pcs)
5mm vertical tension rod (4 pcs)
1
Front view
M8x8mm corner connector screws (32 pcs)
Side view
hexagon spanner (1 pcs)
Short frame
1
Back view
Long Frame
2
Screen Fabric
(4) Put the whole frame upside down and unwrap the fabric (see fig.4).
(NOTE: Avoid scraping the fabric when unwrapping)
Installation Procedure
(1) Insert corner joint connectors into the long (horizontal) frame. (see
fig.1)
Push
Long frame
Corner joint
connector
Push
(Fig.4)
(Fig.1)
(2)Join
all four frame parts together. (fig.2)
(5) Push the screen tension rods gently through the sleeves according to
their corresponding lengths on each edge of the screen. (See fig.5)
e
am
t fr
or
Sh
e
am
t fr
or
Sh
Push
Push
(Fig.2)
Insert the exposed ends of the joint connectors into the short (vertical) frame
and align the four corners so that they meet at perfect 90 degree a ngles.
(Fig.5)
(6) Slip the screen tension rods into the sleeves running along side of the
screen material. At the same time as you are inserting the rods, make sure
to slide at least one tensioner in between the sleeves. (see fig.6 & fig.7)
(3)Fasten the four angles together by using the screws included.
(See fig.3)
M8x8mm corner connector screws
(Fig.3)
(Fig.6)
3
4
(8) Thread metal rods into each sleeve at corners of the black backing.
Then fasten the tension rods by using tension hook. (Fig.10)
(Fig.7)
The average distance between t h e fix brackets is 200mm.
(Fig.10)
Pull
Frame
(9) Position the screen with the attached surface onto the wall bracket as
showed (fig.11)
(Fig.8)
Wall bracket
(7) Making a tight and flat surface after installing the fabric. (fig.9)
M5x40mm tapping
screw with anchor
(Fig.11)
NOTE In the image above, L should be greater than half the length
(Fig.9)
5
of the screen.
6